
Popular categories
Looking for a yarn?


Comments / Questions (99)
![]() Christine wrote:
Christine wrote:
Bei der Passe: Bei der 1. Reihe mit den Umschlägen und A1 geht das Muster nicht auf. Nach dem letzten Umschlag soll man noch 6 Maschen rechts stricken und mit den Blendenmaschen enden. Bei mir sind mehr Maschen übrig. Kann ich sie einfach bis zur Blende glatt rechts stricken oder stimmen dann die Maße nicht mehr? Danke für Ihre Hilfe.
01.02.2026 - 09:22DROPS Design answered:
Liebe Christine, die Maschenzahl muss aufgehen, ansonsten wird die Jacke schief und unsymmetrisch. Haben Sie vielleicht an einer Stelle einen Angabe überlesen? Schauen Sie am besten noch einmal genau hin. Sie können sich auch die Mustersätze A.1 mit Markierungsfäden kennzeichnen., dann wird es etwas einfacher, die einzelnen Blöcke aus Maschen abzuzählen. Die Maschenzahl der Anleitung geht auf jeden Fall auf. Viel Spaß beim Weiterstricken!
02.02.2026 - 11:52
![]() Truus wrote:
Truus wrote:
Sorry; ik zie nu dat ik 2x te vaak gemeerderd heb. Alles oké dus :))
06.12.2025 - 21:07
![]() Hanna wrote:
Hanna wrote:
Ich verstehe die Anleitung bei der Passe nicht. Was bedeutet das? Nach den ersten Zunahmen: Wie zuvor glatt rechts..und A.1 weiterstricken und dabei beidseitig jedes A.1 in jeder Hinreihe InsgesamtX in der Höhe ztunehmen?
05.12.2025 - 18:23DROPS Design answered:
Liebe Hanna, bei der Passe wird man vor und nach jedem A.1 (wie bei der 1. Reihe erklärt) in jeder 2. Reihe = in jeder Hinreihe zunehmen. A.1 = die 5 Maschen (2 links, 1 rechts, 2 links, bei den Hinreihen / 2 rechts, 1 links, 2 rechts bei den Rückreihen), die man am jedem Übergang zwischen Vorder- Rückenteil und Ärmel strickt. Die neuen Maschen werden Glattrechts gestrickt. Viel Spaß beim Stricken!
08.12.2025 - 07:32
![]() Melanie wrote:
Melanie wrote:
Dit is een vestje, en er staat de hals en de pas worden heen en weer gebreid met een rondbreinaald. Hoe doe je dat? Dan heb je toch 2 rondbreinaalden nodig?
03.12.2025 - 15:43
![]() Truus wrote:
Truus wrote:
Drops 42-6.; 12-18 mnd. Aan het eind van de pas ca 12 cm heb ik 5 bies+25 (+5) 40 (+5) 53 (+5) 40 (+5) 25 +5 bies steken. Patroon zegt 5 bies + 26 breien . Dan 40 op hulpdraad MAAR IK HEB DAARVOOR NOG DIE 5 VAN DE RAGLAN, WAT DOE IK DAARMEE? Dan 8 st opzetten; brei 55 st en weer 40 op de hulpdraad. Ook hier: wat doe ik met die 5 van de raglan?? Graag uw advies
02.12.2025 - 22:29
![]() Sam wrote:
Sam wrote:
Hi, I'm not sure how to reply to a message but I am making the 2-3 size. I have completed all the increases and have the correct number of stitches on the needle but it is only 10cm not 13cm. I assume my tension was out. Thanks Sam
01.12.2025 - 11:58DROPS Design answered:
Hi Sam, work without further increases for the next 3 cm. Happy knitting!
01.12.2025 - 13:06
![]() Maj wrote:
Maj wrote:
Hej! Tak for en god opskrift! Lige et par spg Mit arbejde måler ikke 10 cm (som det skal) efter 13 omgange med udtagninger fra retsiden. Skal jeg fortsætte glatstrik og A1 uden udtagninger, indtil jeg når de 10 cm? Jeg vil gerne strikke ærmer med magic loop og rundpind. Forklaringen i opskrift er med strømpepinde. Hvordan gør jeg med rundpind, når arbejdet er delt? Tak! :)
01.12.2025 - 09:14DROPS Design answered:
Hei Maj. 1) Ja, det kan du gjøre (om det ikke gjelder veldig mange cm. Men sjekk strikkefastheten din i høyden). 2 ) Usikker på hva du mener med når arbeidet er delt. Ermene strikkes rundt til arbeidet måler ca 10-13-14-17 (20-25) cm fra der det ble lagt opp nye masker under ermet. mvh DROPS Design
08.12.2025 - 11:26
![]() Sam wrote:
Sam wrote:
Hi, I'm also unsure, when measuring the yoke do you include the rib or not? I know the patter says to insert a marker after the rib but I was unsure whether to carry this each row. Thanks,!
01.12.2025 - 03:36DROPS Design answered:
Hi Sam, you measure the yoke without the rib (neck). The marker which was put after rib should remain at the same place. Happy knitting!
01.12.2025 - 09:16
![]() Sam wrote:
Sam wrote:
Hi, I have just finished the increases in the yoke but my work only measures 12cm from the marker. Presumably my tension was a little out. Should I continue with the pattern? Or add in another row of increases maybe? Thanks Sam.
01.12.2025 - 03:32DROPS Design answered:
Hi Sam, what size are you making?
01.12.2025 - 09:18
![]() Truus wrote:
Truus wrote:
Drops baby 42-6 Ik snap de eerste regels van de raglan. Maar daarna niet meer. Bij de 2e raglanmeerdering, brei ik dan weer 8 steken recht, omslag M1 omslag en dan brei 6 recht? Dat klopt denk ik niet vanwege de eerste meerderingen. Of wordt het brei 9 recht, omslag M1 omslag,brei 8 recht etc.
25.11.2025 - 18:23DROPS Design answered:
Dag Truus,
Klopt, er is natuurlijk een steek bij gekomen door het meerderen. Je meerdert steeds voor en na A.1 voor de raglan en je krijgt steeds meer steken.
26.11.2025 - 09:45
|
|||||||
Dream in Blue Cardigan#dreaminbluecardigan |
|||||||
 |
 |
||||||
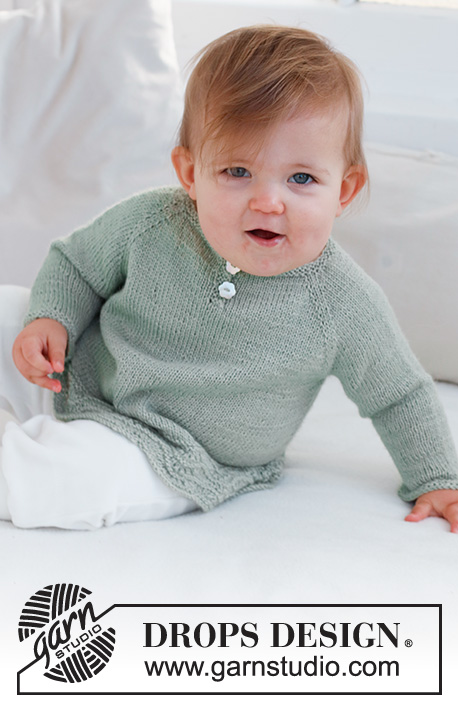
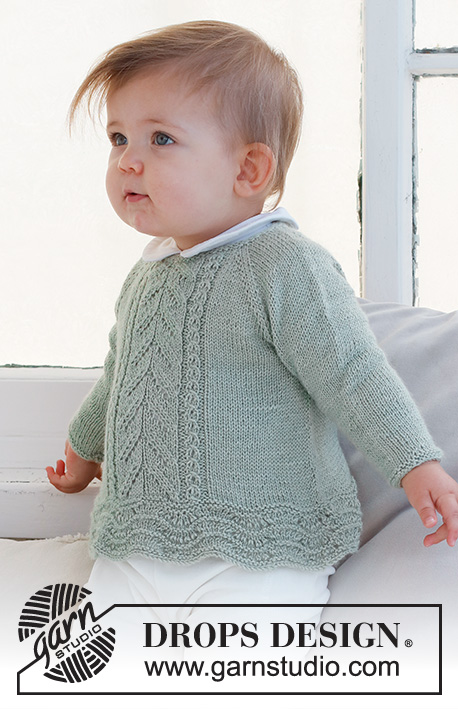
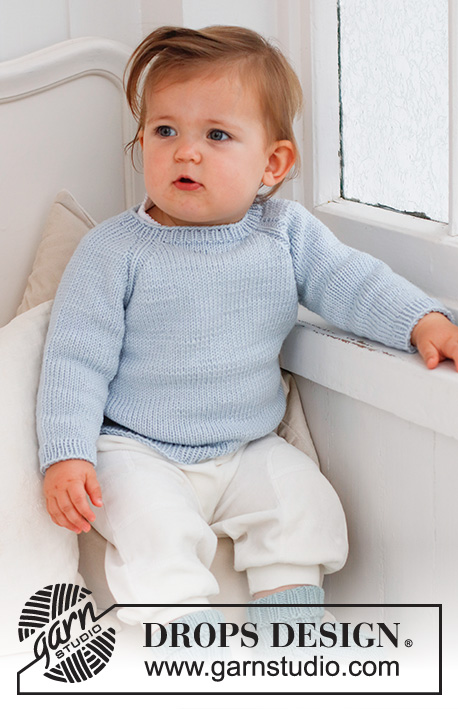
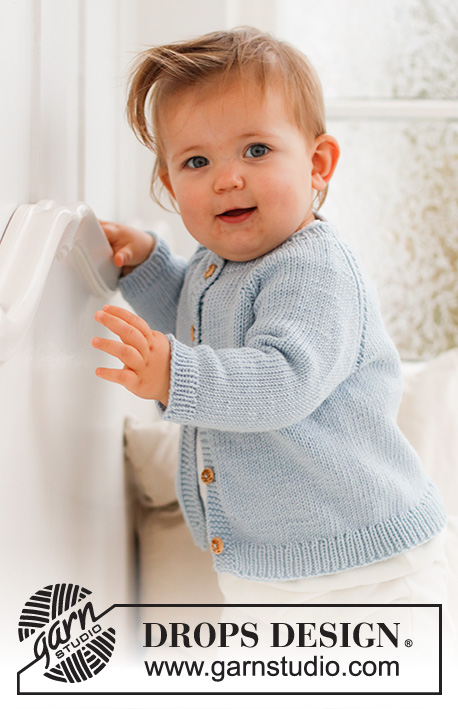
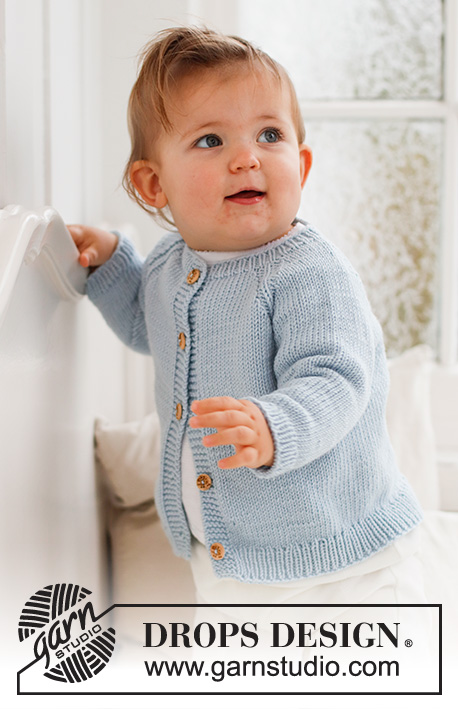
Knitted jacket for babies and children in DROPS Merino Extra Fine. The piece is worked top down with raglan. Sizes 0 - 4 years.
DROPS Baby 42-6 |
|||||||
|
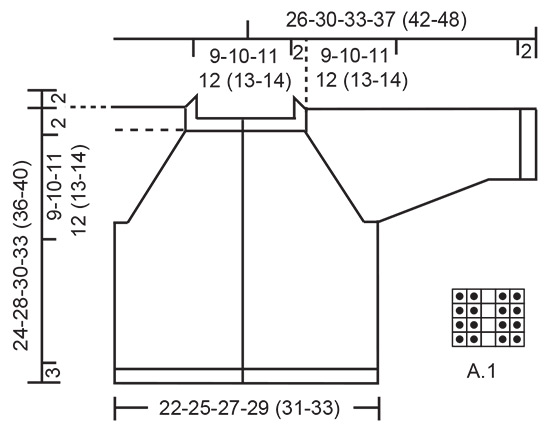
------------------------------------------------------- EXPLANATIONS FOR THE PATTERN: ------------------------------------------------------- RIDGE/GARTER STITCH (worked back and forth): Knit all rows. 1 ridge = knit 2 rows. PATTERN: See diagram A.1. The diagram shows all rows in the pattern from the right side. DECREASE TIP (sleeves): Decrease 1 stitch on either side of the marker as follows: Work until there are 3 stitches left before the marker, knit 2 together, knit 2 (marker sits between these 2 stitches), slip 1 stitch as if to knit, knit 1 and pass the slipped stitch over the knitted stitch. BUTTONHOLES: Work buttonholes on the right band (when the garment is worn). Work from the right side when there are 3 stitches left on the row as follows: Make 1 yarn over, knit 2 together and knit 1. On the next row, knit the yarn over to leave a hole. The first buttonhole is worked when the rib on the neck measures 1½-2 cm. Then work the other 4-4-4-4 (5-5) buttonholes with approx. 5-6-6½-7 (6½-7) cm between each one. ------------------------------------------------------- START THE PIECE HERE: ------------------------------------------------------- JACKET – SHORT OVERVIEW OF THE PIECE: The neck and yoke are worked back and forth with circular needle. The yoke is divided for the body and sleeves and the body continued back and forth. The sleeves are worked in the round with double pointed needles. NECK: Cast on 65-69-73-77 (81-87) stitches with circular needle size 3 mm and DROPS Merino Extra Fine. Purl 1 row from the wrong side with 5 band stitches in GARTER STITCH – read description above, on each side. Then work rib as follows: 5 band stitches in garter stitch, * knit 1, purl 1 *, work from *-* until there are 6 stitches left, knit 1 and 5 band stitches in garter stitch. Remember the BUTTONHOLES – read description above. When the rib measures 2 cm, change to circular needle size 4 mm. Insert 1 marker after the band at the beginning of the row; the yoke is measured from this marker! YOKE: Work the next row from the right side as follows: 5 band stitches in garter stitch, knit 5-6-7-8 (8-10), 1 yarn over, A.1, 1 yarn over, knit 6-6-6-6 (8-8), 1 yarn over, A.1, 1 yarn over, knit 13-15-17-19 (19-21), 1 yarn over, A.1, 1 yarn over, knit 6-6-6-6 (8-8), 1 yarn over, A.1, 1 yarn over, knit 5-6-7-8 (8-10) and 5 band stitches in garter stitch. You have increased 8 stitches for raglan. The yarn overs are purled twisted on the next row and continued in stocking stitch. Continue the pattern and increase on each side of A.1 on each row from the right side a total of 11-13-14-15 (17-18) times = 153-173-185-197 (217-231) stitches. REMEMBER THE KNITTING TENSION! When the piece measures 9-10-11-12 (13-14) cm from the marker, divide the yoke for the body and sleeves as follows: 5 band stitches in garter stitch, work 19-22-24-26 (29-32) stitches in stocking stitch, place the next 32-36-38-40 (44-46) stitches on a thread for the sleeve, cast on 6-6-8-8 (6-6) stitches, work 41-47-51-55 (61-65) stitches in stocking stitch, place the next 32-36-38-40 (44-46) stitches on a thread for the sleeve, cast on 6-6-8-8 (6-6) stitches, work 19-22-24-26 (29-32) stitches in stocking stitch and 5 band stitches in garter stitch. BODY: = 101-113-125-133 (141-151) stitches. Continue back and forth with stocking stitch and 5 band stitches in garter stitch on each side until the body measures 10-13-14-16 (18-21) cm from the division. Now increase 10-12-14-14 (16-16) stitches evenly spaced on the next row from the right side (do not increase over the bands) = 111-125-139-147 (157-167) stitches. Change to circular needle size 3 mm and work rib, starting from the wrong side as follows: 5 band stitches in garter stitch, * purl 1, knit 1 *, work from *-* until there are 6 stitches left, purl 1 and 5 band stitches in garter stitch. Cast off when the rib measures 3 cm. The jacket measures approx. 24-28-30-33 (36-40) cm from the shoulder down. SLEEVES: Place the 32-36-38-40 (44-46) stitches from the thread on the one side of the piece on double pointed needles size 4 mm and knit up 1 stitch in each of the 6-6-8-8 (6-6) stitches cast on under the sleeve = 38-42-46-48 (50-52) stitches. Insert a marker in the middle of the new stitches under the sleeve (= mid-under sleeve). Start at the marker and work stocking stitch in the round. When the sleeve measures 2 cm from the division, decrease 1 stitch on each side of the marker - read DECREASE TIP! Decrease like this every 3-3-2-2½ (3-4) cm a total of 2-3-5-5 (5-5) times = 34-36-36-38 (40-42) stitches. When the sleeve measures 8-11-12-15 (18-23) cm, increase 4-4-4-4 (4-6) stitches evenly spaced = 38-40-40-42 (44-48) stitches. Change to double pointed needles size 3 mm and work rib (knit 1, purl 1) for 2 cm. Cast off. The sleeve measures approx. 10-13-14-17 (20-25) cm. Work the other sleeve in the same way. |
|||||||
Diagram explanations |
|||||||
|
|||||||
 |
|||||||
Have you finished this pattern?Tag your pictures with #dropspattern #dreaminbluecardigan or submit them to the #dropsfan gallery. Do you need help with this pattern?You'll find 28 tutorial videos, a Comments/Questions area and more by visiting the pattern on garnstudio.com. © 1982-2026 DROPS Design A/S. We reserve all rights. This document, including all its sub-sections, has copyrights. Read more about what you can do with our patterns at the bottom of each pattern on our site. |
|||||||


With over 40 years in knitting and crochet design, DROPS Design offers one of the most extensive collections of free patterns on the internet - translated to 17 languages. As of today we count 324 catalogues and 12290 patterns translated into English (UK/cm).
We work hard to bring you the best knitting and crochet have to offer, inspiration and advice as well as great quality yarns at incredible prices! Would you like to use our patterns for other than personal use? You can read what you are allowed to do in the Copyright text at the bottom of all our patterns. Happy crafting!
Post a comment to pattern DROPS Baby 42-6
We would love to hear what you have to say about this pattern!
If you want to leave a question, please make sure you select the correct category in the form below, to speed up the answering process. Required fields are marked *.