
Popular categories
Looking for a yarn?


Comments / Questions (40)
![]() Agata wrote:
Agata wrote:
Właśnie skończyłam rozmiar na 6/9 miesięcy. Byłam gotowa na zużycie 3 młotków. Tymczasem zużyłam około 1 i 3/4 motka. Rozmiar praktycznie się zgadza. Robiłam na drutach 3 i 3,5 bo wg próbki robiłam za dużo oczek na mniejszych drutach. Czy taka rozbieżność zużycia włóczki jest normalna?
05.02.2026 - 22:52DROPS Design answered:
Witaj Agato, tak, zmiana drutów na większe spowodowała, że automatycznie zużyłaś mniej włóczki. Pozdrawiamy!
06.02.2026 - 08:47
![]() Paula Hordijk wrote:
Paula Hordijk wrote:
Ik brei Drops Design little bee cardigan maat 6/9. Bij PAS staat in regel 2: meerder 9-11-7-13 (13-17).Moet dat niet zijn 7-9-11-13 (13-17)? Bij MOUWEN staat in regel 7: minder zo iedere 21/2 -2 1/2 - 1 1/2 - 2 (2-3)cm. Lijkt me ook verkeerd. Moeten toch aflopende of oplopende cijfers zijn? Graag reactie.
09.12.2025 - 16:34
![]() Birgit wrote:
Birgit wrote:
Ich benötige statt 24 -26 M für 10cm wie rechne ich das um?
16.10.2025 - 16:10DROPS Design answered:
Liebe Birgit, umrechnen ist keine gute Idee - nehmen Sie lieber eine andere Nadelstärke. Wenn Sie 26 Maschen statt 24 benötigen, stricken Sie fester als in der Maschenprobe angegeben, also nehmen Sie eine etwas dickere Nadel (3,5 statt 3), dann sollte es mit den 24 Maschen gelingen, stricken Sie dafür einfach eine Maschenprobe mit der etwas dickeren Nadel. Gutes Gelingen!
21.10.2025 - 23:41
![]() Simone wrote:
Simone wrote:
Could it be that there is a mistake in the amount of stitches with the 2yo pattern? After the rib with 82 stitches, you increase 14 until you get 96. Then when dividing the markers you have to count 17, 12, 34, 12, 17. But that makes 92! After the raglan increase (18 needles, 4 increases = 144 increases) you should be left with 240 stitches. 240-144-96 stitches, so that one seems to be right. Is it true then to place the markes 18, 12, 36, 12, 18?
05.08.2025 - 20:43DROPS Design answered:
Dear Simone, please note that the markers are each inserted in one stitch (and not between stitches), so that you will have: 17+1+12+1+34+1+12+1+17=96 sts + (8 sts increased a total of 18 times) = 240 sts. Happy knitting!
06.08.2025 - 08:09
![]() Kristiana wrote:
Kristiana wrote:
Hello, I am up to splitting the body from the sleeves but I can't figure out where I have gone wrong. I'm doing a 2y/o size and my body is the correct amount of stitches (74 + 37 + 37 minus the 6 under the arm) but both of my arms are 48. Am I to assume this includes 6 extra stitches to make it to the 54? However, it does not include that in the pattern. Any help would be great.
20.06.2025 - 10:50DROPS Design answered:
Dear Kristiana, for size 2 years old you should be working the second-to-last size. You should have 240 stitches before dividing the piece. The raglan markers for each section aren't important anymore, so don't divide the piece according to them. Work 34 stitches, slip 52 stitches to a thread, cast on 6 stitches, work 68 sts, slip 52 sts to a thread, cast on 6 sts and work 34 stitches = 240 stitches and 12 stitches cast on. From these, 104 sts are for the sleeves (52 for each sleeve) and 148 sts for the body. Happy knitting!
22.06.2025 - 19:40
![]() Shirley wrote:
Shirley wrote:
I like this. It is very easy en perfect! Thanks!
05.06.2025 - 22:49
![]() Bernie wrote:
Bernie wrote:
Het is heel ingewikkeld, klopt dat.
05.06.2025 - 22:47
![]() Clementine Burger wrote:
Clementine Burger wrote:
Ik ben een heel beginnende breier, is dit patroon voor mij te doen? Ik wil een truitje breien voor een jongetje van 1 1/2 jaar. Of is er een beter patroon voor mij?
05.06.2025 - 22:44DROPS Design answered:
Dag Clementine,
Ja, dit zou te doen moeten zijn voor een beginnende breister. Je kunt ook de video's en lessen bekijken die bij het patroon staat. Neem de tijd en houd goed de stekenverhouding in de gaten.
08.06.2025 - 20:50
![]() Olivia Racionzer wrote:
Olivia Racionzer wrote:
When it says knit sleeve until it measures 11cm (2nd measurement) is this from under the armpit - ie where the stitches were picked up? Thanks!
22.05.2025 - 14:31DROPS Design answered:
Dear Mrs Racionzer, correct, measure from after division, from where you worked sleeve "alone", in the round. Happy knitting!
22.05.2025 - 15:52
![]() Stephie wrote:
Stephie wrote:
Guten Tag, Ich habe Fragen zu der Anleitung beim Pullover Abschnitt. Dort steht: „23 Maschen rechts stricken, die nächsten 38 Maschen für den Ärmel stilllegen und 6 Maschen neu anschlagen (= unter dem Arm)“ - Werden die 38 Maschen auch noch rechts gestrickt oder nur still gelegt? - Wie schlägt man die 6 Maschen an? Sind diese bei den still gelegten Maschen oder auf der Nadel? Herzliche Grüße Stephie -
20.05.2025 - 22:13
|
|
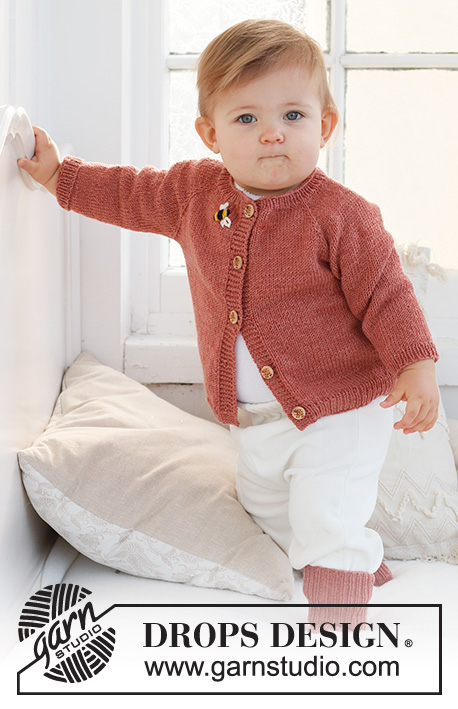
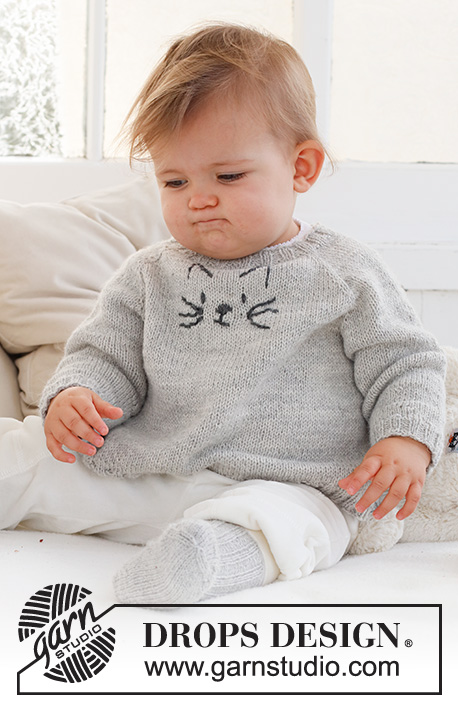
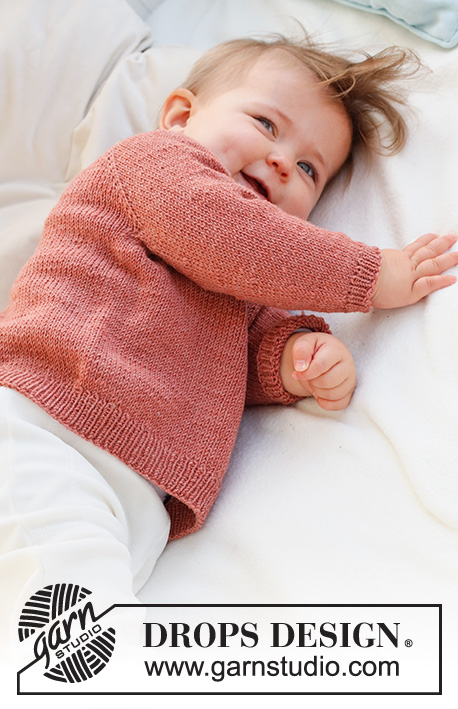
Rosy Cheeks Sweater#rosycheekssweater |
|
 |
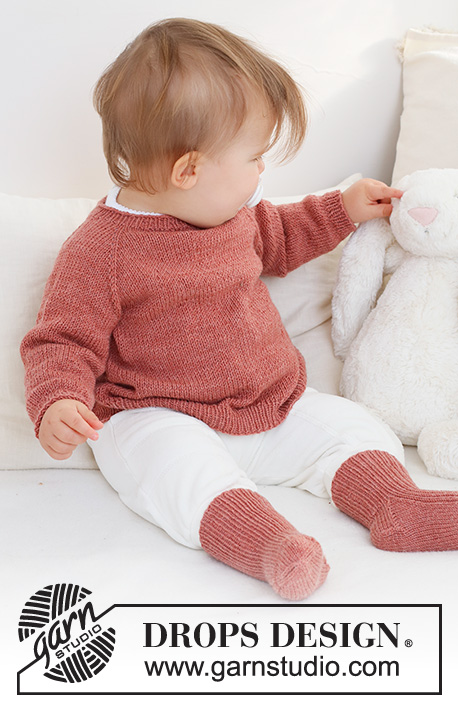 |
Knitted jumper for babies and children in DROPS Safran. The piece is worked top down with raglan. Sizes 0 - 4 years.
DROPS Baby 42-3 |
|
|
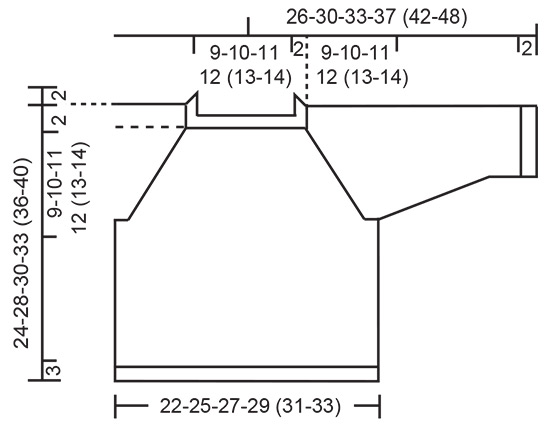
------------------------------------------------------- EXPLANATIONS FOR THE PATTERN: ------------------------------------------------------- RIDGE/GARTER STITCH (worked back and forth): Knit all rows. 1 ridge = knit 2 rows. RAGLAN: All increases are worked from the right side! Work to the marker-stitch, 1 yarn over, knit the marker-stitch, 1 yarn over. Increase like this at each marker-stitch (8 stitches increased). On the next row/round work the yarn overs twisted to avoid holes. Then work the new stitches in stocking stitch. DECREASE TIP (sleeves): Decrease 1 stitch on either side of the marker as follows: Work until there are 3 stitches left before the marker, knit 2 together, knit 2 (marker sits between these 2 stitches), slip 1 stitch as if to knit, knit 1 and pass the slipped stitch over the knitted stitch. BUTTONHOLES (if you work the split at the back): Work buttonholes on the band. Work from the right side when there are 3 stitches left on the row as follows: Make 1 yarn over, knit 2 together and knit 1. On the next row, knit the yarn over to leave a hole. The first buttonhole is worked when the piece measures 1½ cm. Then work the other 0-0-1-1 (1-1) buttonhole after 4 cm. ------------------------------------------------------- START THE PIECE HERE: ------------------------------------------------------- JUMPER – SHORT OVERVIEW OF THE PIECE: The yoke is worked in the round, top down. If you would like a split at the back, begin by working back and forth, then continue in the round. The yoke is divided for the body and sleeves and the body continued in the round. The sleeves are worked in the round with double pointed needles. WITHOUT SPLIT AT THE BACK: If you want a split, start at the next section. Cast on 64-68-74-78 (82-88) stitches with double pointed needles size 2.5 mm and DROPS Safran. Knit 1 round. Then work rib in the round (knit 1, purl 1) for 2 cm. Change to circular needle size 3 mm. Insert 1 marker at the beginning of the round (mid-back), the yoke is measured from this marker! Knit 1 round and increase 8-12-6-14 (14-16) stitches evenly spaced = 72-80-80-92 (96-104) stitches. Now insert 4 markers without working the stitches as follows: Count 11-13-13-16 (17-19) stitches, insert 1 marker in the next stitch, count 12 stitches, insert 1 marker in the next stitch, count 22-26-26-32 (34-38) stitches, insert 1 marker in the next stitch, count 12 stitches, insert 1 marker in the next stitch, there are 11-13-13-16 (17-19) stitches left after the last marker. Work stocking stitch and on the first row from the right side increase 1 stitch on each side of all 4 markers - read RAGLAN. Increase like this every 2nd round a total of 12-14-16-17 (18-19) times = 168-192-208-228 (240-256) stitches. REMEMBER THE KNITTING TENSION! Now go to JUMPER below. WITH SPLIT AT THE BACK: Cast on 71-75-81-85 (89-95) stitches with circular needle size 2.5 mm and DROPS Safran. Purl 1 row from the wrong side. Work rib (knit 1, purl 1) with 6 stitches in GARTER STITCH on each side – read description above. Remember the BUTTONHOLES – read description above. When the rib measures 2 cm, change to circular needle size 3 mm. Insert 1 marker inside the 6 stitches at the beginning of the row; the yoke is measured from this marker! Knit 1 row from the right side and increase 7-11-5-13 (13-15) stitches evenly spaced (do not increase over the bands) = 78-86-86-98 (102-110) stitches. Now insert 4 markers without working the stitches as follows: Count 14-16-16-19 (20-22) stitches, insert 1 marker in the next stitch, count 12 stitches, insert 1 marker in the next stitch, count 22-26-26-32 (34-38) stitches, insert 1 marker in the next stitch, count 12 stitches, insert 1 marker in the next stitch there are 14-16-16-19 (20-22) stitches left after the last marker. Work stocking stitch. On the next row from the right side increase 1 stitch on each side of each marker-stitch – read RAGLAN! Increase like this each row from the right side a total of 12-14-16-17 (18-19) times. REMEMBER THE KNITTING TENSION! AT THE SAME TIME when the piece measures 4-4-5-6 (6-6) cm, work the next row from the right side as follows: Cast off the first 6 stitches, work to the end of the row. Now continue in the round with stocking stitch (continue to increase to raglan every 2nd round). When all the increases to raglan are finished, there are 168-192-208-228 (240-256) stitches. Move the beginning of the round to mid-back JUMPER: When the piece measures 9-10-11-12 (13-14) cm from the marker on the neck, divide the yoke for the body and sleeves as follows: Knit 23-27-29-32 (34-37), place the next 38-42-46-50 (52-54) stitches on a thread for the sleeve, cast on 6 stitches, knit 46-54-58-64 (68-74), place the next 38-42-46-50 (52-54) stitches on a thread for the sleeve, cast on 6 stitches and knit 23-27-29-32 (34-37). BODY: = 104-120-128-140 (148-160) stitches. Continue with stocking stitch for 10-13-14-16 (18-21) cm from the division. On the next round increase 12-12-12-12 (16-18) stitches evenly spaced = 116-132-140-152 (164-178) stitches. Change to circular needle size 2.5 mm and work rib (knit 1, purl 1) for 3 cm. Cast off a little loosely. SLEEVES: Place the 38-42-46-50 (52-54) stitches from the thread on the one side of the piece on double pointed needles size 3 mm and knit up 1 stitch in each of the 6 stitches cast on under the sleeve = 44-48-52-56 (58-60) stitches. Insert a marker in the middle of the new stitches under the sleeve. Start at the marker and work stocking stitch in the round. When the sleeve measures 1 cm from the division, decrease 1 stitch on each side of the marker - read DECREASE TIP! Decrease like this every 2½-2½-1½-2 (2-3) cm a total of 3-4-6-7 (7-7) times = 38-40-40-42 (44-46) stitches. When the sleeve measures 8-11-12-15 (18-23) cm, increase 4-4-4-4 (6-6) stitches evenly spaced = 42-44-44-46 (50-52) stitches. Change to double pointed needles size 2.5 mm and work rib (knit 1, purl 1) for 2 cm. Cast off. Work the other sleeve in the same way. ASSEMBLY: If you have worked a split at the back, sew the buttons onto the band without buttonholes. Lay the button-band under the buttonhole-band and sew together at the bottom. |
|
 |
|
Have you finished this pattern?Tag your pictures with #dropspattern #rosycheekssweater or submit them to the #dropsfan gallery. Do you need help with this pattern?You'll find 32 tutorial videos, a Comments/Questions area and more by visiting the pattern on garnstudio.com. © 1982-2026 DROPS Design A/S. We reserve all rights. This document, including all its sub-sections, has copyrights. Read more about what you can do with our patterns at the bottom of each pattern on our site. |
|


With over 40 years in knitting and crochet design, DROPS Design offers one of the most extensive collections of free patterns on the internet - translated to 17 languages. As of today we count 325 catalogues and 12298 patterns translated into English (UK/cm).
We work hard to bring you the best knitting and crochet have to offer, inspiration and advice as well as great quality yarns at incredible prices! Would you like to use our patterns for other than personal use? You can read what you are allowed to do in the Copyright text at the bottom of all our patterns. Happy crafting!
Post a comment to pattern DROPS Baby 42-3
We would love to hear what you have to say about this pattern!
If you want to leave a question, please make sure you select the correct category in the form below, to speed up the answering process. Required fields are marked *.