
Popular categories
Looking for a yarn?


Comments / Questions (7)
![]() Mari Carmen wrote:
Mari Carmen wrote:
Es un patrón muy bonito, ya he realizado dos jerséis, queda precioso. Quería darles las gracias por los vídeos tan bien explicados, sin ellos no se como hubiese realizado los aumentos de los hombros martillos y de la manga. Gracias.
12.12.2021 - 20:28
![]() Marielle wrote:
Marielle wrote:
Augmentation empiècements, y aurait-il une erreur, soit 31-31-31-35-35-35 pour chaque manche entre les marqueurs, éclairez-moi svp?
05.12.2021 - 17:03DROPS Design answered:
Bonjour Marielle, vous aviez 23-23-23-27-27-27 mailles pour chaque manche et avez augmenté 5-5-4-4-4-3 fois 1 m de chaque côté = vous avez alors 33-33-31-31-35-33 m entre les marqueur pour chaque manche. Comment peut-on vous aidez autrement?
06.12.2021 - 09:08
![]() Reuhl wrote:
Reuhl wrote:
Hallo, ich verstehe wie Frau Müller nicht wie das mit den Markierern bei dem Teil ZUNAHMEN FÜR DIE PASSE funktioniert. Ich stricke ebenfalls Größe S. Können Sie vielleicht ganz genau mit der Maschenanzahl sagen, wo die Markierer hin sollen? Also wie viele Maschen bis zum nächsten Markierer sein müssen. Vielen Dank!
28.11.2021 - 17:43DROPS Design answered:
Liebe Frau Reuhl, nach den Ärmelzunahmen haben Sie 35 Maschen für die Ärmel zwischen die Markierungen, vor den Zunahmmen für die Passe sollen Sie die 1. dieser Markierung in die 1. dieser 35 Maschen einsetzen und die 2. dieser Markierung in die letzte dieser 35 Maschen einsetzen, so haben Sie: 1 M mit Markierung, 33 M für die Ärmel und 1 M mit Markierung. Viel Spaß beim stricken!
29.11.2021 - 08:01
![]() Müller wrote:
Müller wrote:
Guten Tag, ich verstehe bei dem Teil:" ZUNAHMEN FÜR DIE PASSE" nicht was mit folgendem gemeint wird "Die 4 Markierer der Ärmelzunahmen so versetzen, dass jeder dieser Markierer in der äußersten Masche an beiden Seiten von Vorderteil und Rückenteil sitzt. " Ich verstehe leider nicht, wo ich die Markierer nun setzen soll. Ich stricke größe S, können Sie mir das bitte genauer erklären? Vielen Dank
23.11.2021 - 15:28DROPS Design answered:
Liebe Frau Müller, wenn alle Zunahmen für die Ärmel gestrickt sind, haben Sie 35 Maschen für jede Ärmel zwischen den Markierungen, jetzt bringen Sie die Markierung (vor der Ärmel) in die erste dieser 35 Maschen und die Markierung (nach der Ärmel) in die letzte dieser 35 Maschen so haben Sie: 1 Masche mit einer Markierung, 33 Maschen, 1 Masche mit einer Markierung. Viel Spaß beim stricken!
23.11.2021 - 16:31
![]() Jennie wrote:
Jennie wrote:
Stämmer verkligen diagram A1 ? Flätan blir inte alls som på modellen.
11.10.2021 - 11:59DROPS Design answered:
Hei Jennie. Diagrammet er oversendt til design avd. slik at de kan ta en dobbeltsjekk og evnt komme med en rettelse . mvh DROPS Design
11.10.2021 - 15:54
![]() Karin wrote:
Karin wrote:
Stämmer verkligen flätan på bilden med mönstret? Min fläta ser helt annorlunda ut när jag stickar den.,,
10.10.2021 - 21:01DROPS Design answered:
Hei Karin. Diagrammet er oversendt til design avd. slik at de kan ta en dobbeltsjekk og evnt komme med en rettelse. mvh DROPS Design
11.10.2021 - 15:53
![]() Sine wrote:
Sine wrote:
Rose quartz
09.08.2021 - 18:13
|
||||||||||||||||||||||||||||
Dusk Rose#duskrosesweater |
||||||||||||||||||||||||||||
 |
 |
|||||||||||||||||||||||||||
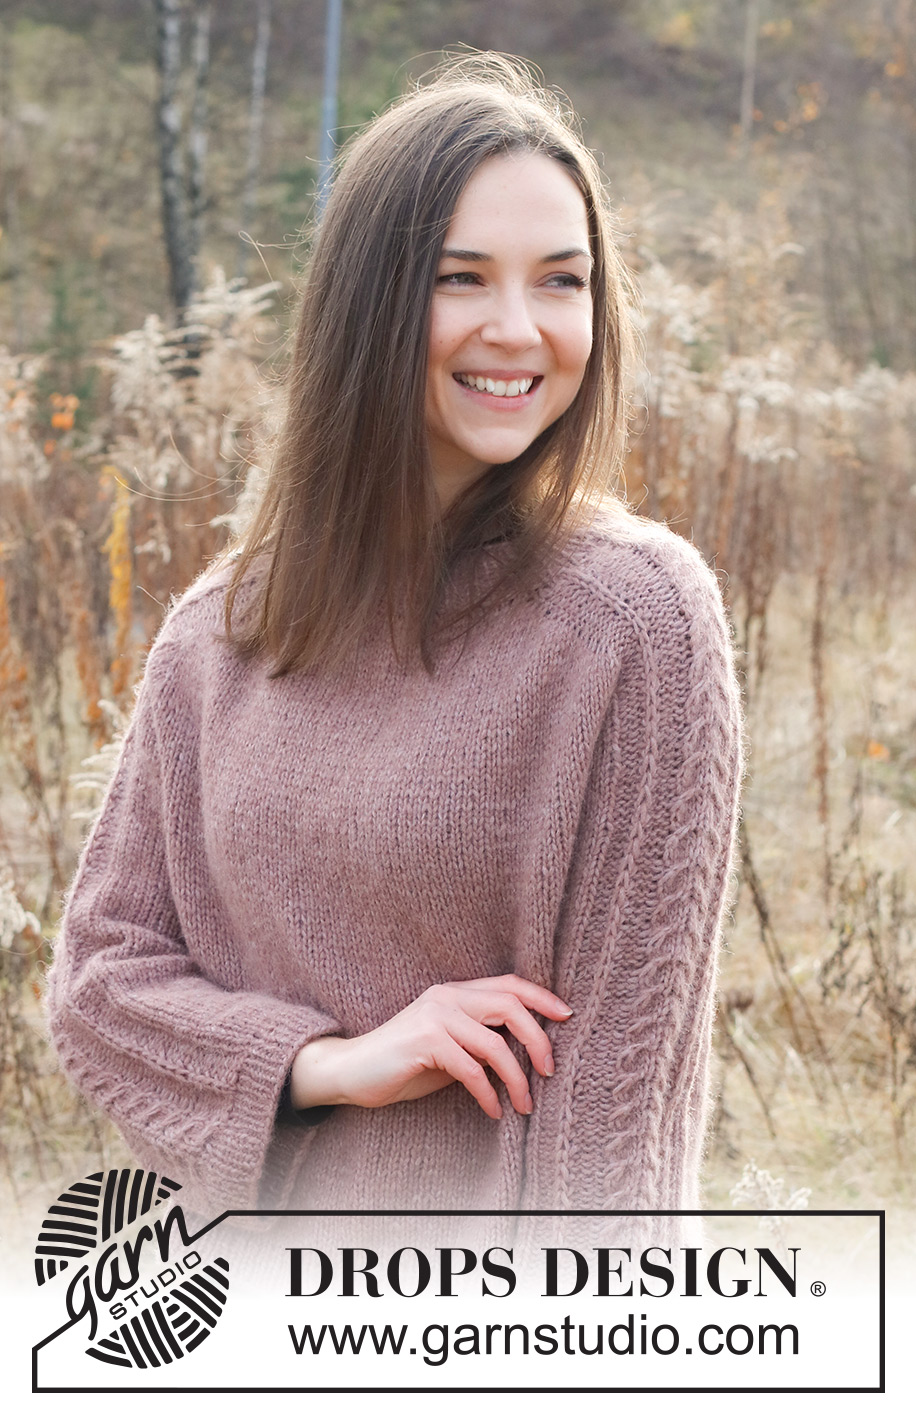
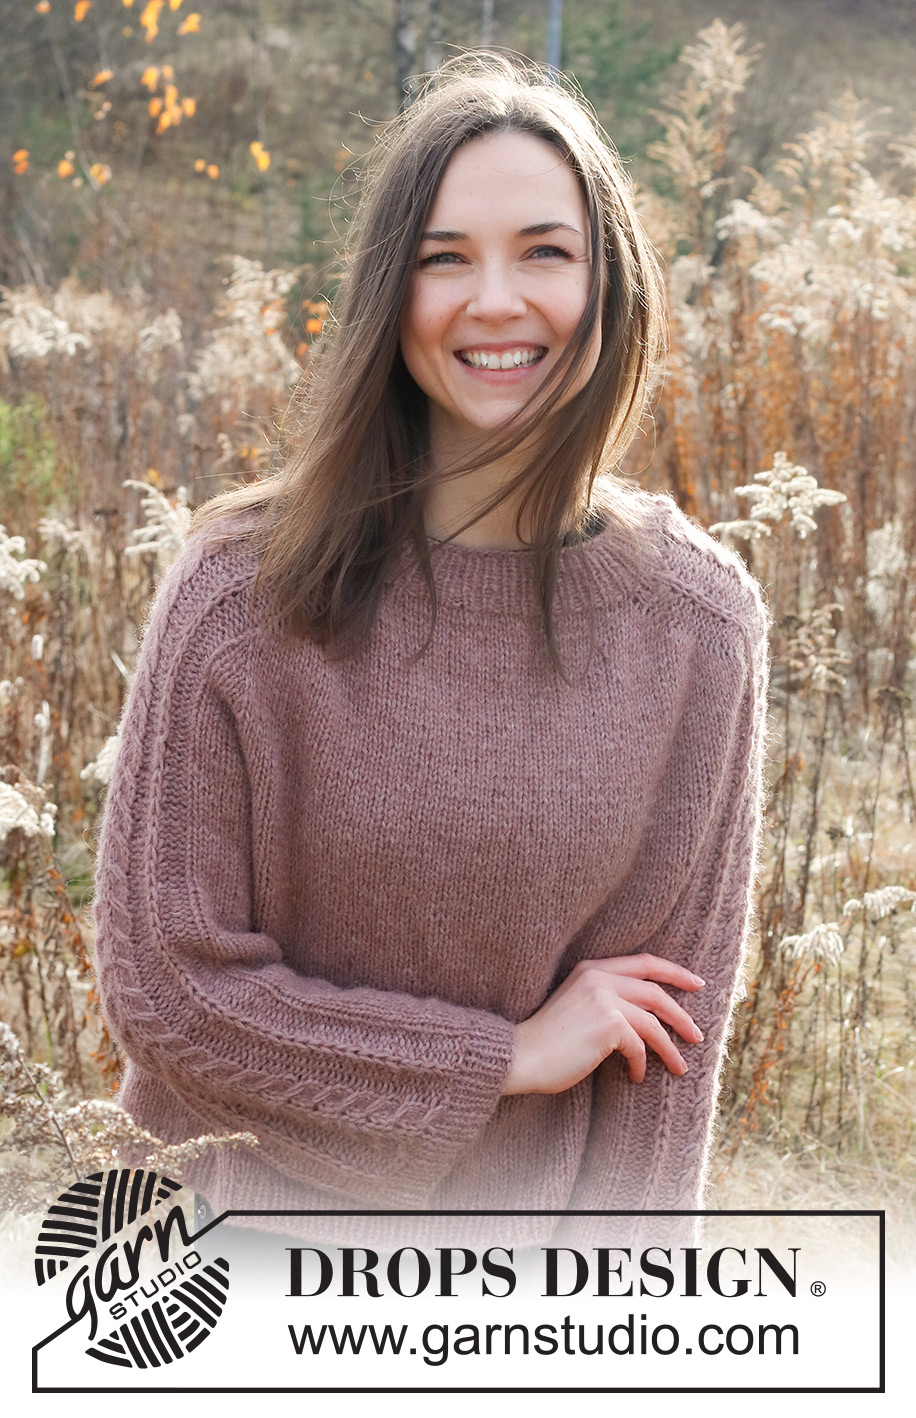
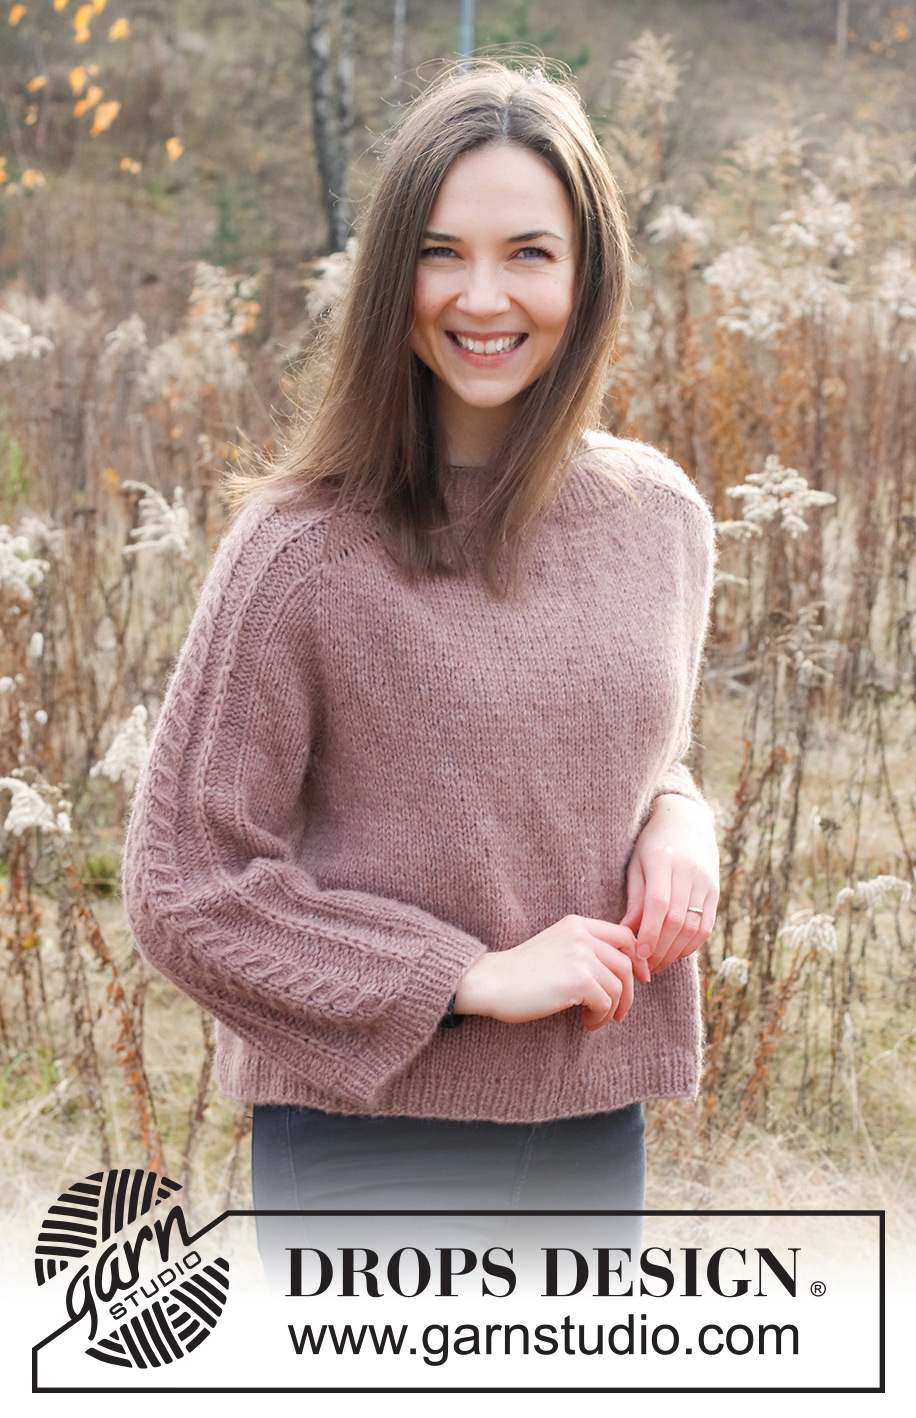
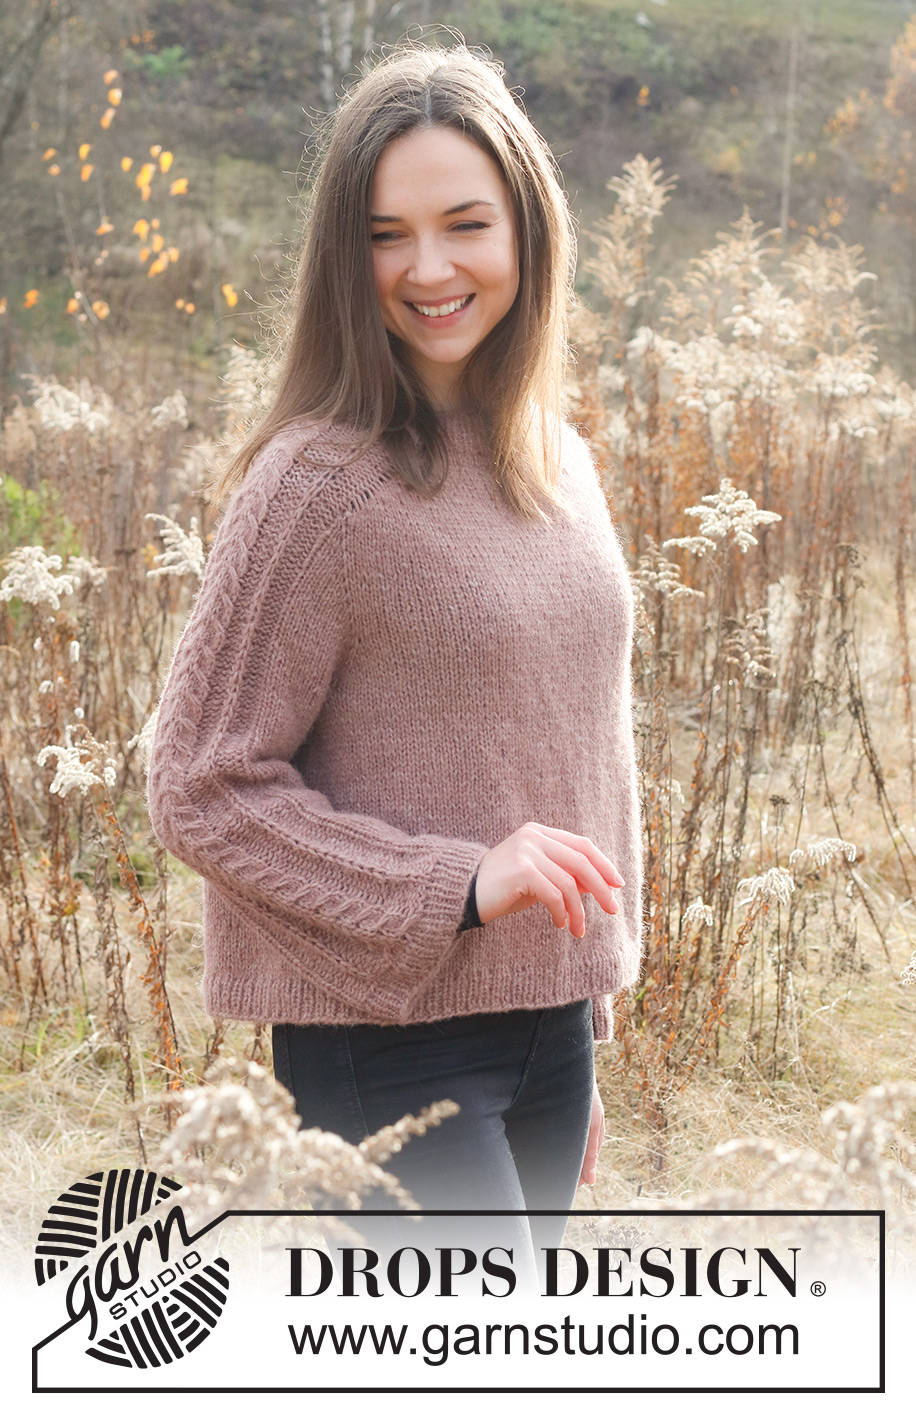
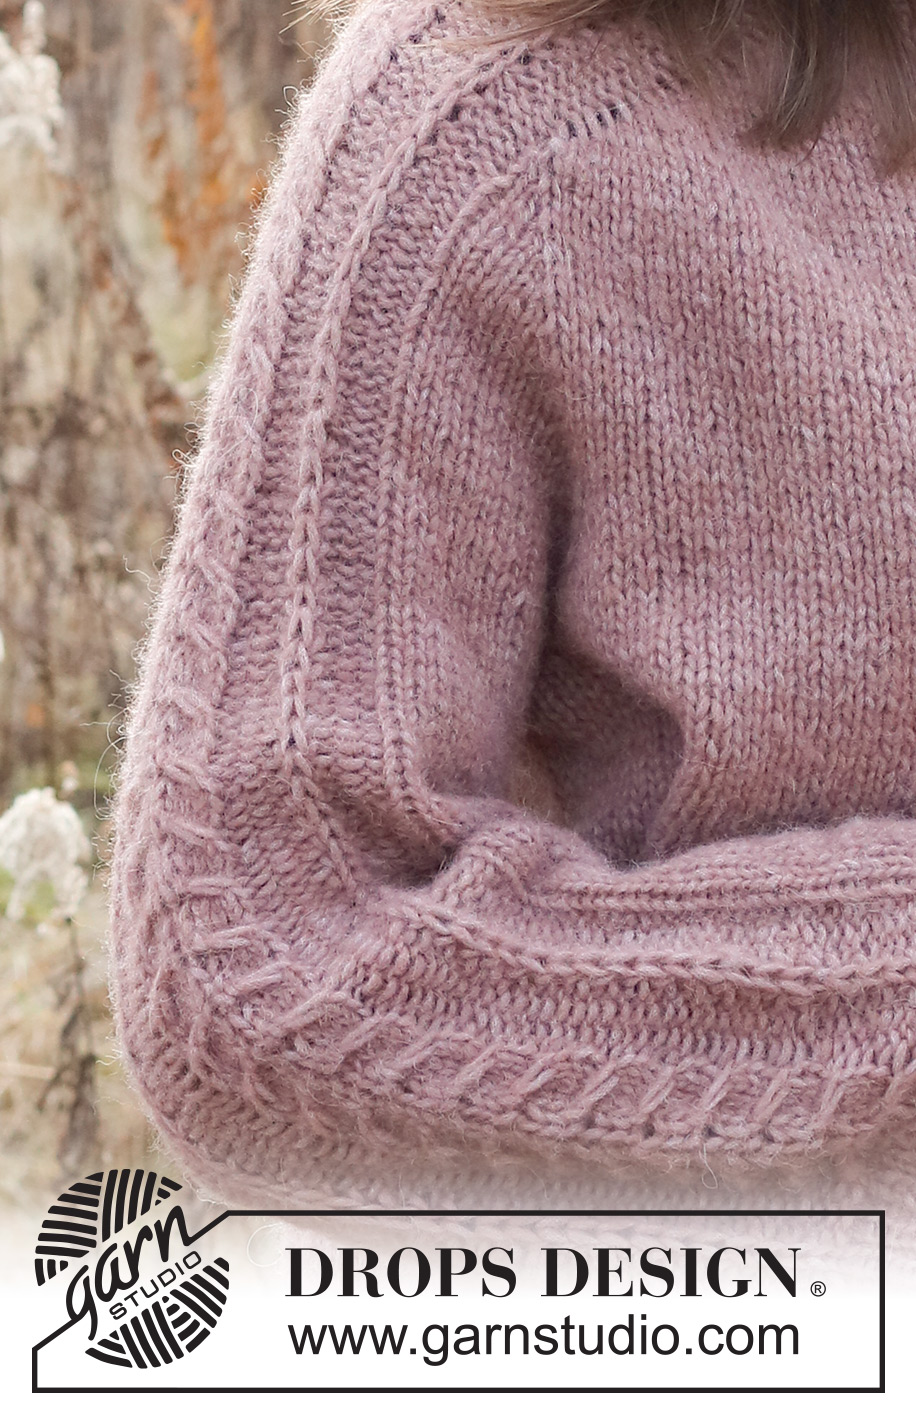
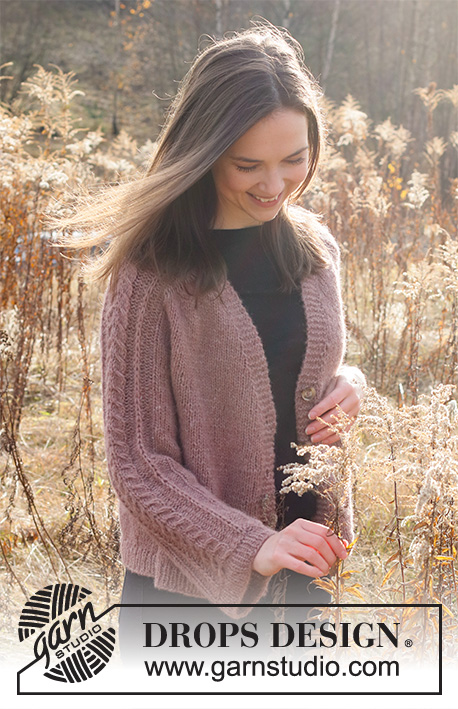
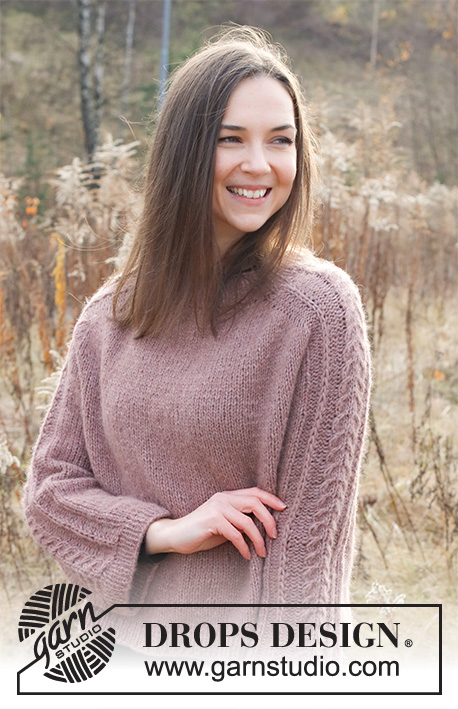
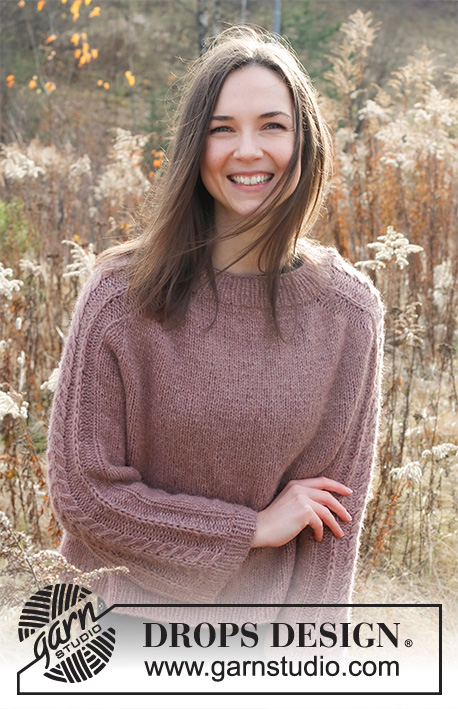
Knitted jumper in DROPS Air. The piece is worked top down, with saddle shoulders and cables on sleeves. Sizes XS - XXL.
DROPS 226-14 |
||||||||||||||||||||||||||||
|
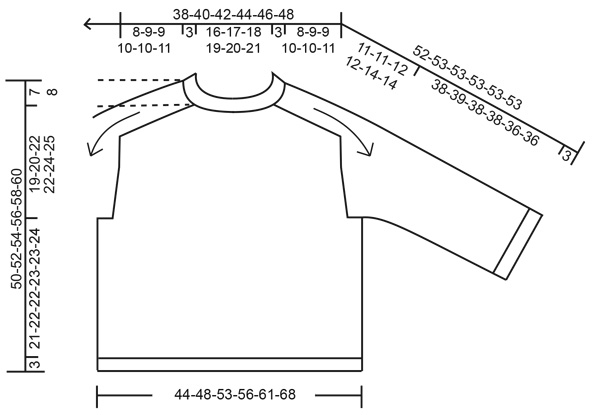
------------------------------------------------------- EXPLANATIONS FOR THE PATTERN: ------------------------------------------------------- PATTERN: See diagram A.1. Choose diagram for your size. INCREASE TIP-1 (evenly spaced): To work out how to increase evenly, count the total number of stitches on the needle (e.g. 70 stitches) and divide by the number of increases to be made (e.g. 20) = 3.5. In this example, increase by making 1 yarn over after alternately each 3rd and 4th stitch. On the next round work the yarn overs twisted to avoid holes. INCREASE TIP-2 (for increases to saddle shoulders, sleeves and yoke): BEFORE MARKER: The new stitch twists to the right. Use the left needle to pick up the strand between 2 stitches from the previous round, pick up the back strand and knit in the front loop. AFTER MARKER: The new stitch twists to the left. Use the left needle to pick up the strand between 2 stitches from the previous round, pick up the front strand and knit in the back loop. DECREASE TIP (for sleeves): Decrease 1 stitch on either side of the marker thread as follows: Work until there are 3 stitches left before the marker thread, knit 2 together, knit 2 (marker thread sits between these 2 stitches), slip 1 stitch as if to knit, knit 1 and pass the slipped stitch over the knitted stitch (2 stitches decreased). CASTING-OFF TIP: To avoid the cast-off edge being tight you can cast off with a larger size needle. If the edge is still tight, make 1 yarn over after approx. each 6th stitch at the same time as casting off; the yarn overs are cast off as normal stitches. ------------------------------------------------------- START THE PIECE HERE: ------------------------------------------------------- JUMPER – SHORT OVERVIEW OF THE PIECE: The neck and yoke are worked in the round with circular needle, from mid back and top down. Stitches are increased for the saddle shoulders, then for the sleeves and yoke. The yoke is divided for the body and sleeves and the body is continued in the round with circular needle. The sleeves are worked with double pointed needles/short circular needle, top down. NECK: Cast on 70-74-76-80-82-84 stitches with short circular needle size 4.5 mm and DROPS Air. Knit 1 round. Then work rib in the round (knit 1, purl 1) for 3 cm. Knit 1 round where you increase 20-20-26-30-32-38 stitches evenly spaced – read INCREASE TIP-1 = 90-94-102-110-114-122 stitches. YOKE: Change to circular needle size 5.5 mm. Insert 1 marker thread at the beginning of the round = mid-back. THE PIECE IS NOW MEASURED FROM HERE! In addition insert 4 other markers without working the stitches and each marker inserted between 2 stitches. These markers are used when increasing for the saddle shoulders. Marker 1: Start mid-back, count 11-12-14-14-15-17 stitches (= ½ back piece), insert the marker before the next stitch. Marker 2: Count 23-23-23-27-27-27 stitches from marker 1 (= shoulder), insert the marker before the next stitch. Marker 3: Count 22-24-28-28-30-34 stitches from marker 2 (= front piece), insert the marker before the next stitch. Marker 4: Count 23-23-23-27-27-27 stitches from marker 3 (= shoulder), insert the marker before the next stitch. There are 11-12-14-14-15-17 stitches left on the back piece after marker 4. Allow these markers to follow your work onwards; you increase by all these markers. INCREASES TO SADDLE SHOULDERS: Work stocking stitch, but over the 23-23-23-27-27-27 shoulder stitches on each side work A.1 (between markers 1 and 2 and between markers 3 and 4). AT THE SAME TIME on the first round increase 4 stitches for the saddle shoulders as follows: Increase BEFORE markers 1 and 3 and AFTER markers 2 and 4 – read INCREASE TIP-2. You are only increasing on the front and back pieces; the number of stitches on the shoulders remains the same. Work the increased stitches in stocking stitch. Increase like this every round a total of 16-18-18-20-20-22 times = 154-166-174-190-194-210 stitches. REMEMBER THE KNITTING TENSION! After the last increase the piece measures approx. 8-9-9-10-10-11 cm from the marker thread on the neck. Now increase for the sleeves as described below. INCREASES TO SLEEVES: Continue in the round with stocking stitch and A.1 as before. AT THE SAME TIME on the next round increase 4 stitches for the sleeves as follows: Increase AFTER markers 1 and 3 and BEFORE markers 2 and 4 – remember INCREASE TIP-2. You are only increasing on the sleeves; the number of stitches on the front and back pieces remains the same. Work the increased stitches in stocking stitch (A.1 is continued over the middle 23-23-23-27-27-27 stitches on the sleeves). Increase like this every 2nd round a total of 5-5-4-4-4-3 times = 174-186-190-206-210-222 stitches. The piece measures approx. 13-14-13-14-14-14 cm from the marker thread on the neck. Now increase for the yoke as described below. INCREASES FOR YOKE: Move the 4 markers so each marker sits in the outermost stitch on each side of the front and back pieces. There are 33-33-31-35-35-33 stitches between the markers on each sleeve. On the next round increase 8 stitches for the yoke by increasing both before and after all 4 marker-stitches – remember INCREASE TIP-2. You are now increasing on the front and back pieces and on the sleeves. Work the increased stitches in stocking stitch. Increase like this every 2nd round a total of 6-6-8-8-10-11 times = 222-234-254-270-290-310 stitches. The piece measures approx. 19-20-21-22-24-25 cm from the marker thread on the neck. If the piece is shorter than this, continue working without further increases to the correct length. Now divide the piece for the body and sleeves on the next round as follows: Work 32-34-38-40-43-47 stitches in stocking stitch (= ½ back piece), place the next 47-49-51-55-59-61 stitches on a thread for the sleeve, cast on 6-8-8-10-12-14 new stitches (= in side under sleeve), work 64-68-76-80-86-94 stitches in stocking stitch (= front piece), place the next 47-49-51-55-59-61 stitches on a thread for the sleeve, cast on 6-8-8-10-12-14 new stitches (= in side under sleeve), work the last 32-34-38-40-43-47 stitches as before (= ½ back piece). Cut the strand. The body and sleeves are finished separately. THE PIECE IS NOW MEASURED FROM HERE! BODY: = 140-152-168-180-196-216 stitches. Insert 1 marker in one side of the piece – in the middle of the 6-8-8-10-12-14 cast-on stitches under the sleeve. Start the round at this marker and work stocking stitch until the piece measures 21-22-22-23-23-24 cm from the division. There is approx. 3 cm left to finished length; try the jumper on and work to desired length. To avoid the following rib being tight, you now increase stitches as follows: Knit 1 round where you increase 20-22-26-28-30-32 stitches evenly spaced – remember INCREASE TIP-1 = 160-174-194-208-226-248 stitches. Change to circular needle size 4.5 mm and work rib (knit 1, purl 1) for 3 cm. Cast off with knit over knit and purl over purl – read CASTING-OFF TIP! The jumper measures approx. 50-52-54-56-58-60 cm from the shoulder down. SLEEVES: Place the 47-49-51-55-59-61 stitches from the thread on the one side of the piece on double pointed needles/short circular needle size 5.5 mm and knit up 1 stitch in each of the 6-8-8-10-12-14 stitches cast on under the sleeve = 53-57-59-65-71-75 stitches. Insert a marker thread in the middle of the 6-8-8-10-12-14 new stitches under the sleeve. Start the round at the marker thread and work stocking stitch in the round, with A.1 over the middle 23-23-23-27-27-27 stitches on top of the sleeve as before . When the sleeve measures 3 cm from the division in all sizes, decrease 2 stitches under the sleeve – read DECREASE TIP. Decrease like this every 3-3-3-3-2½-2½ cm a total of 3-3-3-4-5-6 times = 47-51-53-57-61-63 stitches. Continue working without further decreases until the sleeve measures 38-39-38-38-36-36 cm from the division (shorter measurements in larger sizes due to wider shoulders). There is approx. 3 cm left to finished length; try the jumper on and work to desired length. Knit 1 round where you increase 7-7-7-9-9-9 stitches evenly spaced = 54-58-60-66-70-72 stitches. Change to double pointed needles size 4.5 mm and work rib (knit 1, purl 1) for 3 cm. Cast off with knit over knit and purl over purl – remember CASTING-OFF TIP! The sleeve measures approx. 41-42-41-41-39-39 cm from the division. Work the other sleeve in the same way. |
||||||||||||||||||||||||||||
Diagram explanations |
||||||||||||||||||||||||||||
|
||||||||||||||||||||||||||||
 |
||||||||||||||||||||||||||||
 |
||||||||||||||||||||||||||||
 |
||||||||||||||||||||||||||||
Have you finished this pattern?Tag your pictures with #dropspattern #duskrosesweater or submit them to the #dropsfan gallery. Do you need help with this pattern?You'll find 34 tutorial videos, a Comments/Questions area and more by visiting the pattern on garnstudio.com. © 1982-2026 DROPS Design A/S. We reserve all rights. This document, including all its sub-sections, has copyrights. Read more about what you can do with our patterns at the bottom of each pattern on our site. |
||||||||||||||||||||||||||||


With over 40 years in knitting and crochet design, DROPS Design offers one of the most extensive collections of free patterns on the internet - translated to 17 languages. As of today we count 324 catalogues and 12291 patterns translated into English (UK/cm).
We work hard to bring you the best knitting and crochet have to offer, inspiration and advice as well as great quality yarns at incredible prices! Would you like to use our patterns for other than personal use? You can read what you are allowed to do in the Copyright text at the bottom of all our patterns. Happy crafting!
Post a comment to pattern DROPS 226-14
We would love to hear what you have to say about this pattern!
If you want to leave a question, please make sure you select the correct category in the form below, to speed up the answering process. Required fields are marked *.