
Popular categories
Looking for a yarn?


|
||||||||||||||||||||||||||||
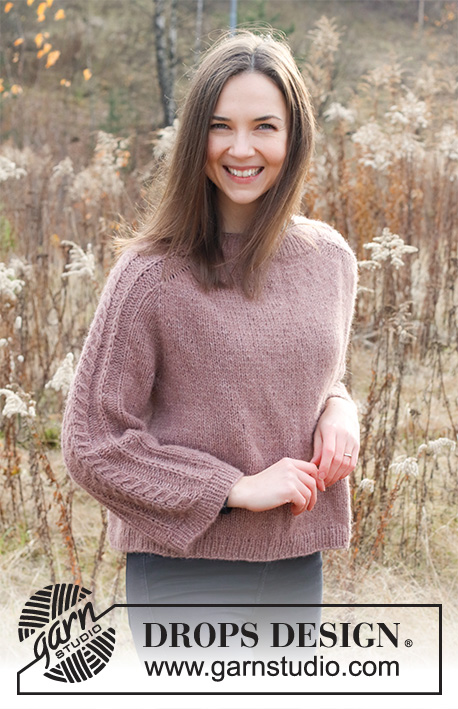
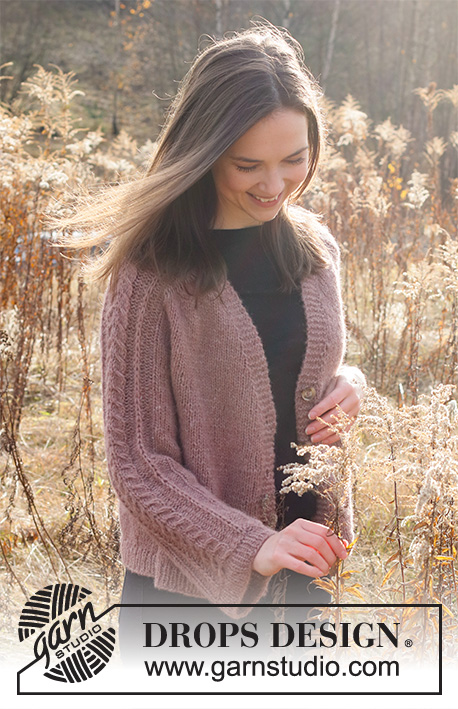
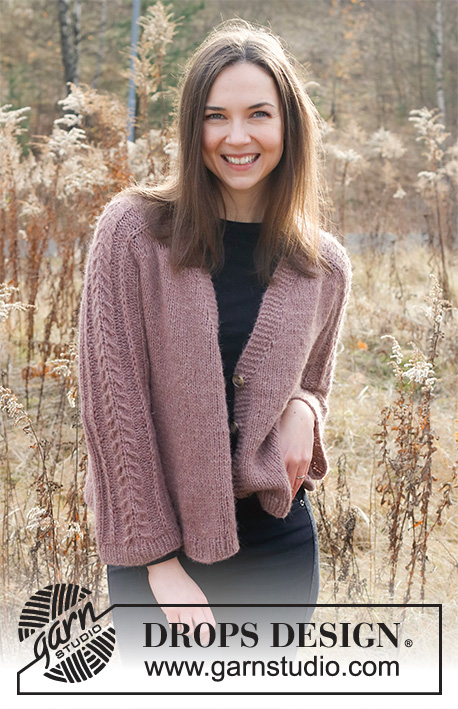
Dusk Rose Jacket |
||||||||||||||||||||||||||||
 |
 |
|||||||||||||||||||||||||||
Knitted jacket in DROPS Air. The piece is worked top down with saddle shoulders, V-neck and cables on the sleeves. Sizes XS - XXL.
DROPS 226-13 |
||||||||||||||||||||||||||||
|
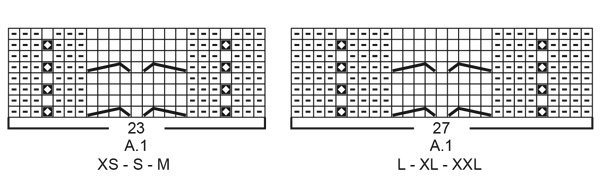
------------------------------------------------------- EXPLANATIONS FOR THE PATTERN: ------------------------------------------------------- RIDGE/GARTER STITCH (worked back and forth): Knit all rows. 1 ridge = knit 2 rows. PATTERN: See diagram A.1. Choose diagram for your size. The diagram shows all rows in the pattern from the right side. INCREASE TIP-1 (evenly spaced): To work out how to increase evenly, count the total number of stitches on the needle (e.g. 152 stitches) minus bands (e.g. 12 stitches) and divide the remaining stitches by the number of increases to be made (e.g. 23) = 6.1. In this example, increase by making 1 yarn over after approx. each 6th stitch. Do not increase on bands. On the next row work the yarn overs twisted to avoid holes. INCREASE TIP-2 (from the right side): BEFORE MARKER: The new stitch twists to the right. Use the left needle to pick up the strand between 2 stitches from the previous row, pick up the back strand and knit in the front loop. AFTER MARKER: The new stitch twists to the left. Use the left needle to pick up the strand between 2 stitches from the previous row, pick up the front strand and knit in the back loop. INCREASE TIP-3 (from the wrong side): BEFORE MARKER: The new stitch twists to the right. Use the left needle to pick up the strand between 2 stitches from the previous row, pick up the front strand and purl in the back loop. AFTER MARKER: The new stitch twists to the left. Use the left needle to pick up the strand between 2 stitches from the previous row, pick up the back strand and purl in the front loop. INCREASE TIP-4 (V-neck): All increases are worked from the right side! Increase 1 stitch inside the 6 band stitches by making 1 yarn over. On the next row (wrong side) purl the yarn overs twisted to avoid holes. The new stitches are worked in stocking stitch. KNITTING TIP (V-neck): To avoid a ‘jump’ at the bottom of the V-neck when the increases are finished, work an extra ridge over the bands after the increases are finished. Do this on each band as follows: Start from the right side, knit the 6 stitches on the left band, turn, tighten the strand and knit the 6 stitches from the wrong side, turn and work the whole row as before, turn, knit the 6 stitches on the right band, turn, tighten the strand and knit the 6 stitches from the right side, turn and work a complete row as before from the wrong side. BUTTONHOLES: Work buttonholes on the right band (when the garment is worn). Work the buttonhole when there are 4 stitches left on the row as follows: Make 1 yarn over, knit 2 together and knit 2. On the next row (wrong side) knit the yarn over to leave a hole. The first buttonhole is worked approx. 1 cm after the increases to the V-neck are finished. The other 3 buttonholes are worked with approx. 7-7-7½-8-8½-8½ cm between each one. DECREASE TIP (for sleeves): Decrease 1 stitch on either side of the marker thread as follows: Work until there are 3 stitches left before the marker thread, knit 2 together, knit 2 (marker thread sits between these 2 stitches), slip 1 stitch as if to knit, knit 1 and pass the slipped stitch over the knitted stitch (2 stitches decreased). CASTING-OFF TIP: To avoid the cast-off edge being tight you can cast off with a larger size needle. If the edge is still tight, make 1 yarn over after approx. each 6th stitch at the same time as casting off; the yarn overs are cast off as normal stitches. ------------------------------------------------------- START THE PIECE HERE: ------------------------------------------------------- JACKET – SHORT OVERVIEW OF THE PIECE: Start by working 2 loose neck pieces. These are then placed together on circular needle and stitches are cast on for the back of the neck as described in the text. Later, the neck is sewn together at the back and sewn to the neckline. The piece is worked top down. The yoke is worked back and forth with circular needle, from mid-front at the same time as stitches are increased for the V-neck, shoulders, sleeves and yoke. The yoke is divided for the body and sleeves and the body continued back and forth with circular needle. The sleeves are worked with double pointed needles/short circular needle. RIGHT NECK/BAND (on right front piece when jacket is worn): Cast on 6 stitches with double pointed needles size 5.5 mm and DROPS Air (use 2 double pointed needles – the stitches are on one needle and worked with the other). Work GARTER STITCH – read description above, until the neck/band piece measures approx. 18-19-19-21-22-23 cm – finish after a knitted row from the wrong side. Place these stitches on a thread or an extra needle and lay to one side. LEFT NECK/BAND (on left front piece when jacket is worn): Cast on 6 stitches with double pointed needles size 5.5 mm and DROPS Air. Work garter stitch until the neck/band piece measures approx. 18-19-19-21-22-23 cm – finish after a knitted row from the wrong side. Now place the 2 neck/band pieces together as described below. YOKE: Change to circular needle size 5.5 mm. Knit the 6 stitches from the left neck/band piece, cast on 68-72-72-80-82-86 new stitches and knit the 6 stitches from the right neck/band piece = 80-84-84-92-94-98 stitches. Purl 1 row from the wrong side (bands worked in garter stitch). Insert a marker thread after the band at the beginning of the row. This marker thread is used when measuring the yoke! In addition, insert 4 other markers without working the stitches and insert each marker between 2 stitches. These markers are used when increasing for the saddle shoulders. Marker 1: Start from the right side and count 6 stitches (= band), insert the marker before the next stitch. Marker 2: Count 23-23-23-27-27-27 stitches from marker 1 (= shoulder), insert the marker before the next stitch. Marker 3: Count 22-26-26-26-28-32 stitches from marker 2 (= back piece), insert the marker before the next stitch. Marker 4: Count 23-23-23-27-27-27 stitches from marker 3 (= shoulder), insert the marker before the next stitch. There are 6 stitches left on the front piece after marker 4. Allow these markers to follow your work onwards; you will increase by all these markers. OVERVIEW OF THE NEXT SECTION: Now you will work pattern, increase to the saddle shoulders, sleeves and yoke at the same time as you increase to the V-neck. Read PATTERN, INCREASES TO SADDLE SHOULDERS, V-NECK, INCREASES TO SLEEVES and INCREASES TO YOKE before continuing! PATTERN: The piece is continued in stocking stitch with 6 band stitches in garter stitch on each side towards mid-front and A.1 over the 23-23-23-27-27-27 shoulder stitches on each side (between markers 1 and 2 and between markers 3 and 4). INCREASES TO SADDLE SHOULDERS (increase on every row): AT THE SAME TIME on the first row from the right side increase 4 stitches for the shoulders as follows: Increase BEFORE markers 1 and 3 and AFTER markers 2 and 4 – read INCREASE TIP-2. You are only increasing on the front and back pieces; the number of stitches on the shoulders remains the same. On the next row from the wrong side increase 4 stitches for the shoulders as follows: Increase BEFORE markers 2 and 4 and AFTER markers 1 and 3 – read INCREASE TIP-3. You increase on EVERY row and differently from the right and wrong side so the stitches lie neatly. The increased stitches are worked in stocking stitch. Continue the pattern and increase on every row a total of 22-22-24-26-26-26 times. REMEMBER THE KNITTING TENSION! After the last increase the piece measures approx. 11-11-12-13-13-13 cm from the marker thread. V-NECK: AT THE SAME TIME when you have worked 2 rows of increases to the saddle shoulders, and next row is from the right side, start to increase to the V-neck on each side towards mid-front – read INCREASE TIP-4. Increase to the V-neck every 4th row a total of 6 times in all sizes, then every 2nd row a total of 5-7-7-7-8-10 times on each side. INCREASES TO SLEEVES: When the increases to the saddle shoulders are finished, start to increase to the sleeves on the next row from the right side. Continue with stocking stitch and 6 band stitches in garter stitch on each side and A.1 over the shoulder stitches as before (and continue to increase to the V-neck). Increase 4 stitches for the sleeves as follows: Increase AFTER markers 1 and 3 and BEFORE markers 2 and 4 – remember INCREASE TIP-2. You are only increasing on the sleeves; the number of stitches on the front and back pieces remains the same. Work the increased stitches in stocking stitch (A.1 is continued over the middle 23-23-23-27-27-27 stitches on the sleeves as before). Increase like this every 2nd row (each row from the right side) a total of 5-6-5-3-3-2 times. The piece measures approx. 16-17-17-16-16-15 cm from the marker thread. Now increase for the yoke as described below. INCREASES FOR YOKE: Move the 4 markers so each marker sits in the outermost stitch on each side of the front and back pieces. There are 33-35-33-33-33-31 stitches between the markers on each sleeve. On the next row from the right side increase 8 stitches for the yoke by increasing both before and after all 4 marker-stitches – remember INCREASE TIP-2. You are now increasing on the front and back pieces and on the sleeves. Work the increased stitches in stocking stitch. Increase like this every 2nd row (each row from the right side) a total of 3-3-5-6-8-10 times. Read KNITTING TIP and REMEMBER THE BUTTONHOLES on the right band – read description above. DIVIDING FOR THE BODY AND SLEEVES: After all the increases to saddle shoulders, V-neck, sleeves and yoke there are 234-246-266-282-302-322 stitches on the needle and the piece measures approx. 19-20-22-22-24-25 cm from the marker thread on the neck. If the piece is shorter than this, continue working without further increases to the correct length. Now divide the piece for the body and sleeves on the next row as follows: Work 38-40-44-46-49-53 stitches as before (= front piece), place the next 47-49-51-55-59-61 stitches on a thread for the sleeve, cast on 6-8-8-10-12-14 new stitches (= in side under sleeve), work 64-68-76-80-86-94 stitches as before (= back piece), place the next 47-49-51-55-59-61 stitches on a thread for the sleeve, cast on 6-8-8-10-12-14 new stitches (= in side under sleeve), work the last 38-40-44-46-49-53 stitches as before (= front piece). The body and sleeves are finished separately. THE PIECE IS NOW MEASURED FROM HERE! BODY: = 152-164-180-192-208-228 stitches. Continue with stocking stitch and 6 band stitches in garter stitch on each side until the piece measures 21-22-22-23-23-24 cm from the division. There is approx. 3 cm left to finished length; try the jacket on and work to desired length. To avoid the following rib being tight, you now increase stitches as follows: Knit 1 row from the right side where you increase 23-25-27-29-31-35 stitches evenly spaced – remember INCREASE TIP-1 = 175-189-207-221-239-263 stitches. Change to circular needle size 4.5 mm. The next row is worked as follows from the wrong side: 6 band stitches in garter stitch, * purl 1, knit 1 *, work from *-* until there are 7 stitches left on the row, purl 1 and 6 band stitches in garter stitch. Continue this rib for 3 cm. Cast off with garter stitch over garter stitch, knit over knit and purl over purl – read CASTING-OFF TIP! The jacket measures approx. 50-52-54-56-58-60 cm from the shoulder down. SLEEVES: Place the 47-49-51-55-59-61 stitches from the thread on the one side of the piece on double pointed needles/short circular needle size 5.5 mm and knit up 1 stitch in each of the 6-8-8-10-12-14 stitches cast on under the sleeve = 53-57-59-65-71-75 stitches. Insert a marker thread in the middle of the 6-8-8-10-12-14 new stitches under the sleeve. Start the round at the marker thread and work stocking stitch in the round, with A.1 over the middle 23-23-23-27-27-27 stitches on top of the sleeve as before . When the sleeve measures 3 cm from the division in all sizes, decrease 2 stitches under the sleeve – read DECREASE TIP. Decrease like this every 3-3-3-3-2½-2½ cm a total of 3-3-3-4-5-6 times = 47-51-53-57-61-63 stitches. Continue working without further decreases until the sleeve measures 42-42-41-42-40-39 cm from the division (shorter measurements in larger sizes due to wider shoulders). There is approx. 3 cm left to finished length; try the jacket on and work to desired length. Knit 1 round where you increase 7-7-7-9-9-9 stitches evenly spaced = 54-58-60-66-70-72 stitches. Change to double pointed needles size 4.5 mm and work rib (knit 1, purl 1) for 3 cm. Cast off with knit over knit and purl over purl – remember CASTING-OFF TIP! The sleeve measures approx. 45-45-44-45-43-42 cm from the division. Work the other sleeve in the same way. ASSEMBLY: Sew the neck together mid-back with the seam to the wrong side. Sew the neck to the neckline – stretch the neck slightly while sewing it down. Sew the buttons onto the left band. |
||||||||||||||||||||||||||||
Diagram explanations |
||||||||||||||||||||||||||||
|
||||||||||||||||||||||||||||
|
||||||||||||||||||||||||||||

|
||||||||||||||||||||||||||||

|
||||||||||||||||||||||||||||
|
Have you made this or any other of our designs? Tag your pictures in social media with #dropsdesign so we can see them! Do you need help with this pattern?You'll find tutorial videos, a Comments/Questions area and more by visiting the pattern on garnstudio.com. © 1982-2024 DROPS Design A/S. We reserve all rights. This document, including all its sub-sections, has copyrights. Read more about what you can do with our patterns at the bottom of each pattern on our site. |
||||||||||||||||||||||||||||


With over 40 years in knitting and crochet design, DROPS Design offers one of the most extensive collections of free patterns on the internet - translated to 17 languages. As of today we count 304 catalogues and 11422 patterns - 11422 of which are translated into English (UK/cm).
We work hard to bring you the best knitting and crochet have to offer, inspiration and advice as well as great quality yarns at incredible prices! Would you like to use our patterns for other than personal use? You can read what you are allowed to do in the Copyright text at the bottom of all our patterns. Happy crafting!
Comments / Questions (16)
Jag uppskattar både Drops garner och stickbeskrivningar som jag ofta stickar efter. Däremot uppskattar jag inte er fotograf. Nästan alla bilder är på plaggens framsida och tagna snett från vänster. Till denna beskrivning finns 4 bilder tagna på det sättet och modellen håller armarna framför sig så det inte går att se axelskärningen ordentligt. Kan ni inte byta till en fotograf som själv stickar och som förstår vad vi stickare vill se?
04.01.2023 - 22:44DROPS Design answered:
Hei Lena. Takk for ditt innspill, vi vil ta det videre. mvh DROPS Design
06.01.2023 - 12:45Hallo 1 Reihe tiefe reinstecken, wird dann aus diese Masche dann zwei Maschen?
30.12.2022 - 11:35DROPS Design answered:
Liebe Frau Weigand, dieses Video zeigt, wie man so eine Masche strickt. Viel Spaß beim stricken!
02.01.2023 - 13:18Dusk rose jacket - increase to the very neck says to increase INSIDE the 6 band stitches, BUT increase tip 1 says NOT to increase on bands. ???
29.12.2022 - 04:18DROPS Design answered:
Hi Lorraine, Inside the band stitches means: Increase after the first band and increase before the last band. Happy festive season!
29.12.2022 - 10:00I am using a 5mm circular needle and have pureled all stitches and placed my markers. (YOKE). I BELIEVE I NOW HAVE TO DO 6 GARTER STITCHES, THEN THE FIRST INCREASE AND THEN FOLLOW A1 for the shoulder stitches, etc. My dilemma is - the wrong side of the garter band is facing me. Is this how it should be? My working yarn is coming from the right. If this is wrong, how do I fix it? I look forward to your early reply. Thank you. Lorraine
27.11.2022 - 23:49DROPS Design answered:
Dear Lorraine, last row on both neck band is worked from the wrong side, then you work from the right side both neck band pieces together casting on sts between both of them, you work the next row from the wrong side knitting the 6 sts on each side and purling all remaining stitches. Happy knitting!
28.11.2022 - 10:21I understand that there is a correction to the Dusk Rose jacket pattern knit in DROPS Air yarn. Please tell me what the correction is and where I might find it. Thank You? Lorraine
17.11.2022 - 00:44DROPS Design answered:
Dear Lorraine, this correction only applies if you printed the pattern before the date of the correction, if you didn't, then correction is included. Happy knitting!
17.11.2022 - 10:08Hej. ja jeg er kommet til delingen og hvis jeg vælger at ændre i udtagninger, skal jeg pille op men at tage m fra forstykke med til ærme må have betydning for design. Jeg kan ikke helt gennemskue det. Skal cardiganen falde i folder på forstykket så man ikke ser den anderledes ærmeudtagning?
27.09.2022 - 12:15DROPS Design answered:
Hej Kirsten, det er rigtig nok, sådan gør vi når vi strikker sadelskulder, se også på måleskitsen hvordan det ser ud. Jeg synes du skal prøve :)
27.09.2022 - 13:56Hej igen. Jeg spørger videre til ærmemasker på tråd: Vil det sige at nogle af hvad vi traditionelt kalder forstykkemasker bliver til ærmemasker, så udtagningslinjen fra saddelskulder og ned til deling ikke markerer delingen? Det ved jeg ikke om jeg visuelt kan leve med, det vil jo se "forkert" ud. Hvis de fem masker jeg mangler til ærmem. skal komme fra forstykket kunne jeg da lige så godt tage dem ud til ærme i stedet og få et pænt udtryk? Vh Kirsten
27.09.2022 - 10:40DROPS Design answered:
Hej igen Kirsten, Hvis du tager alle masker ud ifølge opskriften, så vil også nogle af "udtagningerne til bærestykket" også være en del af ærmerne... så du bør ikke komme til at mangle, men er du kommet dertil hvor du sætter ærmemaskerne på en tråd?
27.09.2022 - 10:44Hej. Jeg kan ikke få udtagninger til ærme til at passe. Jeg strikker str. xl. og har 27 saddelskulder masker, tager 2x3=6 m ud til ærme og senere 8x2 m = 16 ærmeudtagning ialt 49 m men skal sætte 59 m på tråd til ærme. Jeg mangler at tage 10 m ud, hvor er de? Venlig hilsen Kirsten Asmussen
26.09.2022 - 10:42DROPS Design answered:
Hej Kirsten, du har 27 skuldermasker, tager ud på hver side af sadelskulderen 26 gange, og tager ud til V-hals og ærme samtidigt. Inden du deler stykket skal du have 302 masker på pinden. Når du har det kan du dele op så de 49+49+59 (+dem du slår op i hver side under ærmet) danner for & bagstykke. Du vil da have 59 masker i hver side som skal være ærmer (uanset hvor mange du har taget ud just til ærmer) :)
27.09.2022 - 10:26Bonjour Astuce tricot (encolure V ): combien de fois faut-il répéter la côte mousse mentionnée à la fin des augmentations empiècement Merci J'apprécie beaucoup votre site
11.08.2022 - 16:04DROPS Design answered:
Bonjour Mme Gratton, ces rangs raccourcis ne se tricotent qu'une seule fois de chaque côté: tricotez 2 rangs sur les 6 premières, vu sur l'endroit, tricotez toutes les mailles sur l'endroit comme avant (augmentez si besoin, etc.), tricotez 2 rangs sur les 6 premières mailles, vu sur l'envers, tricotez toutes les mailles sur l'envers comme avant. Et continuez comme avant. Bon tricot!
11.08.2022 - 16:34Bonjour, augmentation manche marteau. comment augmenter avant ou après le marqueur si celui-ci est entre les 2 mailles. Merci pour votre aide
27.07.2022 - 15:09DROPS Design answered:
Bonjour Marie-Andrée, regarde la video ICI. Bon tricot!
27.07.2022 - 21:05