Comments / Questions (65)
![]() Jonna Klingstrøm wrote:
Jonna Klingstrøm wrote:
Tak for svar, men det er ikke svar på det jeg spørger om. Ja, jeg har 110 masker (som jeg også skriver), og det er derefter ... altså når jeg skal strikke diagram A1.B. Når jeg har strikket første pind, står jeg med 4 masker tilovers ... Vh. Jonna
04.12.2025 - 21:10DROPS Design answered:
Hej igen, Du har 110 masker. Strik 5 kantmasker retstrik, 1 ret, strik A.1 B 8x12=96m, 2 m i A.1 B, 1 ret og strik 5 kantmasker retstrik = 110 masker. Det vil sige at når du har strikket første pind i A.1B 8 gange, så har du taget 8x2 masker ind = 16m, plus de første 2 m i A.1B er taget ind til 1 maske = 17 m taget ind. 110-17=93 masker tilbage
08.12.2025 - 15:14
![]() Jonna Klingstrøm wrote:
Jonna Klingstrøm wrote:
Jeg skal til at strikke diagram A1.B. Der er 100 masker på pinden (plus 2x5 kantmasker). Så når jeg har strikket første pind i diagrammet, har jeg 4 masker til overs?
03.12.2025 - 15:47DROPS Design answered:
Hej Jonna, Strik 5 kantmasker retstrik, 1 ret, strik A.1 A 8x12=96, 2 m i A.1 A, 1 ret og strik 5 kantmasker retstrik = 110 masker
04.12.2025 - 14:13
![]() Lili wrote:
Lili wrote:
Lorsque qu’on tricote une jetée , le rang suivant la jetée se tricote à l’endroit où a l’envers ?
09.08.2025 - 16:14DROPS Design answered:
Bonjour Lili, tout dépend des jetés, certains seront tricotés à l'endroit, d'autres à l'envers , suivez bien les indications du diagramme qui montre tous les rangs. Bon tricot!
11.08.2025 - 07:39
![]() Lili wrote:
Lili wrote:
Les diagrammes se tricotent t’ils de droite à gauche. Et quand je commence à A2 je fais 1rand end et le rang suivant comme les mailles se présentent car on voit sur le diagramme les rangs pairs seulement.
06.08.2025 - 13:54DROPS Design answered:
Bonjour Lilli, les diagrammes se lisent sur l'endroit de droite à gauche et sur l'envers de gauche à droite; retrouvez plus d'infos sur les diagrammes ici; ainsi, au 1er rang de A.2, tricotez 10 m end; au 2ème rang: (1 m env, 1 m end) x 5. Bon tricot!
06.08.2025 - 16:23
![]() Cindy wrote:
Cindy wrote:
I am working on the Autumn Wreath cardigan. I have managed to get down to 93 stitches before the start of A2 but if you count the stitches for the start of A2 I count 92 stitches. 5 + 1 + 5+1 plus a 10 stitch repeat 8 times times is 92 stitches not 93
05.08.2025 - 22:29DROPS Design answered:
Hi Cindy, At the end of the first row, you work the first stitch in A.2 (so the pattern is symmetrical on the front pieces) before knitting 1 and then working the 5 band-stitches. This is your missing stitch. Regards, Drops team.
06.08.2025 - 06:36
![]() Cindy wrote:
Cindy wrote:
I am having trouble with the pattern Autumn Wreath. I completed the neck portion with no problem. I also completed the yoke with no issues except when I got to the decrease in A.1B where I am supposed to end up with 93 stitches for the medium. I end up with 94. Even if I ended up with 93 stitches the A.2 pattern will not work out as you take the 5 garter stiches for each band and add a knit stitch on either side that is 12 the the pattern is 8 repeats of 10 stitches that only makes 92 not 93
05.08.2025 - 16:59DROPS Design answered:
Dear Cindy, you will decrease 1 stitch in every purl section of the rib, ie you repeat A.1B a total of 8 times and finish with P2 (between front band stitches), decreasing as shown in A.1B you will decrease a total of 9 sts (1 st in every other P-section each A.1B (2 sts decrease in each of the 8 A.1B repeat + 1 st in the last P-section before next front band), so that you will have 110-17=93 sts left. Happy knitting!
06.08.2025 - 07:40
![]() Liliane wrote:
Liliane wrote:
J’ai toujours tricoté d’autres patrons que ceux de drop design car mal expliqué. Quand les personnes bloquent tous à la même place c’est que c’est pas claire. Faudrait peut être modifier vos explications. Je suis une personne qui tricote bcp. Pas une débutante.
20.05.2025 - 17:30DROPS Design answered:
Bonjour Liliane, nous sommes désolés de lire que vous avez des problèmes de compréhension avec nos modèles, pensez à consulter l'onglet "Vidéos" et l'onglet "Leçons" en haut de page, ils pourront peut-être vous aider dans un premier temps, et quoi qu'il arrive, n'hésitez pas à utiliser cet espace pour poser votre question/vos questions, nous ferons notre possible pour vous aider. Bon tricot!
21.05.2025 - 08:54
![]() Brita wrote:
Brita wrote:
I Diagram A 2 vil jeg gerne have forklare hvordan jeg tager rigtigt ud. Umiddelbart ser det ud til at jeg skal tage ud 4 gange på pind 3. Er det korrekt?
06.05.2025 - 20:11DROPS Design answered:
Hei Brita. Jo, du lager 4 kast, men du strikker også 2 masker sammen 2 steder, slik at du øker kun med 2 masker pr gang du strikker A.2. mvh DROPS Design
12.05.2025 - 09:32
![]() Mie wrote:
Mie wrote:
Hvordan skal dette forstås? Jeg forstår ikke hvordan jeg kommer videre fra bærestykket hvor jeg har 103 masker(xl) opskriften kører derefter med 102 masker som jeg forstår det. 5 plus 1, 10 rapporter a 10 masker og 1 plus 5 masker. Det er 102 masker
02.03.2025 - 21:38DROPS Design answered:
Hej Mie. Strikk 5 masker rille, 1 rett, A.2 over maskene i A.1 B (= 9 rapporter à 10 masker), avslutt med første maske i A.2, 1 rett og 5 stolpemasker i rille. 5+1+90+1+1+5 = 103 m. Mvh DROPS Design
07.03.2025 - 09:18
![]() Mie wrote:
Mie wrote:
Der må være noget galt i den opskrift. Jeg strikker størrelse xl. I følge opskriften har jeg 103 masker når jeg er færdig med bærestykket. Så står der: strik 5 kant masker ret strik, 1 ret, og så mønster over 9 rapporter a 10 masker, hvor jeg afslutter den sidste rapport med at strikke sidste maske som første maske i A2, så 1 ret og 5 kantmasker. Det giver 102 masker, men jeg har jo 103 ifølge opskriften. Jeg har brug for hjælp til at redde dette ud.
02.03.2025 - 21:33DROPS Design answered:
Hej Mie. Se svar ovan. Mvh DROPS Design
07.03.2025 - 09:19
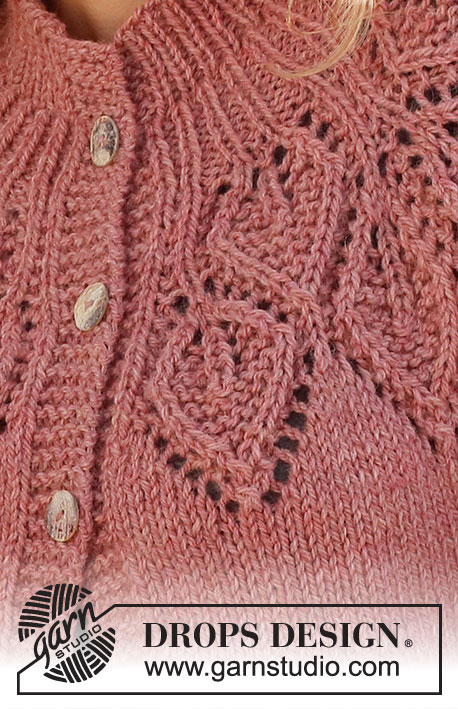
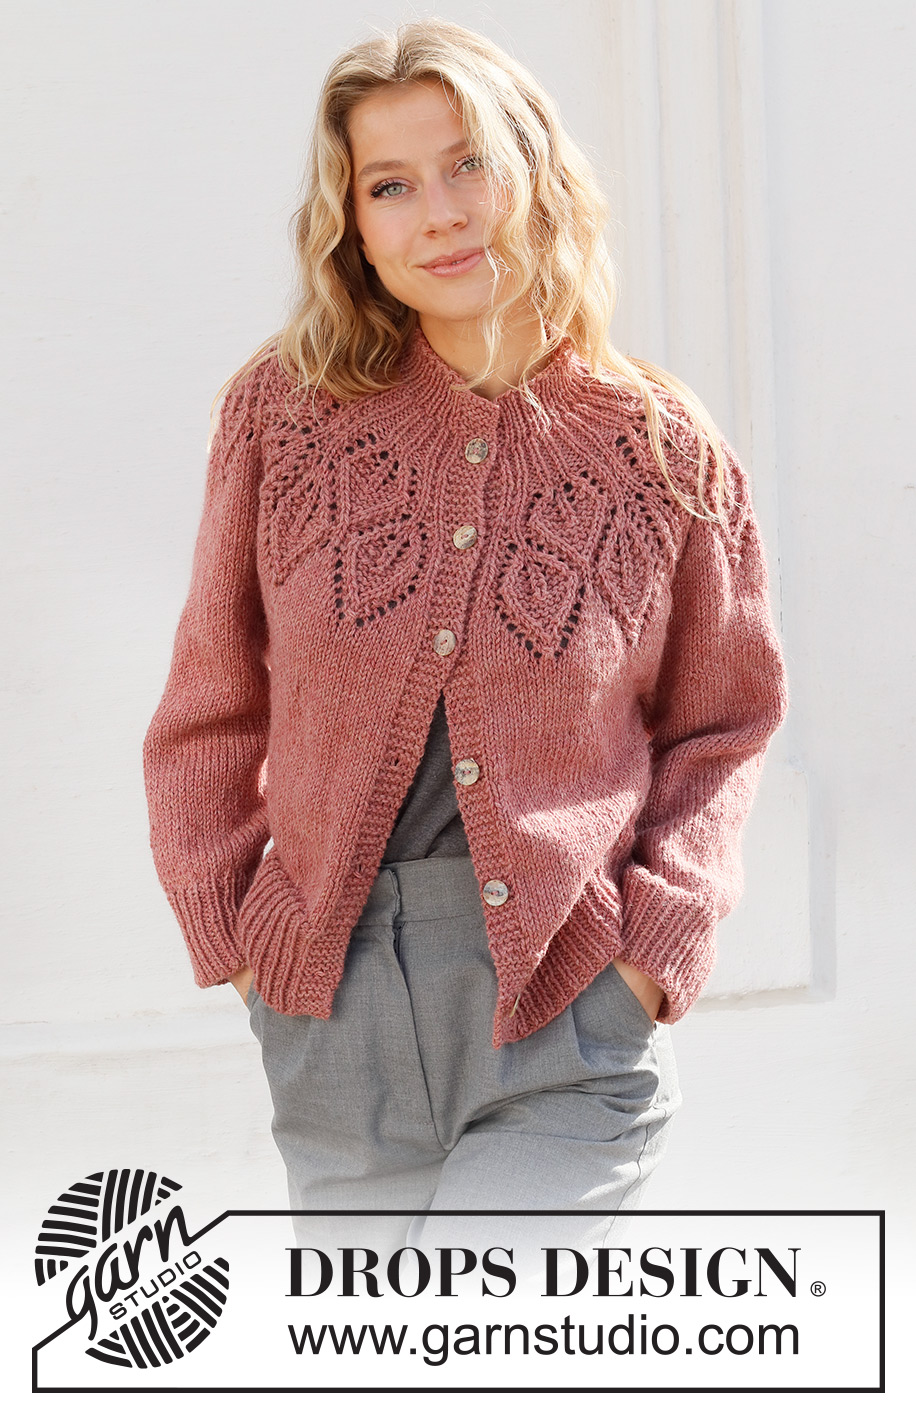
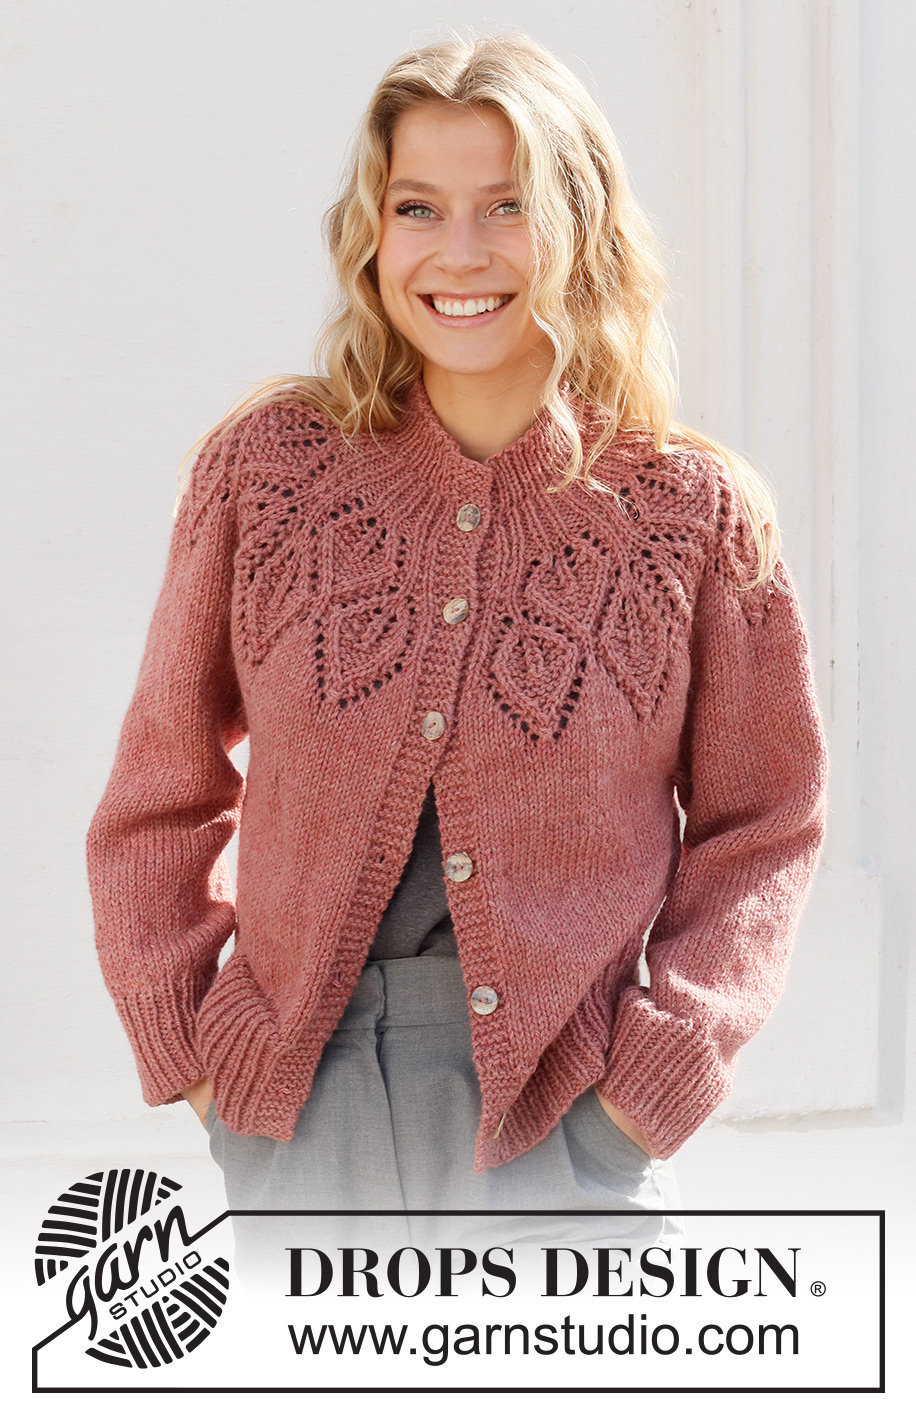
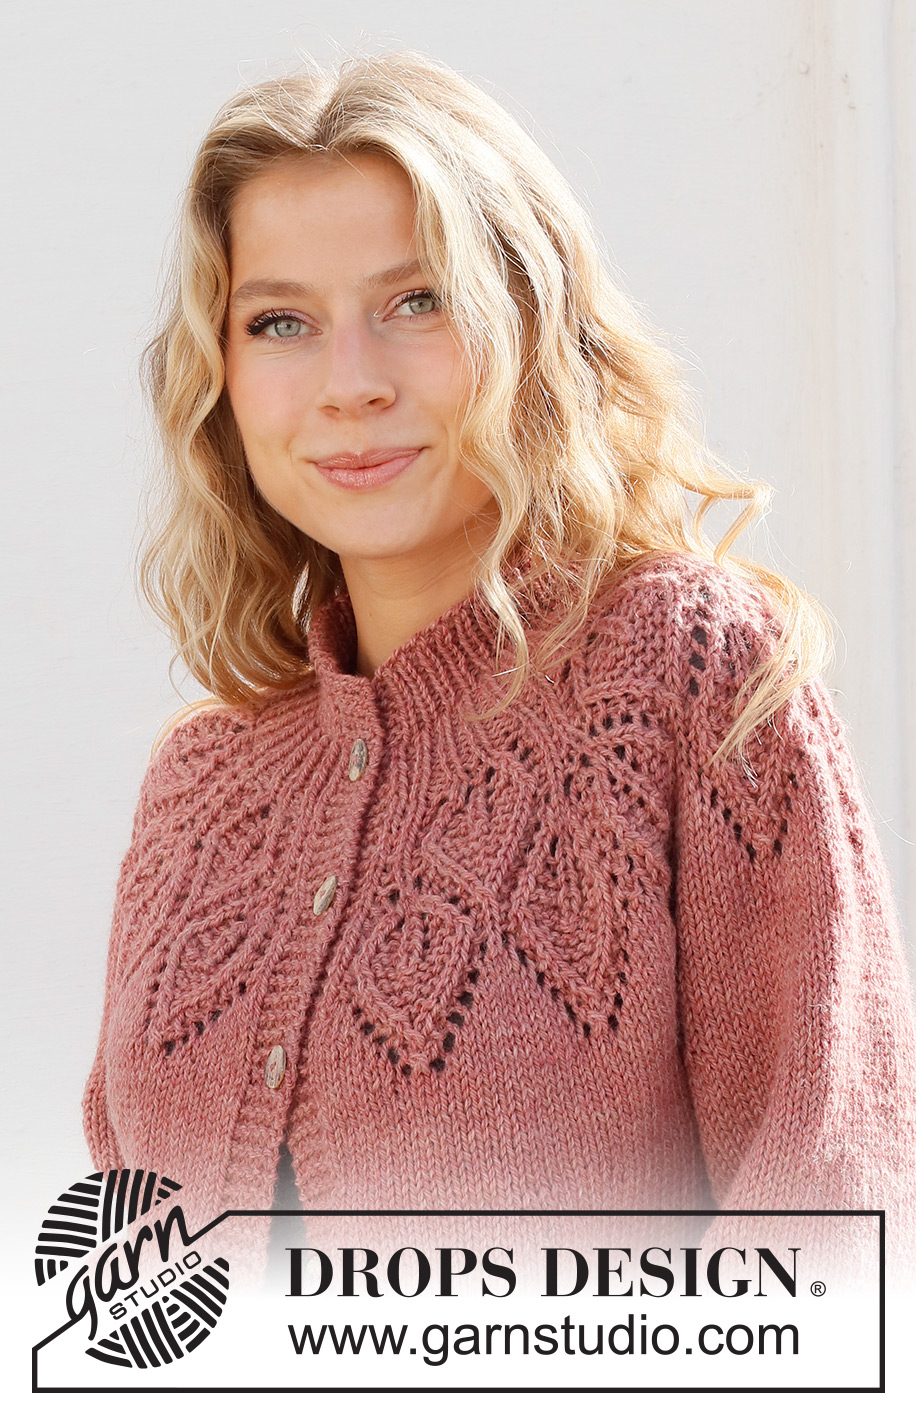
Autumn Wreath Jacket#autumnwreathjacket |
|||||||||||||||||||||||||
 |
 |
||||||||||||||||||||||||
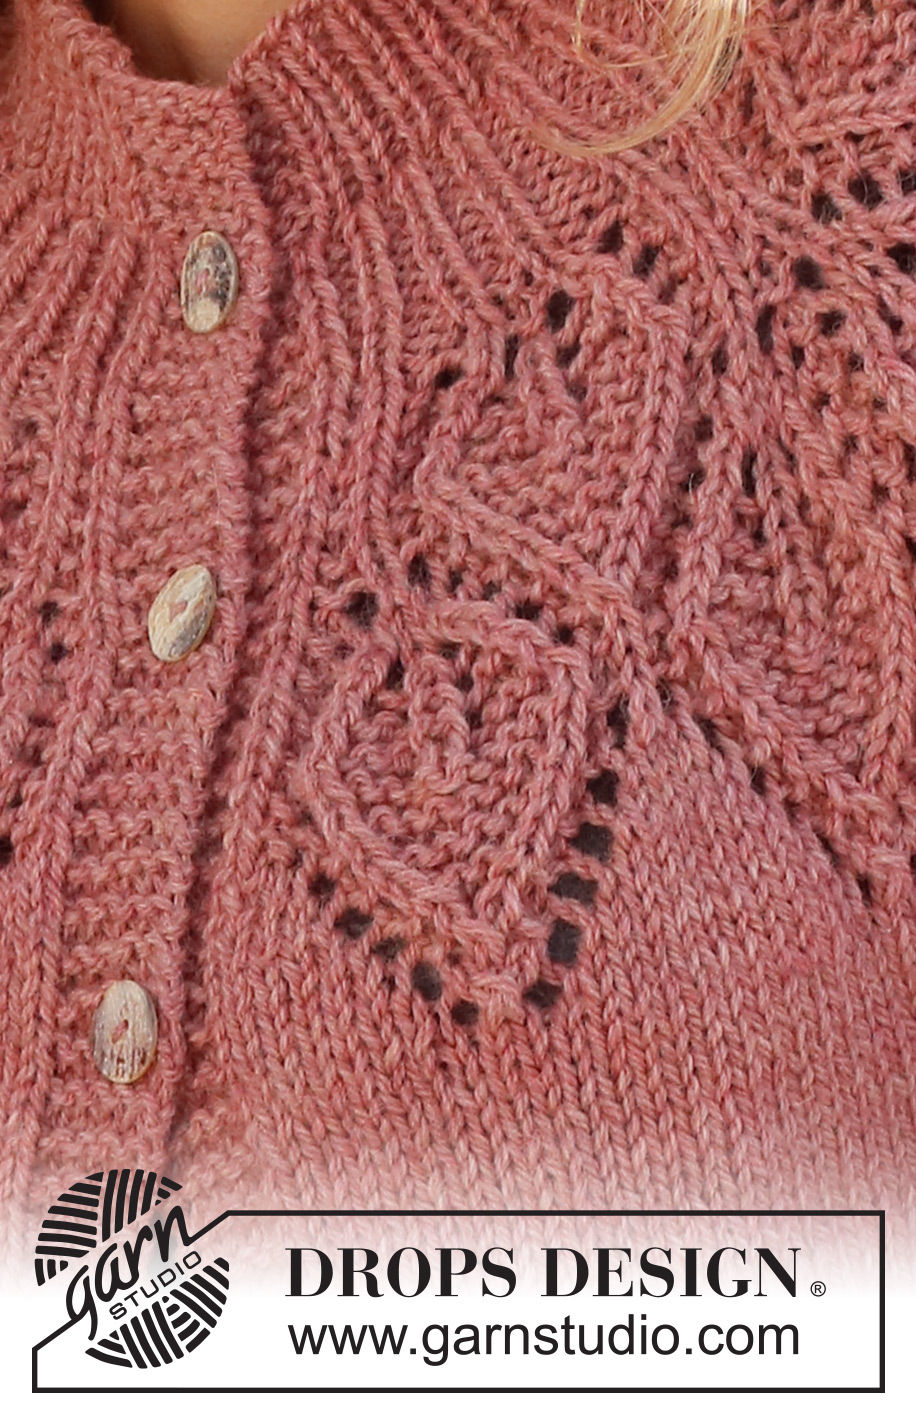
Knitted jacket in DROPS Nepal. The piece is worked top down, with round yoke and leaf pattern. Sizes S - XXXL.
DROPS 228-2 |
|||||||||||||||||||||||||
|
EXPLANATIONS FOR THE PATTERN: ------------------------------------------------------- RIDGE/GARTER STITCH (worked back and forth): Knit all rows. 1 ridge = knit 2 rows. PATTERN: See diagrams A.1 and A.2. The diagrams show all rows in the pattern from the right side INCREASE TIP (evenly spaced): To work out how to increase evenly, count the total number of stitches on the needle (e.g. 73 stitches) minus bands (e.g. 10 stitches) and divide the remaining stitches by the number of increases to be made (e.g. 25) = 2.5. In this example, increase by making 1 yarn over after alternately each 2nd and 3rd stitch. Do not increase on the bands. On the next row work the yarn overs twisted to avoid holes. BUTTONHOLES: Work buttonholes on the right band (when the garment is worn). Work from the right side when there are 3 stitches left on the row as follows: Make 1 yarn over, knit 2 together and knit 1. On the next row (wrong side), knit the yarn over to leave a hole. The first buttonhole is worked when the yoke measures 1 cm. Then work the other 5 buttonholes with approx. 9-9-9-9½-9½-9½ cm between each one. DECREASE TIP (for sleeves): Decrease 1 stitch on either side of the marker thread as follows: Work until there are 3 stitches left before the marker thread, knit 2 together, knit 2 (marker thread sits between these 2 stitches), slip 1 stitch as if to knit, knit 1 and pass the slipped stitch over the knitted stitch (2 stitches decreased). CASTING-OFF TIP: To avoid the cast-off edge being tight you can cast off with a larger size needle. If the edge is still tight, make 1 yarn over after approx. each 6th stitch at the same time as casting off; the yarn overs are cast off as normal stitches. ------------------------------------------------------- START THE PIECE HERE: ------------------------------------------------------- JACKET – SHORT OVERVIEW OF THE PIECE. The neck and yoke are worked back and forth with circular needle, from mid front and top down. The yoke is divided for body and sleeves and the body continued back and forth with circular needle. The sleeves are worked in the round with double pointed needles/short circular needle, top down. NECK: Cast on 73-77-81-85-89-93 stitches (including 5 band stitches on each side towards mid-front) with circular needle size 4.5 mm and DROPS Nepal. Purl 1 row (= wrong side). Then work as follows from the right side: 5 band stitches in GARTER STITCH – read description above, * knit 1, purl 1 *, work from *-* until there are 6 stitches left, knit 1 and 5 band stitches in garter stitch. Work this rib for 4 cm. Purl 1 row from the wrong side (band stitches in garter stitch), and increase 25-33-29-37-33-41 stitches evenly spaced – read INCREASE TIP = 98-110-110-122-122-134 stitches. Insert 1 marker after the band; the yoke is measured from this marker. Switch to circular needle size 5,5 mm. YOKE: The next row is worked as follows from the right side: 5 band stitches in garter stitch, knit 1, work A.1A until there are 8 stitches left (= 7-8-8-9-9-10 repeats of 12 stitches), work the first 2 stitches in A.1A (so the pattern is symmetrical), knit 1 and 5 band stitches in garter stitch. Remember the BUTTONHOLES – read description above. Continue this pattern for 4 cm, then work A.1B (= 2 rows). There are now 83-93-93-103-103-113 stitches. Now work pattern as follows from the right side: 5 band stitches in garter stitch, knit 1, work A.2 over A.1B (= 7-8-8-9-9-10 repeats of 10 stitches), work the first stitch in A.2, knit 1 and 5 band stitches in garter stitch. REMEMBER THE KNITTING TENSION! When A.2 has been completed in height there are 209-237-237-265-265-293 stitches and the piece measures approx. 20 cm from the marker. Knit 1 row from the right side where you increase 15-8-24-24-44-39 stitches evenly spaced = 224-245-261-289-309-332 stitches. Continue with stocking stitch and 5 band stitches in garter stitch on each side until the piece measures 22-22-23-25-27-29 cm from the marker. Now divide for the body and sleeves on the next row from the wrong side as follows: Work the first 35-38-40-44-48-53 stitches as before (= right front piece), place the next 46-50-54-60-62-64 stitches on a thread for the sleeve, cast on 8-8-10-10-12-12 stitches (= in side under sleeve), work the next 62-69-73-81-89-98 stitches (= back piece), place the next 46-50-54-60-62-64 stitches on a thread for the sleeve, cast on 8-8-10-10-12-12 stitches (= in side under sleeve), work the last 35-38-40-44-48-53 stitches as before (= left front piece). The body and sleeves are finished separately. THE PIECE IS NOW MEASURED FROM HERE. BODY: = 148-161-173-189-209-228 stitches. Continue back and forth with stocking stitch and 5 band stitches in garter stitch on each side until the piece measures 20-22-23-23-23-23 cm. There is approx. 10 cm left to finished length; try the jacket on and work to desired length. To avoid the following rib being tight, knit 1 row from the right side where you increase 22-24-27-29-33-35 stitches evenly spaced = 170-185-200-218-242-263 stitches. Change to circular needle size 4.5 mm and work rib as follows from the right side: 5 band stitches in garter stitch, * knit 1, purl 2 *, work from *-* until there are 6 stitches left, knit 1 and 5 band stitches in garter stitch. When the rib measures 10 cm, cast off with knit over knit and purl over purl – read CASTING-OFF TIP. The jacket measures approx. 56-58-60-62-64-66 cm from the shoulder down. SLEEVES: Place the 46-50-54-60-62-64 stitches from the thread on the one side of the piece on double pointed needles/short circular needle size 5.5 mm and knit up 1 stitch in each of the 8-8-10-10-12-12 stitches cast on under the sleeve = 54-58-64-70-74-76 stitches. Insert a marker thread in the middle of the new stitches under the sleeve and start the round at the marker thread. Work stocking stitch in the round for 4 cm, then decrease 1 stitch on each side of the marker thread – read DECREASE TIP. Decrease like this every 3½-3-2-1½-1½-1 cm a total of 8-9-11-13-15-15 times = 38-40-42-44-44-46 stitches. Continue with stocking stitch until the sleeve measures 31-30-30-28-26-24 cm. NOTE: Shorter measurements in larger sizes due to wider neck and longer yoke. Increase 4-5-6-7-7-8 stitches evenly spaced = 42-45-48-51-51-54 stitches. Change to double pointed needles size 4.5 mm and work rib (knit 1, purl 2) for 10 cm. Cast off with knit over knit and purl over purl - remember CASTING-OFF TIP. The sleeve measures approx. 41-40-40-38-36-34 cm from the division. Work the other sleeve in the same way. ASSEMBLY: Sew the buttons onto the left band. |
|||||||||||||||||||||||||
Diagram explanations |
|||||||||||||||||||||||||
|
|||||||||||||||||||||||||
 |
|||||||||||||||||||||||||
 |
|||||||||||||||||||||||||
Have you finished this pattern?Tag your pictures with #dropspattern #autumnwreathjacket or submit them to the #dropsfan gallery. Do you need help with this pattern?You'll find 30 tutorial videos, a Comments/Questions area and more by visiting the pattern on garnstudio.com. © 1982-2026 DROPS Design A/S. We reserve all rights. This document, including all its sub-sections, has copyrights. Read more about what you can do with our patterns at the bottom of each pattern on our site. |
|||||||||||||||||||||||||







Post a comment to pattern DROPS 228-2
We would love to hear what you have to say about this pattern!
If you want to leave a question, please make sure you select the correct category in the form below, to speed up the answering process. Required fields are marked *.