
Popular categories
Looking for a yarn?


Comments / Questions (22)
![]() Maika wrote:
Maika wrote:
Hola! No entiendo cómo se aumenta en el cuerpo después de los 11 cms , no sé si se tiene que aumentar con el TIP 3 AUMENTOS o con el TIP 4 AUMENTOS porque uno es por el lado derecho y otro por el lado del revés y pone que aumente cada centímetro . Necesito ayuda para poder acabar . Saludos
26.06.2021 - 13:58DROPS Design answered:
Hola Maika, se usa TIP 4 en el cuerpo, lo de TIP 3 es una errata del patrón. Los aumentos se hacen solo por el lado derecho. Enviaremos la errata al departamento del diseño
27.06.2021 - 18:55
![]() Anita Lutken wrote:
Anita Lutken wrote:
Hej Drops Jeg er ved at strikke Dancing DiamondsCadigan. Jeg er nu færdig med udtagning bærestykke. Strikker str L . 1. Forstykke 53m, bagstykke 102m ,2. Forstykke 53m ialt 208masker (har sat masker af til ærmer). Ifølg opskriften skal der pludselig være 240masker til ryg og forstykke , pludselig mangler der 32masker ??? Hvor får jeg de masker fra ??? Jeg har hele tiden haft det korrekte antal masker. Hilsen Anita
28.05.2021 - 10:04DROPS Design answered:
Hej Anita, Forstykke 53 masker, slå 16 nye masker op under ærmet, strik 102 (ryg), slå 16 nye masker op under ærmet, strik 53 masker = 240 masker :)
28.05.2021 - 13:52
![]() Olaug Ekerhovd wrote:
Olaug Ekerhovd wrote:
Hei , skal printe ut mønster til Dancing Diamonds Cardigan , men det kommer ikke fram bilde eller symboler for mønsterstrikket . Det blir derfor umulig å strikke mønsteret . Kan dere forsøke å sende på nytt ?
12.05.2021 - 16:18DROPS Design answered:
Hej Olaug, for at få alt med, skal du skrive ud ved at klikke på "skriv ut"-knappen som er til højre for Trenger du hjelp-knappen inde på selve opskriften :)
14.05.2021 - 09:39
![]() Nina Kubbe wrote:
Nina Kubbe wrote:
Nach der Zunahme der Ärmel habe ich deutlich mehr Maschen zwischen den Makierern als 61. muss ich die Markierer gezielt so umsetzten dass es genau 61 sind? Die Zunahme verläuft dann jedoch an einer anderen Stelle, als die bisherigen.
11.05.2021 - 11:22DROPS Design answered:
Liebe Frau Kubbe, in S sowie in L sollen Sie 63 Maschen für jede Ärmel haben, dh: 27 Maschen + 18 Zunahmen beidseitig = 63 M, dann legen Sie 1 Markierung in die 1. dieser 63 Maschen und 1 Markierung in die letzte dieser 63 Maschen. Viel Spaß beim stricken!
11.05.2021 - 13:29
![]() Tanja wrote:
Tanja wrote:
Jag hittar inte när det är dags att byta från stickor 2,5 till 3. Är det på ökningsvarvet efter resåren i halsringningen, eller senare?
25.04.2021 - 14:22DROPS Design answered:
Hej Tanja. Du stickar resår med sticka 2,5 och slätstickning/mönster med sticka 3, så du byter till sticka 3 direkt efter resåren. Mvh DROPS Design
27.04.2021 - 09:26
![]() Alex Ly wrote:
Alex Ly wrote:
Hazy day
10.01.2021 - 22:05
![]() Jana wrote:
Jana wrote:
Sommerbrise
09.01.2021 - 16:50
![]() Maria Do Céu Teixeira wrote:
Maria Do Céu Teixeira wrote:
Lavanda fresh
08.01.2021 - 22:10
![]() Donna wrote:
Donna wrote:
Evening Breeze
08.01.2021 - 13:24
![]() Anna Sarjanen wrote:
Anna Sarjanen wrote:
City chick
07.01.2021 - 21:40
|
||||||||||||||||||||||||||||
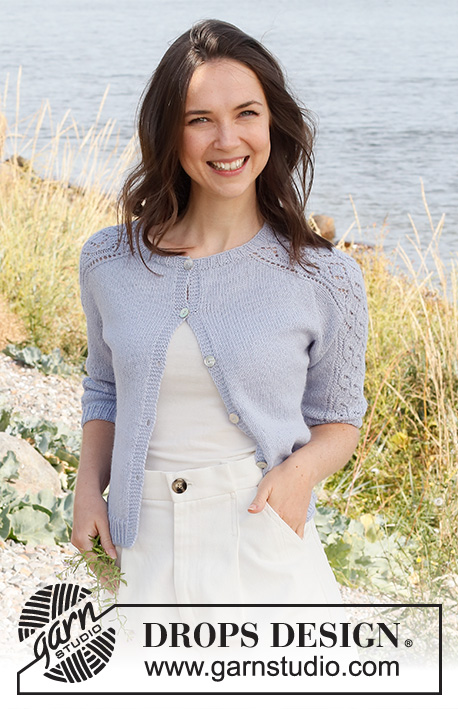
Dancing Diamonds Cardigan#dancingdiamondscardigan |
||||||||||||||||||||||||||||
 |
 |
|||||||||||||||||||||||||||
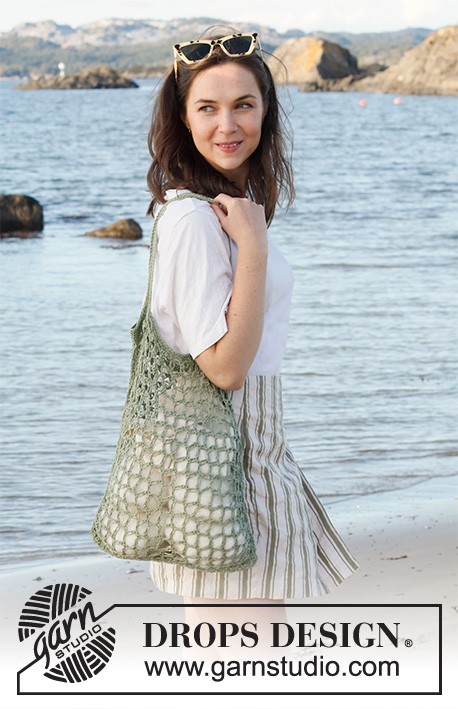
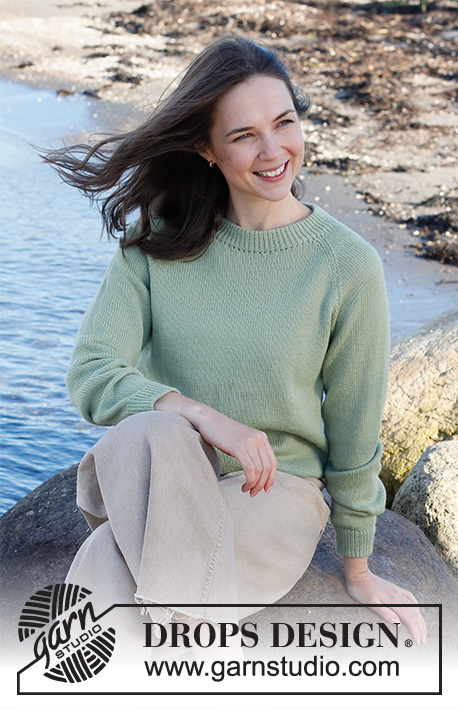
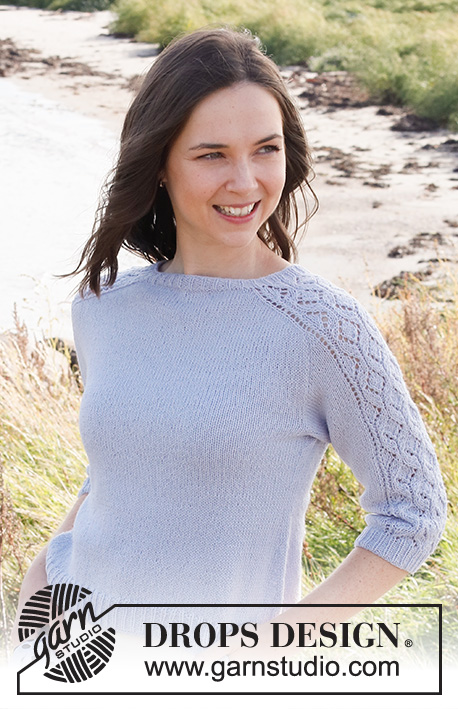
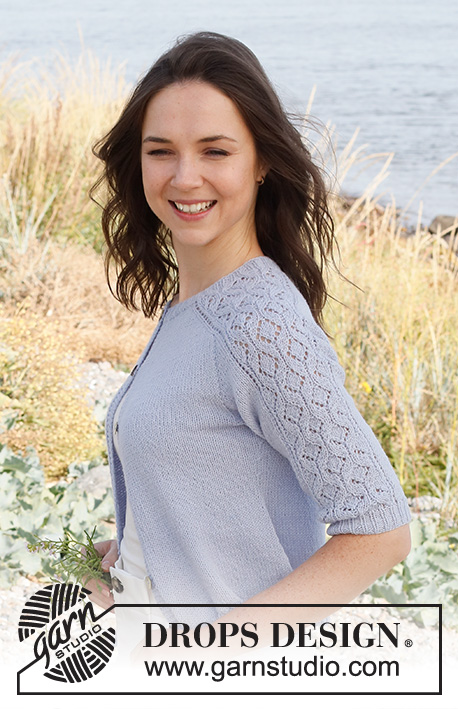
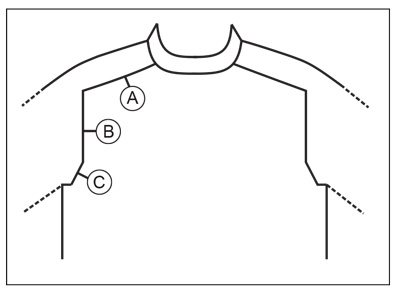
Knitted jacket in DROPS Flora. The piece is worked top down, with saddle shoulders, lace pattern and ¾-length sleeves. Sizes S - XXXL.
DROPS 221-8 |
||||||||||||||||||||||||||||
|
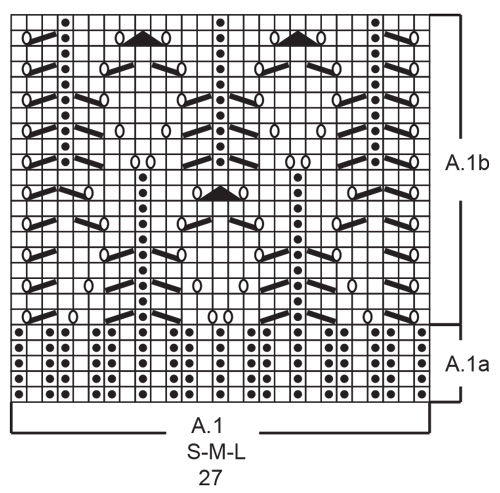
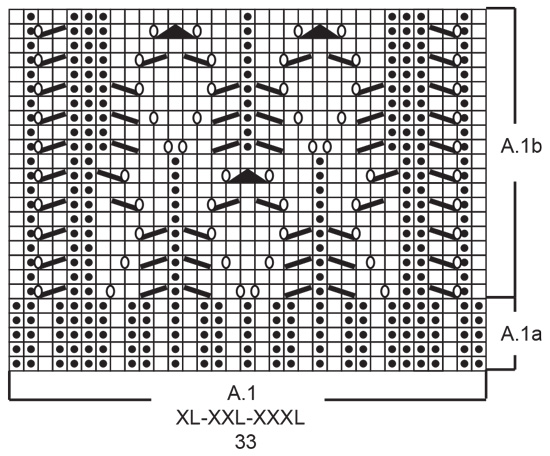
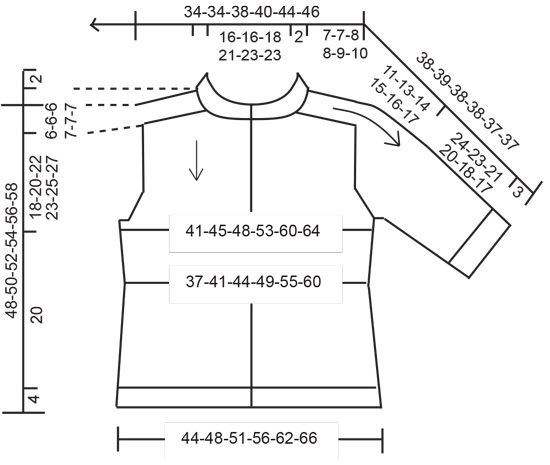
------------------------------------------------------- EXPLANATIONS FOR THE PATTERN: ------------------------------------------------------- RIDGE/GARTER STITCH (worked back and forth): Knit all rows. 1 ridge in height = Knit 2 rows. PATTERN: See diagram A.1. Choose diagram for your size. INCREASE TIP-1 (evenly spaced): To work out how to increase evenly, count the total number of stitches to be increased over (e.g. 14 stitches) and divide by the number of increases to be made (e.g. 6) = 2.3. In this example, increase by making 1 yarn over after alternately each 2nd and 3rd stitch (approx.). On the next row work the yarn overs twisted to avoid holes. INCREASE TIP-2 (from the right side): BEFORE MARKER: The new stitch twists to the right. Use the left needle to pick up the strand between 2 stitches from the previous row, pick up the back strand and knit in the front loop. AFTER MARKER: The new stitch twists to the left. Use the left needle to pick up the strand between 2 stitches from the previous row, pick up the front strand and knit in the back loop. INCREASE TIP-3 (from the wrong side): BEFORE MARKER: The new stitch twists to the right. Use the left needle to pick up the strand between 2 stitches from the previous row, pick up the front strand and purl in the back loop. AFTER MARKER: The new stitch twists to the left. Use the left needle to pick up the strand between 2 stitches from the previous row, pick up the back strand and purl in the front loop. INCREASE TIP-4 (for sides of body): All increases are worked from the right side! Work until there are 3-3-3-4-4-4 stitches left before the marker thread, make 1 yarn over, knit 6-6-6-8-8-8 (marker thread sits in the middle of these stitches) make 1 yarn over. On the next row purl the yarn overs twisted to avoid holes. Then work the new stitches in stocking stitch. DECREASE TIP (for sides of body and sleeves): All increases are worked from the right side! Decrease 1 stitch on either side of the marker thread as follows: Work until there are 4-4-4-5-5-5 stitches left before the marker thread, knit 2 together, knit 4-4-4-6-6-6 (marker thread sits in the middle of these stitches), slip 1 stitch as if to knit, knit 1 and pass the slipped stitch over the knitted stitch. BUTTONHOLES: Work the buttonholes on the right band (when the garment is worn). Decrease from the right side when there are 3 stitches left on the row as follows: Make 1 yarn over, knit 2 together and knit 1. On the next row (wrong side) knit the yarn over to leave a hole. The first buttonhole is worked when the neck measures 1½-2 cm. The remaining 5-5-5-5-5-5 buttonholes are worked with approx. 8-8-8½-9-9-9½ cm between each one. CASTING-OFF TIP: To avoid the cast-off edge being tight you can cast off with a larger size needle. If the edge is still tight, make 1 yarn over after approx. each 3rd or 6th stitch, at the same time as casting off; the yarn overs are cast off as normal stitches. ------------------------------------------------------- START THE PIECE HERE: ------------------------------------------------------- JACKET – SHORT OVERVIEW OF THE PIECE: The neck and yoke are worked back and forth with circular needle from mid front and top down. The yoke is divided for body and sleeves and the body continued back and forth. The sleeves are worked in the round with short circular needle/double pointed needles, top down. NECK: Cast on 122-122-134-146-155-155 stitches (including 5 band stitches on each side towards mid front) with circular needle size 2.5 mm and Flora. Purl 1 row (= wrong side). Now work rib as follows: 5 band stitches in GARTER STITCH – read description above, * knit 1, purl 2 *, work from *-* over the next 12-12-15-15-18-18 stitches, knit 1, purl 1 (= left front piece), work A.1a (choose diagram for your size) over the next 27-27-27-33-33-33 stitches (= left shoulder), purl 1, * knit 1, purl 2 *, work from *-* over the next 27-27-33-33-36-36 stitches, knit 1, purl 1 (= back piece), work A.1a over the next 27-27-27-33-33-33 stitches (= right shoulder), purl 1, knit 1, * purl 2, knit 1 *, work from *-* over the next 12-12-15-15-18-18 stitches and finish with 5 band stitches in garter stitch (= right front piece). A.1a is repeated in height. Continue this rib for 2 cm – adjust so the next row is from the wrong side. Remember the BUTTONHOLES on the right band – read description above. The next row is worked as follows: 5 band stitches in garter stitch, purl 14-14-17-17-20-20 and increase 6-8-3-7-8-8 stitches evenly spaced over these stitches - read INCREASE TIP-1, work pattern as before over the next 27-27-27-33-33-33 stitches, purl 30-30-36-36-39-39 and increase 10-14-10-16-19-19 stitches evenly spaced over these stitches, work pattern as before over the next 27-27-27-33-33-33 stitches, purl 14-14-17-17-20-20 and increase 6-8-3-7-8-8 stitches evenly spaced over these stitches, 5 band stitches in garter stitch = 144-152-150-176-190-190 stitches. Change to circular needles size 3. YOKE: Insert a marker after the band – THE PIECE IS NOW MEASURED FROM HERE! In addition insert 4 other markers as follows – without working the stitches; the markers are inserted between 2 stitches rather than in the stitch and will be used when increasing for the shoulders. Marker 1: Count 25-27-25-29-33-33 stitches (= left front piece), insert marker before the next stitch. Marker 2: Count 27-27-27-33-33-33 stitches from marker 1 (= shoulder), insert marker before the next stitch. Marker 3: Count 40-44-46-52-58-58 stitches from marker 2 (= back piece), insert marker before the next stitch. Marker 4: Count 27-27-27-33-33-33 stitches from marker 3 (= shoulder), insert marker before the next stitch. There are 25-27-25-29-33-33 stitches left after marker 4. Allow the markers to follow your work onwards. INCREASE FOR SADDLE SHOULDERS: Read the whole section before continuing! Continue with A.1b on the shoulders, 5 band stitches in garter stitch on each side and stocking stitch over the remaining stitches. AT THE SAME TIME on the first row from the right side, increase 4 stitches as follows: Increase BEFORE markers 1 and 3 and increase AFTER markers 2 and 4 – read INCREASE TIP-2. You are only increasing on the front and back pieces; the number of shoulder stitches remains the same. On the next row from the wrong side increase 4 stitches as follows: Increase BEFORE markers 4 and 2 and increase AFTER markers 3 and 1 – read INCREASE TIP-3. You increase on EVERY row, in a different way on the right and wrong sides, so the stitches lie neatly. Continue the pattern and increase on every row a total of 22-22-27-27-29-32 times = 232-240-258-284-306-318 stitches (the increased stitches are worked in stocking stitch). REMEMBER THE KNITTING TENSION! After the last increase the piece measures approx. 7-7-8-8-9-10 cm from the marker on the neck. Now increase for the sleeves as described below. INCREASE FOR SLEEVES: Continue the pattern. AT THE SAME TIME on the next row from the right side, increase 4 stitches as follows: Increase AFTER markers 1 and 3 and increase BEFORE markers 2 and 4 – remember INCREASE TIP-2. You are now only increasing on the sleeves and the number of stitches on the front and back pieces remains the same. The increased stitches are worked in stocking stitch. Increase like this every 2nd row (each row from the right side) a total of 18-19-18-19-18-16 times = 304-316-330-360-378-382 stitches. The piece measures approx. 18-19-19-20-20-20 cm from the marker on the neck. Now increase for the yoke as described below. INCREASE FOR YOKE: Move the 4 markers so each marker sits in the outermost sleeve stitches on each side. There are 61-63-61-69-67-63 stitches between the markers on each shoulder. On the next row increase 8 stitches by increasing both before and after each marker-stitch – remember INCREASE TIP-2. You are now increasing on the front and back pieces and on the sleeves, the increased stitches are worked in stocking stitch. Increase like this every 2nd row (each row from the right side) a total of 1-4-4-5-7-9 times = 312-348-362-400-434-454 stitches. When all the increases are finished the piece measures approx. 18-20-22-23-25-27 cm from the marker on the neck. If the piece is shorter than this continue working without further increases to the correct length. Now divide the piece for the body and sleeves on the next row as follows: Work the first 48-53-53-59-66-70 stitches (= front piece), place the next 65-73-77-85-89-91 stitches on a thread for the sleeve, cast on 12-12-16-18-20-22 stitches (= in side under the sleeve), work the next 86-96-102-112-124-132 stitches (= back piece), place the next 65-73-77-85-89-91 stitches on a thread for the sleeve, cast on 12-12-16-18-20-22 stitches (= in side under the sleeve), work the last 48-53-53-59-66-70 stitches (= front piece). Body and sleeves are finished separately. THE PIECE IS NOW MEASURED FROM HERE. BODY: = 206-226-240-266-296-316 stitches. Insert 1 marker thread 54-59-61-68-76-81 stitches in from each side (= sides of body). There are 98-108-118-130-144-154 stitches between the marker threads on the back piece; allow the threads to follow your work onwards, they are used when decreasing and increasing in the sides. Continue with stocking stitch and 5 band stitches in garter stitch on each side. When the piece measures 3 cm from the division, decrease 1 stitch on each side of both marker threads – read DECREASE TIP (= 4 stitches decreased). Decrease like this every 1½ cm a total of 5-5-5-5-5-5 times = 186-206-220-246-276-296 stitches. When the piece measures 11 cm from the division, increase 1 stitch on each side of both marker threads – read INCREASE TIP-4 (= 4 stitches increased). Increase like this every cm a total of 9-9-9-8-8-8 times = 222-242-256-278-308-328 stitches. When the piece measures 20 cm (4 cm left to finished length), increase 11-12-16-21-24-25 stitches evenly spaced = 233-254-272-299-332-353 stitches. Change to circular needle size 2,5. Work rib from the right side as follows: 5 band stitches in garter stitch, * knit 1, purl 2*, work from *-* until there are 6 stitches left, knit 1 and 5 band stitches in garter stitch. When the rib measures 4 cm, cast off with garter stitch over garter stitch, knit over knit and purl over purl – read CASTING-OFF TIP. The jacket measures approx. 48-50-52-54-56-58 cm from the shoulder down. SLEEVES: Place the 65-73-77-85-89-91 stitches from the thread on the one side of the piece on double pointed needles/short circular needle size 3 mm and knit up 1 stitch in each of the 12-12-16-18-20-22 stitches cast on under the sleeve = 77-85-93-103-109-113 stitches. Insert a marker in the middle of the new stitches under the sleeve. Allow the thread to follow your work onwards; it will be used when decreasing under the sleeve. Work pattern as before over the middle 27-27-27-33-33-33 stitches. The other stitches are worked in stocking stitch. When the sleeve measures 3-3-3-3-2-2 cm, decrease 1 stitch on each side of the marker – read DECREASE TIP (= 2 stitches decreased). Decrease like this every 3-2-1½-1-1-1 cm a total of 6-9-12-14-15-15 times = 65-67-69-75-79-83 stitches. Work until the sleeve measures 24-23-21-20-18-17 cm from the division (shorter measurements in larger sizes due to broader shoulders) – or to desired length (3 cm left to finished length). Now increase 1-2-3-3-2-4 stitches evenly over the stocking stitches (stitches in A.1b worked as before) = 66-69-72-78-81-87 stitches. Change to double pointed needles size 2.5 mm. Work A.1a over A.1b, and rib over the remaining stitches (knit 1, purl 2). When the rib measures 3 cm, cast off with knit over knit and purl over purl - remember CASTING-OFF TIP. The sleeve measures approx. 27-26-24-23-21-20 cm from the division. Work the other sleeve in the same way. ASSEMBLY: Sew the buttons onto the left band. |
||||||||||||||||||||||||||||
Diagram explanations |
||||||||||||||||||||||||||||
|
||||||||||||||||||||||||||||
 |
||||||||||||||||||||||||||||
 |
||||||||||||||||||||||||||||
 |
||||||||||||||||||||||||||||
 |
||||||||||||||||||||||||||||
Have you finished this pattern?Tag your pictures with #dropspattern #dancingdiamondscardigan or submit them to the #dropsfan gallery. Do you need help with this pattern?You'll find 33 tutorial videos, a Comments/Questions area and more by visiting the pattern on garnstudio.com. © 1982-2026 DROPS Design A/S. We reserve all rights. This document, including all its sub-sections, has copyrights. Read more about what you can do with our patterns at the bottom of each pattern on our site. |
||||||||||||||||||||||||||||


With over 40 years in knitting and crochet design, DROPS Design offers one of the most extensive collections of free patterns on the internet - translated to 17 languages. As of today we count 325 catalogues and 12298 patterns translated into English (UK/cm).
We work hard to bring you the best knitting and crochet have to offer, inspiration and advice as well as great quality yarns at incredible prices! Would you like to use our patterns for other than personal use? You can read what you are allowed to do in the Copyright text at the bottom of all our patterns. Happy crafting!
Post a comment to pattern DROPS 221-8
We would love to hear what you have to say about this pattern!
If you want to leave a question, please make sure you select the correct category in the form below, to speed up the answering process. Required fields are marked *.