
Popular categories
Looking for a yarn?


Comments / Questions (47)
![]() Josette Testa wrote:
Josette Testa wrote:
Bonjour Je ne comprends pas les explications pour faire l’empiètement après le col et je ne trouve pas de tuto correspondant Pouvez vous m’aider Remerciements
05.05.2021 - 21:04DROPS Design answered:
Bonjour Mme Testa, au 1er rang de l'empiècement, tricotez comme indiqué en plaçant vos marqueurs, en augmentant et en tricotant le 1er rang de A.1, ensuite, augmentez ensuite alternativement 8 et 4 mailles aux marqueurs indiqués pour les épaules comme dans cette vidéo (dans la vidéo, on augmente 8 m). Puis augmentez pour les manches aux marqueurs indiqués (cf cette vidéo. Bon tricot!
06.05.2021 - 07:35
![]() Maureen wrote:
Maureen wrote:
I've been trying to download the pattern but can't seem to save it to my favourites. Can you tell me what I'm doing wrong please?
21.04.2021 - 13:19DROPS Design answered:
Hi Maureen, our patterns can only be printed (or using a virtual printer, you can save them as a .pdf file) - to add them as a favorite, click on the heart on the top at the right side of page and follow instructions. Happy knitting!
21.04.2021 - 13:29
![]() Joyce Geene wrote:
Joyce Geene wrote:
Wanneer komt dit patroon beschikbaar. Wil graag aan de slag
07.04.2021 - 17:38
![]() Sylvia Van Duijvendijk wrote:
Sylvia Van Duijvendijk wrote:
Hele mooie trui mooi patroon ook .wat is de moeilijkheidsgraad ? is t voor beginner of gemiddelde breister. wanneer is t patroon beschikbaar.
28.03.2021 - 20:17DROPS Design answered:
Dag Sylvia,
We geven bij onze patronen geen moeilijkheidsgraden aan omdat dit heel persoonlijk is, afhankelijk van wat voor soort technieken je al beheerst. We hebben wel bij elk patroon instructievideo's staan en je kunt een vraag stellen, mocht je er niet uit komen. We hebben wel een algemene categorie met basispatronen. Ik verwacht dat het patroon ergens eind volgende week online komt.
02.04.2021 - 10:11
![]() Roberta wrote:
Roberta wrote:
Mi piace moltissimo! Bellissimo colore per un interessante modello che sa di fresco e nuovo! Non vedo l'ora che ci siano le spiegazioni per potermelo fare
18.03.2021 - 17:16
![]() Heide wrote:
Heide wrote:
Der Pullover ist einfach toll, ich kann es kaum erwarten ,die Anleitung auszuprobieren !
21.02.2021 - 18:02
![]() Pataud wrote:
Pataud wrote:
Nouveauté pour les emmanchures....j ai hâte de le realiser
12.02.2021 - 14:02
![]() Sylvette wrote:
Sylvette wrote:
Très raffiné, j'adore le motif
09.02.2021 - 12:43
![]() Daisy Frantzen wrote:
Daisy Frantzen wrote:
Dit vind ik een heel mooie en sierlijke trui. deze wil ik beslist gaan maken!
05.02.2021 - 11:40
![]() Astrid wrote:
Astrid wrote:
Toll
11.01.2021 - 15:23
|
|||||||||||||||||||||||||||||||
Easy Twist#easytwistsweater |
|||||||||||||||||||||||||||||||
 |
 |
||||||||||||||||||||||||||||||
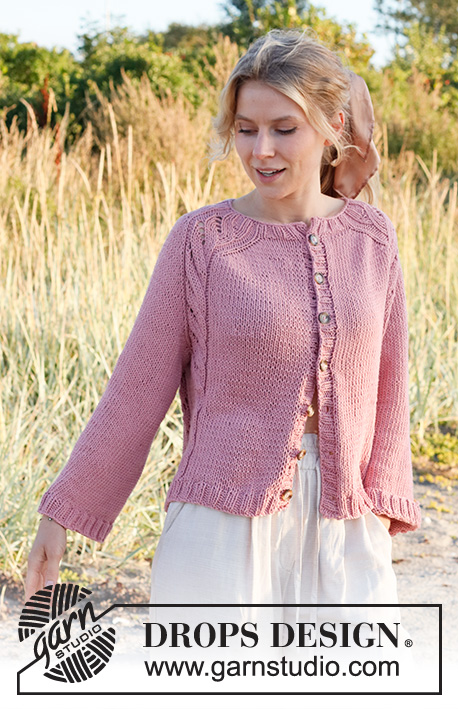
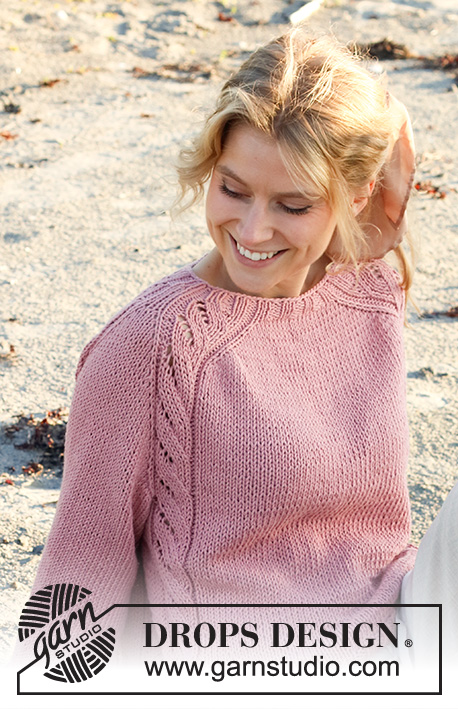
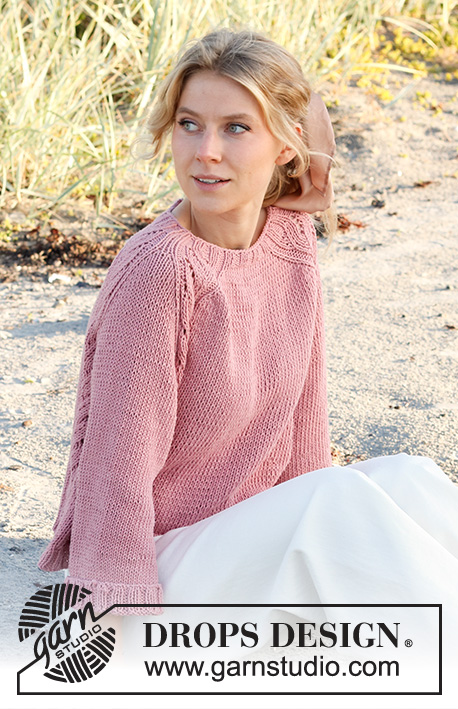
Knitted jumper in DROPS Paris. Piece is knitted top down with saddle shoulders and lace pattern. Size: S - XXXL
DROPS 221-36 |
|||||||||||||||||||||||||||||||
|
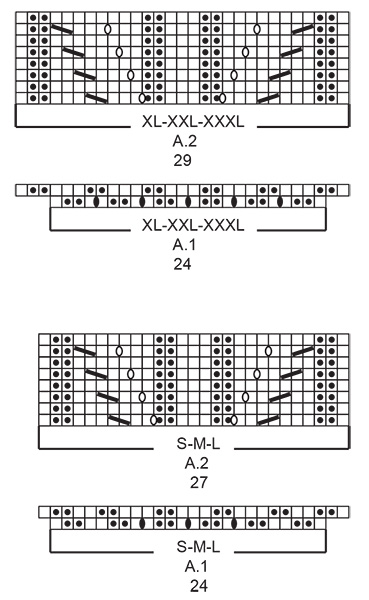
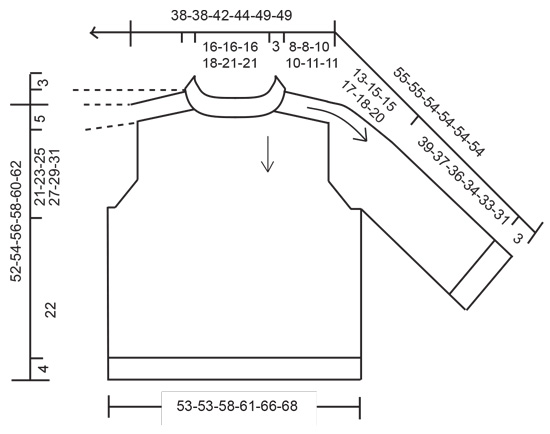
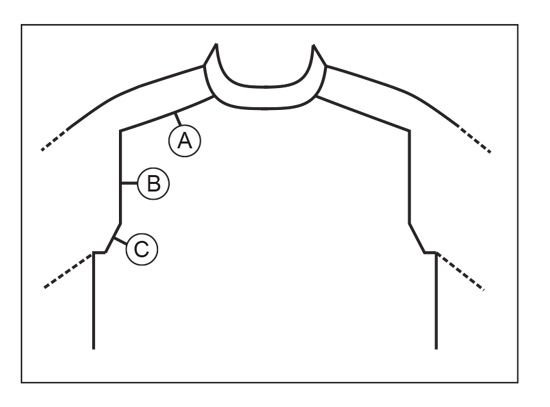
------------------------------------------------------- EXPLANATION FOR THE PATTERN: ------------------------------------------------------- PATTERN: See diagrams A.1 and A.2. Choose diagram for your size. INCREASE TIP-1 (evenly): To calculate how to increase evenly, count the stitches to be increased (e.g. 8 stitches) and divide by stitches of increases to be done (e.g. 2) = 4. In this example increase by making 1 yarn over after every 4th stitch. On next round work yarn overs twisted to avoid holes. INCREASE TIP-2: BEFORE MARKER: The stitch is twisted towards the right. Use left needle to pick up thread between 2 stitches from round below, pick up thread from behind and knit stitch in front loop. AFTER MARKER: The stitch is twisted towards the left. Use left needle to pick up thread between 2 stitches from round below, pick up thread from front and knit stitch in back loop. DECREASE TIP (applies to sleeves in size XL-XXL-XXXL): Decrease 1 stitch on each side of marker as follows: Work until 3 stitches remain before marker, knit 2 together, knit 2 (marker is between these stitches), slip 1 stitch knitwise, knit 1, pass slipped stitch over stitch worked. CAST-OFF TIP: To avoid a tight cast-off edge you may use a larger needle size. If this also is too tight, work a 1 yarn over after approx. every 4th stitch while casting off (cast off yarn overs as regular stitches). ------------------------------------------------------- START THE PIECE HERE: ------------------------------------------------------- JUMPER - SHORT OVERVIEW OF THE PIECE: Work neck edge and yoke in the round on circular needle from mid back, top down. Increase stitches for saddle shoulder, then increase stitches for yoke, and finally increase stitches for sleeves. Now divide yoke for body and sleeves. Body is worked in the round on circular needle, top down. Work sleeves in the round on double pointed needles/short circular needle, top down. NECK EDGE: Cast on 76-76-80-84-88-88 stitches on a short circular needle size 4.5 mm with Paris. Knit 1 round. Then work rib as follows: Knit 1, * purl 2, knit 2 *, repeat from *-* until 3 stitches remain, finish with purl 2 and knit 1. Continue rib like this for 3 cm. YOKE: On next round increase stitches evenly, insert 4 markers in piece. Use markers when increasing for saddle shoulder. Work as follows: 8 stitches in stocking stitch and increase 1-1-1-2-4-4 stitches evenly over these stitches – read INCREASE TIP-1 (= half back piece), insert 1st marker, A.1 over the next 24 stitches (i.e. knit over knit and purl over purl and increase as shown in diagram = shoulder stitches), insert 2nd marker, 12-12-16-20-24-24 stitches in stocking stitch and increase 6-6-2-0-0-0 stitches evenly over these stitches (= front piece), insert 3rd marker, A.1 over the next 24 stitches (i.e. knit over knit and purl over purl and increase as shown in diagram = shoulder stitches), insert 4th marker, 8 stitches in stocking stitch and increase 1-1-1-2-4-4 stitches evenly over these stitches = 90-90-90-98-106-106 stitches. Move markers upwards when working. Switch to circular needle size 5.5 mm. Insert 1 marker after 45-45-45-49-53-53 stitches (= mid front), measure yoke from this marker! SADDLE SHOULDER INCREASE: Read all of the following section before working! Continue to knit piece with A.2 over stitches in A.1 (27-27-27-29-29-29 stitches), and stocking stitch over stitches on front piece and back piece. AT THE SAME TIME on first round increase 4 stitches for saddle shoulder as follows: Increase BEFORE 1st and 3rd marker and increase AFTER 2nd and 4th marker – read INCREASE TIP-2. Now increase only on front piece and back piece, and number of shoulder stitches remains the same. REMEMBER THE KNITTING TENSION! Repeat A.2 vertically. Continue pattern like this, and increase the same way on every round 10-10-12-12-12-12 times (= 130-130-138-146-154-154 stitches). YOKE INCREASE: Now move 2 of the markers and insert 4 new markers without working the stitches as follows: Leave 1st marker, count 13-13-13-14-14-14 stitches of A.2, insert 2nd marker, count 1 stitches of A.2 (= mid on top of shoulder), insert 3rd marker, count 13-13-13-14-14-14 stitches of A.2, insert 4th marker, leave next marker (i.e. before next A.2 = 5th marker), count 13-13-13-14-14-14 stitches of A.2, insert 6th marker, count 1 stitch of A.2, insert 7th marker, count 13-13-13-14-14-14 stitches and insert 8th marker. On next round continue with pattern as before, and increase as follows: Increase 1 stitch before 1st, 3th, 5th and 7th marker and 1 stitch after 2nd, 4th, 6th and 8th marker (= 8 stitches increased in total). On next round increase before 1st and 5th marker and after 4th and 8th marker (= 4 stitches increased in total). Repeat these two rounds, increase alternately 8 and 4 stitches - remember INCREASE TIP-2. Work the increased stitches in stocking stitch, i.e. there are 2 stitches more between lace pattern in every A.2 for every increase from right side. Increase for body on every round, and for sleeve every other round. Increase for body 6-6-8-8-10-10 more times (i.e. increase has been done 16-16-20-20-22-22 times in total from neck edge) and 3-3-4-4-5-5 times in total for sleeve = 166-166-186-194-214-214 stitches. Piece now measures 8-8-10-10-11-11 cm from marker. SLEEVE INCREASE: Continue with stocking stitch and A.2 as before. Continue to increase after 2nd and 6th marker and before 3rd and 7th marker (= 4 stitches increased in total). Increase like this every other round 10-12-13-14-14-16 more times in total (i.e. 13-15-17-18-19-21 increases have been done in total on sleeve) = 206-214-238-250-270-278 stitches. Piece measures approx. 18-20-23-24-25-27 cm. Work until piece measures 18-20-23-24-25-27 cm (approx. 3-3-2-3-4-4 cm remain). Now increase on every round 6-6-4-6-8-8 times in total = 230-238-254-274-302-310 stitches. Piece now measures 21-23-25-27-29-31 cm from marker in the neck. On next round divide piece for body and sleeves as follows: Work 25-25-29-30-34-34 stitches in stocking stitch, pattern as before over the next 12-12-12-13-13-13 stitches (= ½ back piece), slip the next 41-45-45-51-57-61 stitches on a stitch holder for sleeve and cast on 10-10-10-12-12-14 stitches under sleeve, pattern as before over the next 12-12-12-13-13-13 stitches, 50-50-58-60-68-68 stitches in stocking stitch, pattern as before over the next 12-12-12-13-13-13 stitches (= front piece), slip the next 41-45-45-51-57-61 stitches on a stitch holder for sleeve and cast on 10-10-10-12-12-14 stitches under sleeve, pattern as before over the next 12-12-12-13-13-13 stitches, finish with 25-25-29-30-34-34 stitches in stocking stitch (= half back piece). BODY: = 168-168-184-196-212-216 stitches. Continue with stocking stitch and pattern as before. Work stitches under sleeve in stocking stitch When piece measures 22 cm from division (or to desired length, approx. 4 cm remain), increase 8 stitches evenly on next round = 176-176-192-204-220-224 stitches. Switch to circular needle size 4.5 mm and work rib = knit 2/purl 2. Continue like this until rib measures 4 cm. Cast off by knitting - read CAST-OFF TIP. Jumper measures approx. 52-54-56-58-60-62 cm from shoulder. SLEEVES: Slip the 41-45-45-51-57-61 stitches from stitch holder in one side of piece double pointed needles/a short circular needle size 5.5 mm and pick in addition up 1 stitch in each of the 10-10-10-12-12-14 new stitches cast on under sleeve = 51-55-55-63-69-75 stitches. Work in stocking stitch in the round. In size XL-XXL-XXXL decrease stitches as follows: SIZE XL-XXL-XXXL: Insert 1 marker in the middle of the 12-12-14 stitches cast on under sleeve. Decrease stitches on each side of this marker later. When sleeve measures 5 cm from division, decrease 1 stitch on each side of the marker - read DECREASE TIP. Decrease like this every 12-10-5 cm 1-3-5 times in total = 61-63-65 stitches. ALL SIZES: = 51-55-55-61-63-65 stitches. Work in stocking stitch until piece measures 39-37-36-34-33-31 cm (or desired length, approx. 3 cm remain). On next round increase 13-13-13-11-13-11 stitches evenly = 64-68-68-72-76-76 stitches. Switch to double pointed needles/short circular needle size 4.5 mm. Work rib (= knit 2/purl 2) over all stitches. Cast off by knitting when rib measures 3 cm. Work the other sleeve the same way. |
|||||||||||||||||||||||||||||||
Diagram explanations |
|||||||||||||||||||||||||||||||
|
|||||||||||||||||||||||||||||||
 |
|||||||||||||||||||||||||||||||
 |
|||||||||||||||||||||||||||||||
 |
|||||||||||||||||||||||||||||||
Have you finished this pattern?Tag your pictures with #dropspattern #easytwistsweater or submit them to the #dropsfan gallery. Do you need help with this pattern?You'll find 28 tutorial videos, a Comments/Questions area and more by visiting the pattern on garnstudio.com. © 1982-2026 DROPS Design A/S. We reserve all rights. This document, including all its sub-sections, has copyrights. Read more about what you can do with our patterns at the bottom of each pattern on our site. |
|||||||||||||||||||||||||||||||


With over 40 years in knitting and crochet design, DROPS Design offers one of the most extensive collections of free patterns on the internet - translated to 17 languages. As of today we count 325 catalogues and 12298 patterns translated into English (UK/cm).
We work hard to bring you the best knitting and crochet have to offer, inspiration and advice as well as great quality yarns at incredible prices! Would you like to use our patterns for other than personal use? You can read what you are allowed to do in the Copyright text at the bottom of all our patterns. Happy crafting!
Post a comment to pattern DROPS 221-36
We would love to hear what you have to say about this pattern!
If you want to leave a question, please make sure you select the correct category in the form below, to speed up the answering process. Required fields are marked *.