
Popular categories
Looking for a yarn?


Comments / Questions (47)
![]() Birgitte Bjerggaard wrote:
Birgitte Bjerggaard wrote:
Kan man strikke forhøjer i nakken af denne bluse ( Easy twist ) ? Og i så fald inden mannstarter på mønster og ralang
02.02.2026 - 20:05DROPS Design answered:
Hej Birgitte, Vi kan desværre ikke hjælpe dig med det, men selvfølgelig må du det :)
04.02.2026 - 13:37
![]() ÁNGELA wrote:
ÁNGELA wrote:
Podrían por favor incorporar un traductor de los comentarios? Sería muy útil porque muchas dudas de las compañeras son las mismas que yo tengo y quedarían resueltas si pudiera entender las respuestas. Gracias
15.07.2025 - 09:55
![]() ÁNGELA wrote:
ÁNGELA wrote:
Después de terminar los aumentos para el canesú empezamos los aumentos solo en las mangas. Qué quiere decir "aumentar cada segunda vuelta"? Que decir que en la primera vuelta que se hace se aumenta y en la siguiente no y así sucesivamente hasta aumentar 10 veces para la talla S? Gracias
15.07.2025 - 09:52DROPS Design answered:
Hola Ángela, en los aumentos para el canesú vas a aumentar en cada vuelta para el cuerpo y cada 2ª vuelta para las mangas. Esto quiere decir que trabajas todas las vueltas con aumentos, pero solo aumentas en las mangas en 1 de cada 2 vueltas o en vueltas alternas. Trabajas 10 vueltas en total, por lo que serán 5 vueltas con aumentos solo para el cuerpo (5 vueltas de 4 aumentos) y 5 vueltas con aumentos para las mangas y cuerpo (solo 1 de cada 2; con 8 aumentos), alternando entre ellas.
16.07.2025 - 11:03
![]() Ilse Olieroock wrote:
Ilse Olieroock wrote:
Er staat onderaan het patroon dat er 27 instructievideo 's zijn. Als ik op instructievideo klik krijg ik iets over oa vierkantjes haken. Maar niks over het patroon van easy twist. Waar kan ik dat vinden.
05.10.2024 - 12:50DROPS Design answered:
Dag Ilse,
Er zijn niet specifiek voor deze trui filmpjes gemaakt, maar voor de meeste technieken die in de trui gebruikt worden zijn instructievideo's. Je komt bij deze video's door bovenaan het patroon, rechts naast de afbeelding op het vetgedrukte woord 'Video's' te klikken.
06.10.2024 - 09:36
![]() Gigi wrote:
Gigi wrote:
I have worked the pattern successfully until the sleeve increase section. I assume there are no more increases made on the front and back while still increasing the sleeves in this section. While doing this for the requisite 12 more times, I am left with only 186 stitches not 214 as stated in the pattern. I’m not sure what I am doing incorrectly. Please help.
07.09.2023 - 22:42DROPS Design answered:
Dear Gigi, exact you should now increase only on sleeve (= 4 sts increased on each increase round), increase 2 sts on each sleeve a total of 12 times on every other round = 48 sts are increased in total + 166 = 214 sts. Hope it can help. Happy knitting!
08.09.2023 - 08:13
![]() Paulette Pol wrote:
Paulette Pol wrote:
"augmenter 8 mailles à intervalles réguliers suivant sur l'envers" sur la fin du dos/devant, ça revient, si j'ai bien compris à passer de 2 à 3 mailles envers sur chacun des tronçons en mailles envers. Ai-je tout bon ou est-ce autre chose? Merci de me rassurer et surtout merci de votre patience devant nos questions parfois un peu "nunuches".
09.02.2023 - 03:23DROPS Design answered:
Bonjour Mme Pol, en fait, vous allez répartir ces 8 augmentations sur le tour entier (pas seulement dans les mailles envers, mais bien sur tout le tour), il s'agit ici d'une petite erreur que je vais transmettre de ce pas à nos stylistes pour correction. Merci de l'avoir relevée (et j'en ai profité pour ajouter le mot manquant). Bon tricot!
09.02.2023 - 09:56
![]() Nella Forsius wrote:
Nella Forsius wrote:
Hei, haluaisin vielä "täydentää"kysymystäni merkkilangoista.. . Tuleeko siis ( satulaolkapään lisäykset mallissa 221/36) jokaisen merkkilangan kohdalla aina lisätyn silmukan jälkeen? ystävällisesti Nella Forsius
12.09.2022 - 15:25
![]() Nella Forsius wrote:
Nella Forsius wrote:
HEI, siirtyykö merkkilanka kun lisätään satulaolkapääSilmukat?
10.09.2022 - 09:28DROPS Design answered:
Hei, merkkilanka pysyy aina samassa kohdassa.
22.09.2022 - 16:51
![]() Monika wrote:
Monika wrote:
Witam, DODAWANIE OCZEK NA RAMIONA /RĘKAWY SADDLE SHOULDER. Robię Sobie rozmiar. Mam jeszce pytanko, jak mam dodać dziesięć razy oczka na przód I tył a w tym samym czasie a2 wynosi tylko 8 rzędów na wysokość..? Dziękuję
27.07.2022 - 09:40DROPS Design answered:
Witaj, schemat A.2 jest powtarzany na całej długości swetra, więc przerabiasz go od początku (od prawego dolnego rogu schematu). Pozdrawiamy!
27.07.2022 - 10:55
![]() Monika wrote:
Monika wrote:
Witam, mam pytanie. "DODAWANIE OCZEK NA RAMIONA /RĘKAWY SADDLE SHOULDER" "Dalej przerabiać tak samo i dodawać oczka w taki sam sposób 10-10-12-12-12-12 razy w każdym okrążeniu" Czyli dodaje w każdym czy jakby tylko co drugim, jakby tylko podczas okrążenia w którym robię narzuty przy A2? Dziękuję
26.07.2022 - 13:42DROPS Design answered:
Witaj Moniko, NA RAMIONA /RĘKAWY SADDLE SHOULDER dodajesz 1 oczko PRZED 1-szym i 3-cim markerem i 1 oczko ZA 2-gim i 4-tym markerem (dodane 4 oczka w okrążeniu). Wykonujesz to samo 10-10-12-12-12-12 razy w każdym okrążeniu (czyli przez 10 lub 12 kolejnych okrążeń - zależnie od rozmiaru - dodajesz po 4 oczka w każdym okrążeniu). Patrz DODAWANIE OCZEK-2. Miłej pracy!
26.07.2022 - 21:03
|
|||||||||||||||||||||||||||||||
Easy Twist#easytwistsweater |
|||||||||||||||||||||||||||||||
 |
 |
||||||||||||||||||||||||||||||
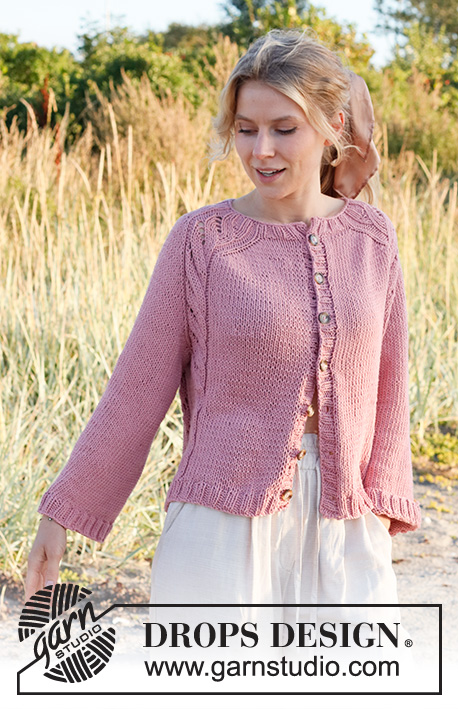
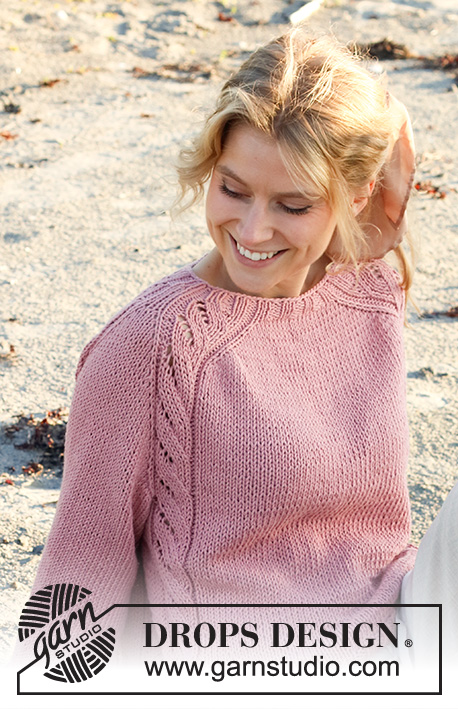
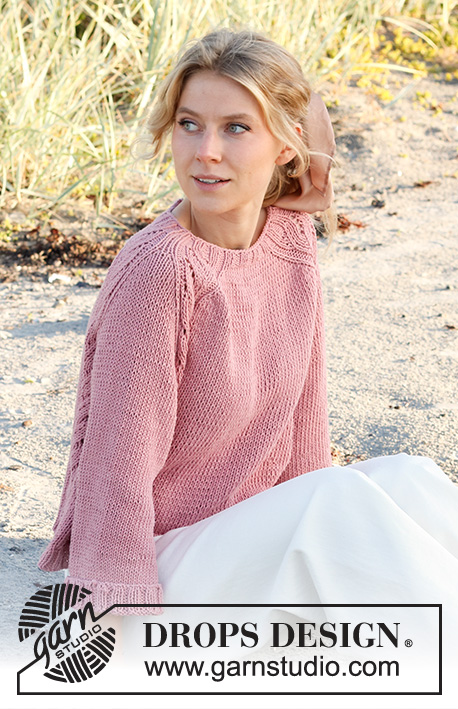
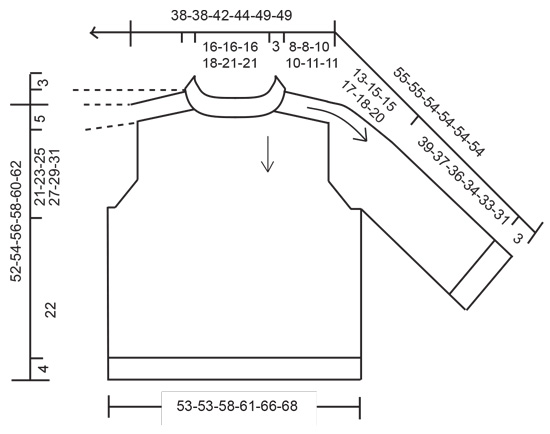
Knitted jumper in DROPS Paris. Piece is knitted top down with saddle shoulders and lace pattern. Size: S - XXXL
DROPS 221-36 |
|||||||||||||||||||||||||||||||
|
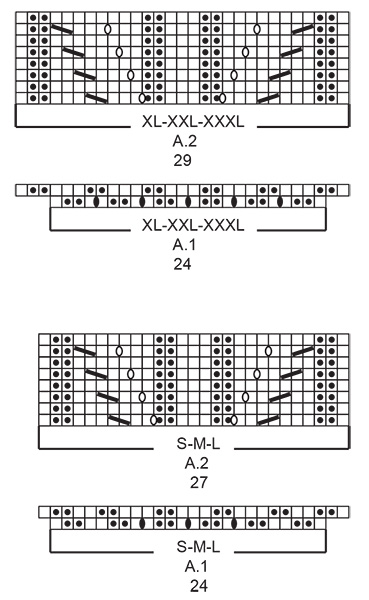
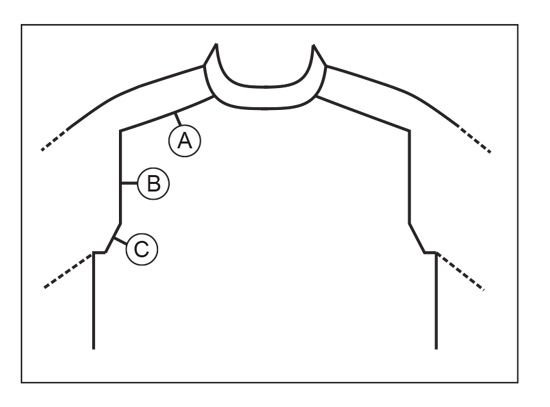
------------------------------------------------------- EXPLANATION FOR THE PATTERN: ------------------------------------------------------- PATTERN: See diagrams A.1 and A.2. Choose diagram for your size. INCREASE TIP-1 (evenly): To calculate how to increase evenly, count the stitches to be increased (e.g. 8 stitches) and divide by stitches of increases to be done (e.g. 2) = 4. In this example increase by making 1 yarn over after every 4th stitch. On next round work yarn overs twisted to avoid holes. INCREASE TIP-2: BEFORE MARKER: The stitch is twisted towards the right. Use left needle to pick up thread between 2 stitches from round below, pick up thread from behind and knit stitch in front loop. AFTER MARKER: The stitch is twisted towards the left. Use left needle to pick up thread between 2 stitches from round below, pick up thread from front and knit stitch in back loop. DECREASE TIP (applies to sleeves in size XL-XXL-XXXL): Decrease 1 stitch on each side of marker as follows: Work until 3 stitches remain before marker, knit 2 together, knit 2 (marker is between these stitches), slip 1 stitch knitwise, knit 1, pass slipped stitch over stitch worked. CAST-OFF TIP: To avoid a tight cast-off edge you may use a larger needle size. If this also is too tight, work a 1 yarn over after approx. every 4th stitch while casting off (cast off yarn overs as regular stitches). ------------------------------------------------------- START THE PIECE HERE: ------------------------------------------------------- JUMPER - SHORT OVERVIEW OF THE PIECE: Work neck edge and yoke in the round on circular needle from mid back, top down. Increase stitches for saddle shoulder, then increase stitches for yoke, and finally increase stitches for sleeves. Now divide yoke for body and sleeves. Body is worked in the round on circular needle, top down. Work sleeves in the round on double pointed needles/short circular needle, top down. NECK EDGE: Cast on 76-76-80-84-88-88 stitches on a short circular needle size 4.5 mm with Paris. Knit 1 round. Then work rib as follows: Knit 1, * purl 2, knit 2 *, repeat from *-* until 3 stitches remain, finish with purl 2 and knit 1. Continue rib like this for 3 cm. YOKE: On next round increase stitches evenly, insert 4 markers in piece. Use markers when increasing for saddle shoulder. Work as follows: 8 stitches in stocking stitch and increase 1-1-1-2-4-4 stitches evenly over these stitches – read INCREASE TIP-1 (= half back piece), insert 1st marker, A.1 over the next 24 stitches (i.e. knit over knit and purl over purl and increase as shown in diagram = shoulder stitches), insert 2nd marker, 12-12-16-20-24-24 stitches in stocking stitch and increase 6-6-2-0-0-0 stitches evenly over these stitches (= front piece), insert 3rd marker, A.1 over the next 24 stitches (i.e. knit over knit and purl over purl and increase as shown in diagram = shoulder stitches), insert 4th marker, 8 stitches in stocking stitch and increase 1-1-1-2-4-4 stitches evenly over these stitches = 90-90-90-98-106-106 stitches. Move markers upwards when working. Switch to circular needle size 5.5 mm. Insert 1 marker after 45-45-45-49-53-53 stitches (= mid front), measure yoke from this marker! SADDLE SHOULDER INCREASE: Read all of the following section before working! Continue to knit piece with A.2 over stitches in A.1 (27-27-27-29-29-29 stitches), and stocking stitch over stitches on front piece and back piece. AT THE SAME TIME on first round increase 4 stitches for saddle shoulder as follows: Increase BEFORE 1st and 3rd marker and increase AFTER 2nd and 4th marker – read INCREASE TIP-2. Now increase only on front piece and back piece, and number of shoulder stitches remains the same. REMEMBER THE KNITTING TENSION! Repeat A.2 vertically. Continue pattern like this, and increase the same way on every round 10-10-12-12-12-12 times (= 130-130-138-146-154-154 stitches). YOKE INCREASE: Now move 2 of the markers and insert 4 new markers without working the stitches as follows: Leave 1st marker, count 13-13-13-14-14-14 stitches of A.2, insert 2nd marker, count 1 stitches of A.2 (= mid on top of shoulder), insert 3rd marker, count 13-13-13-14-14-14 stitches of A.2, insert 4th marker, leave next marker (i.e. before next A.2 = 5th marker), count 13-13-13-14-14-14 stitches of A.2, insert 6th marker, count 1 stitch of A.2, insert 7th marker, count 13-13-13-14-14-14 stitches and insert 8th marker. On next round continue with pattern as before, and increase as follows: Increase 1 stitch before 1st, 3th, 5th and 7th marker and 1 stitch after 2nd, 4th, 6th and 8th marker (= 8 stitches increased in total). On next round increase before 1st and 5th marker and after 4th and 8th marker (= 4 stitches increased in total). Repeat these two rounds, increase alternately 8 and 4 stitches - remember INCREASE TIP-2. Work the increased stitches in stocking stitch, i.e. there are 2 stitches more between lace pattern in every A.2 for every increase from right side. Increase for body on every round, and for sleeve every other round. Increase for body 6-6-8-8-10-10 more times (i.e. increase has been done 16-16-20-20-22-22 times in total from neck edge) and 3-3-4-4-5-5 times in total for sleeve = 166-166-186-194-214-214 stitches. Piece now measures 8-8-10-10-11-11 cm from marker. SLEEVE INCREASE: Continue with stocking stitch and A.2 as before. Continue to increase after 2nd and 6th marker and before 3rd and 7th marker (= 4 stitches increased in total). Increase like this every other round 10-12-13-14-14-16 more times in total (i.e. 13-15-17-18-19-21 increases have been done in total on sleeve) = 206-214-238-250-270-278 stitches. Piece measures approx. 18-20-23-24-25-27 cm. Work until piece measures 18-20-23-24-25-27 cm (approx. 3-3-2-3-4-4 cm remain). Now increase on every round 6-6-4-6-8-8 times in total = 230-238-254-274-302-310 stitches. Piece now measures 21-23-25-27-29-31 cm from marker in the neck. On next round divide piece for body and sleeves as follows: Work 25-25-29-30-34-34 stitches in stocking stitch, pattern as before over the next 12-12-12-13-13-13 stitches (= ½ back piece), slip the next 41-45-45-51-57-61 stitches on a stitch holder for sleeve and cast on 10-10-10-12-12-14 stitches under sleeve, pattern as before over the next 12-12-12-13-13-13 stitches, 50-50-58-60-68-68 stitches in stocking stitch, pattern as before over the next 12-12-12-13-13-13 stitches (= front piece), slip the next 41-45-45-51-57-61 stitches on a stitch holder for sleeve and cast on 10-10-10-12-12-14 stitches under sleeve, pattern as before over the next 12-12-12-13-13-13 stitches, finish with 25-25-29-30-34-34 stitches in stocking stitch (= half back piece). BODY: = 168-168-184-196-212-216 stitches. Continue with stocking stitch and pattern as before. Work stitches under sleeve in stocking stitch When piece measures 22 cm from division (or to desired length, approx. 4 cm remain), increase 8 stitches evenly on next round = 176-176-192-204-220-224 stitches. Switch to circular needle size 4.5 mm and work rib = knit 2/purl 2. Continue like this until rib measures 4 cm. Cast off by knitting - read CAST-OFF TIP. Jumper measures approx. 52-54-56-58-60-62 cm from shoulder. SLEEVES: Slip the 41-45-45-51-57-61 stitches from stitch holder in one side of piece double pointed needles/a short circular needle size 5.5 mm and pick in addition up 1 stitch in each of the 10-10-10-12-12-14 new stitches cast on under sleeve = 51-55-55-63-69-75 stitches. Work in stocking stitch in the round. In size XL-XXL-XXXL decrease stitches as follows: SIZE XL-XXL-XXXL: Insert 1 marker in the middle of the 12-12-14 stitches cast on under sleeve. Decrease stitches on each side of this marker later. When sleeve measures 5 cm from division, decrease 1 stitch on each side of the marker - read DECREASE TIP. Decrease like this every 12-10-5 cm 1-3-5 times in total = 61-63-65 stitches. ALL SIZES: = 51-55-55-61-63-65 stitches. Work in stocking stitch until piece measures 39-37-36-34-33-31 cm (or desired length, approx. 3 cm remain). On next round increase 13-13-13-11-13-11 stitches evenly = 64-68-68-72-76-76 stitches. Switch to double pointed needles/short circular needle size 4.5 mm. Work rib (= knit 2/purl 2) over all stitches. Cast off by knitting when rib measures 3 cm. Work the other sleeve the same way. |
|||||||||||||||||||||||||||||||
Diagram explanations |
|||||||||||||||||||||||||||||||
|
|||||||||||||||||||||||||||||||
 |
|||||||||||||||||||||||||||||||
 |
|||||||||||||||||||||||||||||||
 |
|||||||||||||||||||||||||||||||
Have you finished this pattern?Tag your pictures with #dropspattern #easytwistsweater or submit them to the #dropsfan gallery. Do you need help with this pattern?You'll find 28 tutorial videos, a Comments/Questions area and more by visiting the pattern on garnstudio.com. © 1982-2026 DROPS Design A/S. We reserve all rights. This document, including all its sub-sections, has copyrights. Read more about what you can do with our patterns at the bottom of each pattern on our site. |
|||||||||||||||||||||||||||||||


With over 40 years in knitting and crochet design, DROPS Design offers one of the most extensive collections of free patterns on the internet - translated to 17 languages. As of today we count 325 catalogues and 12298 patterns translated into English (UK/cm).
We work hard to bring you the best knitting and crochet have to offer, inspiration and advice as well as great quality yarns at incredible prices! Would you like to use our patterns for other than personal use? You can read what you are allowed to do in the Copyright text at the bottom of all our patterns. Happy crafting!
Post a comment to pattern DROPS 221-36
We would love to hear what you have to say about this pattern!
If you want to leave a question, please make sure you select the correct category in the form below, to speed up the answering process. Required fields are marked *.