
Popular categories
Looking for a yarn?


Comments / Questions (42)
![]() Jenni Damborg wrote:
Jenni Damborg wrote:
Hej igen. Hvordan skal jeg så strikke således at slå om maske ved ærmet ikke forstyrrer mønster? Bliver ærmet udvidet fra 14 masker til flere eller hvordan skal omslaget strikkes/passe ind i mønster? Håber I kan hjælpe.
27.11.2023 - 10:01DROPS Design answered:
Hei Jenni. På forstykkene og bakstykket inngår raglanøkningen i diagrammene (se i diagrammene hvordan kastene skal strikkes på neste omgang). Det er ingen mønster på ermene. Du øker til ermene etter 1. og 3.merke og før 2. og 4.merke ved å lage et kast om pinnen. Kastene strikkes vridd vrang på neste pinne (= fra vrangen). Videre strikkes de nye maskene i glattstrikk. mvh DROPS Design
27.11.2023 - 11:33
![]() Jenni Damborg wrote:
Jenni Damborg wrote:
Jeg strikker str 2 år og kan får 99 masker i stedet for 95 til start. Jeg kan se at problemet er ved start og slut ærmer. Jeg tæller 1 m glatstrik, 1 slåom, 14 glatstrik, 1 slåom, 1 glatstrik. Dette giver 18 masker men kan se i jeres andre kommentarer at der kun skal være 16 masker. Defor forskel på 2x2 masker, altså 4 for meget. Hvad har jeg misforstået? På forhånd tak for hjælpen
25.11.2023 - 09:59DROPS Design answered:
Hei Jenni. Ikke tell kastene (slå om) som en maske, altså slik skal du telle: 1 m glatstrik + 14 glatstrik + 1 glatstrik = 16 masker. mvh DROPS Design
27.11.2023 - 09:10
![]() Dagmar Povlsen wrote:
Dagmar Povlsen wrote:
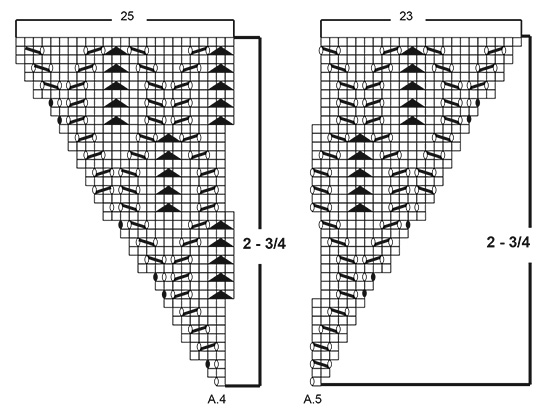
Jeg er nybegynder og forstår ikke raglan udtagningerne, her står at raglanudtagningerne indgår i diagrammerne ??? Vil i beskrive hvordan jeg skal tage ud til ærmerne så jeg ender med 259 masker Skal mønster A. 5 også læses fra venstre mod højre
01.11.2023 - 11:23DROPS Design answered:
Hei Dagmar. På forstykkene og bakstykket inngår raglanøkningen i diagrammene (A.4 og A.5), men raglanøkningene til ermene er forklar under RAGLAN. Når du strikker fra retten, leses diagrammene fra høyre til venstre. Når du strikker vra vrangen leses diagrammene fra venstre mot høyre. mvh DROPS Design
06.11.2023 - 10:13
![]() Maria wrote:
Maria wrote:
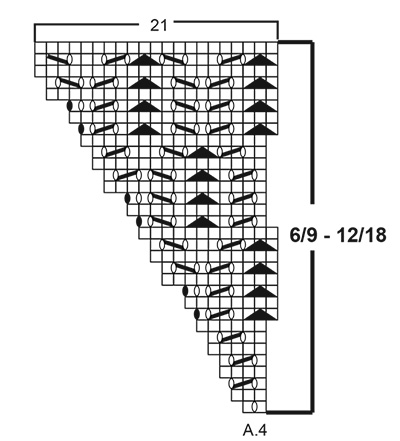
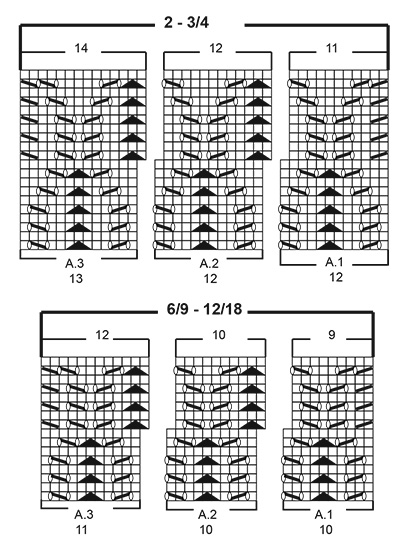
I am knitting the yoke for size 12/18 and the instructions for the left front indicate to follow the pattern A4 (=2-2(1-1-3-3) stitches. Which A4 shall I use?. There are A4 for 2-3/4, A.4 for 6/9-12/18, and A.4 for 5/6-7/8. Also, I had assumed the back was in stockinette stitch, but apparently it is in the decorative stitch. The instructions to start the back piece indicate to use A.5 (size 6/9 and A.2 over 20-20 stitches for size 12/18, etc. Am I misreading the pattern? Thanks for your help
28.07.2023 - 03:28DROPS Design answered:
Hi Maria, You use A.4 for sizes 6/9 and 12/18 on the left front piece On the back piece you use A.5 as you rightly suggest (for size 12/18). Happy knitting!
28.07.2023 - 06:47
![]() Maria Taub wrote:
Maria Taub wrote:
I would appreciate your help. I am trying to make size 12/18 months of Sweet Marigold jacket. Unfortunately, I do not understand the instructions on how to start the design for the front pieces. Looking at the diagrams on pages 7 to 11 (in English) I see A1, A2, and A3 only for bigger sizes. Thank you very much for explaining to me how to do this beautiful design.
25.07.2023 - 23:28DROPS Design answered:
Hi Maria, Diagrams A.1, A.2 and A.3 for 12/18 months are the fourth row of diagrams from the top. Happy knitting!
26.07.2023 - 06:42
![]() Suzanne MacDonald wrote:
Suzanne MacDonald wrote:
Hi, I am knitting size 2-3/4 and am having trouble with A.5. It seems to me that there are more increases than shown on the pattern for the next row. For example, in row 11, it shows two yarn overs and one stitch increase which would result in two additional stitches, but only one additional stitch is shown in the pattern. This seems to occur again for rows 13 (3 increases but only two shown on pattern) and again in 15, 17 and 19. Please help, thanks
01.07.2023 - 09:38DROPS Design answered:
Dear Mrs MacDonald, correct you are increasing sometimes only 1 stitch (eg row 1, 3,5 in A.5) and sometimes 2 sts (row 11, 13, 19... in A.5), and same in A.4, you will increase 1 st in row 1, 5... in A.4 and 2 sts in row 3, 11,13... in A.4), just follow diagram and make sure you get the correct number of increases / stitches to let the lace pattern matching. Happy knitting!
03.07.2023 - 09:44
![]() Le Hunsec Sophie wrote:
Le Hunsec Sophie wrote:
Bonjour, je tricote la taille 3/4. Sur le premier rang après le col, il me reste plus de 5 mailles. ... merci pour votre aide Sophie
12.05.2023 - 07:21DROPS Design answered:
Bonjour Mme Le Hunsec, tricotez vos 95m ainsi: 5 m point mousse, A.1 (12 m), A.4 (1 m) (devant gauche), 1 m, 14 m, 1 m (manche), A.5 (=1 m), A.2 (24 m), A.4 (1 m) (dos), 1 m, 14 m, 1 m (manche), A.5 (1 m), A.3 (13 m), 5 m point mousse (devant droit) =5+12+1+1+14+1+1+24+1+1+14+1+1+13+5=95 m. Bon tricot!
12.05.2023 - 08:06
![]() Francine wrote:
Francine wrote:
Bonjour,pour les boutonnières, est-ce que je les tricotent lorsque je commence sur l’envers? Merci!
28.02.2023 - 20:26DROPS Design answered:
Bonjour Francine, les boutonnières sont faites en fin de rang sur l'endroit, tricotez le rang sur l'endroit comme indiqué jusqu'à ce qu'il reste 3 mailles, faites 1 jeté, tricotez les 2 m suivantes ensemble à l'endroit et tricotez la dernière maille à l'endroit. Au rang suivant (sur l'envers), tricotez le jeté à l'endroit. Bon tricot!
01.03.2023 - 09:42
![]() Mathilda wrote:
Mathilda wrote:
Dank voor het antwoord. Dus in de eerste serie van opvolging: 5 boord, A1, A4, etc. Dus voor en na de 14 mouwsteken een omslag. Is dat de omslag van de raglan? Begreep uit het patroon dat ik de serie moest volgen EN de toevoeging voor de raglan. Dus het mouwdeel is -1 tricot-1 omslag-14 steken-1 omslag-1 tricot is. en de volgende dan 16 steken inplaats van 14 etc. Als dat zo is waarom dan de extra aandacht vestigen op het niet vergeten raglan meerderen. Is het 1 of 2 voor en na de 14 bijmaken
20.02.2023 - 00:17DROPS Design answered:
Dag Mathilde,
Op de voor- en achterpanden zijn de raglanmeerderingen in de telpatronen weergegeven. De omslagen naast de 14 steken zijn inderdaad de meerderingen voor de mouw voor de raglan.
22.02.2023 - 13:21
![]() Mathilda wrote:
Mathilda wrote:
Klopt dit patroon? Bij de pas staat bij de mouwen de volgende omschrijving: Markeerder - omslag - 14 steken tricot - omslag - markeerder. Als ik een steek na de eerste markeerder bij maak en voor de 2e markeerder dan is het mouwdeel dus omslag 14 steken omslag. Dat geeft een gaatje. Op de foto is in het mouwgedeelte geen gaatje zichtbaar. er staat ook niet dat je deze omslag verdraaid moet breien in de opvolgende averechtse toer. Mijn vraag: klopt dat wel met die omslagen bij de mouw?
18.02.2023 - 14:00DROPS Design answered:
Dag Mathilda,
Bovenaan onder het kopje 'RAGLAN' staat aangegeven dat je de omslagen op de volgende naald gedraaid moet breien.
19.02.2023 - 18:30
|
|||||||||||||||||||
Sweet Marigold#sweetmarigoldcardigan |
|||||||||||||||||||
 |
 |
||||||||||||||||||
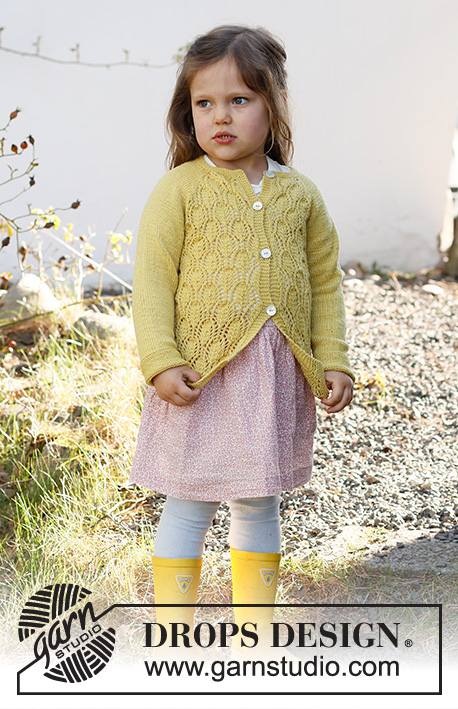
Knitted jacket for baby and kids in DROPS BabyMerino. Piece is knitted top down with raglan pattern and lace pattern. Size 6 month - 8 years
DROPS Baby & Children 38-11 |
|||||||||||||||||||
|
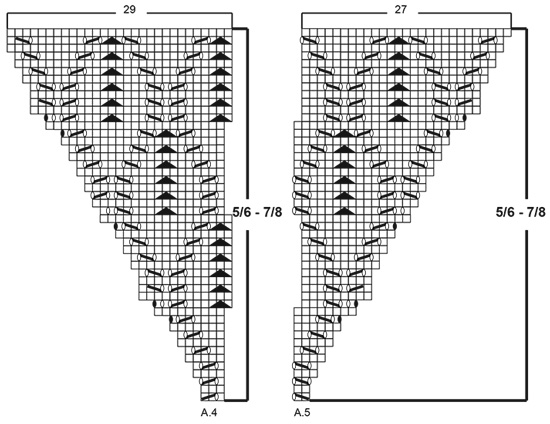
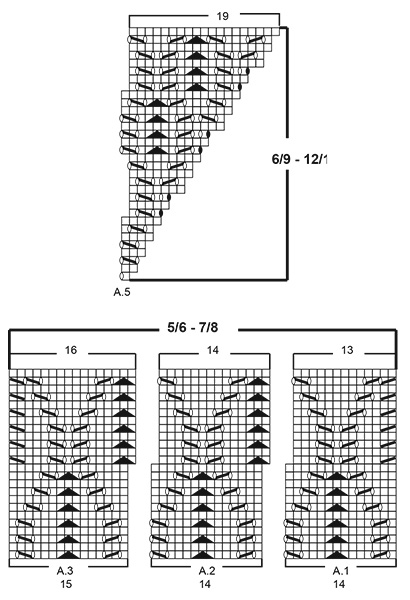
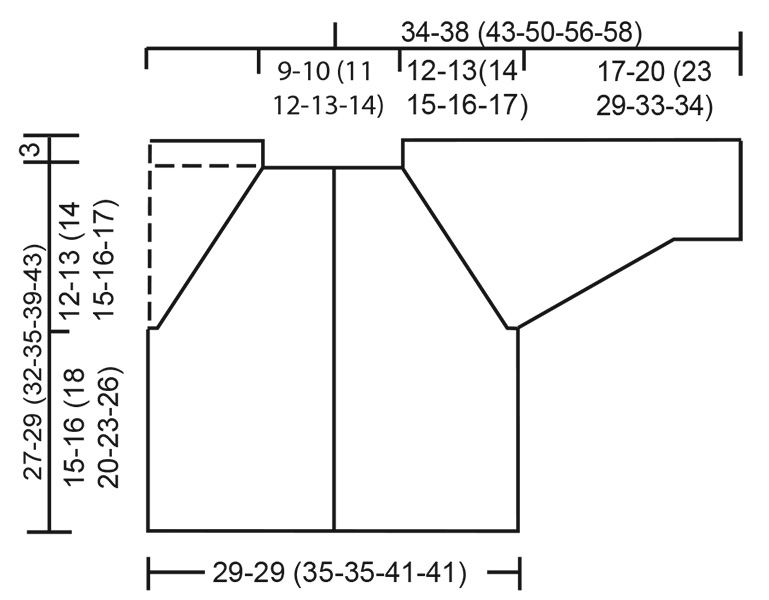
------------------------------------------------------- EXPLANATION FOR THE PATTERN: ------------------------------------------------------- GARTER STITCH (back and forth): 1 ridge = knit 2 rows. GARTER STITCH (in the round - applies to sleeves): 1 ridge = 2 rounds. Knit 1 round and purl 1 round. PATTERN: See diagrams A.1 to A.5. Choose diagram for your size. INCREASE TIP (evenly): To calculate how to increase evenly, use the total number of stitches on row (e.g. 82 stitches), minus bands (e.g. 10 stitches) , and divide the stitches by number of increases to be done (e.g. 7) = 10.3. In this example increase by making 1 yarn over after approx. every 10th stitch. Do not increase over band stitches. On next row knit yarn over twisted to avoid holes. RAGLAN: All increases are done on a row from right side! On front and back piece raglan increase is shown in diagrams. Increase for raglan on each of the sleeves as follows: Increase 1 stitch after 1st and 3rd marker and before 2nd and 4th marker by making a yarn over. Purl yarn overs twisted on next row (= from wrong side). Then work the new stitches in stocking stitch. DECREASE TIP (applies to sleeves): Decrease 1 stitch on each side of marker thread as follows: Work until 3 stitches remain before stitch with marker thread, knit 2 together, knit 3, slip 1 stitch knitwise, knit 1, pass slipped stitch over stitch worked. BUTTONHOLES: Decrease for buttonholes on right band (when garment is worn). Decrease from right side when 3 stitches remain on row as follows: Make 1 yarn over, knit the next 2 stitches together, knit last stitch. On next row knit yarn over to make hole. Decrease for first buttonhole when rib in neck measures approx. 1-1½ cm. Then decrease the next 4-4 (4-4-5-5) buttonholes, approx. 6- 6½ (7-7½-7-7½) cm between each. CAST-OFF TIP: To avoid a tight cast-off edge you may use a larger needle size. If this also is too tight, work a 1 yarn over after approx. every 4th stitch while casting off (cast off yarn overs as regular stitches). ------------------------------------------------------- START THE PIECE HERE: ------------------------------------------------------- JACKET - SHORT OVERVIEW OF THE GARMENT: Work back and forth on circular needle from mid front, work top down. Work sleeves in the round on double pointed needles, top down. NECK EDGE: Cast on 82-86 (92-95-100-104) stitches (including 5 band stitches in each side towards mid front) on circular needle size 2.5 mm with Baby Merino. Work 4 ridges in GARTER STITCH - read explanation above. Decrease for BUTTONHOLES on right band - read explanation above. Knit 1 row from right side while increasing 7-3 (3-0-9-5) stitches evenly - read INCREASE TIP = 89-89 (95-95-109-109) stitches. Purl 1 row from wrong side inside with 5 band stitches in garter stitch towards mid front. Insert 1 marker thread inside 5 band stitches. NOW MEASURE PIECE FROM HERE! Switch to circular needle size 3 mm and work yoke as explained below. REMEMBER THE KNITTING TENSION! YOKE: Work next row as follows from right side: Left front piece: Work 5 band stiches in garter stitch, A.1 (= 10-10 (12-12-14-14) stitches), A.4 (= 2-2 (1-1-3-3) stitches). Left sleeve: Work 1 stitch in stocking stitch, insert 1st marker, make 1 yarn over, work 14 stitches in stocking stitch, make 1 yarn over, insert 2nd marker, 1 stitch in stocking stitch. Back piece: Work A.5 (= 1-1 (1-1-2-2) stitches), A.2 over 20-20 (24-24-28-28) stitches, A.4 over 2-2 (1-1-3-3) stitches. Right sleeve: Work 1 stitch in stocking stitch, insert 3rd marker, make 1 yarn over, work 14 stitches in stocking stitch, make 1 yarn over, insert 4th marker, 1 stitch in stocking stitch. Right front piece: Work A.5 over 1-1 (1-1-2-2) stitches, A.3 (= 11-11 (13-13-15-15) stitches) and finish with 5 band stitches in garter stitch = 97-97 (103-103-113-113) stitches (including all yarn overs). Continue pattern like this and increase for RAGLAN - read explanation above on every row from right side 14-16 (17-18-19-20) times in total (including increases on first row from right side after neck edge). When increase for sleeves are finished, continue in stocking stitch and pattern as before. After last increase for raglan and A.4/A.5 have been worked 1 time vertically, there are 219-227 (255-259-287-291) stitches on needle. Piece measures approx. 10-10 (12-12-15-15) cm from neck edge. Now work pattern as follows (from right side): Left front piece: Work 5 band stitches in garter stitch, A.1 over 10-10 (12-12-14-14) stitches, A.2 over 10-10 (12-12-14-14) stitches, A.3 over 11-11 (13-13-15-15) stitches. Left sleeve: Work 43-47 (49-51-53-55) stitches in stocking stitch. Back piece: Work A.1 over 10-10 (12-12-14-14) stitches, A.2 over 40-40 (48-48-56-56) stitches (= 4 times in width), A.3 over 11-11 (13-13-15-15) stitches. Right sleeve: Work 43-47 (49-51-53-55) stitches in stocking stitch. Right front piece: Work A.1 over 10-10 (12-12-14-14) stitches, A.2 over 10-10 (12-12-14-14) stitches, A.3 over 11-11 (13-13-15-15) stitches and finish with 5 band stitches in garter stitch. Continue pattern like this until piece measures 12-13 (14-15-16-17) cm from marker thread after neck edge - adjust so that last row is from right side. Work next row as follows from wrong side: Continue with band and pattern as before over the first 36-36 (42-42-48-48) stitches (= front piece), slip the next 43-47 (49-51-53-55) stitches on 1 stitch holder for sleeve, cast on 9-9 (11-11-13-13) new stitches on needle (= in the side under sleeve), continue with pattern as before over the next 61-61 (73-73-85-85) stitches (= back piece), slip the next 43-47 (49-51-53-55) stitches on 1 stitch holder for sleeve, cast on 9-9 (11-11-13-13) new stitches on needle (= in the side under sleeve) and continue with pattern as before over the last 36-36 (42-42-48-48) stitches (= front piece). Finish body and sleeves separately. BODY: = 151-151 (179-179-207-207) stitches. On next row as follows from right side (continue on correct row in diagram): Work 5 band stiches in garter stitch, A.1 over 10-10 (12-12-14-14) stitches, A.2 over 120-120 (144-144-168-168) stitches (= 12 times in width), A.3 over 11-11 (13-13-15-15) stitches and 5 band stitches in garter stitch. Continue the pattern like this until piece measures 14-15 (17-19-22-25) cm from division - adjust so that next row is worked from right side. Switch to circular needle size 2.5 mm. Work 3 ridges back and forth over all stitches. Cast off by knitting– read CAST-OFF TIP. SLEEVES: Slip the 43-47 (49-51-53-55) stitches from stitch holder in one side of piece on double pointed needles size 3 mm and pick in addition up 1 stitch in each of the 9-9 (11-11-13-13) new stitches cast on under sleeve = 52-56 (60-62-66-68) stitches. Insert 1 marker thread in the middle stitch under sleeve and begin round here. Work in stocking stitch in the round. When piece measures 2 cm from division, decrease 2 stitches mid under sleeve - read DECREASE TIP. Decrease like this every 1½-1½ (2-3-3-3) cm 8-9 (9-8-9-9) times in total = 36-38 (42-46-48-50) stitches. Work until sleeve measures 16-19 (22-28-32-33) cm. Switch to double pointed needles size 2.5 mm. Work 3 ridges in GARTER STITCH - read explanation above. Cast off by knitting. Sleeve measures approx. 17-20 (23-29-33-34) cm from division. Work the other sleeve the same way. ASSEMBLY: Sew the buttons on to the left band. |
|||||||||||||||||||
Diagram explanations |
|||||||||||||||||||
|
|||||||||||||||||||
 |
|||||||||||||||||||
 |
|||||||||||||||||||
 |
|||||||||||||||||||
 |
|||||||||||||||||||
 |
|||||||||||||||||||
 |
|||||||||||||||||||
Have you finished this pattern?Tag your pictures with #dropspattern #sweetmarigoldcardigan or submit them to the #dropsfan gallery. Do you need help with this pattern?You'll find 28 tutorial videos, a Comments/Questions area and more by visiting the pattern on garnstudio.com. © 1982-2026 DROPS Design A/S. We reserve all rights. This document, including all its sub-sections, has copyrights. Read more about what you can do with our patterns at the bottom of each pattern on our site. |
|||||||||||||||||||


With over 40 years in knitting and crochet design, DROPS Design offers one of the most extensive collections of free patterns on the internet - translated to 17 languages. As of today we count 324 catalogues and 12290 patterns translated into English (UK/cm).
We work hard to bring you the best knitting and crochet have to offer, inspiration and advice as well as great quality yarns at incredible prices! Would you like to use our patterns for other than personal use? You can read what you are allowed to do in the Copyright text at the bottom of all our patterns. Happy crafting!
Post a comment to pattern DROPS Baby & Children 38-11
We would love to hear what you have to say about this pattern!
If you want to leave a question, please make sure you select the correct category in the form below, to speed up the answering process. Required fields are marked *.