
Popular categories
Looking for a yarn?


Comments / Questions (42)
![]() Diny wrote:
Diny wrote:
Het moet geel 03 zijn 3 bollen
14.03.2026 - 18:42
![]() Dit Breukers wrote:
Dit Breukers wrote:
Ik wil graag de baby Merino wol bestellen.maar kan de bestelknop niet vinden.
14.03.2026 - 18:38DROPS Design answered:
Dag Dit,
Het bestellen van garens gaat via een van de verkooppunten die onze artikelen verkopen; wij verkopen geen garens via de site. Via deze link vind je een lijst met verkooppunten.
15.03.2026 - 09:40
![]() Saray wrote:
Saray wrote:
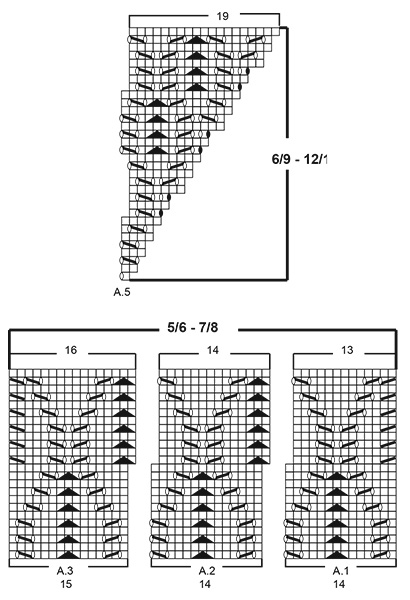
Hi! I am knitting 4 years old size. I have done 10 of the raglan increases and I just finished the A1, A2 and A3 schemes. To continue the pattern, shall I start the A1, A2 and A3 again from the beginning? Thank you!
28.02.2026 - 09:28DROPS Design answered:
Dear Saray, correct, you will now just have more repeats of A.2 before A.4 and after A.5. Happy knitting!
02.03.2026 - 08:33
![]() Claudia wrote:
Claudia wrote:
Liebes Drops-Team Ich stricke das Modell in Größe 3 /4 Jahre. In der Mustereinteilung nach dem Halsbündchen sollen Blendenmaschen gestrickt werden, dann A1 über 12 Machen. Im Anschluss daran soll A4 über 1 Mache gestrickt werden. Das Muster beginnt aber mit 2 Maschen (1 rechte Masche + 1 Umschlag). Bedeutet das, dass ich von A4 nur die erste (rechte) Masche stricke und den Umschlag nicht? Wenn das so ist stricke ich auch nur über diese 1 Masche zurück? Und wie weiter in Reihe 3?
26.02.2026 - 20:48DROPS Design answered:
Liebe Claudia, Sie stricken den Umschlag mit - der Umschlag zählt erst in der nächsten Reihe als Masche, da er ja in der vorherigen Reihe noch nicht existiert. Viel Spaß beim Stricken!
26.02.2026 - 21:59
![]() Anna wrote:
Anna wrote:
Ik snap niet waar de meerderingen op de voorpanden en het achterpand te vinden zijn. Alleen de meerderingen van de mouwen zie ik. Al wordt er gezegd dat ze terug te vinden zijn in het telpatroon? Ik heb het nu 2 x opnieuw gedaan en kan het niet terugvinden, mijn panden blijven recht. (Maat 3/4)
09.08.2025 - 21:23DROPS Design answered:
Dag Anna,
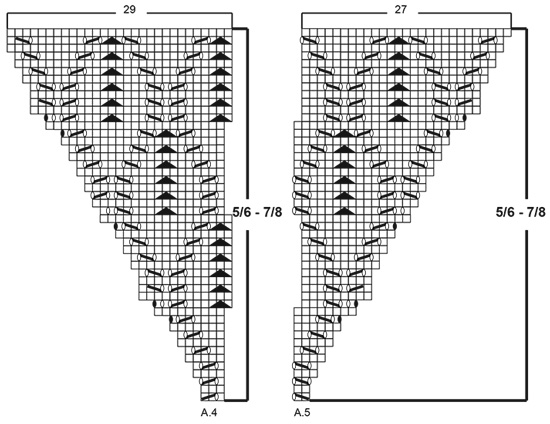
De meerderingen voor de panden staan inderdaad aangegeven in de telpatroon. In A.5 staan de meerderingen in de vorm van omslagen, dit zijn de zwarte ovaaltjes. Deze omslagen brei je op de volgende naald gedraaid om gaatjes te voorkomen. Je ziet ook dat het aantal steken in A.5 toeneemt (je leest de telpatronen van onder naar boven.)
18.08.2025 - 19:09
![]() Inger Melin wrote:
Inger Melin wrote:
Saknas det spegelvända mönstret A.4 för storlek 12/18 däremot finns 2 stycken vänster
15.02.2025 - 14:27DROPS Design answered:
Hej Inger, det er A.5 (str 6/9 - 12/18) som du finder længere nede på siden :)
18.02.2025 - 11:16
![]() Andrea Overheu wrote:
Andrea Overheu wrote:
Hallo , Ich habe Probleme mit dem herunterladen der Anleitung. Können Sie mir da auch weiterhelfen? Danke Gruß Andrea Overheu
27.01.2025 - 20:58DROPS Design answered:
Liebe Frau Overheu, unsere Anleitungen können nur ausgedruckt werden, wenn Sie aber als .PDF speichern möchten, dann sollen Sie einen virtuellen Drucker wählen. Viel Spaß beim Stricken!
28.01.2025 - 09:19
![]() Nicole wrote:
Nicole wrote:
Bonjour, comment adapter le motif avec les augmentations des diagrammes? Avec les jetés, il y a plus de mailles par ex. dans le dos, A2 (14 mailles) 2x=28 mailles mais le rang suivant, il y a plus de 28 mailles mais pas assez pour faire A2 3X. Merci pour vos explications!
31.10.2024 - 13:10DROPS Design answered:
Bonjour Nicole, les augmentations figurent dans les diagrammes A.5 (début du dos) et A.4 (fin du dos), vous n'augmentez pas dans A.2, autrement dit, les 28 mailles de A.2 restent à 28, on va augmenter avant A.4 et après A.5 comme le montrent les diagrammes, ainsi c'est le nombre de mailles de A.4 et de A.5 qui va augmenter, pas celui de A.2. Bon tricot!
31.10.2024 - 15:51
![]() Thifaine wrote:
Thifaine wrote:
Bonjour dans l’empiecement que signifie « au dessus des X mailles » je ne parvient pas à comprendre cette partie merci
22.07.2024 - 16:19DROPS Design answered:
Bonjour Thifaine, cela signifie que vous devez tricoter le nombre de mailles indiqué en suivant le diagramme correspondant. Bon tricot!
02.08.2024 - 14:43
![]() María Luisa wrote:
María Luisa wrote:
Hola, ¿Cuántos puntos deben haber antes del primer marcapuntos al comenzar a tejer la 5ta corrida del canesú? Gracias
06.03.2024 - 16:13DROPS Design answered:
Hola María Luisa, el número de puntos dependerá de la talla que estés trabajando. ¿Puedes indicar tu talla? Los aumentos del raglán se hacen después del 1º marcapuntos, así que el número de puntos antes del marcapuntos solo varía según los aumentos en A.4. Dependiendo de la talla tendrás 10, 12 o 14 puntos en A.1 y 4 en puntos en A.4. Sumados a los otros 6 puntos (5 de la cenefa + 1 en punto jersey) deberías tener 20 puntos en las tallas más pequeñas, 22 puntos en las medianas o 24 puntos en las tallas más grandes.
10.03.2024 - 20:59
|
|||||||||||||||||||
Sweet Marigold#sweetmarigoldcardigan |
|||||||||||||||||||
 |
 |
||||||||||||||||||
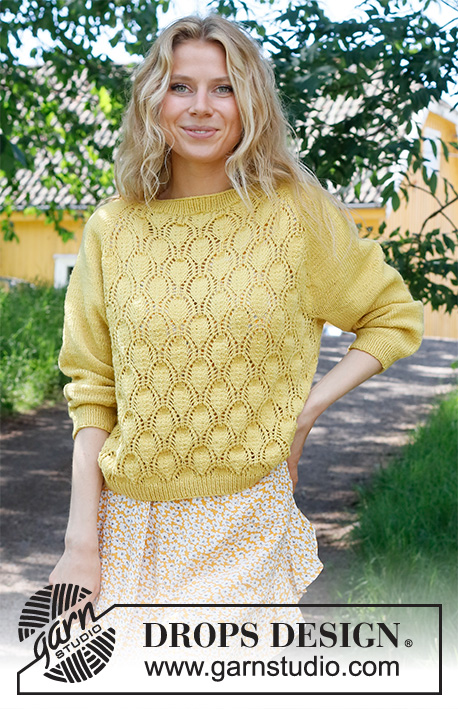
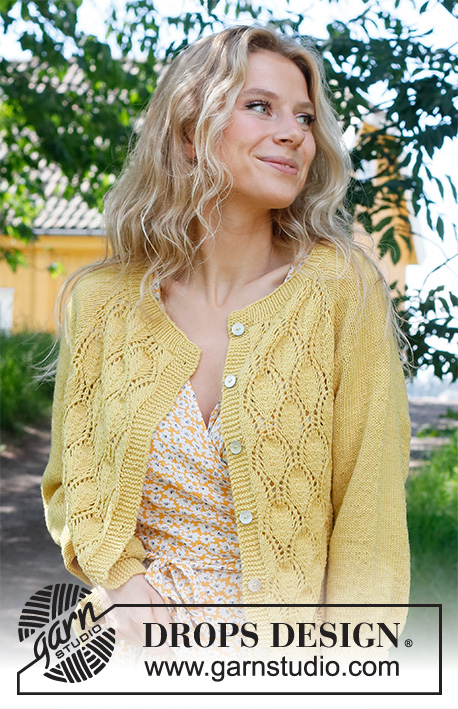
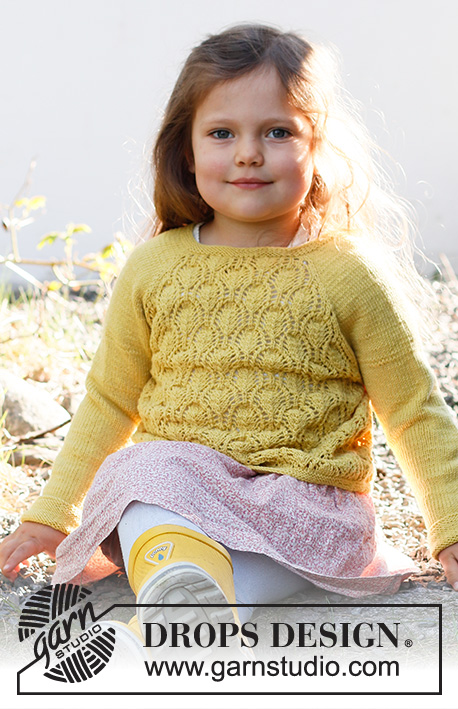
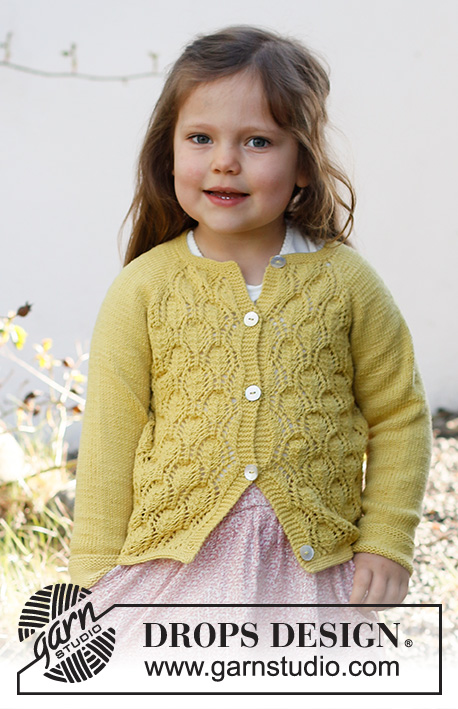
Knitted jacket for baby and kids in DROPS BabyMerino. Piece is knitted top down with raglan pattern and lace pattern. Size 6 month - 8 years
DROPS Baby & Children 38-11 |
|||||||||||||||||||
|
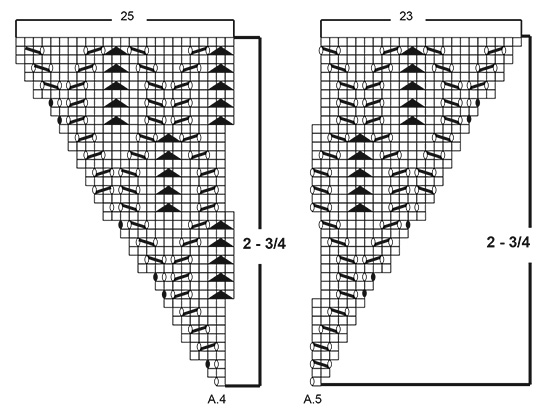
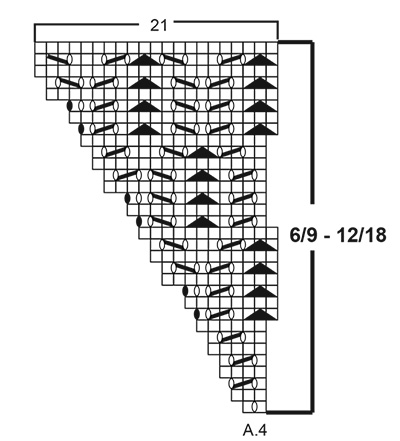
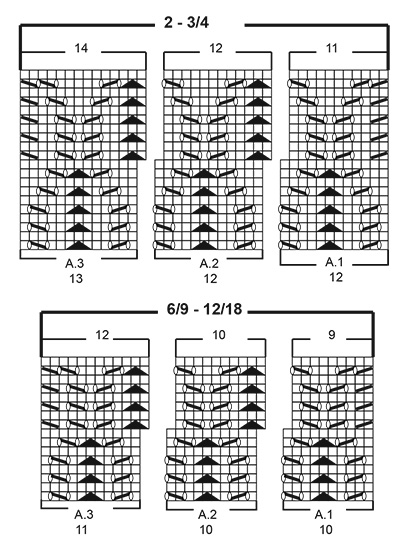
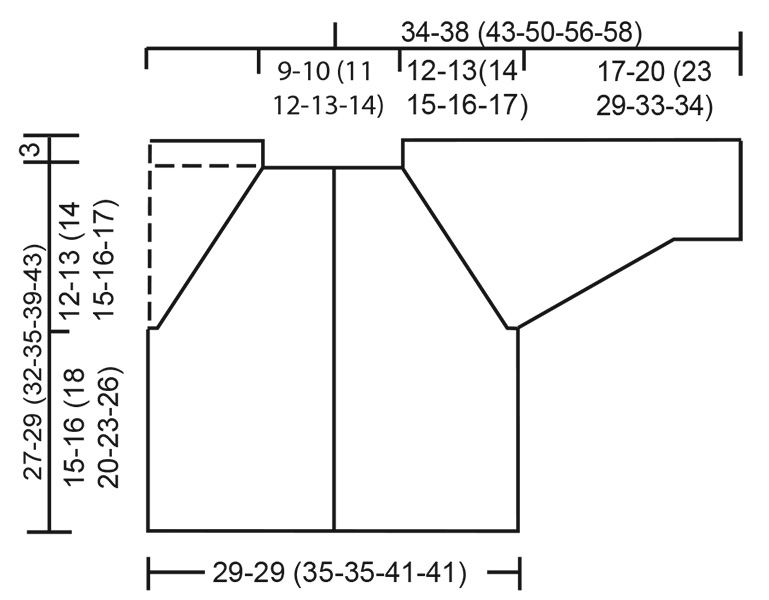
------------------------------------------------------- EXPLANATION FOR THE PATTERN: ------------------------------------------------------- GARTER STITCH (back and forth): 1 ridge = knit 2 rows. GARTER STITCH (in the round - applies to sleeves): 1 ridge = 2 rounds. Knit 1 round and purl 1 round. PATTERN: See diagrams A.1 to A.5. Choose diagram for your size. INCREASE TIP (evenly): To calculate how to increase evenly, use the total number of stitches on row (e.g. 82 stitches), minus bands (e.g. 10 stitches) , and divide the stitches by number of increases to be done (e.g. 7) = 10.3. In this example increase by making 1 yarn over after approx. every 10th stitch. Do not increase over band stitches. On next row knit yarn over twisted to avoid holes. RAGLAN: All increases are done on a row from right side! On front and back piece raglan increase is shown in diagrams. Increase for raglan on each of the sleeves as follows: Increase 1 stitch after 1st and 3rd marker and before 2nd and 4th marker by making a yarn over. Purl yarn overs twisted on next row (= from wrong side). Then work the new stitches in stocking stitch. DECREASE TIP (applies to sleeves): Decrease 1 stitch on each side of marker thread as follows: Work until 3 stitches remain before stitch with marker thread, knit 2 together, knit 3, slip 1 stitch knitwise, knit 1, pass slipped stitch over stitch worked. BUTTONHOLES: Decrease for buttonholes on right band (when garment is worn). Decrease from right side when 3 stitches remain on row as follows: Make 1 yarn over, knit the next 2 stitches together, knit last stitch. On next row knit yarn over to make hole. Decrease for first buttonhole when rib in neck measures approx. 1-1½ cm. Then decrease the next 4-4 (4-4-5-5) buttonholes, approx. 6- 6½ (7-7½-7-7½) cm between each. CAST-OFF TIP: To avoid a tight cast-off edge you may use a larger needle size. If this also is too tight, work a 1 yarn over after approx. every 4th stitch while casting off (cast off yarn overs as regular stitches). ------------------------------------------------------- START THE PIECE HERE: ------------------------------------------------------- JACKET - SHORT OVERVIEW OF THE GARMENT: Work back and forth on circular needle from mid front, work top down. Work sleeves in the round on double pointed needles, top down. NECK EDGE: Cast on 82-86 (92-95-100-104) stitches (including 5 band stitches in each side towards mid front) on circular needle size 2.5 mm with Baby Merino. Work 4 ridges in GARTER STITCH - read explanation above. Decrease for BUTTONHOLES on right band - read explanation above. Knit 1 row from right side while increasing 7-3 (3-0-9-5) stitches evenly - read INCREASE TIP = 89-89 (95-95-109-109) stitches. Purl 1 row from wrong side inside with 5 band stitches in garter stitch towards mid front. Insert 1 marker thread inside 5 band stitches. NOW MEASURE PIECE FROM HERE! Switch to circular needle size 3 mm and work yoke as explained below. REMEMBER THE KNITTING TENSION! YOKE: Work next row as follows from right side: Left front piece: Work 5 band stiches in garter stitch, A.1 (= 10-10 (12-12-14-14) stitches), A.4 (= 2-2 (1-1-3-3) stitches). Left sleeve: Work 1 stitch in stocking stitch, insert 1st marker, make 1 yarn over, work 14 stitches in stocking stitch, make 1 yarn over, insert 2nd marker, 1 stitch in stocking stitch. Back piece: Work A.5 (= 1-1 (1-1-2-2) stitches), A.2 over 20-20 (24-24-28-28) stitches, A.4 over 2-2 (1-1-3-3) stitches. Right sleeve: Work 1 stitch in stocking stitch, insert 3rd marker, make 1 yarn over, work 14 stitches in stocking stitch, make 1 yarn over, insert 4th marker, 1 stitch in stocking stitch. Right front piece: Work A.5 over 1-1 (1-1-2-2) stitches, A.3 (= 11-11 (13-13-15-15) stitches) and finish with 5 band stitches in garter stitch = 97-97 (103-103-113-113) stitches (including all yarn overs). Continue pattern like this and increase for RAGLAN - read explanation above on every row from right side 14-16 (17-18-19-20) times in total (including increases on first row from right side after neck edge). When increase for sleeves are finished, continue in stocking stitch and pattern as before. After last increase for raglan and A.4/A.5 have been worked 1 time vertically, there are 219-227 (255-259-287-291) stitches on needle. Piece measures approx. 10-10 (12-12-15-15) cm from neck edge. Now work pattern as follows (from right side): Left front piece: Work 5 band stitches in garter stitch, A.1 over 10-10 (12-12-14-14) stitches, A.2 over 10-10 (12-12-14-14) stitches, A.3 over 11-11 (13-13-15-15) stitches. Left sleeve: Work 43-47 (49-51-53-55) stitches in stocking stitch. Back piece: Work A.1 over 10-10 (12-12-14-14) stitches, A.2 over 40-40 (48-48-56-56) stitches (= 4 times in width), A.3 over 11-11 (13-13-15-15) stitches. Right sleeve: Work 43-47 (49-51-53-55) stitches in stocking stitch. Right front piece: Work A.1 over 10-10 (12-12-14-14) stitches, A.2 over 10-10 (12-12-14-14) stitches, A.3 over 11-11 (13-13-15-15) stitches and finish with 5 band stitches in garter stitch. Continue pattern like this until piece measures 12-13 (14-15-16-17) cm from marker thread after neck edge - adjust so that last row is from right side. Work next row as follows from wrong side: Continue with band and pattern as before over the first 36-36 (42-42-48-48) stitches (= front piece), slip the next 43-47 (49-51-53-55) stitches on 1 stitch holder for sleeve, cast on 9-9 (11-11-13-13) new stitches on needle (= in the side under sleeve), continue with pattern as before over the next 61-61 (73-73-85-85) stitches (= back piece), slip the next 43-47 (49-51-53-55) stitches on 1 stitch holder for sleeve, cast on 9-9 (11-11-13-13) new stitches on needle (= in the side under sleeve) and continue with pattern as before over the last 36-36 (42-42-48-48) stitches (= front piece). Finish body and sleeves separately. BODY: = 151-151 (179-179-207-207) stitches. On next row as follows from right side (continue on correct row in diagram): Work 5 band stiches in garter stitch, A.1 over 10-10 (12-12-14-14) stitches, A.2 over 120-120 (144-144-168-168) stitches (= 12 times in width), A.3 over 11-11 (13-13-15-15) stitches and 5 band stitches in garter stitch. Continue the pattern like this until piece measures 14-15 (17-19-22-25) cm from division - adjust so that next row is worked from right side. Switch to circular needle size 2.5 mm. Work 3 ridges back and forth over all stitches. Cast off by knitting– read CAST-OFF TIP. SLEEVES: Slip the 43-47 (49-51-53-55) stitches from stitch holder in one side of piece on double pointed needles size 3 mm and pick in addition up 1 stitch in each of the 9-9 (11-11-13-13) new stitches cast on under sleeve = 52-56 (60-62-66-68) stitches. Insert 1 marker thread in the middle stitch under sleeve and begin round here. Work in stocking stitch in the round. When piece measures 2 cm from division, decrease 2 stitches mid under sleeve - read DECREASE TIP. Decrease like this every 1½-1½ (2-3-3-3) cm 8-9 (9-8-9-9) times in total = 36-38 (42-46-48-50) stitches. Work until sleeve measures 16-19 (22-28-32-33) cm. Switch to double pointed needles size 2.5 mm. Work 3 ridges in GARTER STITCH - read explanation above. Cast off by knitting. Sleeve measures approx. 17-20 (23-29-33-34) cm from division. Work the other sleeve the same way. ASSEMBLY: Sew the buttons on to the left band. |
|||||||||||||||||||
Diagram explanations |
|||||||||||||||||||
|
|||||||||||||||||||
 |
|||||||||||||||||||
 |
|||||||||||||||||||
 |
|||||||||||||||||||
 |
|||||||||||||||||||
 |
|||||||||||||||||||
 |
|||||||||||||||||||
Have you finished this pattern?Tag your pictures with #dropspattern #sweetmarigoldcardigan or submit them to the #dropsfan gallery. Do you need help with this pattern?You'll find 28 tutorial videos, a Comments/Questions area and more by visiting the pattern on garnstudio.com. © 1982-2026 DROPS Design A/S. We reserve all rights. This document, including all its sub-sections, has copyrights. Read more about what you can do with our patterns at the bottom of each pattern on our site. |
|||||||||||||||||||


With over 40 years in knitting and crochet design, DROPS Design offers one of the most extensive collections of free patterns on the internet - translated to 17 languages. As of today we count 324 catalogues and 12290 patterns translated into English (UK/cm).
We work hard to bring you the best knitting and crochet have to offer, inspiration and advice as well as great quality yarns at incredible prices! Would you like to use our patterns for other than personal use? You can read what you are allowed to do in the Copyright text at the bottom of all our patterns. Happy crafting!
Post a comment to pattern DROPS Baby & Children 38-11
We would love to hear what you have to say about this pattern!
If you want to leave a question, please make sure you select the correct category in the form below, to speed up the answering process. Required fields are marked *.