
Popular categories
Looking for a yarn?


Comments / Questions (22)
![]() Sabine wrote:
Sabine wrote:
A quoi correspond une flèche ?
23.08.2025 - 10:36DROPS Design answered:
Bonjour Sabine, les flèches correspondent aux tours d'augmentations qui sont expliquées dans le texte, sous le paragraphe EMPIÈCEMENT. Bon tricot!
25.08.2025 - 09:25
![]() Kerstin wrote:
Kerstin wrote:
Hallo ihr Lieben, ich habe eine Frage zu dem Teil A2. In der dritten Runde soll der Rundenmarkierer 1 Masche nach rechts versetzt werden. Das ist soweit klar. Was mache ich ab der 4. Runde? Bleibt der Maschenmarkierer an dieser Stelle oder versetzte ich ihn wieder zurück. Also eine Masche nach links?
21.04.2025 - 11:16DROPS Design answered:
Liebe Kerstin, die 4. Runde beginnt wie zuvor, dh die 1. Masche der Runde / von jedem A.2. beginnt mit der Abnahmen der 3. Runde. Viel Spaß beim Stricken!
22.04.2025 - 15:49
![]() Arline wrote:
Arline wrote:
In chart A.2, when you slip the stitch marker one stitch to the right in Round 3, is that a one time event or do you repeat that move on the two subsequent repetitions of the chart? Thank you.
01.06.2022 - 23:10DROPS Design answered:
Dear Arline, on 3rd round in A.2 you start this round with the last stitch of previous round, but then rounds start again as before, do not move the beginning of the round, it should still be there. Happy knitting!
02.06.2022 - 08:55
![]() Lisa wrote:
Lisa wrote:
I think I know the answer to this, but need confirmation before going forward. When it says that on Round 3 of chart A.2 you move the BOR marker 1 st to the right, is that where you begin the Round or do you just move the marker but start the Round at the original st? Thanks!
26.05.2022 - 23:08DROPS Design answered:
Dear Lisa, start the 3rd row in A.2 with the last stitch of 2nd round, slip this stitch as if to K, knit the first 2 sts of next round (first repeat A.2 on the round) together, pass the slipped stitch over the knitted stitches, and continue diagram, ie the last stitch each A.2 will be worked together with the first 2 stitches next repeat. At the end of the round, continue as before, the beginning of the rounds should be as before. Happy knitting!
27.05.2022 - 09:07
![]() Susana wrote:
Susana wrote:
Bonjour, Je voudrais faire ce modèle mais les diagrammes manquent Merci de votre aide Cdt
27.12.2021 - 09:28DROPS Design answered:
Bonjour Susana, probablement un bug passager, ils s'affichent désormais, actualisez et si besoin videz le cache de votre navigateur. Bon tricot!
03.01.2022 - 14:36
![]() Trp wrote:
Trp wrote:
What a beautiful pattern
19.03.2021 - 09:14
![]() Trp wrote:
Trp wrote:
What a beautiful pattern
19.03.2021 - 09:13
![]() Margarita wrote:
Margarita wrote:
El diagrama A2 pienso que tiene un fallo, tejiendo siguiendo las instrucciones no queda igual a la foto. He rectificado tejiendo las pasadas retorcidas en las vueltas 3 y 7 y así si queda igual al no formarse el agujero. No se si queda bien expuesto.
16.03.2021 - 15:23DROPS Design answered:
Hola Margarita, mandaremos tu sugerencia al departamento de diseño para ver si se trata de algún fallo.
21.03.2021 - 19:58
![]() Edith wrote:
Edith wrote:
Je ne comprends pas ce passage Continuer jusqu'à ce que le diagramme ait été tricoté 2-2-2-3-3-3 fois en hauteur, tricoter ensuite les 6 premiers tours dans le diagramme. Les 6 premiers tours est de reprendre le A1 ou A2
10.03.2021 - 18:48DROPS Design answered:
Bonjour Edith, vous répétez 2 à 3 fois A.2 (cf taille) puis tricotez juste les les 6 premiers rangs de A.2. Bon tricot!
11.03.2021 - 08:05
![]() Stamou Panagiota wrote:
Stamou Panagiota wrote:
Hallo Brauche Ihre Hilfe muss ich bei A2 Diagramm die umschlägt so wie sie kommen stricken mit Löcher oder rechts verschränkt im Foto sehe ich am muster löcher wenn ich rechts verschränkt stricke gibt es keine löcher bitte für Anfänger die Anleitungen ausführlich erklären
07.03.2021 - 13:18DROPS Design answered:
Liebe Frau Panagiota, die Umschläge in A.2 (sowie in A.1 und A.3) werden bei der nächsten Runde rechts gestrickt damit Löcher entstehen. Viel Spaß beim stricken!
08.03.2021 - 09:09
|
||||||||||||||||||||||
Incoming Tide Sweater#incomingtidesweater |
||||||||||||||||||||||
 |
 |
|||||||||||||||||||||
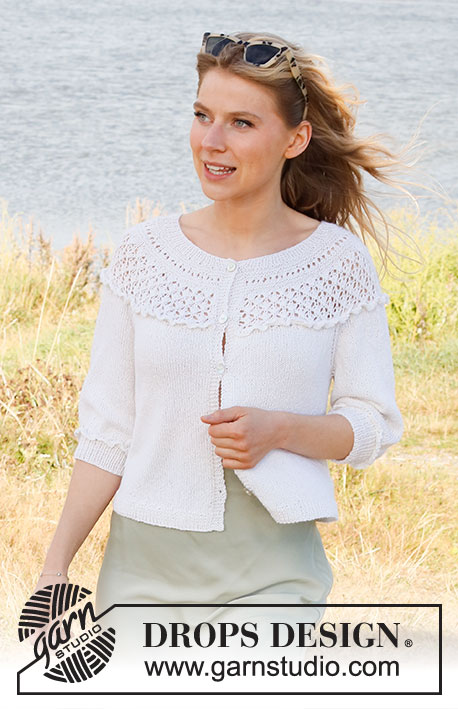
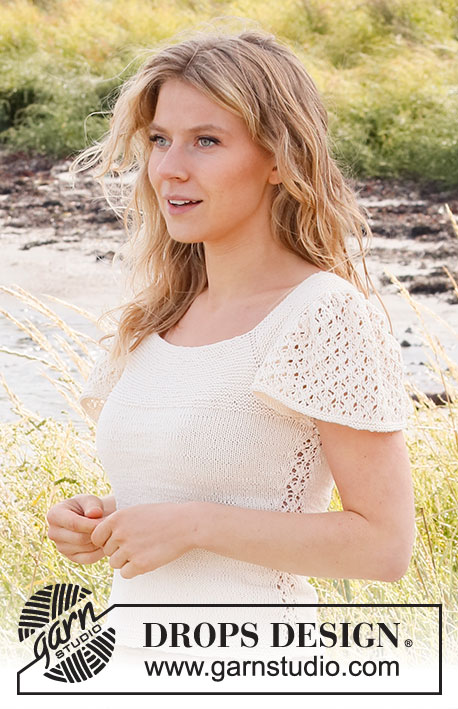
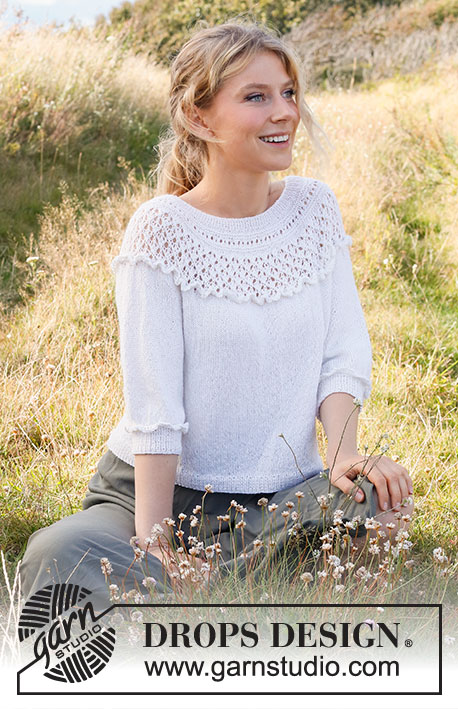
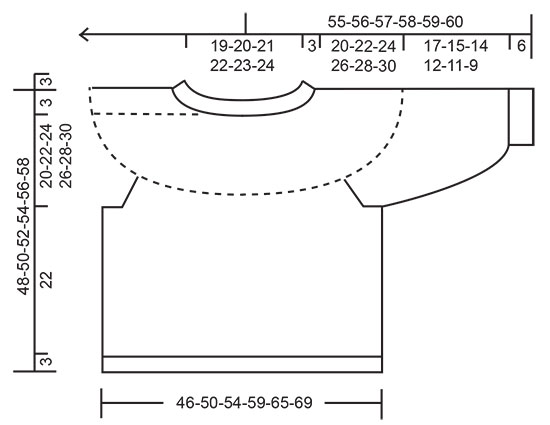
Knitted jumper in DROPS Alpaca. The piece is worked top down, with round yoke, raglan, flounces, lace pattern and ¾-length sleeves. Sizes S - XXXL.
DROPS 222-21 |
||||||||||||||||||||||
|
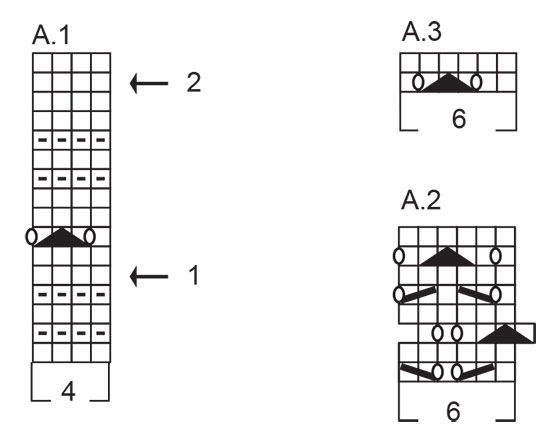
------------------------------------------------------- EXPLANATIONS FOR THE PATTERN: ------------------------------------------------------- PATTERN: See diagrams A.1 to A.3. INCREASE/DECREASE TIP (evenly spaced): To work out how to increase/decrease evenly, count the total number of stitches on needle (e.g. 120 stitches) and divide by the number of increases/decreases to be made (e.g. 36) = 3.3. In this example, increase by making 1 yarn over after alternately each 3rd and 4th stitch. On the next round work the yarn overs twisted to avoid holes. When decreasing, knit together alternately each 2nd and 3rd and each 3rd and 4th stitch. RAGLAN: Increase 1 stitch on each side of the markers, in each transition between body and sleeves as follows: Work until there is 1 stitch left before marker, 1 yarn over, knit 2 (marker sits between these 2 stitches), 1 yarn over. On the next round, knit the yarn overs twisted to avoid holes. Then work the new stitches in stocking stitch. A total of 8 stitches increased on each increase-round. CASTING-OFF TIP: To avoid the cast-off edge being tight you can cast off with a larger size needle. If the edge is still tight, make 1 yarn over after approx. each 4th stitch at the same time as casting off; the yarn overs are cast off as normal stitches. ------------------------------------------------------- START THE PIECE HERE: ------------------------------------------------------- JUMPER – SHORT OVERVIEW OF THE PIECE: The neck and yoke are worked in the round with circular needle, top down from mid back. The yoke is divided for body and sleeves and the body continued in the round with circular needle. The sleeves are worked in the round with short circular needle/double pointed needles, top down. Flounce-edges are crocheted to finish and sewn onto the yoke and sleeves. NECK: Cast on 120-124-128-134-138-144 stitches with circular needle size 2.5 mm and Alpaca. Knit 1 round. Then work rib (knit 1, purl 1) in the round for 3 cm. When the rib is finished, knit 1 round where you increase 36-36-36-38-38-40 stitches evenly spaced – read INCREASE/DECREASE TIP = 156-160-164-172-176-184 stitches. Knit 1 round (yarn overs knitted twisted). Change to circular needle size 3 mm. Insert 1 marker at the beginning of the round; the yoke is measured from this marker! YOKE: Now work pattern as follows: Work A.1 for the whole round (= 39-40-41-43-44-46 repeats of 4 stitches). At the same time, on the rounds with arrows, increase evenly as follows: Arrow-1: Increase 28-28-28-32-36-36 stitches = 184-188-192-204-212-220 stitches. Arrow-2: Increase 50-52-54-54-64-62 stitches = 234-240-246-258-276-282 stitches. REMEMBER THE KNITTING TENSION! When A.1 has been completed in height, continue with A.2 (= 39-40-41-43-46-47 repeats of 6 stitches). On round 3 in A.2, move the beginning of the round 1 stitch to the right, so you can work the first symbol in the diagram. Continue working until the diagram has been worked 2-2-2-3-3-3 times in height, then work the first 6 rounds in the diagram. Now work A.3 over each repeat of A.2. When A.3 has been completed in height, the piece measures approx. 13-13-13-15-15-15 cm. On the next round, increase 34-44-54-66-64-70 stitches evenly spaced = 268-284-300-324-340-352 stitches. Insert 4 markers, without working the piece, as follows: Marker 1: Count 42-45-47-51-55-58 stitches, insert marker here (= in transition between back piece and right sleeve). Marker 2: Count 50-52-56-60-60-60 stitches, insert marker here (= in transition between right sleeve and front piece). Marker 3: Count 84-90-94-102-110-116 stitches, insert marker here (= in transition between front piece and left sleeve). Marker 4: Count 50-52-56-60-60-60 stitches, insert marker here (= in transition between left sleeve and front piece). There are 42-45-47-51-55-58 stitches left after marker 4. Work stocking stitch in the round. At the same time, on the next round start to increase for RAGLAN – read description above. Increase like this every 2nd round a total of 10-11-14-15-18-19 times = 348-372-412-444-484-504 stitches. Continue working until the piece measures 20-22-24-26-28-30 cm. Now divide the yoke for the body and sleeves on the next round as follows: Work the first 52-56-61-66-73-77 stitches (= ½ back piece), place the next 70-74-84-90-96-98 stitches on a thread for the sleeve, cast on 6-8-8-10-10-12 stitches (= in side under sleeve), work the next 104-112-122-132-146-154 stitches (= front piece), place the next 70-74-84-90-96-98 stitches on a thread for the sleeve, cast on 6-8-8-10-10-12 stitches (= in side under sleeve), work the last 52-56-61-66-73-77 stitches (= ½ back piece). Body and sleeves are finished separately. THE PIECE IS NOW MEASURED FROM HERE. BODY: = 220-240-260-284-312-332 stitches. Work stocking stitch in the round until the piece measures 22 cm from the division. There is approx. 3 cm left to finished length; try the jumper on and work to desired length. Knit 1 round where you increase 44-48-52-58-64-68 stitches evenly spaced = 264-288-312-342-376-400 stitches. Change to circular needle size 2.5 mm and work rib (knit 1, purl 1) for 3 cm. Cast off with knit over knit and purl over purl – read CASTING-OFF TIP. The jumper measures approx. 48-50-52-54-56-58 cm from the shoulder down. SLEEVES: Place the 70-74-84-90-96-98 stitches from the thread on the one side of the piece on double pointed needles/short circular needle size 3 mm and knit up 1 stitch in each of the 6-8-8-10-10-12 stitches cast on under the sleeve = 76-82-92-100-106-110 stitches. Start the round in the middle of the 6-8-8-10-10-12 stitches under the sleeve and work stocking stitch in the round until the sleeve measures 17-15-14-12-11-9 cm from the division (There is approx. 6 cm left to finished length; try the jumper on and work to desired length). NOTE: Shorter measurements in larger sizes due to wider neck and longer yoke. Knit 1 round where you decrease 14-18-24-30-34-36 stitches evenly spaced – read INCREASE/DECREASE TIP = 62-64-68-70-72-74 stitches. Change to double pointed needles size 2.5 mm and work rib (knit 1, purl 1) for 6 cm. Cast off with knit over knit and purl over purl – remember CASTING-OFF TIP. The sleeve measures approx 23-21-20-18-17-15 cm from the division. Work the other sleeve in the same way. FLOUNCE-EDGE, YOKE: Crochet 277-284-291-305-326-333 chain stitches (including 5 chain stitches to turn) using crochet hook size 3.5 mm and Alpaca. Turn and work as follows: Work 1 treble crochet in the 4th chain stitch from the hook, * 2 chain stitches, 1 treble crochet in the next chain stitch *, work from *-* to end of row. Lay the flounce-edge on the right side of the piece so it lies evenly along the bottom edge of the lace pattern, i.e. A.3. Tack the flounce in place. The flounce should be attached with the chain stitch edge towards the right side of the garment and can either be sewn or crocheted to the yoke as follows: ATTACH WITH SEWING: Work from the wrong side as follows: Fasten the thread in the decrease (i.e. triangle in A.3) mid-back of the jumper, and sew a stitch between the 2 outermost treble crochets on the flounce. Thread the strand back to the wrong side, * baste along the bottom edge of the lace pattern (do not sew in the flounce) as far as the next decrease in the pattern (i.e. triangle in next repeat of A.3), take the needle around this decrease and then between the 6th and 7th treble crochets after the last time the flounce was fastened to the piece, thread the strand back to the wrong side *, repeat from *-* the whole round; it is important the seam is not tight as this will make the garment less elastic. Fasten the strand. ATTACH WITH CROCHETING: Work from the wrong side using hook size 3.5 mm as follows: Fasten the strand with a double crochet around the decrease (i.e. triangle in A.3) mid back of the jumper, insert the hook through the garment (from the wrong side to the right side - the strand stays on the wrong side), then insert the hook between the 2 outermost treble crochets on the flounce and then back through to the wrong side of the garment, make 1 yarn over and pull the strand through the loops on the hook so the flounce is attached to the yoke *, work 8 chain stitches (on the wrong side of the garment), skip to the next decrease on the yoke (triangle in A.3), insert the hook through the garment (from the wrong side to the right side - the strand stays on the wrong side), then insert the hook between the 6th and 7th treble crochet after the last time the flounce was attached to the garment, and then back to the wrong side of the garment, make 1 yarn over and pull the strand through the loops on the hook so the flounce is attached to the yoke *, repeat from *-* for the whole round - it is important the seam is not tight as this will make the garment less elastic. Fasten the strand. FLOUNCE-EDGE, SLEEVE: Work 67-67-74-74-81-81 chain stitches (including 5 chain stitches to turn) using hook size 3.5 mm and Alpaca. Turn and work as follows: Work 1 treble crochet in the 6th chain stitch from the hook, * 2 chain stitches, 1 treble crochet in the next chain stitch *, work from *-* to the end of the row. The flounce can either be sewn or crocheted in the top round of rib on the sleeve. Sew or crochet in the same way as on the yoke, and skip 7 treble crochets on the flounce and approx. 7 stitches between each time the flounce is fastened to the sleeve. The strand is fastened around a stitch rather than around a decrease as on the yoke. Make sure the seam is not tight. |
||||||||||||||||||||||
Diagram explanations |
||||||||||||||||||||||
|
||||||||||||||||||||||
 |
||||||||||||||||||||||
 |
||||||||||||||||||||||
Have you finished this pattern?Tag your pictures with #dropspattern #incomingtidesweater or submit them to the #dropsfan gallery. Do you need help with this pattern?You'll find 28 tutorial videos, a Comments/Questions area and more by visiting the pattern on garnstudio.com. © 1982-2026 DROPS Design A/S. We reserve all rights. This document, including all its sub-sections, has copyrights. Read more about what you can do with our patterns at the bottom of each pattern on our site. |
||||||||||||||||||||||


With over 40 years in knitting and crochet design, DROPS Design offers one of the most extensive collections of free patterns on the internet - translated to 17 languages. As of today we count 325 catalogues and 12298 patterns translated into English (UK/cm).
We work hard to bring you the best knitting and crochet have to offer, inspiration and advice as well as great quality yarns at incredible prices! Would you like to use our patterns for other than personal use? You can read what you are allowed to do in the Copyright text at the bottom of all our patterns. Happy crafting!
Post a comment to pattern DROPS 222-21
We would love to hear what you have to say about this pattern!
If you want to leave a question, please make sure you select the correct category in the form below, to speed up the answering process. Required fields are marked *.