
Popular categories
Looking for a yarn?


Comments / Questions (49)
![]() Monica Smette Johansen wrote:
Monica Smette Johansen wrote:
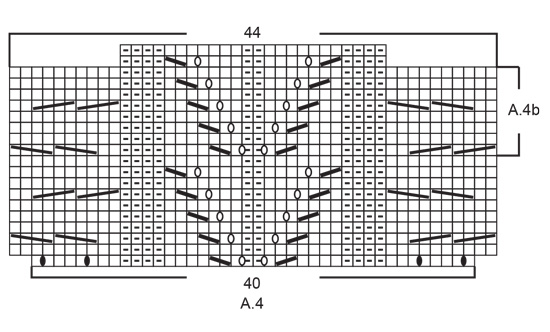
Hei. Jeg har noen spørsmål. 1) A4b kan ikke være riktig. Rett? Den øverste omgangen må vel også være med... 2) Etter deling. Tenker dere kun fletting på raden som er rett? Når jeg tar a3a og a5a og legger de inntil A4 så får jeg flette både fra rett og vrangsiden... Kan ikke finne OK forklaring på dette eller hvordan jeg skal gjøre det etter jeg har delt til for og bakstykke. Er det rett? På forhånd takk for svar. Mvh Monica
22.09.2025 - 16:14DROPS Design answered:
Hei Monica. Litt usikker på hva du mener med "den øverste omgangen". A.4b består av 8 pinner, der 1. pinne strikkes fra retten og med fletter. Før delingen er det blitt strikket rundt, slik at flettene er blitt strikket fra rettet hver gang og etter fellingen av skuldermaskene strikkes det frem og tilbake der 1. pinne av A.3b, A.5a og A.4b strikkes fra retten / fletten strikkes fra retten. mvh DROPS Design
06.10.2025 - 11:02
![]() Inger Line Birkeland wrote:
Inger Line Birkeland wrote:
På halsen, så står det at A4b skal gjentas. Men da mangler jo det 5. hullet og kastet på hver side av midten. 1. rapport av de 16 maskene i midten har 5 hull på de 10 første omg. A4b har 4 hull på 8 omg.
21.09.2025 - 22:06DROPS Design answered:
Hei Inger Line. Beklager sent svar. Oppskriften er oversendt til Design avd slik at de kan dobbeltsjekke. mvh DROPS Design
27.10.2025 - 08:42
![]() Pauline wrote:
Pauline wrote:
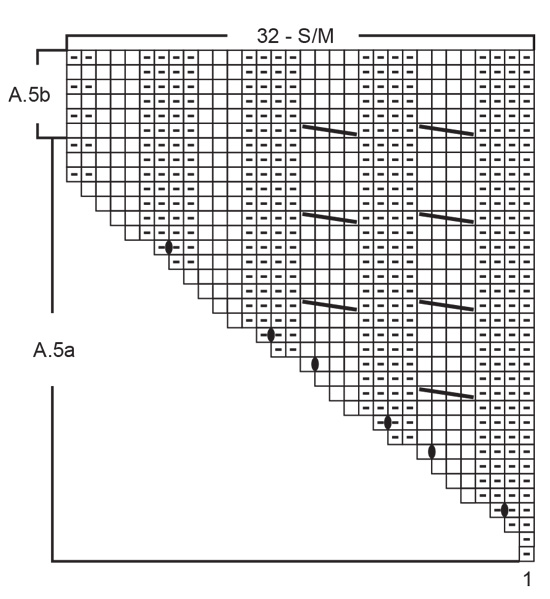
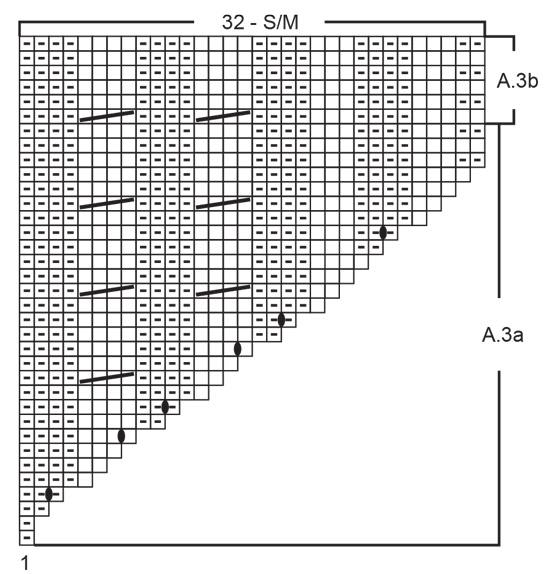
Can you help me to know after the shoulder cast offs ....do I begin on the first row of all three of these areas....A.3b.....A.4b .....and A.5b.....my cables are off on my neckwarmer when I did this....wish I could send a photo so you can see.....they look longer and thr A.5b cables look wonky....please help me ....I have tried to write it out from the charts to make it easier but I'm a bit confused
07.06.2025 - 05:44DROPS Design answered:
Dear Pauline, A.3b is worked from the first row of A.3b over the stitches in A.3a from the previous row; the same with A.5b over A.5a. A.4 is worked over the same stitches as before and continued where you were left off before; then you will only repeat the A.4b section from now on. Happy knitting!
08.06.2025 - 15:47
![]() Laura wrote:
Laura wrote:
Sto realizzando il cappello nella taglia M/L. Quello che mi lascia perplessa è che tutte e due le taglie hanno lo stesso numero di maglie. Ho lavorato quasi 5 centimetri ma mi sembra piccolo. Avete qualche suggerimento o qualche modifica da propormi? Grazie, Laura
31.12.2024 - 23:49DROPS Design answered:
Buonasera Laura, se il cappello le risulta piccolo, può avviare qualche maglia in più, secondo le proporzioni. Buon lavoro!
01.01.2025 - 21:40
![]() Jean wrote:
Jean wrote:
I have made the hat, and mitts. I am now on the neck warmer. I realize that you read the graft from right to left but is the first stitch your increase stitch on the right hand side of A3b . On graft A5a your increase stitch would be the last stitch. Is this correct
12.03.2024 - 23:13DROPS Design answered:
Hi Jean, Yes, all charts are read from right to left and bottom up from the right side and from left to right on the wrong side, when working back and forth. The increase (yarn over) is after the first stitch on A.3a and before the last stitch on A.5a, so the 2nd stitch and next-to-last stitch respectively. Happy knitting!
13.03.2024 - 06:34
![]() Sarah wrote:
Sarah wrote:
Hi, I am working on the neckwarmer and have worked the A4 chart once -but only up to where it shows A4b ends, so 18 rows of the chart. Do I now work the rows 19 and 20, or do I repeat A4b? Also I do not understand in the instructions \'continue the pattern and increase like this every round a total of 25-31 times\' does this mean do up to row 25 to 31 on charts A3, A4 and A5?
24.02.2024 - 20:54
![]() My wrote:
My wrote:
Hej, jag håller på att sticka halsvärmaren och har nu kommit till slutet av diagram A4b, som jag förstår det ska jag bara fortsätta med A4b men får då inte ihop sicksack flätorna. Det saknas rutor på två rader i slutet och jag antar att det ska vara ett flät varv på det första varvet av dem två, men om jag gör på detta sätt och fortsätter med A4b blir det bara ett varv mellan sista flätan och första i A4b och det stämmer ju inte. Vad är det jag missar?
21.02.2024 - 01:31DROPS Design answered:
Hej My, jo du fortsætter bare sicksack flätorna i varje sida på var 4:e varv som du har gjort hela tiden :)
23.02.2024 - 13:13
![]() Aaa wrote:
Aaa wrote:
Synes dere burde laget nytt mønsterdiagram etter a4. Skjønte til slutt at flettene skal fortsatt gjentas etter 3omg samtidig som mønsteret i midten følges. Men ser for meg at dette kan være forvirrende for både nybegynnere og andre strikkere. I det minste ha en bedre forklaring enn ‘se a4b’, det gir ingen mening!
09.01.2024 - 10:48
![]() Chhavi Methi wrote:
Chhavi Methi wrote:
I have a couple of more questions What is A4 b or A3b, or A5b? and can i continue the shoulders and bring it to the same length , i can keep it attached or even work separately? thanks
14.12.2023 - 08:07DROPS Design answered:
Dear Mrs Methi, the -b section of the diagrams are written on the right side or on the left side of diagrams, they are the last rows to repeat; in A.4b you will repeat the last rows for cables as shown and at the same time the whole lace pattern (as they are worked over a different number of stitches). Happy knitting!
14.12.2023 - 08:45
![]() Chhavi Methi wrote:
Chhavi Methi wrote:
Work A.3a (= 1 stitch), A.4 (= 40 stitches), A.5a (= 1 stitch), continue with rib as before over the next 22-26 stitches, work A.3a (= 1 stitch), A.4 (= 40 stitches), A.5a (= 1 stitch), and continue with rib as before over the remaining 22-26 stitches. There are 136-144 stitches on the needle. i am not sure how to increae
08.12.2023 - 13:40DROPS Design answered:
Dear Chhavi, in the first round of chart A.4 you increase 4 stitches. Since there are 2 repeats of A.4 on the round, you will have 8 increases in the first round of the charts. So you will go from: 128 to 136 or from 136 to 144, depending on the size you are working. Happy knitting!
10.12.2023 - 22:44
|
|||||||||||||||||||||||||||||||
Cool Cables Set#coolcablesset |
|||||||||||||||||||||||||||||||
 |
 |
||||||||||||||||||||||||||||||
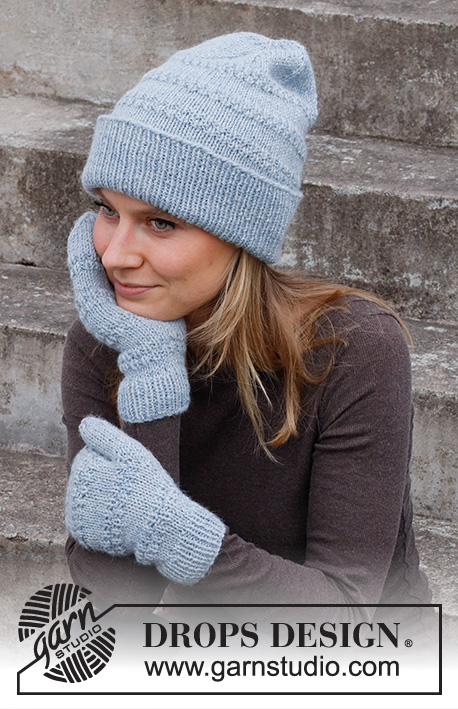
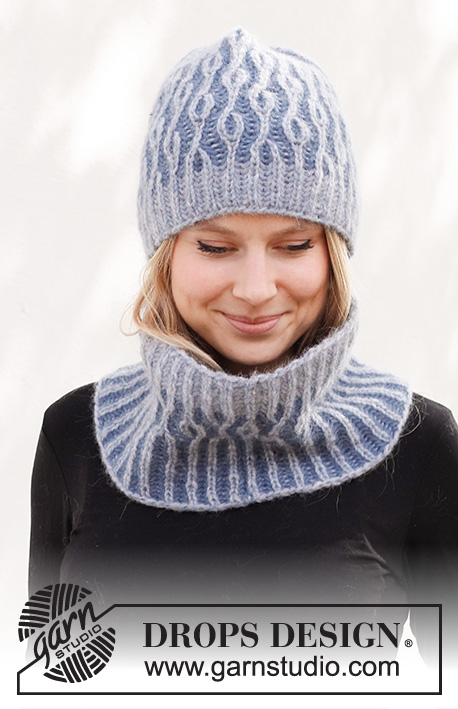
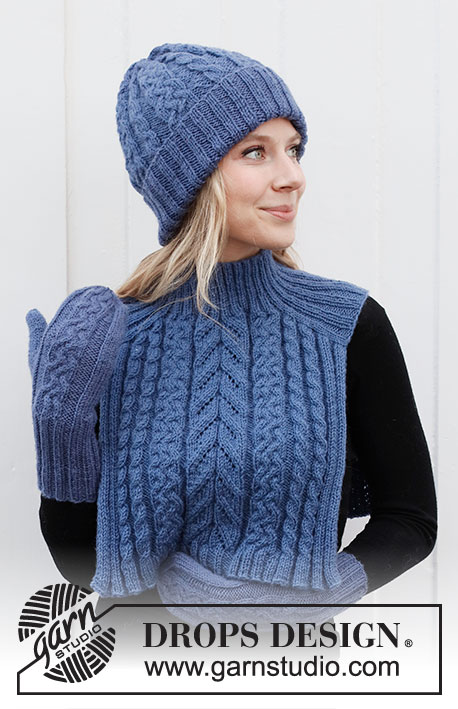
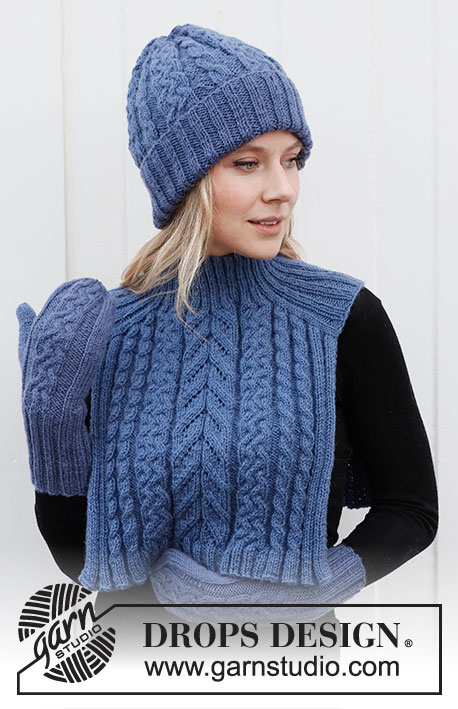
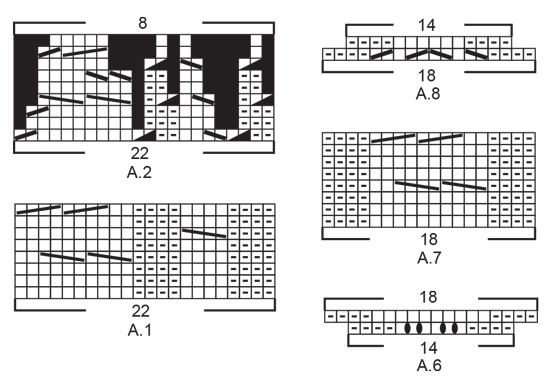
Knitted hat, neck warmer with saddle shoulder and mittens in DROPS Merino Extra Fine. The whole set is worked with cables and ribbed edging.
DROPS 214-25 |
|||||||||||||||||||||||||||||||
|
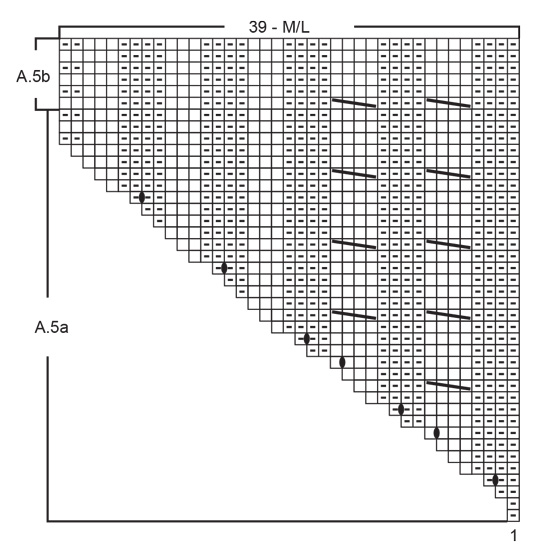
------------------------------------------------------- EXPLANATIONS FOR THE PATTERN: ------------------------------------------------------- RIDGE/GARTER STITCH (worked back and forth): Knit all rows. 1 ridge in height = Knit 2 rows. PATTERN: Hat: See diagrams A.1 and A.2. Neck warmer: See diagrams A.3, A.4 and A.5. Mittens: See diagrams A.6, A.7 and A.8. The diagrams show all rows from the right side. INCREASE/DECREASE TIP (evenly spaced): To work out how to increase/decrease evenly, count the total number of stitches on needle (e.g. 108 stitches), and divide by the number of increases/decreases to be made (e.g. 24) = 4.5. In this example, increase by making 1 yarn over after alternately each 4th and 5th stitch. On the next round work the yarn overs twisted to avoid holes. When decreasing, knit together alternately each 3rd and 4th stitch and each 4th and 5th stitch. INCREASE TIP-1 (for saddle shoulder increase): BEFORE MARKER: The new stitch will be twisted, leaning towards the right. Use left needle to pick up strand between 2 stitches from the round below, pick up strand from behind and knit stitch in front loop. AFTER MARKER: The new stitch will be twisted, leaning towards the left. Use left needle to pick up strand between 2 stitches from the round below, pick up strand from the front and knit stitch in back loop. INCREASE TIP-2 (for thumb): Increase 1 stitch by making 1 yarn over. On the next round knit the yarn over twisted to avoid a hole. Then work the new stitches in stocking stitch. DECREASE TIP (top of mitten): Work until there are 3 stitches left before the marker thread, knit 2 together, knit 2 (marker thread sits between these 2 stitches) slip 1 stitch as if to knit, knit 1 and pass the slipped stitch over the knitted stitch (= 2 stitches decreased). ------------------------------------------------------- START THE PIECE HERE: ------------------------------------------------------- HAT – SHORT OVERVIEW OF THE PIECE: The piece is worked in the round, bottom up. Change to double pointed needles when necessary. HAT: Cast on 108-108 stitches with short circular needle size 3 mm and Merino Extra Fine. Work rib in the round (knit 2, purl 2) for 14-18 cm. Change to short circular needle size 4 mm and knit 1 round where you increase 24-24 stitches evenly spaced – read INCREASE/DECREASE TIP = 132-132 stitches. Continue with A.1 in the round (= 6-6 repeats of 22 stitches). REMEMBER THE KNITTING TENSION! When A.1 has been worked 5 times in height, work A.2 (= 6-6 repeats of 22 stitches). When A.2 has been completed there are 48-48 stitches left. Work 2 rounds where all stitches are knitted together 2 and 2 on both rounds = 12-12 stitches. Cut the strand, pull it through the remaining stitches, tighten and fasten well. The hat measures approx. 31-35 cm from the top down. Fold up the bottom 7-9 cm. ------------------------------------------------------- NECK WARMER – SHORT OVERVIEW OF THE PIECE: The piece is worked in the round with short circular needle, top down. Stitches are increased for saddle shoulders, then stitches are cast off and each section is finished separately, back and forth. NECK WARMER: Cast on 128-136 stitches with short circular needle size 3.5 mm and Merino Extra Fine. Work rib in the round (starting from the left shoulder when the garment is worn) as follows: * Purl 2, knit 2,*, work from *-* to end of round. Continue this rib for 7-8 cm. Insert 1 marker thread; the piece is now measured from here. Insert 4 markers as described below – without working the stitches. The markers are placed between stitches and are used when increasing for saddle shoulders. Marker 1 is inserted at the beginning of the round, count 42-42 stitches (= back piece), insert marker 2 before the next stitch, count 22-26 stitches (= shoulder), insert marker 3 before the next stitch, count 42-42 stitches (= front piece) and insert marker 4 before the next stitch. There are 22-26 stitches left for the shoulder. Allow all 4 markers to follow your work onwards. SADDLE SHOULDER INCREASE: Change to circular needle size 4 mm and work the first round as follows: Work A.3a (= 1 stitch), A.4 (= 40 stitches), A.5a (= 1 stitch), continue with rib as before over the next 22-26 stitches, work A.3a (= 1 stitch), A.4 (= 40 stitches), A.5a (= 1 stitch), and continue with rib as before over the remaining 22-26 stitches. There are 136-144 stitches on the needle. On the next round the increase for saddle shoulders begin, increase 4 stitches on every round as described below (the pattern continues but when A.4 is finished in height; repeat the pattern as before - see A.4b) – note that the cables on each side are worked over 8 rows in height, and the lace pattern in the middle is worked over 10 rows in height): Increase 1 stitch AFTER markers 1 and 3 (after the 22-26 ribbed stitches) and increase 1 stitch BEFORE markers 2 and 4 (before the 22-26 ribbed stitches) – read INCREASE TIP-1 (= 4 stitches increased on the round). The number of stitches on the shoulders remains the same, the increased stitches are on the front and back pieces. Continue the pattern and increase like this EVERY round a total of 25-31 times (a total of 24-28 stitches are also increased in A.3a and A.5a as shown in the diagrams) = 260-296 stitches. REMEMBER THE KNITTING TENSION! After the last increase the piece measures approx. 9-11 cm along the shoulders (where the marker thread is). When there is 1 round left in A.3a and A.5a, work as follows: Work as before as far as marker 2, cast off the 22-26 shoulder-stitches, making sure the cast-off edge is not tight, work to marker 4 and cast off the remaining 22-26 shoulder-stitches. Back and front pieces are finished separately. BACK PIECE: = 108-122 stitches. Continue the pattern back and forth as before; i.e. the first row is worked from the right side as follows: Work A.3b over the first 32-39 stitches, continue A.4 as before over the next 44-44 stitches and work A.5b over the remaining 32-39 stitches. Continue back and forth and repeat A.3b, A.4b and A.5b in height until the piece measures approx. 33-35 cm from the shoulder, measuring close to the neck and with the piece flat (28-29 cm from the marker on the neck) – NOTE: adjust so you finish after the last row in A.4. Change to circular needle size 3.5 mm and work rib from the right side as follows: Work 2 stitches in garter stitch, knit over knit and purl over purl the next 30-37 stitches, * knit 2, purl 2 *, work from *-* over the next 10 stitches, purl 4, knit 2, purl 3, knit 2, purl 2, knit 2, purl 3, knit 2, purl 4, * knit 2, purl 2 *, work from *-* over the next 10 stitches, knit over knit and purl over purl the next 30-37 stitches and finish with 2 stitches in garter stitch. Continue this rib for 3 cm. Cast off with knit over knit and purl over purl. The neck warmer measures approx 36-38 cm from the shoulder, when flat. FRONT PIECE: = 108-122 stitches. Work in the same way as the back piece. ------------------------------------------------------- MITTENS – SHORT OVERVIEW OF THE PIECE: The piece is worked in the round with double pointed needles, bottom up. RIGHT MITTEN: Cast on 48-48 stitches with double pointed needles size 3 mm and Merino Extra Fine. Work rib in the round (knit 2, purl 2) for 12-13 cm. Then work as follows: * Knit 2, purl 2 *, work from *-* over the first 28 stitches, knit 2, work A.6 (= 14 stitches), knit 2 and purl 2. When A.6 has been completed in height there are 52-52 stitches on the needles. Insert a marker on the round. The piece is now measured from this marker. Change to double pointed needles size 3.5 mm and work as follows: Knit the first 27 stitches and decrease 8-6 stitches evenly over these stitches, knit 3, work A.7 (= 18 stitches) over A.6 and knit 4 = 44-46 stitches on the round. Continue this pattern onwards. REMEMBER THE KNITTING TENSION! AT THE SAME TIME when the piece measures 1½ cm from the marker, increase for the thumb by increasing 1 stitch on each side of the first stitch on the round – read INCREASE TIP-2 (= 2 stitches increased). Increase like this on each side of the increased stitches every 2nd round a total of 5-6 times in height = 54-58 stitches. Place the 11-13 thumb-stitches on a thread. Continue in the round – AT THE SAME TIME, on the first round, cast on 1 stitch over the stitches on the thread = 44-46 stitches. Continue working until the mitten measures approx. 15-16 cm from the marker – adjust so the next round is not a cable-round in A.7 (i.e. not round 4 or 8). There is approx. 3 cm left to finished length; try the mitten on and continue to desired length. Now work A.8 over A.7 – the other stitches are worked as before. When A.8 has been completed in height there are 40-42 stitches on the needles. Insert 1 marker thread in each side of the mitten, with 20 stitches on the palm and 20-22 stitches on the back. There are 3-4 knitted stitches between the marker threads and A.8. On the next round decrease 1 stitch on each side of both marker threads – read DECREASE TIP (= 4 stitches decreased). Decrease like this every 2nd round a total of 3 times, then every round a total of 3 times = 16-18 stitches. On the next round knit all stitches together 2 and 2 = 8-9 stitches. Cut the strand, pull it through the remaining stitches, tighten and fasten well. The mitten measures approx. 30-32 cm from the top down. You can turn up the 6-6½ cm of the rib. if you wish THUMB: Place the 11-13 thumb-stitches from the thread onto double pointed needles size 3.5 mm and knit up 4-3 stitches around the opening = 15-16 stitches. Work stocking stitch in the round for 5-5½ cm. There is now ½ cm left to finished length; try the mitten on and continue to desired length. Knit 1-0, then knit the remaining stitches together 2 and 2 = 8 stitches left. On the next round knit all stitches together 2 and 2 = 4 stitches. Cut the strand, pull it through the remaining stitches, tighten and fasten well. LEFT MITTEN: Cast on 48-48 stitches with double pointed needles size 3 mm and Merino Extra Fine. Work rib in the round (knit 2, purl 2) for 12-13 cm. Then work as follows: * Knit 2, purl 2 *, work from *-* over the first 28 stitches, knit 2, work A.6 (= 14 stitches), knit 2 and purl 2. When A.6 has been completed in height there are 52-52 stitches on the needles. Insert a marker on the round. The piece is now measured from this marker. Change to double pointed needles size 3.5 mm and work as follows: Knit the first 27 stitches and decrease 8-6 stitches evenly over these stitches, knit 3, work A.7 (= 18 stitches) over A.6 and knit 4 = 44-46 stitches. Continue this pattern onwards. AT THE SAME TIME when the piece measures 1½ cm from the marker, increase for the thumb by increasing 1 stitch on each side of the 19th-21st stitch on the round – remember INCREASE TIP-2. Increase like this on each side of the increased stitches every 2nd round a total of 5-6 times = 54-58 stitches. Place the 11-13 thumb-stitches on a thread. Continue in the round – AT THE SAME TIME on the first round cast on 1 stitch over the stitches on the thread = 44-46 stitches. The rest of the mitten is worked in the same way as the right mitten. Work the thumb in the same way as the right thumb. |
|||||||||||||||||||||||||||||||
Diagram explanations |
|||||||||||||||||||||||||||||||
|
|||||||||||||||||||||||||||||||
 |
|||||||||||||||||||||||||||||||
 |
|||||||||||||||||||||||||||||||
 |
|||||||||||||||||||||||||||||||
 |
|||||||||||||||||||||||||||||||
 |
|||||||||||||||||||||||||||||||
 |
|||||||||||||||||||||||||||||||
Have you finished this pattern?Tag your pictures with #dropspattern #coolcablesset or submit them to the #dropsfan gallery. Do you need help with this pattern?You'll find 32 tutorial videos, a Comments/Questions area and more by visiting the pattern on garnstudio.com. © 1982-2026 DROPS Design A/S. We reserve all rights. This document, including all its sub-sections, has copyrights. Read more about what you can do with our patterns at the bottom of each pattern on our site. |
|||||||||||||||||||||||||||||||


With over 40 years in knitting and crochet design, DROPS Design offers one of the most extensive collections of free patterns on the internet - translated to 17 languages. As of today we count 324 catalogues and 12290 patterns translated into English (UK/cm). 12290
We work hard to bring you the best knitting and crochet have to offer, inspiration and advice as well as great quality yarns at incredible prices! Would you like to use our patterns for other than personal use? You can read what you are allowed to do in the Copyright text at the bottom of all our patterns. Happy crafting!
Post a comment to pattern DROPS 214-25
We would love to hear what you have to say about this pattern!
If you want to leave a question, please make sure you select the correct category in the form below, to speed up the answering process. Required fields are marked *.