
Popular categories
Looking for a yarn?


Comments / Questions (32)
![]() Tini wrote:
Tini wrote:
Ik heb voor de mouw 54 steken. Patroon gaat over 8 steken. Dus patroon komt niet uit. 2 steken te weinig. Moet ik dan 2 extra steken erbij op zetten?
18.10.2025 - 19:02DROPS Design answered:
Dag Tini,
Nee, je hoeft niet te minderen. Het patroon past inderdaad niet onder de mouw, maar dat geeft niet. Brei zo ver mogelijk door met het patroon tot midden onder de mouw.
19.10.2025 - 19:36
![]() Maria wrote:
Maria wrote:
Hej, det här mönstret verkar bra men jag skulle vilja ha en förhöjning i nacken, då brukar passformen bli bättre. Kan jag göra halskanten kortare och lägga till en förhöjning där eller göra den efter halskanten, före oket. Eller går det inte alls? Tacksam för svar!
18.07.2025 - 12:52DROPS Design answered:
Hei Maria. Du kan fint strikke en forhøyning bak (etter vrangborden og før du starter på oket/diagrammet). mvh DROPS Design
04.08.2025 - 13:35
![]() Alexandra Spindlberger wrote:
Alexandra Spindlberger wrote:
Wunderschöner Norwegerpulli! Alexandra
16.09.2024 - 15:55
![]() Lues wrote:
Lues wrote:
Ik heb 8 steken in 1 sterk gemeerderd, lijkt wat vreemd. ik ga t zien.
20.12.2023 - 19:12
![]() Lies wrote:
Lies wrote:
In vervolg op de 8 nieuw op te zetten steken: ik ben erachter. Opnemen en gewoon meebreien in het lijf. Staat ook goed beschreven. Ik had niet goed geteld.
20.12.2023 - 12:26
![]() Lies wrote:
Lies wrote:
Ik moet 8 nieuwe steken opnemen = in dezijkant van de mouw staat in de patroonbeschrijving. Als ik ze opneem in de laatste steek van de mouw heb ik 8 steken extra in de mouw, als ik ze opneem in delaatste steek van de achterkant heb ik daar 8 steken teveel. waar laat ik deze steken?
20.12.2023 - 11:40DROPS Design answered:
Dag Lies,
Bij het scheiden van het werk voor het lijf en de mouwen heb je 8 steken opgezet onder de arm (/oksel). In die 8 steken, neem je nu 8 nieuwe steken op. In elke steek 1 steek opnemen.
20.12.2023 - 18:44
![]() Brigitte Schürmann wrote:
Brigitte Schürmann wrote:
Guten Tag, ich möchte den Pullover in Größe 134 mit Drops Big Merino stricken. Können Sie mir bei der Umrechnung helfen?? Herzlichen Dank Brigitte Schürmann
16.12.2023 - 12:08DROPS Design answered:
Liebe Frau Schürmann, leider können wir nicht jede Anleitung nach jeder Maschenprobe bzw Anfrage umrechnen, herzlichen Dank für Ihr Verständnis. Hier finden Sie aber Modellen, die Ihnen damit helfen können. Viel Spaß beim stricken!
18.12.2023 - 08:21
![]() Veronique Theron-Pignoux wrote:
Veronique Theron-Pignoux wrote:
Bonjour ,je ne comprends pas du tout les explications pour commencer les manches .les marqueurs doivent se placer entre les mailles ou dans les mailles? Vous dites que celui du dessus servira pour commencer le jacquard ,alors que je vais le commencer normalement SOUS la manche la ou j'ai monte les 6 mailles non? vous dites /en commençant le tour sous la manche etc.... Pouvez vous m'eclairer s'il vous plait? Merci beaucoup
03.09.2023 - 16:25DROPS Design answered:
Bonjour Mme Theron-Pignou, le marqueur sous la manche sert effectivement de repère au début des tours (et aux diminutions), mais pour centrer le motif sur le milieu du dessus de la manche, vous allez compter à partir de la maille avec le marqueur au milieu du dessus de la manche - dans cette leçon, nous expliquons comment centrer un diagramme, vous saurez ainsi comment tricoter A.2 et A.3. Bon tricot!
04.09.2023 - 08:43
![]() Line Normandeau wrote:
Line Normandeau wrote:
MANCHES (3e grandeur) J’ai repris mes 48 mailles en attente. J’ai relevé 6 mailles Ce qui me donne 54 mailles A.2 = 8 mailles 54 n’est pas divisible par 8 Je fais quoi?
06.07.2023 - 20:18DROPS Design answered:
Bonjour Line, parce que vous diminuez progressivement de mailles sous la manche, le jacquard ne sera pas ideal, mais cela ne sera pas tres visible. Lisez les parties MANCHES et JACQUARD avant d'entammer votre travail. Comment proceder quand le nombre de mailles ne correspond pas au nombre de fois que l'on répète le diagramme, regardez la video ICI. Bon tricot!
15.07.2023 - 20:18
![]() Line Normandeau wrote:
Line Normandeau wrote:
Après avoir repris les mailles en attente pour la manche, relevé 6 mailles, placer les marqueurs, vous dites de commencer à tricoter à partir de la maille placée avant le 1er marqueur. Après avoir relevé les 6 mailles, mon fil ne se retrouve pas au bon endroit pour commencer à tricoter à l’endroit indiqué. J’ai demandé l’avis d’expertes et nous sommes vraiment dans l’impasse.
06.07.2023 - 12:15DROPS Design answered:
Bonjour Mme Normandeau, le tour doit commencer au milieu des 6 mailles sous la manche (soit 3 mailles avant les mailles en attente et 3 mailles après les mailles en attente); remettez vos mailles sur l'aiguille et relevez les mailles pour commencer le tour au milieu sous la manche pour commencer le tour au bon endroit et surtout par la bonne maille du diagramme. Bon tricot!
06.07.2023 - 15:07
|
|||||||||||||
North Star#northstarsweater |
|||||||||||||
 |
 |
||||||||||||
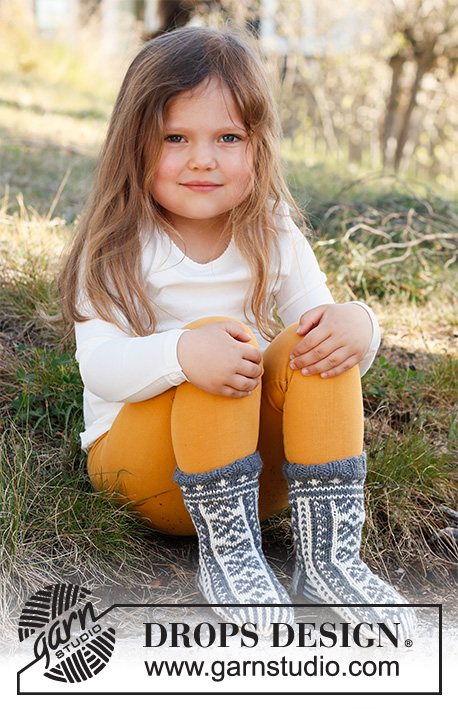
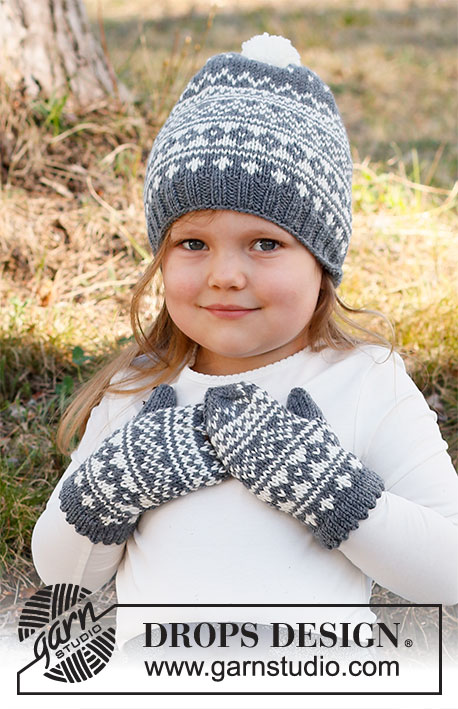
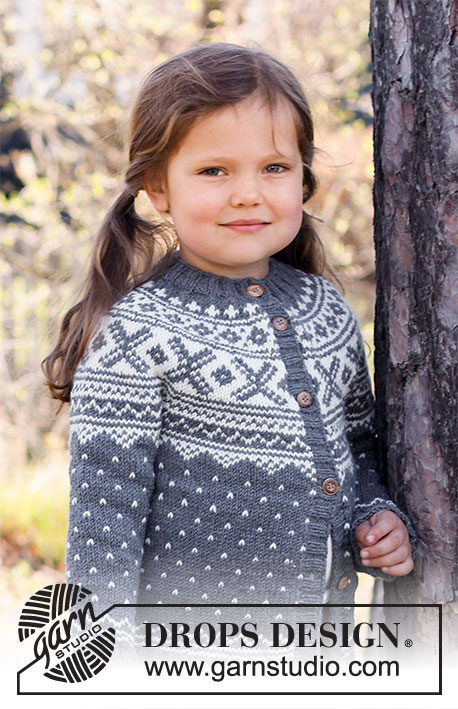
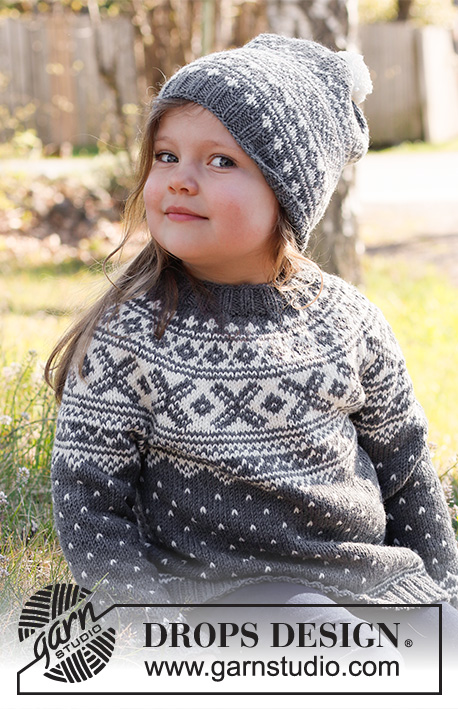
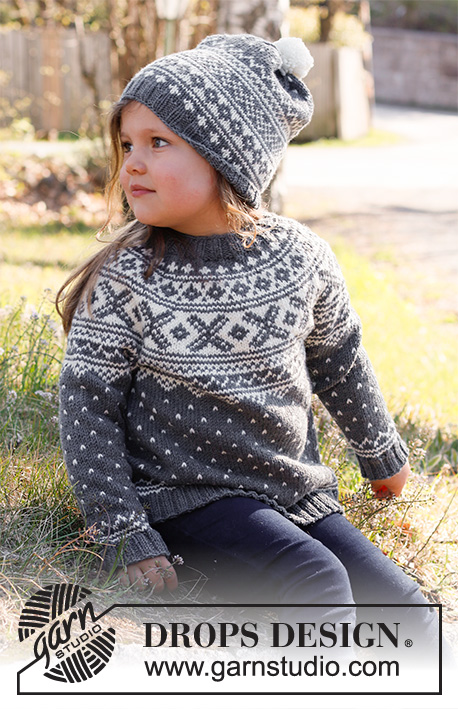
Knitted jumper for children in DROPS Merino Extra Fine. The piece is worked top down, with round yoke and Nordic pattern. Sizes 2 – 12 years.
DROPS Children 37-1 |
|||||||||||||
|
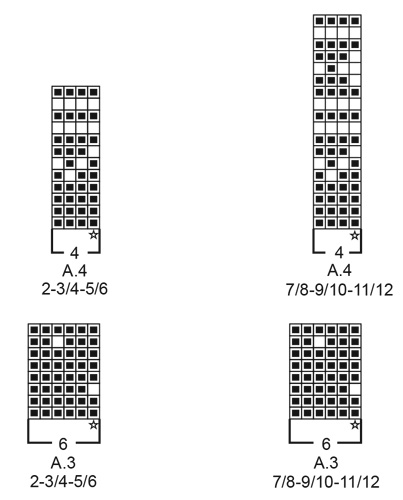
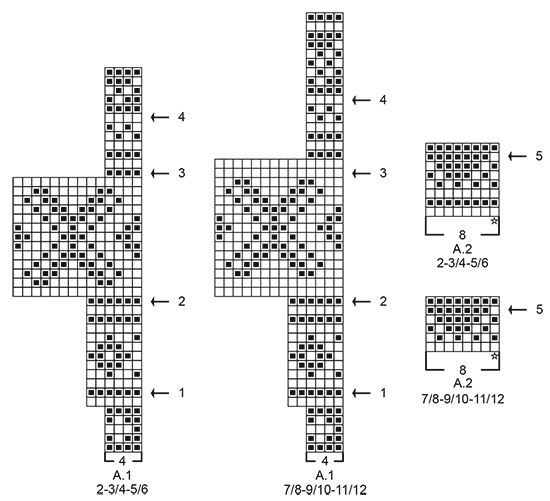
------------------------------------------------------- EXPLANATIONS FOR THE PATTERN: ------------------------------------------------------- INCREASE TIP (evenly spaced): To work out how to increase evenly, count the total number of stitches on the needle (e.g. 72 stitches) and divide by the number of increases to be made (e.g. 24) = 3. In this example, increase by making 1 yarn over after each 3rd stitch. On the next round work the yarn overs twisted to avoid holes. PATTERN: See diagrams A.1 to A.4. Choose diagram for your size. The whole pattern is worked in stocking stitch. KNITTING TIP: To avoid the garment losing its elasticity when working the pattern, it is important the strands at the back are not tight. Increase a needle size when working pattern if this is a problem. If the knitting tension is not correct in height and your work is too tight, the garment will be too short and the armholes too small – to adjust for this you can work 1 extra round in the one-coloured sections. If your work is too loose, the garment will be too long and the armholes too big; to adjust for this, you can work 1 round less in the one-coloured sections. DECREASE TIP (for mid under sleeves): Decrease 1 stitch on each side of the marker-stitch as follows (the 5 next stitches are worked with medium grey): Work until there are 2 stitches left before the marker-stitch, knit 2 together, knit the marker-stitch, knit 2 twisted together (= 2 stitches decreased). CASTING-OFF TIP: To avoid the cast-off edge being tight you can cast off with a larger size needle. If the edge is still tight, make 1 yarn over after approx. each 4th stitch at the same time as casting off and the yarn overs are cast off as normal stitches. ------------------------------------------------------- START THE PIECE HERE: ------------------------------------------------------- JUMPER – SHORT OVERVIEW OF THE PIECE: The neck and yoke are worked in the round with circular needle, from mid back and top down. The yoke is divided for the body and sleeves. The body is continued in the round with circular needle. The sleeves are worked in the round with double pointed needles, top down. NECK: Cast on 72-72-76-76-80-80 stitches with circular needle size 3 mm and medium grey. Knit 1 round, then work rib (= knit 2 / purl 2) for 3 cm. Knit 1 round and increase 24-28-28-32-32-36 stitches evenly spaced – read INCREASE TIP = 96-100-104-108-112-116 stitches. Change to circular needle size 4 mm. Insert 1 marker at the beginning of the round; the yoke will be measured from this marker! YOKE: Work 0-0-2-0-2-4 rounds of stocking stitch with medium grey. Read KNITTING TIP and then work A.1 in the round (= 24-25-26-27-28-29 repeats of 4 stitches). Continue this pattern. REMEMBER THE KNITTING TENSION! AT THE SAME TIME on each row marked with an arrow in A.1, increase stitches evenly spaced as described below – remember INCREASE TIP: Arrow-1: Increase 30-32-34-36-38-40 stitches evenly spaced = 126-132-138-144-150-156 stitches (there is now room for 21-22-23-24-25-26 repeats of A.1 with 6 stitches). Arrow-2: Increase 42-36-44-38-46-40 stitches evenly spaced = 168-168-182-182-196-196 stitches (there is now room for 12-12-13-13-14-14 repeats of A.1 with 14 stitches). Arrow-3: Increase 28-36-34-38-36-44 stitches evenly spaced = 196-204-216-220-232-240 stitches (there is now room for 49-51-54-55-58-60 repeats of A.1 with 4 stitches). Arrow-4: Increase 16-20-20-20-20-24 stitches evenly spaced = 212-224-236-240-252-264 stitches (there is now room for 53-56-59-60-63-66 repeats of A.1 with 4 stitches). Continue working until there is 1 round left in A.1. The piece measures approx. 15-15-16-17-18-19 cm from the marker on the neck. On the last round in A.1 divide the yoke for the body and sleeves as follows: Work 31-33-35-36-38-40 stitches as before (= half back piece), place the next 44-46-48-48-50-52 stitches on 1 thread for the sleeve, cast on 6-6-6-8-8-8 new stitches (= in side under the sleeve), work 62-66-70-72-76-80 stitches as before (= front piece), place the next 44-46-48-48-50-52 stitches on 1 thread for the sleeve, cast on 6-6-6-8-8-8 new stitches (= in side under the sleeve) and work the remaining 31-33-35-36-38-40 stitches as before (= half back piece). Body and sleeves are finished separately. THE PIECE IS NOW MEASURED FROM HERE! BODY: = 136-144-152-160-168-176 stitches. Work A.2 in the round (there is room for 17-18-19-20-21-22 repeats of A.2 with 8 stitches). AT THE SAME TIME on the row marked with arrow-5 in A.2, increase 8-0-4-8-0-4 stitches evenly spaced = 144-144-156-168-168-180 stitches. When A.2 has been completed, work A.3 in the same way (there is room for 24-24-26-28-28-30 repeats of A.3 with 6 stitches). A.3 is repeated in height until the piece measures 12-16-19-19-22-25 cm from the division; there is approx. 7-7-7-10-10-10 cm left to finished length, you can try the jumper on and work to desired length. Work A.4 in the round (= 36-36-39-42-42-45 repeats of 4 stitches). Continue until A.4 has been completed. Knit 1 round with medium grey and increase 32-32-32-36-36-36 stitches evenly spaced on this round = 176-176-188-204-204-216 stitches. This is done to avoid the rib being tight. Change to circular needle size 3 mm and work rib (= knit 2 / purl 2) for 3-3-3-4-4-4 cm. Cast off with knit over knit and purl over purl – read CASTING-OFF TIP! SLEEVE: Place the 44-46-48-48-50-52 stitches from the thread on the one side of the piece on double pointed needles size 4 mm and knit up 1 stitch in each of the 6-6-6-8-8-8 stitches cast on under the sleeve = 50-52-54-56-58-60 stitches. Insert 2 markers in the piece without working the stitches. Start mid under the sleeve in the middle of the 6-6-6-8-8-8 stitches and insert 1 marker in the first stitch after the middle, count 24-25-26-27-28-29 stitches and insert the second marker in the next stitch. Allow the markers to follow your work onwards; the one under the sleeve is used when decreasing and the one on top of the sleeve will be used when starting the pattern. Work PATTERN at the same time as you DECREASE under the sleeve as described below: PATTERN: Start the round under the sleeve in the stitch before the marker-stitch and work A.2 in the round – count out from the middle of the sleeve to find where the pattern starts – the second marker-stitch on top of the sleeve should match the stitch marked with a star in A.2, and you will decrease under the sleeve at the same time as you work pattern. When A.2 has been completed, work A.3 in the same way. A.3 is repeated in height until the sleeve measures 12-17-21-23-26-30 cm, but finish after a round of «spots». Now work the whole of A.4. DECREASE: At the same time, when the sleeve measures 3 cm from the division in all sizes, decrease 2 stitches mid under the sleeve – read DECREASE TIP. Decrease like this every 2-2½-3-4-4½-4½ cm a total of 6-7-7-7-7-8 times. When A.4 has been completed and the decreases are finished, there are 38-38-40-42-44-44 stitches left on the needles and the sleeve measures approx. 16-21-25-29-32-36 cm from the division. The rest of the sleeve is worked with medium grey. Knit 1 round where you increase 6-6-8-6-8-8 stitches evenly spaced = 44-44-48-48-52-52 stitches. Change to double pointed needles size 3 mm and work rib (= knit 2 / purl 2) for 3-3-3-4-4-4 cm. Cast off with knit over knit and purl over purl – remember CASTING-OFF TIP. The sleeve measures approx. 19-24-28-33-36-40 cm from the division. Work the other sleeve in the same way. |
|||||||||||||
Diagram explanations |
|||||||||||||
|
|||||||||||||
 |
|||||||||||||
 |
|||||||||||||
 |
|||||||||||||
Have you finished this pattern?Tag your pictures with #dropspattern #northstarsweater or submit them to the #dropsfan gallery. Do you need help with this pattern?You'll find 27 tutorial videos, a Comments/Questions area and more by visiting the pattern on garnstudio.com. © 1982-2026 DROPS Design A/S. We reserve all rights. This document, including all its sub-sections, has copyrights. Read more about what you can do with our patterns at the bottom of each pattern on our site. |
|||||||||||||


With over 40 years in knitting and crochet design, DROPS Design offers one of the most extensive collections of free patterns on the internet - translated to 17 languages. As of today we count 325 catalogues and 12298 patterns translated into English (UK/cm). 12298
We work hard to bring you the best knitting and crochet have to offer, inspiration and advice as well as great quality yarns at incredible prices! Would you like to use our patterns for other than personal use? You can read what you are allowed to do in the Copyright text at the bottom of all our patterns. Happy crafting!
Post a comment to pattern DROPS Children 37-1
We would love to hear what you have to say about this pattern!
If you want to leave a question, please make sure you select the correct category in the form below, to speed up the answering process. Required fields are marked *.