
Popular categories
Looking for a yarn?


Comments / Questions (35)
![]() Mme Morera wrote:
Mme Morera wrote:
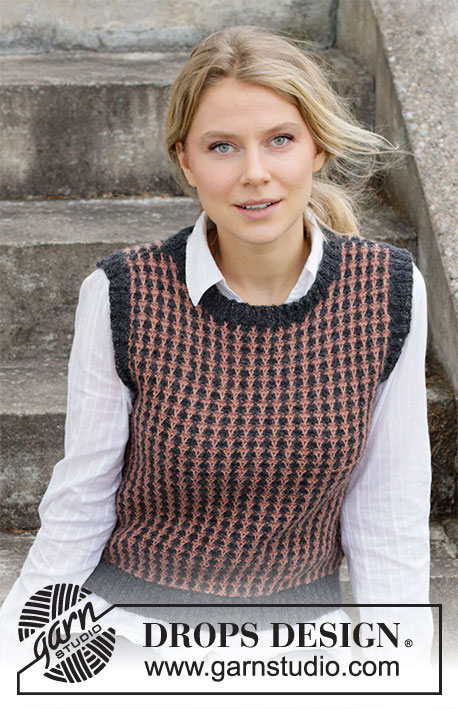
L'explication des symboles du diagramme sont claires pour les 2 premiers mais pour les 2 suivants, il n'est pas dit en quelle couleur, pouvez vous me le dire, merci
29.04.2026 - 20:31DROPS Design answered:
Bonjour Mme Morera, les rangs 1 et 3 se tricotent de la même façon et les rangs 2 et 4 de la même façon, vous tricotez ces mailles avec la même couleur qu'indiquée dans A.1 (et A.3), soit en blush. Les 4 derniers rangs seront tricotés en gris foncé. Découvrez ici, en vidéo comment on tricote ce point fantaisie. Bon tricot!
30.04.2026 - 09:02
![]() Joke wrote:
Joke wrote:
Goedemiddag kun je dit patroon ook in het rond breien? Met vriendelijke groet en dankjewel.
28.02.2026 - 14:30DROPS Design answered:
Dag Joke,
Ja, tot de armsgaten zou dit in de rondte kunnen breien. Je zet dan geen kantsteken op voor de zijnaden.
01.03.2026 - 11:10
![]() Karin Økern wrote:
Karin Økern wrote:
Hei, kan denne vesten strikkes rundt, på rundpinne? I så fall hvordan?
08.10.2025 - 13:43DROPS Design answered:
Hei Karin. Om den skal strikkes rundt vil ikke diagrammene / diagramtekstene stemme. Design avd har dessverre ikke muligheten til å omskrive oppskriften, men strikk gjerne en prøvelapp (rundt), tilpass diagramteksten og se hvordan det blir. mvh DROPS Design
20.10.2025 - 07:59
![]() Sylviane wrote:
Sylviane wrote:
Pourquoi ne pas préconiser des aiguilles droites plutôt, ou au moins les mentionner car tricoter avec une aiguille circulaire n’est pas commode. Merci.
12.09.2025 - 19:23DROPS Design answered:
Bonjour Sylviane, dans ce modèle, on tricote le dos et le devant séparément sur aiguille circulaire et en allers et retours pour avoir suffisamment de place pour y loger toutes les mailles; vous pourrez donc utiliser des aiguilles droites; seuls le col et la bordure des emmanchures sont tricotés en rond, cette leçon pourra alors vous aider à faire les ajustements nécessaires. Bon tricot!
15.09.2025 - 07:28
![]() Sylviane wrote:
Sylviane wrote:
Votre petite calculette flottante est geniale permettant de calculer les aumentations et diminutions.
12.09.2025 - 19:21
![]() Marianne wrote:
Marianne wrote:
Hei! Jeg lurer på om det er en feil i oppskriften på bakstykket. Jeg strikker i str xl. Når jeg skal felle av til ermehull feller jeg 9 masker i hver side. Deretter skal jeg felle ei maske I STARTEN av hver pinne 7 ganger. I oppskriften står det at jeg da skal sitte igjen med 100 masker. Jeg har 107. Skulle det vært felt både i starten og i slutten av hver pinne?
29.07.2025 - 18:40DROPS Design answered:
Hei Marianne, Du feller i starten av hver pinne, 7 ganger på begge sider (14 pinner strikket). Da sitter du igjen med 100 masker på pinnen. God fornøyelse!
30.07.2025 - 06:22
![]() Lena Almkvist Olsson wrote:
Lena Almkvist Olsson wrote:
Hej Står i beskrivningen att alla varv stickas räta. Menas att det är rätstickning eller Innebär detta att vartannat varv blir avigt sett från framsidan. Med vänlig hälsning, Lena
07.06.2025 - 09:13DROPS Design answered:
Hej Lena. I förklaringen för rätstickning står det att alla varv stickas räta om du stickar fram och tillbaka (sett från rätsidan blir då vartannat varv rät och vartannat avigt). Läs sedan i beskrivningen när du ska sticka rätstickning och när du stickar på annat sätt. Mvh DROPS Design
09.06.2025 - 12:16
![]() DI MORRIS wrote:
DI MORRIS wrote:
Thanks for the quick response. This is the video I watched. It showed me clearly how "Pepita" works (I have never done this before) but it doesn't answer the question of why the pattern changes after every 4 rows.
12.08.2024 - 15:39
![]() DI MORRIS wrote:
DI MORRIS wrote:
I was really pleased to find the Pepita instructions but cannot work out why the pattern changes after 4 rows - it just seems to be the same thing
12.08.2024 - 15:25DROPS Design answered:
Dear Mrs Di Morris, maybe this video can help you to understand how to work the diagram for this pattern. Happy knitting!
12.08.2024 - 15:32
![]() Paula wrote:
Paula wrote:
Buongiorno, non sono sicura di aver capito la spiegazione del diagramma. Le prime 4 righe sono da lavorare con il colore blush e le altre 4 righe con il colore grigio scuro? Sono un pochettino confusa con le spiegazioni. Grazie mille
14.01.2024 - 14:02DROPS Design answered:
Buongiorno Paula, si è corretta la sequenza di colori. Buon lavoro!
02.03.2024 - 11:47
|
|||||||||||||
Back to School#backtoschoolvest |
|||||||||||||
 |
 |
||||||||||||
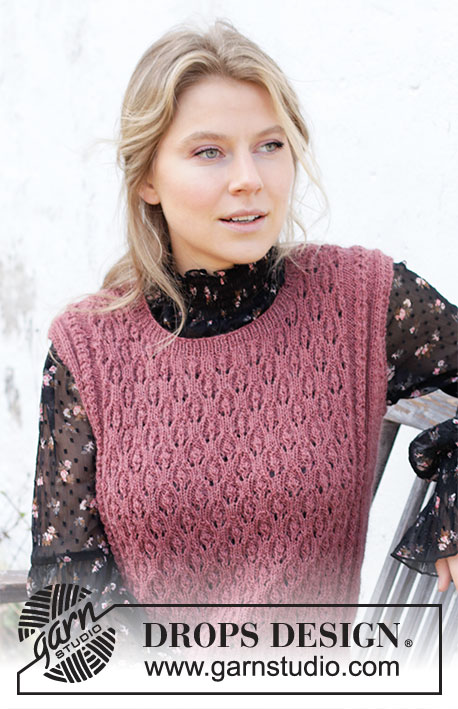
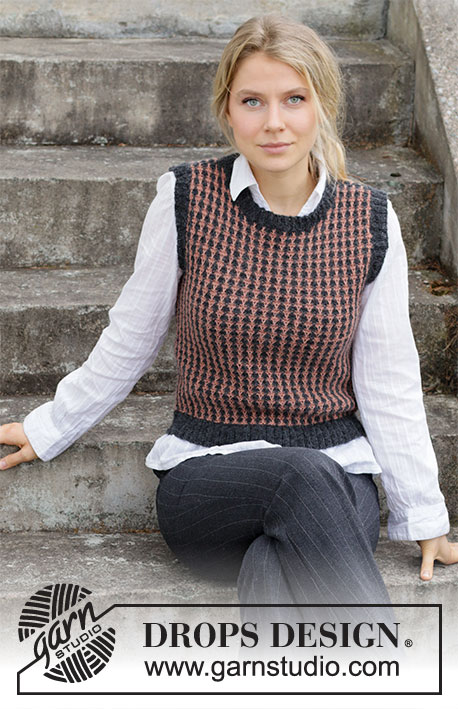
Knitted vest / slipover with Pepita pattern in DROPS Alpaca. Sizes S - XXXL.
DROPS 218-22 |
|||||||||||||
|
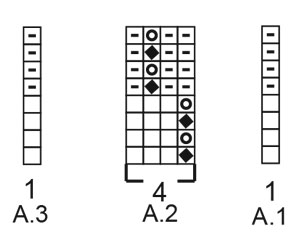
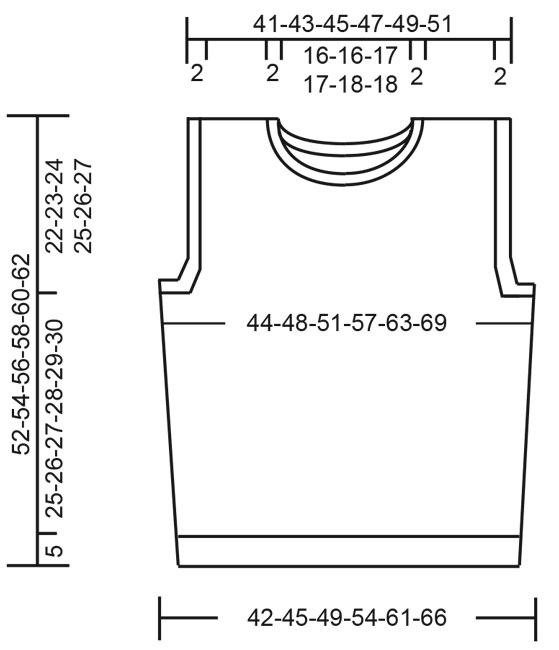
------------------------------------------------------- EXPLANATIONS FOR THE PATTERN: ------------------------------------------------------- RIDGE/GARTER STITCH (worked back and forth): Knit all rows. 1 ridge in height = Knit 2 rows. PATTERN: See diagrams A.1, A.2 and A.3. The diagrams show all rows in the pattern from the right side. DECREASE TIP (evenly spaced): To work out how to decrease evenly, count the total number of stitches on needle (e.g. 118 stitches) and divide by number of decreases to be made (e.g. 20) = 5.9. In this example decrease by knitting approx. each 5th and 6th stitch together. INCREASE TIP (for sides of body): Increase 1 stitch inside 1 edge stitch by making 1 yarn over; on the next row work the yarn over twisted to avoid a hole. The increased stitches are worked into the pattern as you go. KNITTING TIP: When increasing in the side the pattern continues upwards as before, the same applies when decreasing for the armholes and neck. If the outermost stitch in the sides or neck is a stitch which should be slipped, replace it with a knitted stitch in the colour the row is being worked in. ------------------------------------------------------- START THE PIECE HERE: ------------------------------------------------------- VEST – SHORT OVERVIEW OF THE PIECE: The back and front pieces are worked back and forth separately, bottom up. The shoulders and sides are sewn, then the neck and sleeve edges are worked in the round to finish. BACK PIECE: Cast on 118-130-142-154-170-186 stitches with circular needle size 3 mm and dark grey. Knit 1 row from the right side. Then work rib starting from the wrong side as follows: 1 edge stitch in GARTER STITCH, knit 1, * purl 2, knit 2 *, work from *-* until there are 4 stitches left, purl 2, knit 1 and 1 edge stitch in garter stitch. Continue with knit over knit, purl over purl and garter stitch over garter stitch until the rib measures 5 cm in all sizes. Change to circular needle size 3.5 mm, knit 1 row from the right side and decrease 20-24-28-28-28-32 stitches evenly spaced – read DECREASE TIP in the explanations above = 98-106-114-126-142-154 stitches. Knit 1 row from the wrong side. Now continue according to diagrams A.1, A.2 and A.3 as follows from the right side: Work A.1, then work A.2 until there is 1 stitch left on the row and finally A.3. Continue this pattern until the piece measures approx. 8 cm from the cast-on edge in all sizes. REMEMBER THE KNITTING TENSION! Read KNITTING TIP and INCREASE TIP in explanations above! On the next row increase 1 stitch on each side by working 2 stitches in both of the outermost stitches (the increased stitches are worked into the pattern). Repeat the increase every 9-9½-10-10½-11-11½ cm a total of 3 times in all sizes = 104-112-120-132-148-160 stitches. Continue the pattern until the piece measures 30-31-32-33-34-35 cm from the cast-on edge. Cast off 5-6-7-9-11-14 stitches on each side for the armholes, then cast off 1 stitch at the beginning of each row a total of 4-4-5-7-10-11 times = 86-92-96-100-106-110 stitches. Continue the pattern until the piece measures 50-52-54-56-58-60 cm from the cast-on edge, then on the next row from the right side work as follows: Work the first 22-24-26-27-29-31 stitches as before (= right shoulder), and place these stitches on a thread. Cast off the next 42-44-44-46-48-48 stitches for the neck, work the last 22-24-26-27-29-31 stitches as before. Each shoulder is finished separately. LEFT SHOULDER (back piece): Start from the wrong side and cast off 1 stitch at the beginning of the next row from the right side = 21-23-25-26-28-30 stitches. Work until the piece measures 52-54-56-58-60-62 cm from the cast-on edge, cast off with knit in the same colour as the previous row. Cut and fasten the strands. RIGHT SHOULDER (back piece): Place the 22-24-26-27-29-31 stitches from the threadback on circular needle size 3.5 mm. The first rowis worked from the wrong side and cast off 1 stitch at the beginning of thefirst row = 21-23-25-26-28-30 stitches. Work until the piece measures 52-54-56-58-60-62cm from the cast-on edge (making sure the two shoulders match), cast off with knit in the same colour as the previousrow. Cutand fasten the strands. FRONT PIECE: Cast on 118-130-142-154-170-186 stitches with circular needle size 3 mm and dark grey. Knit 1 row from the right side. Then work rib starting from the wrong side as follows: 1 edge stitch in garter stitch, knit 1, * purl 2, knit 2 *, work from *-* until there are 4 stitches left, purl 2, knit 1 and 1 edge stitch in garter stitch. Continue with knit over knit, purl over purl and garter stitch over garter stitch until the rib measures 5 cm in all sizes. Change to circular needle size 3.5 mm, knit 1 row from the right side and decrease 20-24-28-28-28-32 stitches evenly spaced = 98-106-114-126-142-154 stitches. Knit 1 row from the wrong side. Now continue according to diagrams A.1, A.2 and A.3 as follows from the right side: Work A.1, then work A.2 until there is 1 stitch left on the row and finally A.3. Continue this pattern until the piece measures approx. 8 cm from the cast-on edge in all sizes. On the next row increase 1 stitch on each side by working 2 stitches in both of the outermost stitches (the increased stitches are worked into the pattern). Repeat the increase every 9-9½-10-10½-11-11½ cm a total of 3 times in all sizes = 104-112-120-132-148-160 stitches. Continue the pattern until the piece measures 30-31-32-33-34-35 cm from the cast-on edge. Cast off 5-6-7-9-11-14 stitches on each side for the armholes, then cast off 1 stitch at the beginning of each row a total of 4-4-5-7-10-11 times = 86-92-96-100-106-110 stitches. Continue the pattern until the piece measures 42-44-45-47-48-50 cm from the cast-on edge, then on the next row from the right side work as follows: Work the first 30-33-34-36-38-40 stitches as before (= left shoulder) and place these stitches on a thread. Cast off the next 26-26-28-28-30-30 stitches for the neck and work the last 30-33-34-36-38-40 stitches as before (= right shoulder). Each shoulder is finished separately. RIGHT SHOULDER (front piece): = 30-33-34-36-38-40 stitches. Continue with the pattern (the first row is from the wrong side) and cast off for the neck at the beginning of each row from the right side: 3 stitches 1 time, 2 stitches 1-2-2-2-2-2 times and 1 stitch 4-3-2-3-3-3 times = 21-23-25-26-28-30 stitches. Continue the pattern until the piece measures 52-54-56-58-60-62 cm from the cast-on, cast off with knit in the same colour as the previous row and the same colour as on the back piece. Cut and fasten the strands. LEFT SHOULDER (front piece): Place the 30-33-34-36-38-40 stitches from the thread back on circular needle size 3.5 mm. Start from the wrong side and cast off at the beginning of each row from the wrong side: 3 stitches 1 time, 2 stitches 1-2-2-2-2-2 times and 1 stitch 4-3-2-3-3-3 times = 21-23-25-26-28-30 stitches. Continue with the pattern until the piece measures 52-54-56-58-60-62 cm from the cast-on edge (make sure the two shoulders match), cast off with knit in the same colour as the previous row and the same colour as on the back piece. Cut and fasten the strands. ASSEMBLY: Sew the shoulder seams with the same colour you used to cast off with. Sew the side seams, starting where stitches were cast off for the armholes and sewing inside 1 stitch. NECK: Using circular needle size 3 mm and dark grey, start from the right side at the shoulder seam and knit up approx. 144-160 stitches inside 1 stitch around the whole neck. Purl 1 round and adjust the number of stitches so it is divisible by 4. Then work rib (2 knit 2, purl 2) in the round for 2 cm. Cast off with knit over knit and purl over purl. Cut and fasten the strand. SLEEVE EDGES: Using circular needle size 3 mm and dark grey, start from the right side at the side seam and knit up approx. 124-180 stitches inside 1 stitch around the whole armhole. Purl 1 round and adjust the number of stitches so it is divisible by 4. Then work rib (2 knit 2, purl 2) in the round for 2 cm. Cast off with knit over knit and purl over purl. Work the other sleeve-edge in the same way. |
|||||||||||||
Diagram explanations |
|||||||||||||
|
|||||||||||||
 |
|||||||||||||
 |
|||||||||||||
Have you finished this pattern?Tag your pictures with #dropspattern #backtoschoolvest or submit them to the #dropsfan gallery. Do you need help with this pattern?You'll find 26 tutorial videos, a Comments/Questions area and more by visiting the pattern on garnstudio.com. © 1982-2026 DROPS Design A/S. We reserve all rights. This document, including all its sub-sections, has copyrights. Read more about what you can do with our patterns at the bottom of each pattern on our site. |
|||||||||||||


With over 40 years in knitting and crochet design, DROPS Design offers one of the most extensive collections of free patterns on the internet - translated to 17 languages. As of today we count 324 catalogues and 12290 patterns translated into English (UK/cm). 12290
We work hard to bring you the best knitting and crochet have to offer, inspiration and advice as well as great quality yarns at incredible prices! Would you like to use our patterns for other than personal use? You can read what you are allowed to do in the Copyright text at the bottom of all our patterns. Happy crafting!
Post a comment to pattern DROPS 218-22
We would love to hear what you have to say about this pattern!
If you want to leave a question, please make sure you select the correct category in the form below, to speed up the answering process. Required fields are marked *.