
Popular categories
Looking for a yarn?


Comments / Questions (111)
![]() Louise Désilets wrote:
Louise Désilets wrote:
Bonjour! Il y a une note comme quoi il y a eu des corrections dans les diagrammes mais il n'y a aucun autre diagramme. Est-ce que les diagrammes que l'on voit sont déjà corrigé? Merci d'avance!
30.10.2020 - 21:11DROPS Design answered:
Bonjour Mme Désilets, tout à fait, il ne faudra les réimprimer que si vous aviez déjà imprimé les explications avant la date de la correction. Bon tricot!
02.11.2020 - 07:34
![]() Kat wrote:
Kat wrote:
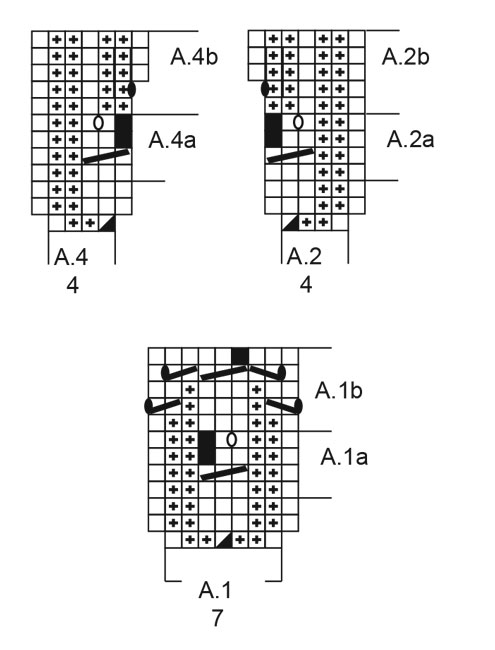
I'm trying to knit the L size. From collar to Yoke at front, it said knit 22 stitches for front, but if I do this, the stitches will not match to collar (knit to knit and purl to purl). The stitches before the front (A2, A3a, A4) mostly match. Want to make sure. Thanks.
28.10.2020 - 00:00DROPS Design answered:
Dear Kat, that's right like this, ou need to knit 22 stitches for the mid front even if the knit stitches do no match the knit stitches from the rib. Happy knitting!
28.10.2020 - 07:59
![]() Helena wrote:
Helena wrote:
Ich meinte dass A2, A3 und A4 sind mit (2Links 1 Rechts) gezeichnet. Nicht das Bündchen.
22.09.2020 - 15:58DROPS Design answered:
Liebe Helena, nach den 3 ersten Reihen in A.1, A.2, A.3 , wiederholen Sie A.1a, A.2b, A.4b = A.1a = 1 re, 2 li, 3 re, 2 li, 1 re, aber bei A.2a und A.4a haben Sie nur einmal 2 li bei A.2a/A.4a - das "b" Teil wird später gestrickt. Viel Spaß beim stricken!
22.09.2020 - 16:52
![]() Helena wrote:
Helena wrote:
Hallo, wieso sind alle Muster mit 2L 1R gezeichnet? Das Bild zeigt doch ganz klar glatt Rechts...
19.09.2020 - 01:39DROPS Design answered:
Liebe Helena, das Bündchen bei der Halsblende wird im Rippenmuster 1 M re, 2 M links gestrickt - siehe 3. Foto -meinten Sie was anderes? Vielleicht könnten Sie uns mehr beschreiben, im Falle Ihre Frage wurde misverstanden. Danke im voraus. Viel Spaß beim stricken!
21.09.2020 - 08:33
![]() Tonya wrote:
Tonya wrote:
My question is: in the 9th row of the A1 scheme there is a yarn on both sides. And at the same time, according to the instructions, I need to make increases on both sides of this scheme. It turns out that there are 2 yarn over in a row? Then you get a big hole in this place. How to proceed? Thanks!
03.09.2020 - 05:34DROPS Design answered:
Dear Tonya, when you increase on each side of each A.1 this applies when working A.1a only ie when you repeat the rows 4 to 7 in A.1 (= see A.1a on the right side of diagram), this means you start first with the first 3 rows in A.1 then work and repeat A.1a in height with increases for raglan until all increases are done, divide piece as explained, and then you will work A.1b (see under BODY). Happy knitting!
03.09.2020 - 09:12
![]() Tonya wrote:
Tonya wrote:
У меня такой вопрос: в 9-м ряду схемы А1 стоит накид с обеих сторон. А тоже время, согласно инструкции, мне нужно сделать прибавки с обеих сторон этой схемы. Получается, подряд идут 2 накида? Тогда получится большая дырка в этом месте. Как поступить? Спасибо!
02.09.2020 - 12:00
![]() Monica wrote:
Monica wrote:
Ik vroeg mij af of het patroon voor maat L wel klopt. Als ik de pas ga breien na de boordsteek, dan kom ik niet uit. Het voorpand heeft dan 36 steken en het achterpand 32. Volgens mij hoort het voorpand niet 22 steken recht te hebben maar 20 en het achterpand ook. Dus dan wordt de eerste naald van de pas te beginnen met 9 steken, de 22 steken voor het voorpand worden dan 20 en eindigt de naald met 11 steken recht. Klopt dit? Zo niet dan loopt het patroon van de pas niet goed met de boord.
24.07.2020 - 19:49DROPS Design answered:
Dag Monica,
Ja, zou inderdaad de steken aan kunnen passen, zodat je een gelijk aantal steken op het voor- en achterpand hebt.
18.11.2020 - 21:53
![]() Ulla Jørgensen wrote:
Ulla Jørgensen wrote:
Så har jeg fundet fejlen ang. diagram A4 og A2. Jeg har strikket fra venstre mod højre i stedet for omvendt. Derfor blev der forkert for mig :)
16.07.2020 - 20:25
![]() Ulla Jørgensen wrote:
Ulla Jørgensen wrote:
Skal hver ærme ikke starte med A4 og slutte med A2 i stedet for omvendt som det står i opskriften? Alternativt skal A2 hedde A4... jeg har nu strikket A2 først, som der står i opskriften, men det ser helt forkert ud i forhold til billederne her på siden. Det vil til gengæld stemme, hvis der byttes om. Lad mig gerne høre om jeg er helt forkert på den.
02.07.2020 - 20:44
![]() Wanessa wrote:
Wanessa wrote:
Onde estão as correções?
14.06.2020 - 01:40DROPS Design answered:
Boa tarde, As correcções já estão nas explicações mas pode sempre ver quais foram no texto a vermelho mesmo acima do diagrama. As correcções foram as seguintes: Correcção: Foram feitas alterações no diagrama A.4. Além disso, foram dadas mais indicações nas explicações acerca de como repetir os diagramas A.1a, A.2a e A.4a.
15.06.2020 - 16:41
|
|||||||||||||||||||||||||||||||
Spring Surrender#springsurrendersweater |
|||||||||||||||||||||||||||||||
 |
 |
||||||||||||||||||||||||||||||
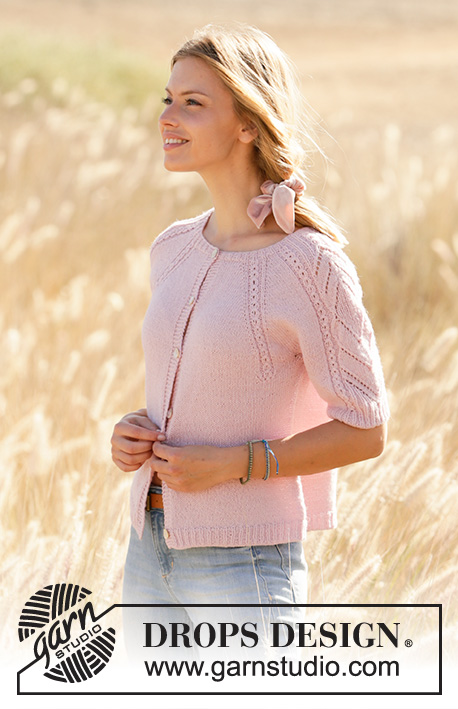
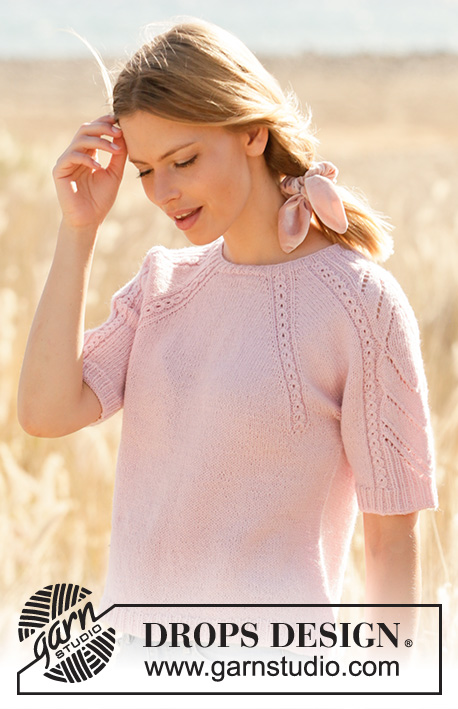
Knitted jumper with raglan in DROPS Alpaca. Piece is knitted top down with lace pattern and short sleeves. Size: S - XXXL
DROPS 212-40 |
|||||||||||||||||||||||||||||||
|
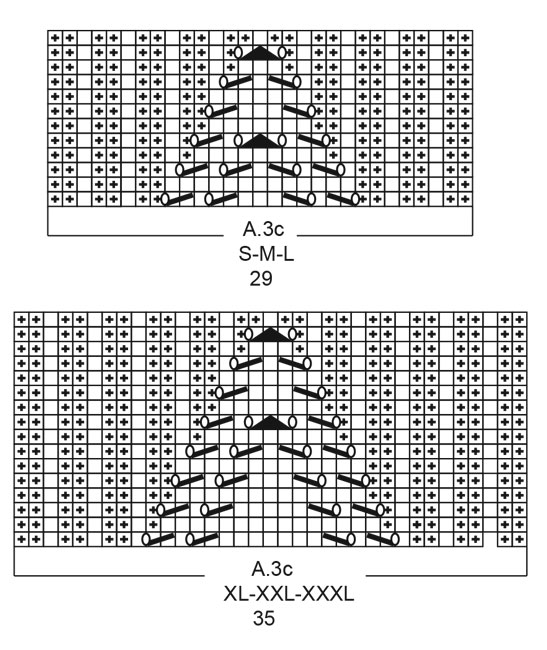
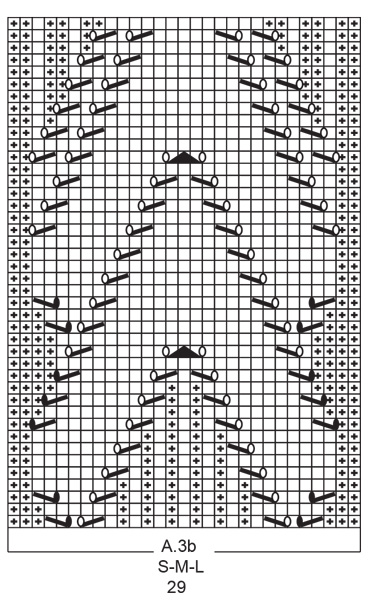
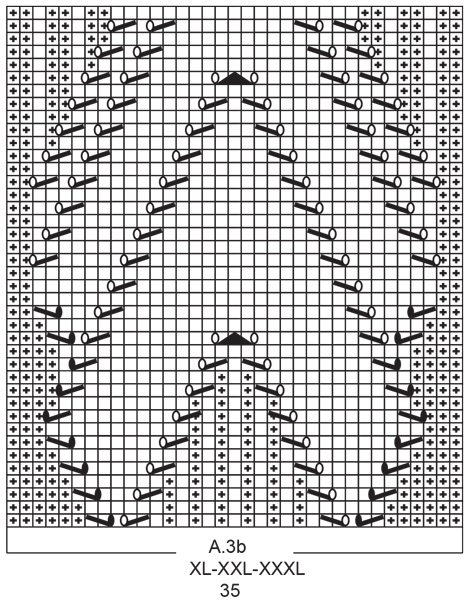
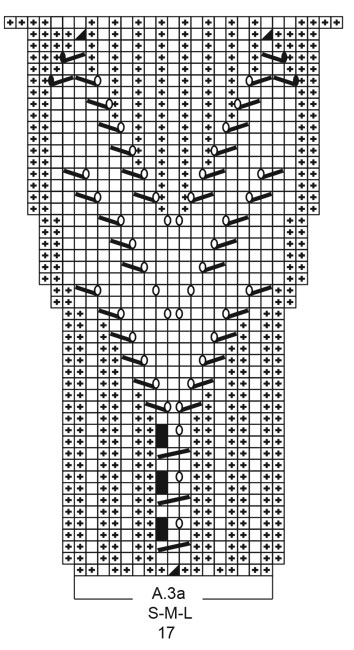
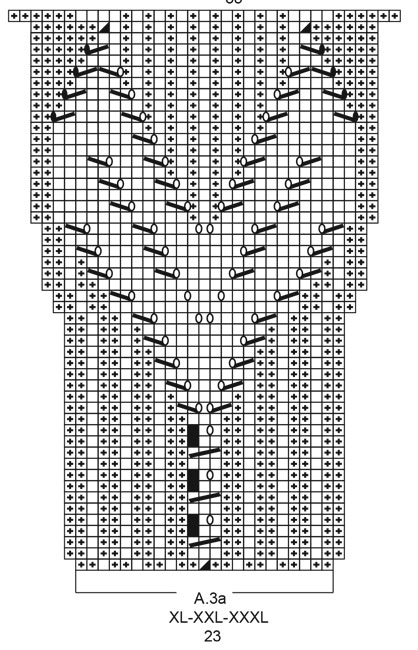
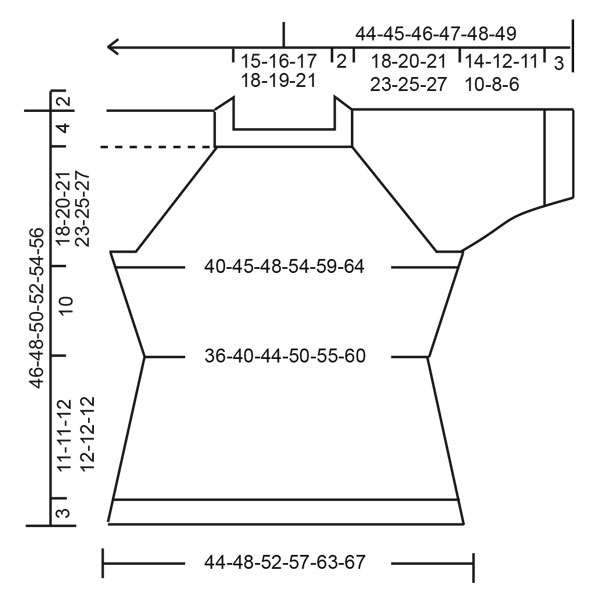
---------------------------------------------------------- EXPLANATION FOR THE PATTERN: ---------------------------------------------------------- PATTERN: See diagrams A.1 to A.4. Choose diagram for your size. INCREASE TIP-1 (applies to raglan): Increase 1 stitch by making 1 yarn over between 2 stitches. On next round knit yarn over twisted to avoid holes. Then work the new stitches in stocking stitch. INCREASE TIP-2 (applies to sides of body): Work until 2 stitches remain before marker thread, 1 yarn over, knit 4 (marker thread is in the middle of these stitches), 1 yarn over. On next round knit yarn overs twisted to avoid holes. Then work the new stitches in stocking stitch. DECREASE TIP (applies to side on body and sleeves): Decrease 1 stitch on each side of marker thread as follows: Work until 3 stitches remain before marker thread and knit 2 together, knit 2 (marker thread is between these stitches), slip 1 stitch knitwise, knit 1, pass slipped stitch over stitch worked. NUMBER OF STITCHES: As both increases and decreases are done in A.1a, A.2a, A.3a and A.4a, number of stitches vary according to which round it is counted on (depending on you are increasing/decreasing in pattern). CAST-OFF TIP: To avoid a tight cast-off edge you may use a larger needle. If this also is too tight, make 1 yarn over after approx. every 4th stitch and cast off these as regular stitches. ---------------------------------------------------------- START THE PIECE HERE: ---------------------------------------------------------- JUMPER - SHORT OVERVIEW OF THE PIECE: Work neck edge and yoke in the round on circular needle from mid back, top down. Now divide yoke for body and sleeves. Body is worked in the round on circular needle, top down. Work sleeves in the round on double pointed needles, top down. NECK EDGE: Cast on 108-120-126-132-135-144 stitches on circular needle size 2.5 mm with Alpaca. Knit 1 round. Work rib (= knit 1/purl 2). Continue rib like this for 2 cm. Switch to circular needle size 3 mm. Insert 1 marker at the beginning of round mid back, measure yoke from this marker! YOKE: Half back piece: Knit 6-9-9-9-9-12, A.1 (= 7 stitches). Right sleeve: Knit 2, A.2 (= 4 stitches), A.3a (= 17-17-17-23-23-23 stitches), A.4 (= 4 stitches), knit 2. Front piece: Work A.1 over 7 stitches, knit 11-17-22-17-19-23, A.1 over 7 stitches. Left sleeve: Knit 2, A.2 over 4 stitches, A.3a over 17-17-17-23-23-23 stitches, A.4 over 4 stitches, knit 2. Half back piece: Work A.1 over 7 stitches, knit 5-8-9-8-9-11. Work 1 round with the established pattern. On next round increase for raglan on each side of every A.1 – read INCREASE TIP-1 (= 8 stitches increased). REMEMBER THE KNITTING TENSION! Increase like this every other round 22-24-28-33-37-40 times in total. When the first 3 rows in pattern A.1, A.2 and A.4 has been worked, repeat A.1a, A.2a and A.4a in height. When A.3a has been worked 1 time vertically, work A.3b (= 29-29-29-35-35-35 stitches) over A.3a. When increase for raglan is done, there are 324-352-390-436-471-504 stitches on needle – read NUMBER OF STITCHES. Work in the established pattern until piece measures 18-20-21-23-25-27 cm from marker. Adjust so that next round is a round with total number of stitches (i.e. 324-352-390-436-471-504 stitches), this because number of stitches can vary because of decreases/increases in diagrams. On next round divide piece for body and sleeves as follows: Work over the first 45-50-54-61-68-73 stitches as before, slip the next 73-77-87-97-101-107 stitches on a stitch holder for sleeve and cast on 8 stitches under sleeve, work over the next 89-99-108-121-134-145 stitches, slip the next 73-77-87-97-101-107 stitches on a stitch holder for sleeve and cast on 8 stitches under sleeve and work the last 44-49-54-60-67-72 stitches. BODY: = 194-214-232-258-285-306 stitches. Insert 1 marker thread in the middle of the 8 stitches under over each sleeve (= in the sides of body). There are 97-107-116-129-142-153 stitches between marker threads on front piece and 97-107-116-129-143-153 stitches between marker threads on back piece. Move the marker threads upwards when working; they should be used for increase and decrease later in the sides. When last repetition of A.1a from the yoke has been worked vertically, work A.1b over every A.1a. When A.1b has been worked 1 time vertically, there are 190-210-228-254-281-302 stitches on needle. Continue in the round in stocking stitch. When piece measures 2 cm from division, decrease 1 stitch on each side of the marker thread in each side - read DECREASE TIP (= 4 stitches decreased). Decrease like this every 2 cm 4 times in total = 174-194-212-238-265-286 stitches. When piece measures 10 cm from division, increase 1 stitch on each side of marker threads in the sides - read INCREASE TIP-2(= 4 stitches increased). Increase like this every cm 9 times in total = 210-230-248-274-301-322 stitches. When piece measures 21-21-22-22-22-22 cm from division, increase 12-13-13-14-14-14 stitches evenly = 222-243-261-288-315-336 stitches. Switch to circular needle size 2.5 mm and work rib (= knit 1/purl 2). When piece measures 24-24-25-25-25-25 cm from division, cast off all stitches by knitting- read CAST-OFF TIP. SLEEVES: Slip the 73-77-87-97-101-107 stitches from stitch holder in one side of piece on double pointed needles size 3 mm and pick up 1 new stitch in each of the 8 stitches cast on under sleeve = 81-85-95-105-109-115 stitches – remember number of stitches. Insert 1 marker thread in the middle of the 8 new stitches. Move the marker thread upwards when working; it should be used for decrease mid under sleeve. READ ALL OF THE FOLLOWING SECTION BEFORE CONTINUING! Work pattern and decrease stitches mid under sleeve as follows: Work A.2a, A.3b and A.4a over the middle stitches, knit the remaining stitches. When A.3b has been worked, work A.3c over A.3b. When sleeve measures 1 cm from division, decrease 1 stitch on each side of marker thread (= 2 stitches decreased). Decrease like this every cm 3-3-3-3-5-5 times in total, then decrease every other cm 2-2-2-2-0-0 times in total = 71-75-85-95-99-105 stitches. On last round in A.3c increase 0-1-2-0-1-1 stitches before pattern, and 2-0-1-2-0-0 stitches after the pattern = 73-76-88-97-100-106 stitches. When A.3c has been worked 1 time vertically, piece measures approx. 14-12-11-10-8-6 cm from division. Switch to double pointed needles size 2.5 mm. Work next round as follows: * Knit 1, purl 2 *, work from *-* over the first 15-18-24-24-27-30 stitches, A.2b over A.2a, continue with knit over knit and purl over purl over stitches in A.3c, A.4b over A.4a, * purl 2, knit 1 *, work from *-* over 15-15-21-24-24-27 stitches and finish with purl 2 = 75-78-90-99-102-108 stitches. Continue with knit over knit and purl over purl until piece measures 17-15-14-13-11-9 cm from division, then cast off by knitting. Work the other sleeve the same way. |
|||||||||||||||||||||||||||||||
Diagram explanations |
|||||||||||||||||||||||||||||||
|
|||||||||||||||||||||||||||||||
 |
|||||||||||||||||||||||||||||||
 |
|||||||||||||||||||||||||||||||
 |
|||||||||||||||||||||||||||||||
 |
|||||||||||||||||||||||||||||||
 |
|||||||||||||||||||||||||||||||
 |
|||||||||||||||||||||||||||||||
 |
|||||||||||||||||||||||||||||||
Have you finished this pattern?Tag your pictures with #dropspattern #springsurrendersweater or submit them to the #dropsfan gallery. Do you need help with this pattern?You'll find 28 tutorial videos, a Comments/Questions area and more by visiting the pattern on garnstudio.com. © 1982-2026 DROPS Design A/S. We reserve all rights. This document, including all its sub-sections, has copyrights. Read more about what you can do with our patterns at the bottom of each pattern on our site. |
|||||||||||||||||||||||||||||||


With over 40 years in knitting and crochet design, DROPS Design offers one of the most extensive collections of free patterns on the internet - translated to 17 languages. As of today we count 325 catalogues and 12298 patterns translated into English (UK/cm). 12298
We work hard to bring you the best knitting and crochet have to offer, inspiration and advice as well as great quality yarns at incredible prices! Would you like to use our patterns for other than personal use? You can read what you are allowed to do in the Copyright text at the bottom of all our patterns. Happy crafting!
Post a comment to pattern DROPS 212-40
We would love to hear what you have to say about this pattern!
If you want to leave a question, please make sure you select the correct category in the form below, to speed up the answering process. Required fields are marked *.