
Popular categories
Looking for a yarn?


Comments / Questions (41)
![]() Kirsi wrote:
Kirsi wrote:
Miksi ruutupiirros ei näy?
17.10.2019 - 07:14DROPS Design answered:
Nyt piirros aukeaa!
19.12.2019 - 12:55
![]() Odete wrote:
Odete wrote:
Vielen Dank für die schnelle Antwort.
01.10.2019 - 14:59
![]() Marianne Frenning Olsen wrote:
Marianne Frenning Olsen wrote:
Prøver igjen jeg - det mangler diagram for størrelsene XXL og XXXL når en kommer til A2a osv. Det er mulig at det er ment at disse størrelsene inngår i diagrammet for størrelsene L og XL, men da bør de to andre størrelsene også stå der. Det mangler også på diagrammene A3, og A4. Håper dere kan rette opp dette snart? (jeg har så lyst til å bli ferdig med jakken :) )
26.09.2019 - 08:01DROPS Design answered:
Hej Marianne, vi jobber med denne, der kommer snart en opdatering af både opskrift og diagrammer :)
26.09.2019 - 08:38
![]() Odete wrote:
Odete wrote:
Stricke gerade die Jacke - Größe M. Beim Rumpfteil habe ich Muster A3.a bis A3.e 1 Mal gestrickt. In der Anleitung steht per Größe 1-0-0-0 Mal A3.a bis A3.3 weiterstricken. Das ist doch nicht richtig oder? Dass nur bei Größe S das Muster 1 Mal gestrickt wird? Wie bekomme ich denn die Länge? Danke. Am Cold cold ground C In the cold cold ground Am In the cold cold ground
23.09.2019 - 17:47DROPS Design answered:
Liebe Odette, A.3 wird zum ersten Mal über nur 2 Reihen in der Größe S gestrickt, aber in den anderen Größen stricken Sie mehr Reihen = bei der Größe M haben Sie A.3 von der 1. Reihe gestrickt, deshalb wiederholen Sie nicht A.3 in der Höhe aber stricken Sie nur die ersten 12 Reihen vom Diagram. Viel Spaß beim stricken!
24.09.2019 - 10:12
![]() Marianne Frenning Olsen wrote:
Marianne Frenning Olsen wrote:
Er det en feil i første omgang på diagram A1d og A1e? Skulle det vært et kast helt på starten av diagrammet? Masketallet på neste omgang stemmer ikke.
09.09.2019 - 08:38DROPS Design answered:
Hej Marianne, det kan se ud som om at du har ret, vi skal se på diagrammerne, hold øje med en rettelse :)
12.09.2019 - 14:13
![]() Marianna wrote:
Marianna wrote:
Zit er in patroon A1e een foutje ? Je begint het patroon met 14 steken met mindering van 2 steken en 1 omslag. Dan houd je toch maar 13 steken over.
04.09.2019 - 14:06DROPS Design answered:
Dag Marianna,
Er zat inderdaad een fout in het patroon. Inmiddels is het patroon herschreven en zijn er nieuwe telpatronen geplaatst.
16.10.2019 - 09:31
![]() Lisa wrote:
Lisa wrote:
Wordt dit hele vestmet dubbele draad gebreid ?
02.09.2019 - 09:59
![]() Birgitte Larsen wrote:
Birgitte Larsen wrote:
Kommer der en opskrift til denne?
21.08.2019 - 13:00DROPS Design answered:
Hej. Nu finns den på danska! Lycka till!
22.08.2019 - 11:55
![]() MARIE-LINE wrote:
MARIE-LINE wrote:
Ohlala on pourra le faire quand celui-là.... j'aime beaucoup beaucoup...
08.08.2019 - 22:33
![]() Daniella wrote:
Daniella wrote:
Héél mooie gilet in kunstbreiwerk.
04.08.2019 - 17:20
|
||||||||||||||||||||||||||||
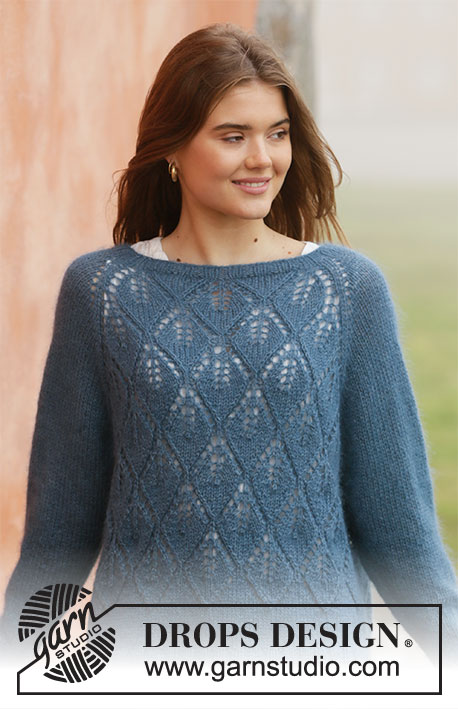
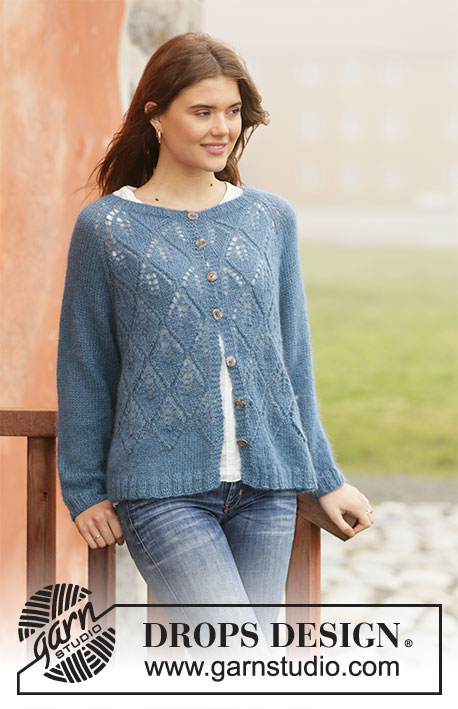
Blue Spruce Jacket#bluesprucejacket |
||||||||||||||||||||||||||||
 |
 |
|||||||||||||||||||||||||||
Knitted jacket with raglan in DROPS Nord and DROPS Kid-Silk. The piece is worked top down with lace pattern. Sizes S - XXXL.
DROPS 205-15 |
||||||||||||||||||||||||||||
|
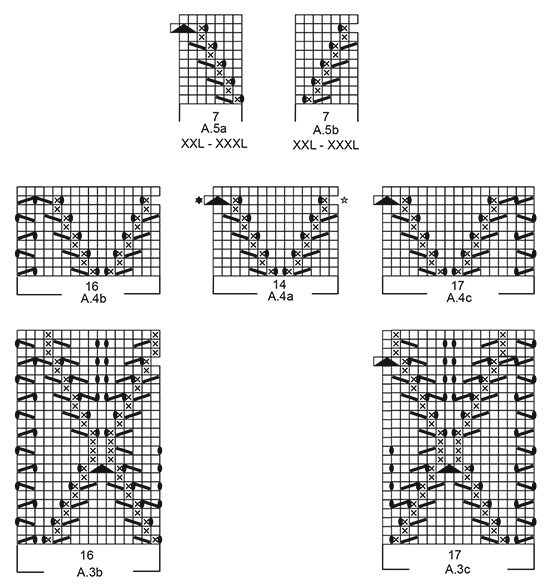
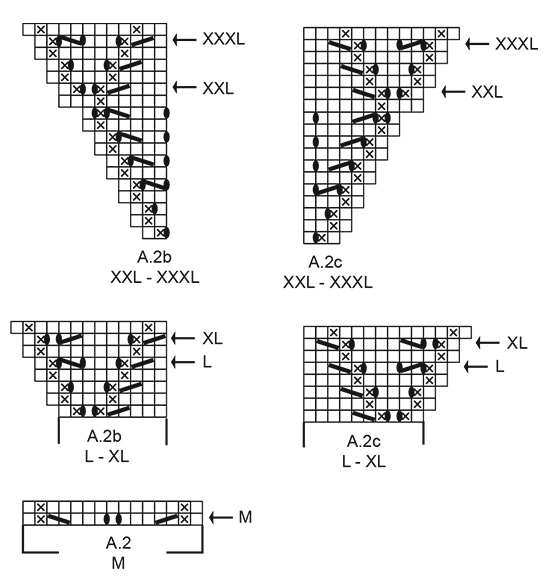
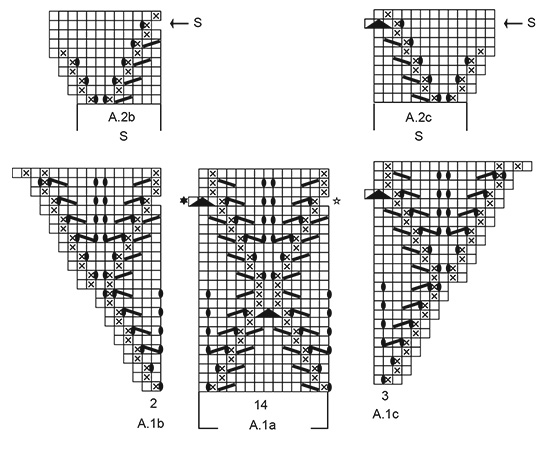
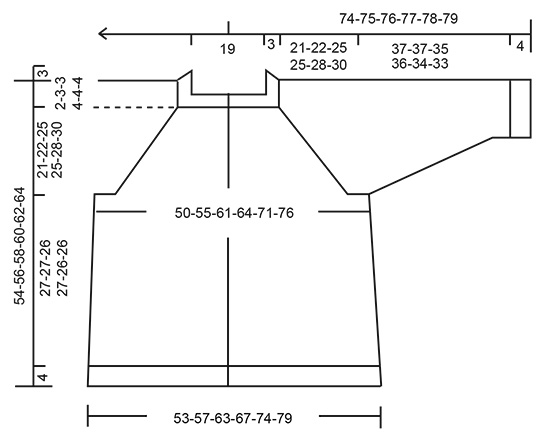
------------------------------------------------------- EXPLANATIONS FOR THE PATTERN: ------------------------------------------------------- RIDGE/GARTER STITCH (worked back and forth): Knit all rows. 1 ridge in height = Knit 2 rows. PATTERN: See diagrams A.1 to A.5. Choose diagrams for your size. INCREASE TIP-1 (evenly spaced): To work out how to increase evenly, count the total number of stitches on the needle (e.g. 82 stitches) minus the bands (e.g. 8 stitches) and divide the remaining stitches by the number of increases to be made (e.g. 9) = 8.2. In this example, increase by making 1 yarn over after approx. each 8th stitch. On the next round work the yarn overs twisted to avoid holes. INCREASE TIP-2 (for sides of body): All increases are worked from the right side! Work until there is 1 stitch left before the marker thread, make 1 yarn over, knit 2 (marker thread sits between these 2 stitches) make 1 yarn over. On the next row purl the yarn overs twisted to avoid holes. Then work the new stitches in stocking stitch. RAGLAN: All increases are worked from the right side! Increase 1 stitch on each side of each sleeve, on the inside of the marker thread and knit 1 (4 stitches increased on the row). Increase 1 stitch by making 1 yarn over. On the next row purl the yarn over twisted to avoid holes. Then work the new stitches in stocking stitch. DECREASE TIP (for sleeves): Decrease 1 stitch on each side of the marker thread as follows: Work until there are 3 stitches left before the marker thread, knit 2 together, knit 2 (marker thread sits between these 2 stitches), slip 1 stitch as if to knit, knit 1 and pass the slipped stitch over the knitted stitch. BUTTONHOLES: Work buttonholes on the right band (when the garment is worn). Work from the right side when there are 3 stitches left on the row as follows: Make 1 yarn over, knit 2 together and knit 1. On the next row knit the yarn over to leave a hole. The first buttonhole is worked when the rib on the neck measures approx. 2 cm. Then work the other 6 buttonholes with approx. 7-7-7½-7½-8-8 cm between each one. ------------------------------------------------------- START THE PIECE HERE: ------------------------------------------------------- JACKET – SHORT OVERVIEW OF THE PIECE: The neck and yoke are worked back and forth with circular needle, top down. The yoke is divided for body and sleeves and the body continued back and forth with circular needle. The sleeves are worked in the round with double pointed needles/short circular needle, top down. NECK: Cast on 82-86-90-94-94-98 stitches (including 4 band stitches in garter stitch on each side towards mid front) with circular needle size 4 mm and 1 strand Nord + 1 strand Kid-Silk (= 2 strands). Purl 1 row (wrong side). The next row is worked as follows from the right side: 4 band stitches in GARTER STITCH – read description above, *knit 2 / purl 2*. work from *-* until there are 6 stitches left on the row, knit 2 and finish with 4 band stitches in garter stitch. Continue back and forth like this for 3 cm. REMEMBER BUTTONHOLES on the right band – read description above. When the rib is finished, knit 1 row from the right side where you increase 9-9-5-5-5-5 stitches evenly spaced – read INCREASE TIP-1 = 91-95-95-99-99-103 stitches. Purl 1 row from the wrong side (the yarn overs are purled twisted and the band stitches are worked in garter stitch to finished length). Change to circular needle size 5 mm. Insert 1 marker after the band at the beginning of the row mid front; the yoke will be measured from this marker! YOKE: Now work pattern as follows: 4 band stitches in garter stitch, knit 1, A.1a over the next 14 stitches, A.1b over the next 2 stitches, insert a marker thread here (= in the transition between left front piece and left sleeve), knit 1, make 1 yarn over, knit 6-8-8-10-10-12, 1 yarn over, knit 1, insert a marker thread here (= in transition between left sleeve and back piece), A.1c over the next 3 stitches, A.1a over the next 28 stitches (= 2 repeats in width), A.1b over the next 2 stitches, insert a marker thread here (= in transition between back piece and right sleeve), knit 1, 1 yarn over, knit 6-8-8-10-10-12, 1 yarn over, knit 1, insert a marker thread here (= in transition between right sleeve and right front piece), A.1c over the next 3 stitches, A.1a over the next 14 stitches and finish with 4 band stitches in garter stitch. You now have 1 marker thread in each transition between body and sleeves (= 4 marker threads – allow them to follow your work onwards). In addition to the increases in the diagrams, you have increased 1 stitch on each side of the sleeves to RAGLAN – read description above. REMEMBER THE KNITTING TENSION! Continue this pattern back and forth and increase to raglan on the sleeves every 2nd row 18-19-22-21-20-20 more times, then every 4th row 2-2-2-3-5-6 times (= a total of 21-22-25-25-26-27 times on each side of the sleeves). AT THE SAME TIME on row 21 in A.1a, work as described by the white star after the band stitches at the beginning of the row (seen from the right side) and as described by the black star before the band stitches at the end of the row – read description in the symbol explanations. When A.1a, A.1b and A.1c have been completed in height, continue the pattern in the same way; i.e. work A.1b and A.1c towards the raglan on the sides of the front and back pieces and leaf pattern (= A.1a) as before between the raglan on the back piece (= A.1b and A.1c) and between the raglan and bands on the front pieces until you have worked 36-46-48-48-48-48 rows of pattern in height and there are 42-47-49-49-49-49 stitches on each front piece (including the 4 band stitches) and 75-85-89-89-89-89 stitches on the back piece. There are 3-4-4-4-5-5 leaves along the raglan. Now continue in the different sizes as follows. Size M: Continue the leaf pattern in the same way, but towards the markers in each raglan (on the front and back pieces) work pattern A.2 (i.e. no more increases to raglan). There are now 47 stitches on each front piece (including the 4 band stitches) and 85 stitches on the back piece. When you have worked up to and including the row with the arrow in the diagrams (and all the increases on the sleeves are finished) there are 287 stitches on the needle. The piece measures approx. 22 cm. If the piece is shorter than this continue with the leaf-pattern (without increasing to raglan) to the correct length. Sizes S, L, XL, XXL and XXXL: Continue the leaf pattern in the same way, but towards the markers in each raglan (on the front and back pieces) work pattern as shown in A.2b and A.2 c. When all the increases are finished there are 45-52-53-57-59 stitches on each front piece (including the 4 band stitches) and 81-95-97-105-109 stitches on the back piece. When you have worked up to and including the arrow for your size in the diagrams (and all the increases on the sleeves are finished) there are 271-319-327-347-363 stitches on the needle. The piece should measure approx. 21-25-25-28-30 cm. If the piece is shorter than this continue with the leaf-pattern (without increasing to raglan) to the correct length. ALL SIZES: The yoke is now divided for body and sleeves. The next row (= row after the row with the arrow) from the wrong side is worked as follows: NOTE: In sizes XXL and XXXL you work 1-3 sleeve-stitches onto the back/front pieces. Work the first 45-47-52-53-58-62 stitches (= right front piece), place the next 50-54-60-62-62-62 stitches on a thread for sleeve and cast on 4-8-8-12-14-14 new stitches on the needle (= in side under sleeve), work the next 81-85-95-97-107-115 stitches (= back piece), place the next 50-54-60-62-62-62 stitches on a thread for sleeve and cast on 4-8-8-12-14-14 new stitches on the needle (= in side under sleeve), work the last 45-47-52-53-58-62 stitches (= left front piece). The body and sleeves are finished separately. THE PIECE IS NOW MEASURED FROM HERE! BODY: There are 179-195-215-227-251-267 stitches on the body. Insert a marker thread in the middle of the 4-8-8-12-14-14 stitches cast on under each sleeve (= 2-4-4-6-7-7 new stitches on each side of each marker thread). Work pattern from the right side as follows: NOTE: The pattern should match the pattern from the yoke; make sure you continue from the correct row in the diagrams. Work 4 band stitches in garter stitch, leaf pattern as before over the next 15-29-29-29-36-36 stitches, A.3b over the next 16 stitches, 12-2-7-10-9-13 stitches in stocking stitch (marker thread sits here), 12-2-7-10-9-13 stitches in stocking stitch, A.3c over the next 17 stitches, leaf pattern as before over the next 28-56-56-56-70-70 stitches (= 2-4-4-4-5-5 repeats of A.1a in width), A.3b over the next 16 stitches, 12-2-7-10-9-13 stitches in stocking stitch (marker thread sits here), 12-2-7-10-9-13 stitches in stocking stitch, A.3c over the next 17 stitches, leaf pattern as before over the next 14-28-28-28-35-35 stitches and 4 band stitches in garter stitch. AT THE SAME TIME when the piece measures 4 cm, increase 2 stitches in each side – read INCREASE TIP-2. Repeat this increase when the piece measures 12 cm = 187-203-223-235-259-275 stitches. When the piece measures approx. 17-16-14-13-15-14 cm – adjust so you finish after a row like row 12 in A.1a, you have 5 cm left of pattern and 5-6-7-9-6-7 cm left of stocking stitch before the rib at the bottom of the body. Now work pattern in the different sizes as follows. Sizes S, M, L and XL: Work 4 band stitches in garter stitch, knit 1, work A.4a over the next 14-28-28-28 stitches (= 1-2-2-2 repeats), A.4b over the next 16 stitches, stocking stitch over the next 14-4-9-12 stitches, marker thread sits here, work stocking stitch over the next 14-4-9-12 stitches, A.4c over the next 17 stitches, A.4a over the next 28-56-56-56 stitches (= 2-4-4-4 repeats), A.4b over the next 16 stitches, stocking stitch over the next 14-4-9-12 stitches, marker thread sits here, work stocking stitch over the next 14-4-9-12 stitches, A.4c over the next 17 stitches, A.4a over the next 14-28-28-28 stitches (= 1-2-2-2 repeats) and 4 band stitches in garter stitch. Continue this pattern back and forth until A.4a-A.4c have been completed in height. Continue from ALL SIZES – read description below. Sizes XXL and XXXL: Work 4 band stitches in garter stitch, knit 1, A.5a over the next 7 stitches, A.4a over the next 28-28 stitches (= 2-2 repeats), A.4b over the next 16 stitches, stocking stitch over the next 11-15 stitches, marker thread sits here, stocking stitch over the next 11-15 stitches, A.4c over the next 17 stitches, A.4a over the next 70-70 stitches (= 5 repeats), A.4b over the next 16 stitches, stocking stitch over the next 11-15 stitches, marker thread sits here, stocking stitch over the next 11-15 stitches, A.4c over the next 17 stitches, A.4a over the next 28-28 stitches (= 2-2 repeats), A.5b over the next 7 stitches and 4 band stitches in garter stitch. Continue back and forth like this until A.4a-A.4c, A.5a and A.5b have been completed in height. Continue from ALL SIZES below. ALL SIZES: Continue with stocking stitch and band stitches in garter stitch until the body measures 27-27-26-27-26-26 cm. Knit 1 row where you increase 27-31-35-35-39-43 stitches evenly spaced = 214-234-258-270-298-318 stitches. Change to circular needle size 4 mm and work rib as follows: 4 band stitches in garter stitch, * knit 2, purl 2 * work from *-* until there are 6 stitches left on the row, knit 2 and 4 band stitches in garter stitch. When the rib measures 4 cm, cast off with knit over knit and purl over purl. The jacket measures approx. 54-56-58-60-62-64 cm from the shoulder down. SLEEVE: Place the 50-54-60-62-62-62 stitches from the thread on the one side of the piece on double pointed needles/short circular needle size 5 mm and knit up 1 stitch in each of the 4-8-8-12-14-14 stitches cast on under the sleeve = 54-62-68-74-76-76 stitches. Insert a marker thread in the middle of the 4-8-8-12-14-14 new stitches under the sleeve (2-4-4-6-7-7 new stitches on each side of the thread). Work stocking stitch in the round. When the sleeve measures 4 cm, decrease 2 stitches mid under sleeve – read DECREASE TIP. Decrease like this every 3½-2½-2-1½-1½-1½ cm a total of 9-13-15-17-17-16 times = 36-36-38-40-42-44 stitches. When the sleeve measure 37-37-35-36-34-33 cm, knit 1 round where you increase 4-4-6-4-6-4 stitches evenly spaced = 40-40-44-44-48-48 stitches. Change to double pointed needles size 4 mm and work rib (= 2 knit / purl 2) for 4 cm. Cast off with knit over knit and purl over purl. Work the other sleeve in the same way. ASSEMBLY: Sew buttons onto the left band. |
||||||||||||||||||||||||||||
Diagram explanations |
||||||||||||||||||||||||||||
|
||||||||||||||||||||||||||||
 |
||||||||||||||||||||||||||||
 |
||||||||||||||||||||||||||||
 |
||||||||||||||||||||||||||||
 |
||||||||||||||||||||||||||||
Have you finished this pattern?Tag your pictures with #dropspattern #bluesprucejacket or submit them to the #dropsfan gallery. Do you need help with this pattern?You'll find 27 tutorial videos, a Comments/Questions area and more by visiting the pattern on garnstudio.com. © 1982-2026 DROPS Design A/S. We reserve all rights. This document, including all its sub-sections, has copyrights. Read more about what you can do with our patterns at the bottom of each pattern on our site. |
||||||||||||||||||||||||||||


With over 40 years in knitting and crochet design, DROPS Design offers one of the most extensive collections of free patterns on the internet - translated to 17 languages. As of today we count 324 catalogues and 12290 patterns translated into English (UK/cm). 12290
We work hard to bring you the best knitting and crochet have to offer, inspiration and advice as well as great quality yarns at incredible prices! Would you like to use our patterns for other than personal use? You can read what you are allowed to do in the Copyright text at the bottom of all our patterns. Happy crafting!
Post a comment to pattern DROPS 205-15
We would love to hear what you have to say about this pattern!
If you want to leave a question, please make sure you select the correct category in the form below, to speed up the answering process. Required fields are marked *.