
Popular categories
Looking for a yarn?


Comments / Questions (42)
![]() Maureen Thomas wrote:
Maureen Thomas wrote:
Please can you help me. How can I alter the pattern to produce a slightly lower (more scooped) neckline at the front?
30.09.2022 - 16:08DROPS Design answered:
Dear Maureen, we don't make custom patterns. You could check out other jackets worked with Merino ExtraFine in our collection and see if there is a neckline which fits your idea. Happy knitting!
02.10.2022 - 23:37
![]() Carol McMillan wrote:
Carol McMillan wrote:
Is the bottom ribbing done with the larger or smaller needle?
09.05.2022 - 16:23DROPS Design answered:
Dear Carol, the bottom ribbing is worked with the 3.5mm needle, as indicated in the pattern. Happy knitting!
09.05.2022 - 19:42
![]() Paula wrote:
Paula wrote:
He hecho esta preciosa chaqueta y es una maravilla, sienta muy bien y es cómoda.
13.02.2022 - 13:01
![]() Margit Roos wrote:
Margit Roos wrote:
Der henvises til flg. mønstre A1, A1B, A2 og A3. A3 findes ikke i opskriftsudskriften. Hvor kan jeg finde A3?
09.02.2022 - 23:23DROPS Design answered:
Hej Margit, Tak for info, vi har fjernet A.3 :)
11.02.2022 - 07:59
![]() Margit Roos wrote:
Margit Roos wrote:
Sweet Iris Jacket /DROPS 206-51 I afsnit Raglan henvises til udtagning: ... der tages ud på hver side af de 4 midterste rapporter i A1... Hvad betyder det ift Diagram A1? Hvilke masker er der tale om ift diagrammet? Skal ind- og udtagninger kun strikkes på retsiden?
09.02.2022 - 16:32DROPS Design answered:
Hej Margit, det er på hver side af de 4 diagrammer som er i hver raglanovergang (ikke dem mod midt foran). Ja du tager ud på hver 2.pind :)
11.02.2022 - 07:55
![]() Maria wrote:
Maria wrote:
Dzień dobry! Sweter DROPS / 206 / 51 Dziękuję za odpowiedź. Tak bardzo chciałam już wczoraj zacząć mój sweter, że przeczytałam kilka razy i z próbką w ręku rozwiązałam ten problem, właśnie tak jak piszesz i nie wiem, czemu nie zrozumiałam tego od razu. Wszystko jest bardzo dobrze wyjaśnione, ale miło było się z Wami skontaktować. Pozdrawiam Maria
16.09.2021 - 12:24DROPS Design answered:
Witaj Mario, nam również jest bardzo miło. Pisz kiedy tylko potrzebujesz. Sama wiem jak ten nałóg wciąga i jak trudno się oderwać od pracy, nawet jak coś nie wychodzi :) Pozdrawiamy gorąco!
16.09.2021 - 12:53
![]() Maria wrote:
Maria wrote:
Dzień dobry. Chcę zrobić sweter z wzoru DROPS / 206 / 51 i mam problem ze schematem A!, tzn. jak robię na prawej stronie 2 oczka lewe, zdjąć 1 oczko, przerobić 2 razy następne oczko, przełożyć oczko zdjęte ponad 2 przerobionymi oczkami, 2 oczka lewe to z 6 oczek zostaje mi 5. Na lewej stronie robię oczka jak schodzą z drutu i tu już się zgubiłam, gdzie narzut? Może ktoś mi wyjaśni, albo jakiś filmik. Proszę o pomoc. Pozdrawiam Maria Pietrzak
15.09.2021 - 18:48DROPS Design answered:
Witaj Mario, Pierwszy rząd : 2 oczka lewe, a następnie zdjąć 1 oczko, przerobić 2 razy następne oczko wkłuwając drut raz z przodu, a raz z tyłu tego samego oczka (z 1 oczka mamy teraz 2) i przełożyć oczko zdjęte ponad 2 przerobionymi oczkami (zostaje 2 oczka), 2 oczka lewe > 6 oczek. Drugi rząd: 2 oczka prawe, 1 oczko lewe (jedno z tych 2 oczek nabranych w 1 oczko w poprzednim rzędzie), narzut, 1 oczko lewe, 2 oczka prawe > 7 oczek. Liczba oczek w schemacie A.1 będzie wahać się między 6 i 7. Powodzenia!
16.09.2021 - 11:49
![]() Ellen wrote:
Ellen wrote:
Wie wird der Umschlag im Muster gestrickt, normal oder verschränkt?
14.03.2021 - 09:32DROPS Design answered:
Liebe Ellen, der Umschlag in A.1/A.2 wird ganz normal gestrickt, es muss ein Loch enstehen. Dieses Video zeigt einen ähnlichen Zopf. Viel Spaß beim stricken!
15.03.2021 - 08:39
![]() Ana wrote:
Ana wrote:
Ok. Gracias
01.03.2021 - 23:09
![]() Ana wrote:
Ana wrote:
Porque decis siempre:, tejer una vuelta revés por el revés en el comienzo del canesú... Yo interpreto q despues del montaje de puntos la primera pasada es el derecho de la labor y el hilo queda a la derecha.... Tal como decis lo que para mi es derecho para vosotros es revés. Me equivoco??
28.02.2021 - 15:57DROPS Design answered:
Hola Ana, no es siempre. En algunos modelos, para tener un borde más bonito, la 1ª fila/vuelta se trabaja de revés. Luego, dependiendo del patrón, esta puede ser una fila por el lado revés, por lo que, cuando trabajamos por el lado derecho, el extremo del hilo de montaje está situado a la izquierda.
28.02.2021 - 17:55
|
|||||||||||||||||||
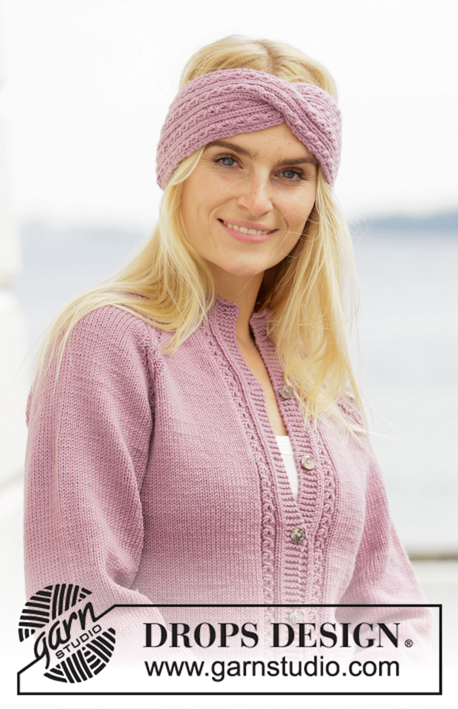
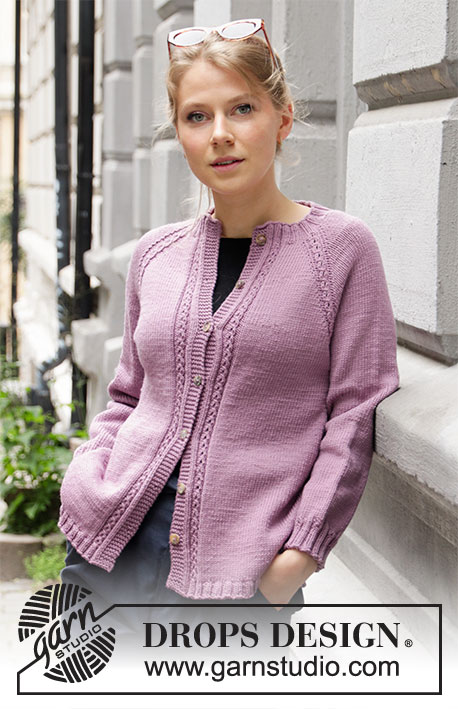
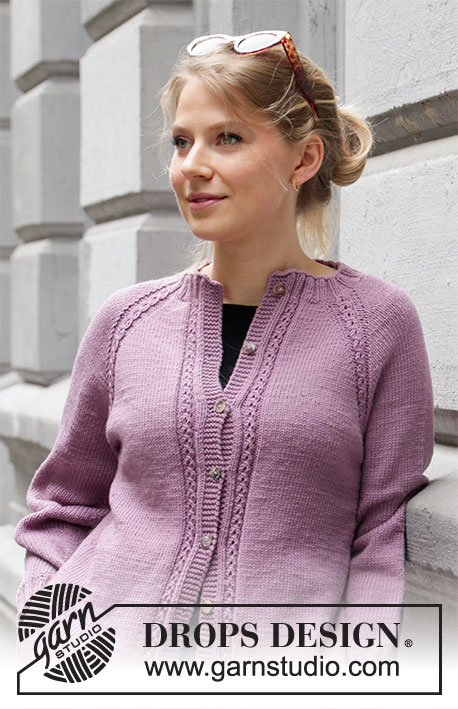
Sweet Iris Jacket#sweetirisjacket |
|||||||||||||||||||
 |
 |
||||||||||||||||||
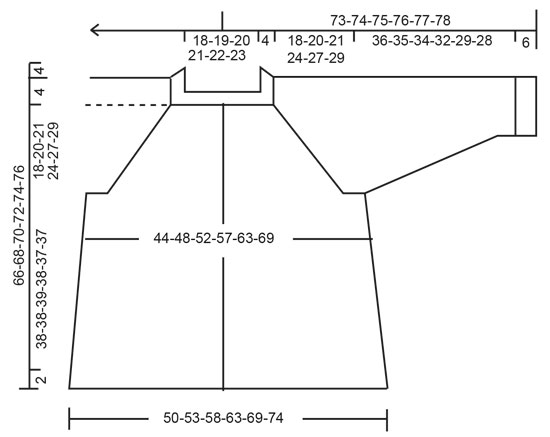
Knitted jacket with raglan in DROPS Merino Extra Fine. Piece is knitted top down with false cables. Size: S - XXXL
DROPS 206-51 |
|||||||||||||||||||
|
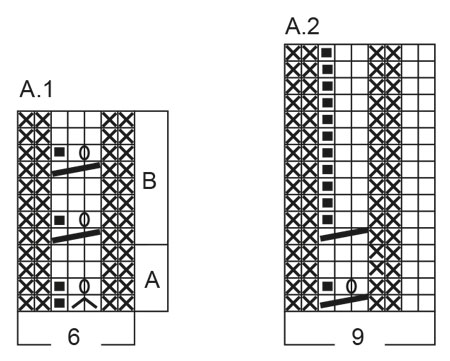
---------------------------------------------------------- EXPLANATION FOR THE PATTERN: ---------------------------------------------------------- GARTER STITCH (back and forth): 1 ridge = knit 2 rows. RAGLAN: All increases are done from the right side. Increase in every transition between sleeves and body as follows (increase on each side of the middle 4 repetitions of A.1, do not increase at A.1 on each side of bands): Work until A.1, make 1 yarn over, work A.1, make 1 yarn over (= 2 stitches increased). On next row (wrong side) purl yarn overs twisted to avoid holes. Then work the new stitches in stocking stitch. Increase 8 stitches in total on every increase row. PATTERN: See diagrams A.1 and A.2. Number of stitches in A.1 varies between 6 and 7 stitches, but stitches should always be counted as 6 stitches. Diagrams show all rows in pattern seen from the right side. DECREASE TIP (applies to mid under sleeves): Decrease 1 stitch on each side of marker thread as follows: Work until 3 stitches remain before marker thread, knit 2 together, knit 2 stitches (marker thread is between these 2 stitches), slip 1 stitch knitwise, knit 1, pass slipped stitch over stitch worked (= 2 stitches decreased). BUTTONHOLES: Decrease for buttonholes on right band (when garment is worn). Decrease from right side when 3 stitches remain on row as follows: Make 1 yarn over, work the next 2 stitches together, work last stitch. On next row (wrong side) knit yarn over to make a hole (i.e. do not knit twisted). Decrease first buttonhole when rib in neck measures approx. 1½-2 cm. Then decrease the next 5-6-6-6-6-6 buttonholes, approx. 8-8-8-8-8½-9 cm between each. ---------------------------------------------------------- START THE PIECE HERE: ---------------------------------------------------------- JACKET - SHORT OVERVIEW OF THE PIECE: Work neck edge, yoke and body back and forth on circular needle from mid front, work top down. Work sleeves in the round on double pointed needles/a short circular needle, top down. NECK EDGE: Cast on 104-104-120-120-136-136 stitches (including 5 band stitches in each side towards mid front) on circular needle size 3.5 mm with Merino Extra Fine. Purl 1 row (= wrong side). Work next row as follows from right side: 5 band stitches in GARTER STITCH - read explanation above - * knit 2, purl 2 *, repeat from *-* until 7 stitches remain, knit 2 and finish with 5 band stitches in garter stitch. Continue rib like this for 4 cm – remember BUTTONHOLES on right band – read explanation above. Finish with a row from wrong side. Switch to circular needle size 4 mm. YOKE: Then work as follows from right side: 5 stitches in garter stitch, 2 stitches in stocking stitch, A.1A (= 6 stitches), 6-6-10-10-14-14 stitches in stocking stitch, make 1 yarn over, A.1A, make 1 yarn over, 6 stitches in stocking stitch, make 1 yarn over, A.1A, make 1 yarn over, 30-30-38-38-46-46 stitches in stocking stitch, make 1 yarn over, A.1A, make 1 yarn over, 6 stitches in stocking stitch, make 1 yarn over, A.1A, make 1 yarn over, 6-6-10-10-14-14 stitches in stocking stitch, A.1A, 2 stitches in stocking stitch, 5 stitches in garter stitch. On next row purl yarn overs twisted to avoid holes (first increase for raglan is now done). Then work in stocking stitch with 5 band stitches in garter stitch and 6 repetitions of A.1. Continue increase for raglan every other row (i.e. on every row from right side) until increase has been done 25-29-29-34-35-41 times in total on each side of the 4 middle repetitions of A.1. When A.1A has been worked 1 time vertically, repeat A.1B upwards. After last increase there are 304-336-352-392-416-464 stitches on needle. Work without increases until piece measures 22-24-25-28-31-33 cm from cast-on edge mid front, continue pattern as before, finish with 1st or 5th row in A.1B. Now the piece will be divided for body and sleeves. Continue with garter stitch over the bands and pattern as before over the outermost repetitions of A.1B in each side, work stocking stitch over the 4 middle repetitions of A.1B. Work next row as follows from wrong side: Work 47-51-55-60-65-71 stitches as before (= front piece), slip the next 62-70-70-80-82-94 stitches on 1 stitch holder for sleeve, cast on 6-6-8-8-10-10 new stitches on needle (= in the side under sleeve), knit 86-94-102-112-122-134 stitches (= back piece), slip the next 62-70-70-80-82-94 stitches on 1 stitch holder for sleeve, cast on 6-6-8-8-10-10 new stitches on needle (= in the side under sleeve) and work the remaining 47-51-55-60-68-71 stitches as before (= front piece). Now finish body and sleeves separately. NOW MEASURE THE PIECE FROM HERE! BODY: = 192-208-228-248-272-296 stitches. Work first row from right side: Continue in stocking stitch, 5 band stitches in garter stitch and A.1 towards mid front (= where A.1 was previously worked in transition between body and sleeve, now work in stocking stitch) insert 1 marker thread in each side, in the middle of the new 6-6-8-8-10-10 stitches cast on (back piece = 92-100-110-120-132-144 stitches, front piece = 50-54-59-64-70-76 stitches). When piece measures 4 cm from division, increase 1 stitch on each side of every marker thread (= 4 stitches increased). Increase every 5 cm 6 times in total = 216-232-252-272-296-320 stitches. Continue until piece measures 38-38-39-38-37-37 cm. Knit 1 row from right side while increasing 44-48-52-56-60-64 stitches evenly = 260-280-304-328-356-384 stitches. Switch to circular needle size 3.5 mm. Work next row as follows from wrong side: 5 stitches in garter stitch, * purl 2, knit 2 *, repeat from *-* until 7 stitches remain on needle, purl 2 and 5 stitches in garter stitch. Continue rib for 2 cm, then cast off with knit over knit and purl over purl. SLEEVE: Slip the 62-70-70-80-82-94 stitches from stitch holder in one side of piece double pointed needles or a short circular needle size 4 mm and pick in addition up 1 stitch in each of the 6-6-8-8-10-10 new stitches cast on in the side under sleeve = 68-76-78-88-92-104 stitches. Insert 1 marker thread in the middle of the 6-6-8-8-10-10 stitches under sleeve and begin round here. Work in stocking stitch in the round. When piece measures 3 cm from division, decrease 2 stitches mid under sleeve - read DECREASE TIP. Decrease like this every 5-5-4-2½-1½-1½ cm 7-7-8-13-15-16 times in total = 54-62-62-62-62-72 stitches. Continue until sleeve measures 36-35-34-32-29-28 cm from division (shorter measurements in the larger sizes because of longer yoke). Knit 1 round while increasing 0-1-1-1-1-0 stitches evenly = 54-63-63-63-63-72 stitches. Switch to double pointed needles size 3.5 mm and work A.2 in the round (= 6-7-7-7-7-8 repetitions of 9 stitches, after 6th round there are 48-56-56-56-56-64 stitches on round). Cast off with knit over knit and purl over purl (to avoid a tight cast-off edge use double pointed needles size 4 mm). Sleeve measures approx. 42-41-40-38-37-36 cm from division. Work the other sleeve the same way. ASSEMBLY: Sew the buttons on to the left band. ---------------------------------------------------------- |
|||||||||||||||||||
Diagram explanations |
|||||||||||||||||||
|
|||||||||||||||||||
 |
|||||||||||||||||||
 |
|||||||||||||||||||
Have you finished this pattern?Tag your pictures with #dropspattern #sweetirisjacket or submit them to the #dropsfan gallery. Do you need help with this pattern?You'll find 29 tutorial videos, a Comments/Questions area and more by visiting the pattern on garnstudio.com. © 1982-2026 DROPS Design A/S. We reserve all rights. This document, including all its sub-sections, has copyrights. Read more about what you can do with our patterns at the bottom of each pattern on our site. |
|||||||||||||||||||


With over 40 years in knitting and crochet design, DROPS Design offers one of the most extensive collections of free patterns on the internet - translated to 17 languages. As of today we count 324 catalogues and 12290 patterns translated into English (UK/cm). 12290
We work hard to bring you the best knitting and crochet have to offer, inspiration and advice as well as great quality yarns at incredible prices! Would you like to use our patterns for other than personal use? You can read what you are allowed to do in the Copyright text at the bottom of all our patterns. Happy crafting!
Post a comment to pattern DROPS 206-51
We would love to hear what you have to say about this pattern!
If you want to leave a question, please make sure you select the correct category in the form below, to speed up the answering process. Required fields are marked *.