
Popular categories
Looking for a yarn?


Comments / Questions (9)
![]() Conny Fahrendorf wrote:
Conny Fahrendorf wrote:
Zijn alleen de heengaande naalden in het patroon getekend?
22.08.2021 - 11:49DROPS Design answered:
Dag Conny,
Nee, zowel de heengaande als de teruggaande naalden zijn in het telpatroon getekend.
03.09.2021 - 10:22
![]() Anne wrote:
Anne wrote:
Hej igen, bare glem mit “knaphuls spørgsmål” jeg havde åbenbart ikke fået skrevet hele opskriften ud !
31.08.2019 - 13:38DROPS Design answered:
Hej Anne, Super - god fornøjelse! :)
02.09.2019 - 15:32
![]() Anne wrote:
Anne wrote:
Er lige begyndt på denne model og har strikket de første 4 pinde. I opskriften står der så “husk knaphul”. Dette skal selvfølgelig strikkes i de 5 ret m kanten, men over hvor mange masker og hvor i opskriften står der noget om det?
31.08.2019 - 10:04DROPS Design answered:
Hej Anne, ser at du har fundet svaret selv :)
02.09.2019 - 15:31
![]() Gry Rønnevik wrote:
Gry Rønnevik wrote:
Hei. Hvis jeg legger sammen alle mønstrene som er oppgitt får jeg 132 masker, mens det i oppskrifta bare står oppført 119masker. På størrelse L. Får da 5 stolper rille, A1=1m, A2=16-m, 1mr, 1k, 15r, 1k, 1r, A3=16m, A4=1m, A2=16m, 1r, 1k, 15 m, 1k, 1r, A3=16-m, A5=1m, 5stolpemasker. Dette blir 132 m, men det står oppført 119m. Hvor er feilen?
02.08.2019 - 10:39DROPS Design answered:
Hej Gry, hvis du lægger dine tal sammen så får du 111 m (uden kast) + 4 kast (på hver side af ærmet) + 4 kast (fra diagrammerne) = 119 masker. God fornøjelse!
02.08.2019 - 11:43
![]() Christa wrote:
Christa wrote:
Toll ich habe gerade die deutsche Uebersetzung gefunden,freue mich sehr,bin am nachdenken ob ich beide Jacke und Pullover stricke. Besten Dank Christa.
28.03.2019 - 15:19
![]() Martine wrote:
Martine wrote:
Proposez le même au crochet. Merci
18.12.2018 - 08:43
![]() Ilovedogs wrote:
Ilovedogs wrote:
Bello e adatto a qualunque età
17.12.2018 - 19:46
![]() Chantal wrote:
Chantal wrote:
Bonsoir ... J'adore ce modèle, il est chic tout en étant tout allé... Bien Habillée pour les jeunes aux ainées ! BRAVO à tous vos CRÉATEURS et grand merci de nous donner la possibilité de les réaliser avec tous vos tutos que vos nous proposés ! ... Cordialement Vôtre Chantal
13.12.2018 - 00:24
![]() Angelika wrote:
Angelika wrote:
Raglan-Teile bevorzuge ich besonders, da sie sich viel besser stricken und individuell anpassen lassen. Außerdem entfällt das lästige Zusammennähen. Diese Jacke gefällt mir sehr gut in ihrer Farb- und Formgebung.
11.12.2018 - 19:10
|
||||||||||
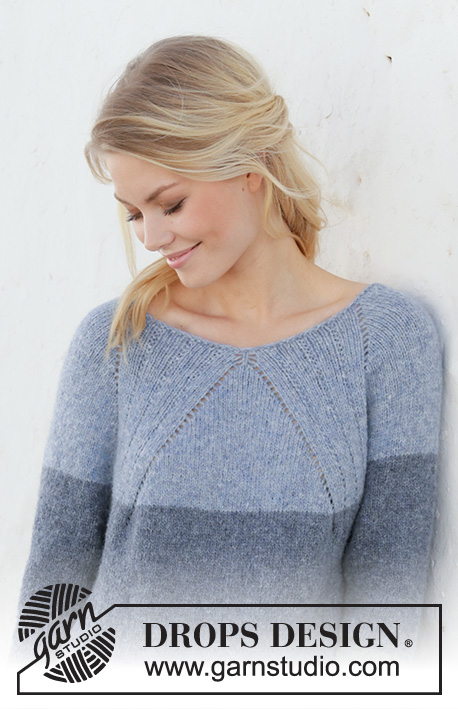
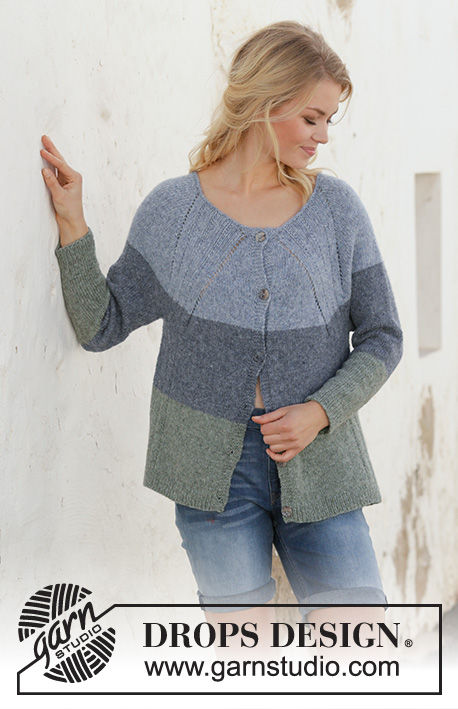
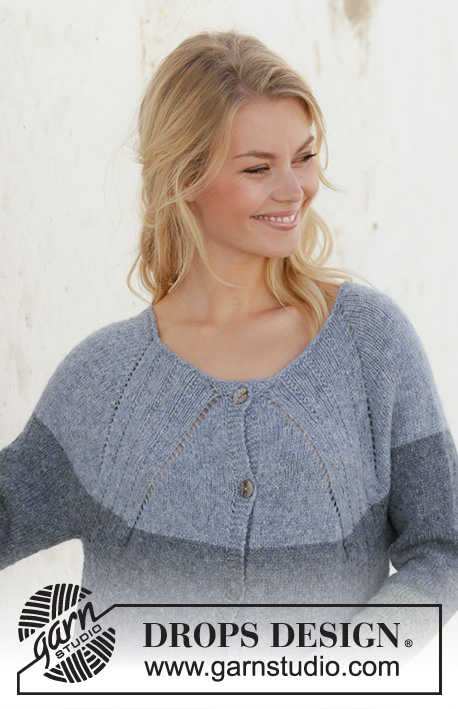
Sweet Nothing Cardigan#sweetnothingcardigan |
||||||||||
 |
 |
|||||||||
Knitted jacket with raglan in DROPS Sky. The piece is worked top down with stripes and a split in each side. Sizes S - XXXL.
DROPS 199-19 |
||||||||||
|
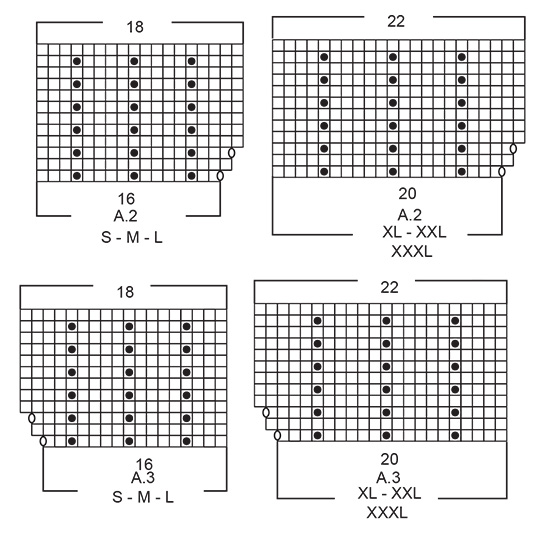
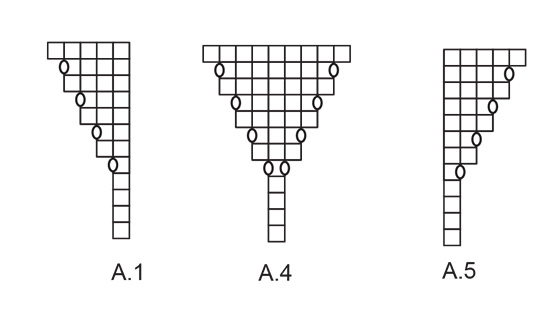
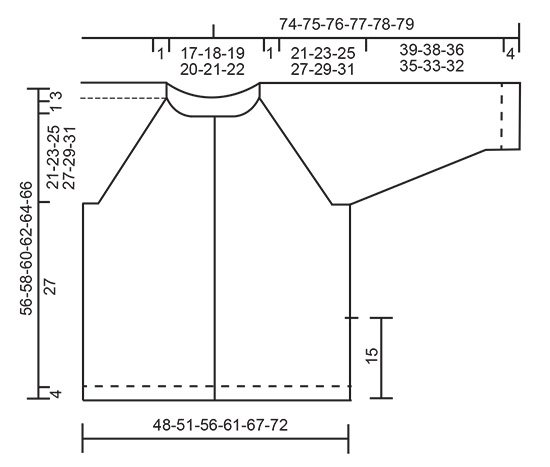
------------------------------------------------------- EXPLANATIONS FOR THE PATTERN: ------------------------------------------------------- RIDGE/GARTER STITCH (worked back and forth): Knit all rows. 1 ridge in height = Knit 2 rows. PATTERN: See diagrams A.1 to A.5. Choose diagram for your size. INCREASE TIP-1 (evenly spaced): To work out how to increase evenly, count the total number of stitches on needle (e.g. 95 stitches) minus edge stitches in garter stitch on each side (= 4 stitches) and divide the remaining stitches with the number of increases to be made (e.g. 20) = 4.5. In this example, increase by making 1 yarn over after alternately each 4th and 5th stitch; the yarn overs are worked twisted on the next row to avoid holes. STRIPES BODY: Work stripes as follows: Stripe-1: Work 18-19-19-20-21-21 cm with light jeans blue. Stripe-2: Work 18-18-19-20-20-21 cm with jeans blue. Stripe-3: Work with light sea green to finished length (= 17-18-19-19-20-21 cm). STRIPES SLEEVE: Continue with jeans blue until the stripe measures a total of 23 cm in all sizes, then work with light sea green to finished length. RAGLAN (for sleeves): All increases are worked from the right side! Increase 1 stitch after/before marker thread on sleeve as follows: Work as far as the first marker thread on sleeve, knit 1, 1 yarn over, work as far as 1 stitch before the next marker thread, 1 yarn over and knit 1. Repeat on other sleeve (= 4 stitches increased on row. On the next row (wrong side) purl the yarn overs to leave holes. Then work the new stitches in stocking stitch. DECREASE TIP (for sleeves): Decrease 1 stitch on each side of stitch with marker thread as follows: Work until there are 3 stitches left before marker thread, knit 2 together, knit 2 (marker thread sits between these 2 stitches), slip 1 stitch as if to knit, knit 1 and pass the slipped stitch over the knitted stitch. BUTTONHOLES: Work buttonholes on right band (when garment is worn). Work from the right side until there are 4 stitches left on the row then cast off the next 2 stitches and knit 2. On next row cast on 2 new stitches above the cast-off stitches. First buttonhole is worked when piece measures approx. 2 cm. Then work the next 5-5-5-5-6-6 buttonholes with approx. 9-9-10-10-9-9 cm between each. ------------------------------------------------------- START THE PIECE HERE: ------------------------------------------------------- JACKET - SHORT OVERVIEW OF THE PIECE: The piece is worked back and forth with circular needle, top down. Body is worked back and forth as far as the split in the sides, then the front and back pieces are finished separately, back and forth. Sleeves are worked in the round with short circular needle/double pointed needles, top down. NECK: Cast on 103-107-111-115-119-123 stitches (including 5 band stitches on each side towards mid front) with circular needle size 3.5 mm and light jeans blue. Work as follows: ROW 1 (wrong side): Knit. ROW 2 (right side): Knit. ROW 3: Work 5 band stitches in GARTER STITCH – read description above, purl until there are 5 stitches left and 5 band stitches in garter stitch. YOKE: Change to circular needle size 4,5 mm. Work STRIPES BODY – read description above and pattern as follows: 5 band stitches in garter stitch, A.1 (= 1 stitch), A.2 – choose diagram for your size (= 16-16-16-20-20-20 stitches), insert 1 marker thread here (= left front piece), knit 1, 1 yarn over, knit 11-13-15-9-11-13 , 1 yarn over, knit 1, insert a marker thread here (= sleeve), A.3 – choose diagram for your size (= 16-16-16-20-20-20 stitches), A.4 (= 1 stitch; mid-stitch back), A.2 – choose diagram for your size, insert a marker thread here (= back piece), knit 1, 1 yarn over, knit 11-13-15-9-11-13 stitches, 1 yarn over, knit 1, insert a marker thread here (= sleeve), A.3 – choose diagram for your size, A.5 (= 1 stitch), (= right front piece) and 5 band stitches in garter stitch. You have now increased 1 stitch to RAGLAN – read description above, on each side of the sleeves and increased 2 stitches mid-back (on each side of mid-stitch = A.4), increased 1 stitch on each front piece (after A.1 and before A.5) = 111-115-119-123-127-131 stitches. REMEMBER THE KNITTING TENSION and remember BUTTONHOLES - read description above. Continue like this back and forth increasing to raglan on sleeves every 2nd row 21-25-26-31-31-30 more times (a total of 22-26-27-32-32-31 times), AT THE SAME TIME when the diagrams have been completed in height, repeat the last 2 rows in height 20-23-27-28-33-36 more times (i.e. until there are 49-55-63-65-75-81 stitches stocking stitch between A.2 and A.3 on back piece and 25-28-32-33-38-41 stitches stocking stitch between A.2/A.3 and band on each front piece) = 295-327-351-379-403-415 stitches. Continue with textured pattern over the 18-18-18-22-22-22 stitches in A.2 and A.3, 5 band stitches in garter stitch on each side towards mid front and stocking stitch over the remaining stitches until the piece measures 22-24-26-28-30-32 cm from the cast-on edge and down mid front. The next row from the wrong side is worked as follows: Work pattern as before over the first 48-51-55-60-65-68 stitches (= right front piece), place the next 57-67-71-75-77-77 stitches on a thread (= sleeve), cast on 10-10-12-12-14-18 stitches on needle (= in side under sleeve), work the next 85-91-99-109-119-125 stitches as before (= back piece), place the next 57-67-71-75-77-77 stitches on a thread (= sleeve), cast on 10-10-12-12-14-18 stitches on needle (= in side under sleeve) and work the remaining 48-51-55-60-65-68 stitches as before (= left front piece). THE PIECE IS NOW MEASURED FROM HERE! BODY: = 201-213-233-253-277-297 stitches. Insert a marker thread in the middle of the stitches cast on under each sleeve (= 5-5-6-6-7-9 new stitches on each side of the marker threads). Continue with the last 2 rows in A.2 and A.3, 5 band stitches in garter stitch on each side towards mid front and work garter stitch over the 4 middle stitches under the sleeves (= 2 stitches garter stitch on each side of both marker threads in the sides) with the remaining stitches in stocking stitch. When the piece measures 16 cm place the first and last 53-56-61-66-72-77 stitches on a thread for left and right front pieces. Then finish the front/back pieces separately (gives you the split in each side). BACK PIECE: = 95-101-111-121-133-143 stitches. Work pattern A.2/A.3, stocking stitch and 2 stitches in garter stitch on each side as before. When the piece measures 27 cm work 1 row stocking stitch where you increase 20-20-22-24-26-28 stitches evenly spaced – read INCREASE TIP = 115-121-133-145-159-171 stitches. Change to circular needle size 3.5 mm and work rib (knit 1, purl 1) with 2 edge stitches in garter stitch on each side. When the rib measures 4 cm cast off with knit over knit and purl over purl. Make sure the cast-off edge is not tight; increase a needle size when casting off if necessary. The jacket measures approx. 56-58-60-62-64-66 cm from the shoulder down. RIGHT FRONT PIECE: Place the 53-56-61-66-72-77 stitches from the thread back on circular needle size 4.5 mm. Work pattern back and forth as before. When the piece measures 27 cm work 1 row stocking stitch where you increase 9-9-11-11-13-15 stitches evenly spaced = 62-65-72-77-85-92 stitches. Change to circular needle size 3.5 mm and work rib (knit 1, purl 1) with 2 edge stitches in garter stitch towards the side and 5 band stitches in garter stitch towards mid front. When the rib measures 4 cm, cast off with knit over knit and purl over purl. Make sure the cast-off edge is not tight; increase a needle size when casting off if necessary. The jacket measures approx. 56-58-60-62-64-66 cm from the shoulder down. LEFT FRONT PIECE: Work the same way as right front piece but reversed. SLEEVE: Place the 57-67-71-75-77-77 stitches from the thread on the one side of the piece on short circular needle/double pointed needles size 4.5 mm and knit up 1 stitch in each of the 10-10-12-12-14-18 stitches cast on under sleeve = 67-77-83-87-91-95 stitches. Insert 1 marker thread in the middle of the new stitches (= 5-5-6-6-7-9 new stitches on each side of marker thread). Work stocking stitch in the round and STRIPES SLEEVE - read description above. When the piece measures 4 cm from the division decrease 2 stitches mid under sleeve – read DECREASE TIP. Decrease like this as follows in the different sizes: Size S: Decrease every 2 cm 7 times and every 3 cm 6 times. Size M: Decrease every 2 cm 12 times and every 3 cm 3 times. Size L: Decrease every cm 5 times and every 2 cm 12 times. Size XL: Decrease every cm 9 times and every 2 cm 9 times. Size XXL: Decrease every cm 12 times and every 2 cm 7 times. Size XXXL: Decrease every cm 16 times and every 2 cm 4 times. When all the decreases are finished there are 41-47-49-51-53-55 stitches. Continue working until the sleeve measures 39-38-36-35-33-32 cm from the division (shorter measurements in larger sizes due to wider neck and longer yoke). Knit 1 round where you increase 9-9-9-11-11-11 stitches evenly spaced = 50-56-58-62-64-66 stitches. Change to double pointed needles size 3.5 mm and work rib (knit 1, purl 1) for 4 cm. Cast off with knit over knit and purl over purl; to avoid the cast-off edge being tight you can make 1 yarn over after each 6th stitch at the same time as casting off (yarn overs cast off as normal stitches). The sleeve measures approx. 43-42-40-39-37-36 cm from the division. Work the other sleeve in the same way. ASSEMBLY: Sew buttons onto left band. |
||||||||||
Diagram explanations |
||||||||||
|
||||||||||
 |
||||||||||
 |
||||||||||
 |
||||||||||
Have you finished this pattern?Tag your pictures with #dropspattern #sweetnothingcardigan or submit them to the #dropsfan gallery. Do you need help with this pattern?You'll find 25 tutorial videos, a Comments/Questions area and more by visiting the pattern on garnstudio.com. © 1982-2026 DROPS Design A/S. We reserve all rights. This document, including all its sub-sections, has copyrights. Read more about what you can do with our patterns at the bottom of each pattern on our site. |
||||||||||


With over 40 years in knitting and crochet design, DROPS Design offers one of the most extensive collections of free patterns on the internet - translated to 17 languages. As of today we count 324 catalogues and 12290 patterns translated into English (UK/cm). 12290
We work hard to bring you the best knitting and crochet have to offer, inspiration and advice as well as great quality yarns at incredible prices! Would you like to use our patterns for other than personal use? You can read what you are allowed to do in the Copyright text at the bottom of all our patterns. Happy crafting!
Post a comment to pattern DROPS 199-19
We would love to hear what you have to say about this pattern!
If you want to leave a question, please make sure you select the correct category in the form below, to speed up the answering process. Required fields are marked *.