
Popular categories
Looking for a yarn?


Comments / Questions (23)
![]() Cornelia wrote:
Cornelia wrote:
Hallo, ist das in der Anleitung richtig, dass linkes und rechtes Vorderteil gleich gestrickt werden, muss es nicht spiegelverkehrt sein?
14.01.2021 - 13:13DROPS Design answered:
Liebe Cornelia, beide Vorderteile sind spiegelverkehrt beschrieben: beim rechten Vorderteil beginnen Sie die Hinreihen mit den 16 M A.1 (Blendemaschen) und beim linken Vorderteil enden Sie die Hinreihen mit den 16 M A.1 (Blendemaschen), usw... Viel Spaß beim stricken!
14.01.2021 - 15:55
![]() Madeleine wrote:
Madeleine wrote:
Hi I am having problems with the knitting tension. I cast on 15 st in sizes 6,5.5, 5 and in desperation 7. There is no way that I can achieve 10 cm across with only 15st. The most I can get is 7cm .what am I doing wrong?
03.12.2020 - 15:07DROPS Design answered:
Dear Madeleine, are you using DROPS Air? Read more about tension here. Hope this can help - your DROPS store might have other tips for you that they could share either by telephone or e-mail. Happy knitting!
03.12.2020 - 16:32
![]() Raquel wrote:
Raquel wrote:
Hola, sería posible ver una foto de la espalda? Como va rematado el cuello por atras? Gracias
11.11.2020 - 22:55DROPS Design answered:
Hola Raquel, lo sentimo,s pero no hay ninguna foto de la espalda de este modelo.
19.11.2020 - 11:24
![]() Kirsten Sofie Sebulonsen wrote:
Kirsten Sofie Sebulonsen wrote:
Det ser ud som om, der er indsneget sig en lille fejl i opskriften, når man er nået til venstre forstykke efter første pind, der er vrang og derefter strikker fra ret-siden: "Derefter strikkes der rib således: 4 kantmasker retstrik, (1 ret, 2 vrang) til der er 2 masker tilbage på pinden, 1 ret, 1 kantmaske retstrik." Der skal vel startes med rib-strik og DEREFTER afslutte med 4 kantmasker? Det kan virke lidt forvirrende, hvis man evt. er nybegynder.
22.08.2020 - 22:00
![]() Lillian wrote:
Lillian wrote:
Jeg vil ha denne jakken ca 15 til 20 cm lengre,hva gjør jeg i forhold til oppskriften strikker jeg bare rettstrikking til jeg skal felle til ermet og strikker den så mye lengre jeg vil ha den i så fall hva med forstykkene,de har jo mønster foran.
25.06.2020 - 19:37DROPS Design answered:
Hei Lillian. Bare pass på at du har samme lengde på bakstykket og begge framstykkene når du skal felle til ermene og at du strikker A.2 over A.1 x antall cm før du feller til ermene (x = hvor mange ektra cm du skal strikke). Pass på at du også har nok garn og husk knappehullene. God Fornøyelse!
29.06.2020 - 09:47
![]() Lillian wrote:
Lillian wrote:
ER DENNE JAKKEN INNSVINGET,JEG REAGERER PÅ AT DET ER SÅ MANGE MASKER SOM FELLES LANGT NEDE.
03.06.2020 - 18:47DROPS Design answered:
Hei Lillian, Masker er felt fordi det er flere masker på vrangborden enn trengs for bolen - dette hindrer at vrangborden er stram. God fornøyelse!
04.06.2020 - 08:17
![]() Rachel wrote:
Rachel wrote:
Hello, I am wondering about the knitting gauge for this pattern. this pattern uses 5mm needles for the cuffs and 6mm for the main body. Is the knitting gauge done on 5mm or 6mm needles? (I asked this question yesterday and just had a response but the link came up as 404 page not found) many thanks
25.05.2020 - 15:21DROPS Design answered:
Dear Rachel, oh sorry for the link in the other answer, it should work fine - but as asnwered there, your swatch should be worked with larger needes = in stocking stitch with needle size 6 mm. Happy knitting!
25.05.2020 - 16:26
![]() Cindy wrote:
Cindy wrote:
Beim Armausschnitt des Rückenteils heißt es für Größe M „für die nächsten 2 Reihen beidseitig eine Masche abnehmen“, es sind 84 Maschen auf der Nadel. Dann heißt es danach sind 82 auf der Nadel, müssten es dann nicht nur 80 sein? Muss ich nun insgesamt 2 oder 4 Maschen abnehmen?
07.07.2019 - 14:03DROPS Design answered:
Liebe Cindy, am Anfang der nächsten beiden Reihen ketten Sie 1 Masche ab, dh nach der 1. Reihe haben Sie 1 M am Anfang der Reihe abgekettet (= 83 M bleiben), wenden, am Anfang der nächsten Reihe 1 M abketten = 82 M sind jetzt übrig. Viel Spaß beim stricken!
08.07.2019 - 10:03
![]() Natalia wrote:
Natalia wrote:
Hi! I’m making a cardigan using written pattern for the first time and got a little stuck on this moment: “When the piece measures 50-52-54-56-58-60 cm, work garter stitch over the middle 18-18-20-20-22-22 stitches on the row.“ Could you please advise what I would need to do with stitches on the left and right of those middle ones? Thank you!
26.05.2019 - 22:54DROPS Design answered:
Dear Natalia, the middle stitches knit with garter stitch to give the neck a bit of an edge that does not roll. All the other stitches should be knitted as before, unless otherwise stated. I hope this helps. Happy Knitting!
27.05.2019 - 01:43
![]() Cindy wrote:
Cindy wrote:
Hallo, meinen Sie die Jacke wird auch mit der Bomull Lin als Alternative gut aussehen? Dann ist die Jacke fast doppelt so dick wie Original. Oder jetzt für den Sommer mit der Brushed Alpaca Silk, wofür man jedoch nur knapp die Hälfte an Garn benötigt?
25.05.2019 - 10:27DROPS Design answered:
Liebe Cindy, dieses Modell wird mit Air (= Garngruppe C) gestrickt, Sie können ein anderes Garn derselben Garngruppe = C benutzen = gleiche Maschenprobe aber, da unterschiedlichen Garne auch unterschiedliche Struckturen haben, wird das fertige Strickstück unterschiedlich aussehen - hier lesen Sie mehr über Garnalternativen - Ihr DROPS Laden wird Ihnen gerne weiterhelfen, eine Alternative zu finden. Garnumrechner können Sie auch benutzen, um die neue Garnmenge zu kalkulieren. Viel Spaß beim stricken!
27.05.2019 - 09:53
|
||||||||||||||||
Robin Song Jacket#robinsongjacket |
||||||||||||||||
 |
 |
|||||||||||||||
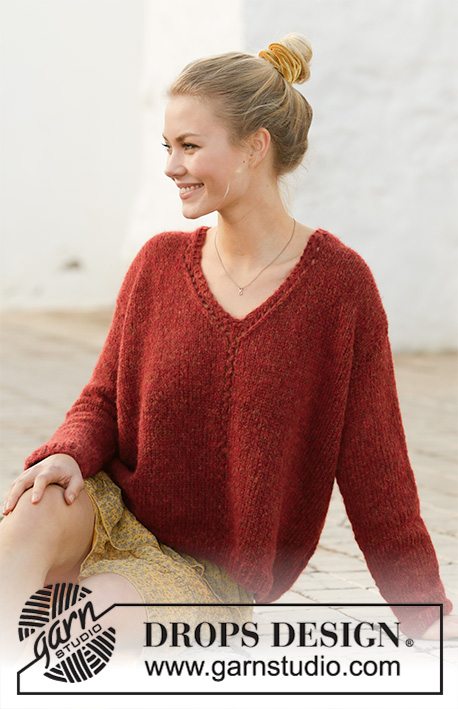
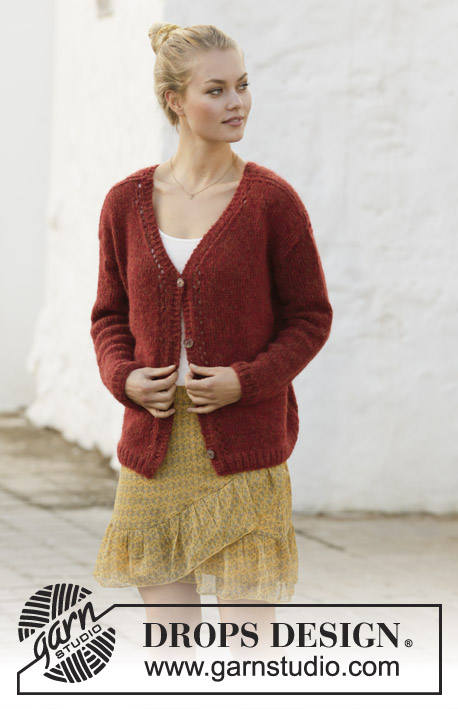
Knitted jacket with V-neck in DROPS Air. The piece is worked with lace pattern. Sizes S - XXXL.
DROPS 202-26 |
||||||||||||||||
|
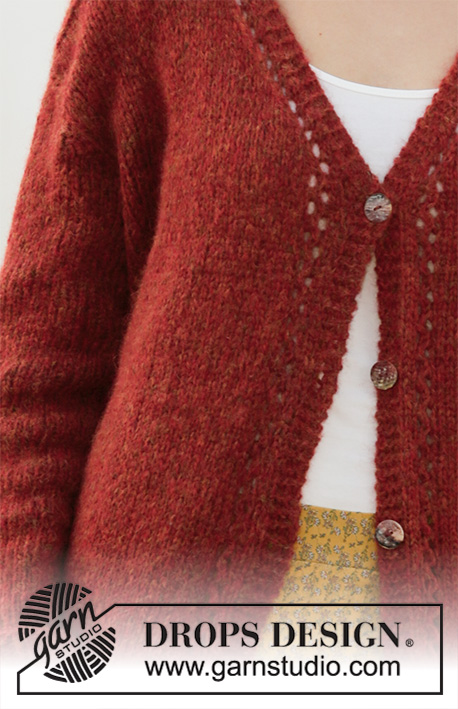
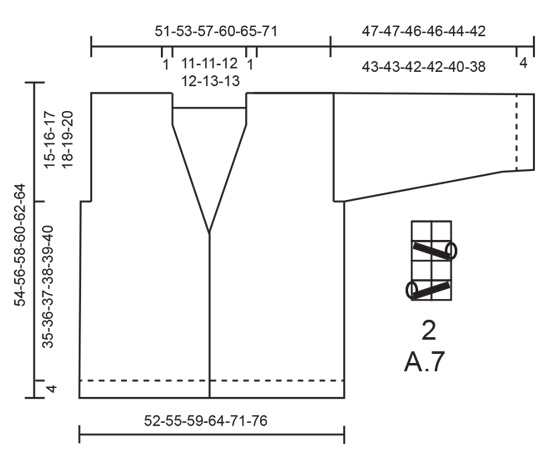
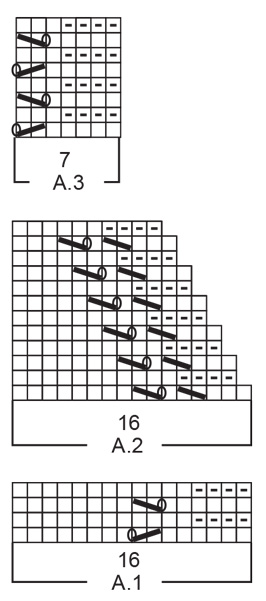
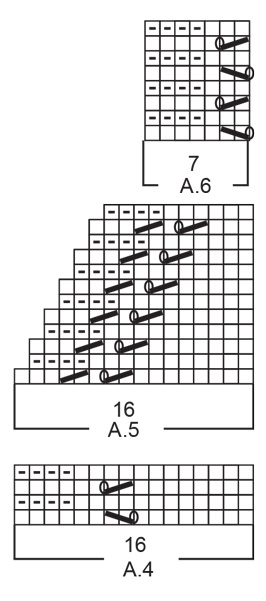
------------------------------------------------------- EXPLANATIONS FOR THE PATTERN: ------------------------------------------------------- RIDGE/GARTER STITCH (worked back and forth): Knit all rows. 1 ridge in height = Knit 2 rows. PATTERN: See diagrams A.1 to A.7. Diagrams show all rows in pattern seen from right side. DECREASE TIP-1 (evenly spaced): To work out how to decrease evenly, count the total number of stitches on needle (e.g. 99 stitches) minus edge stitches (= 2 stitches) and divide the remaining stitches by number of decreases to be made (e.g. 19) = 5.1. In this example, decrease by knitting together approx. each 4th and 5th stitch. DECREASE TIP-2 (for neck on back piece): All decreases worked from right side. Decrease 1 stitch after the 2 stitches in garter stitch from the neck as follows: Slip 1 stitch as if to knit, knit 1 and pass the slipped stitch over the knitted stitch. Decrease 1 stitch before the 2 stitches in garter stitch towards the neck as follows: Knit 2 together. INCREASE TIP (for sleeves): Work until there are 2 stitches left before A.7 under the sleeve, make 1 yarn over, knit 2, A.7, knit 2, make 1 yarn over. On the next round knit yarn overs twisted to avoid holes. Then work new stitches in stocking stitch. BUTTONHOLES (bottom up): Work buttonholes on right band. 1 BUTTONHOLE = knit together 3rd and 4th stitch from the edge and make 1 yarn over. On next row knit the yarn over = hole. Work buttonholes when piece measures: S: 5, 14, 23 and 32 cm. M: 5, 14, 23 and 32 cm. L: 6, 15, 24 and 33 cm. XL: 5, 15, 25 and 35 cm. XXL: 6, 16, 26 and 36 cm. XXXL: 7, 17, 27 and 37 cm. ------------------------------------------------------- START THE PIECE HERE: ------------------------------------------------------- JACKET – SHORT OVERVIEW OF THE PIECE: The piece is worked back and forth with circular needle in sections which are sewn together to finish. Sleeves are worked in the round with double pointed needles. BACK PIECE: Cast on 99-105-111-123-135-144 stitches (including 1 edge stitch on each side) with circular needle size 5 mm and Air. Purl 1 row from the wrong side. Then work rib as follows: 1 edge stitch in GARTER STITCH – read description above, (knit 1, purl 2) until there are 2 stitches left on row, knit 1 and 1 edge stitch in garter stitch. Continue like this back and forth for 4 cm. Change to circular needle size 6 mm. Now knit 1 row from the right side where you decrease 19-21-21-25-27-28 stitches evenly spaced – read DECREASE TIP-1 = 80-84-90-98-108-116 stitches. Work stocking stitch with 1 edge stitch in garter stitch on each side until the piece measures 39-40-41-42-43-44 cm. REMEMBER THE KNITTING TENSION! At the beginning of the next 2 rows cast off 1-1-1-3-4-4 stitches for armholes = 78-82-88-92-100-108 stitches. Continue with stocking stitch and 1 edge stitch in garter stitch on each side. When the piece measures 50-52-54-56-58-60 cm, work garter stitch over the middle 18-18-20-20-22-22 stitches on the row. When you have worked 2 ridges over these stitches work the next row from the right side as follows: Work the first 32-34-36-38-41-45 stitches and place on 1 thread for right shoulder, cast off the next 14-14-16-16-18-18 stitches for neck and work the remaining 32-34-36-38-41-45 stitches. Then finish the shoulders separately. Work 1 edge stitch in garter stitch towards the armhole, 2 stitches in garter stitch towards the neck and stocking stitch over the remaining stitches. On the next row from the right side decrease 1 stitch inside the 2 stitches in garter stitch – read DECREASE TIP-2 = 31-33-35-37-40-44 stitches. Continue working until the armhole measures 15-16-17-18-19-20 cm. Cast off. The piece measures approx. 54-56-58-60-62-64 cm from the shoulder down. Work the other shoulder in the same way. RIGHT FRONT PIECE: Cast on 54-57-60-66-72-75 stitches (including 1 edge stitch in side and 4 band stitches towards mid front) with circular needle size 5 and Air. Purl 1 row from the wrong side. Then work rib as follows: 4 band stitches in garter stitch, (knit 1, purl 2) until there are 2 stitches left on row, knit 1 and 1 edge stitch in garter stitch. Continue this rib back and forth for 4 cm. Change to circular needle size 6 mm. Work the next row from the right side as follows: Work A.1 over the first 16 stitches (the first 4 stitches in garter stitch = band), stocking stitch until there is 1 stitch left on row, at the same time as you decrease 10-11-11-13-14-13 stitches evenly spaced and 1 edge stitch in garter stitch = 44-46-49-53-58-62 stitches. Continue back and forth like this and repeat A.1 in height. Remember BUTTONHOLES! When the piece measures 33-34-35-36-37-38 cm, work A.2 over A.1. When A.2 has been completed in height you have decreased 6 stitches for neck. Continue this pattern and decrease in the same way until you have decreased a total of 12-12-13-13-14-14 stitches for the neck. AT THE SAME TIME when the piece measures 39-40-41-42-43-44 cm, cast off 1-1-1-3-4-4 stitches for armhole on the next row from the side. When all decreases for neck and armhole are finished there are 31-33-35-37-40-44 stitches on the needle. Continue with A.3 over the outermost 7 stitches towards the neck, stocking stitch and 1 edge stitch in garter stitch towards the armhole until the armhole measures 15-16-17-18-19-20 cm – adjust to match the back piece. Cast off. The piece measures approx. 54-56-58-60-62-64 cm from the shoulder down. LEFT FRONT PIECE: Cast on 54-57-60-66-72-75 stitches (including 1 edge stitch in side and 4 band stitches towards mid front) with circular needle size 5 mm and Air. Purl 1 row from the wrong side. Then work rib as follows: 1 edge stitch in garter stitch, (knit 1, purl 2) until there are 5 stitches left on row, knit 1 and 4 band stitches in garter stitch. Continue this rib back and forth for 4 cm. Change to circular needle size 6 mm. Work the next row from the right side as follows: 1 edge stitch in garter stitch, stocking stitch until there are 16 stitches left at the same time as you decrease 10-11-11-13-14-13 stitches evenly spaced and then A.4 over the last 16 stitches (the last 4 stitches in garter stitch = band) = 44-46-49-53-58-62 stitches. Continue back and forth like this and repeat A.4 in height. When the piece measures 33-34-35-36-37-38 cm, work A.5 over A.4. When A.5 has been completed in height you have decreased 6 stitches for neck. Continue this pattern and decrease in the same way until you have decreased a total of 12-12-13-13-14-14 stitches for neck. AT THE SAME TIME when the piece measures 39-40-41-42-43-44 cm, cast off 1-1-1-3-4-4 stitches for armhole on the next row from the side. When all decreases for neck and armhole are finished there are 31-33-35-37-40-44 stitches on the needle. Continue with 1 edge stitch in garter stitch, stocking stitch and A.6 over the outermost 7 stitches towards the neck until the armhole measures 15-16-17-18-19-20 cm – adjust to match the right front piece and back piece. Cast off. The piece measures approx. 54-56-58-60-62-64 cm from the shoulder down. SLEEVE: The sleeve is worked in the round with double pointed needles. Cast on 42-42-45-48-48-51 stitches with double pointed needles size 5 mm. Knit 1 round 1. Then work rib (knit 1, purl 2) for 4 cm. Change to double pointed needles size 6 mm. The next round is worked as follows: Knit 2, work A.7 over the next 2 stitches, knit to end of round at the same time as you decrease 9-8-8-10-9-11 stitches evenly spaced = 33-34-37-38-39-40 stitches. Continue in the round with stocking stitch and A.7 mid under sleeve. AT THE SAME TIME when the piece measures 8-9-9-9-8-8 cm, increase 1 stitch on each side of A.7 – read INCREASE TIP. Increase in the different sizes as follows: Size S: Increase alternately every 6 and 7 cm a total of 6 times. Size M: Increase every 5 cm a total of 7 times. Size L: Increase every 5 cm a total of 7 times. Size XL: Increase every 4 cm a total of 8 times. Size XXL: Increase alternately every 3 and 4 cm a total of 9 times. Size XXXL: Increase every 3 cm a total of 10 times. When all the increases are finished there are 45-48-51-54-57-60 stitches on the needles. Then continue in the different sizes as follows: Sizes S, M and L Continue working until the piece measures 47-47-46 cm (shorter measurements in larger sizes due to wider shoulders). Cast off. Work the other sleeve in the same way. Sizes XL, XXL and XXXL: Continue working until the piece measures 44-41-39 cm (shorter measurements in larger sizes due to wider shoulders). Finish the round in the middle of diagram A.7 (= mid under sleeve). Now continue back and forth with stocking stitch over all stitches, so that you can sew the sleeve to the armhole. When you have worked back and forth with stocking stitch for 2-3-3 cm, the sleeve measures a total of 46-44-42 cm. Cast off. Work the other sleeve in the same way. ASSEMBLY: Sew shoulder seams with grafting stitches inside the cast off edge. Sew sleeves to body. Sew side seams inside the 1 edge stitch in garter stitch on each side. Sew buttons to left band. |
||||||||||||||||
Diagram explanations |
||||||||||||||||
|
||||||||||||||||
 |
||||||||||||||||
 |
||||||||||||||||
 |
||||||||||||||||
Have you finished this pattern?Tag your pictures with #dropspattern #robinsongjacket or submit them to the #dropsfan gallery. Do you need help with this pattern?You'll find 27 tutorial videos, a Comments/Questions area and more by visiting the pattern on garnstudio.com. © 1982-2026 DROPS Design A/S. We reserve all rights. This document, including all its sub-sections, has copyrights. Read more about what you can do with our patterns at the bottom of each pattern on our site. |
||||||||||||||||


With over 40 years in knitting and crochet design, DROPS Design offers one of the most extensive collections of free patterns on the internet - translated to 17 languages. As of today we count 324 catalogues and 12290 patterns translated into English (UK/cm). 12290
We work hard to bring you the best knitting and crochet have to offer, inspiration and advice as well as great quality yarns at incredible prices! Would you like to use our patterns for other than personal use? You can read what you are allowed to do in the Copyright text at the bottom of all our patterns. Happy crafting!
Post a comment to pattern DROPS 202-26
We would love to hear what you have to say about this pattern!
If you want to leave a question, please make sure you select the correct category in the form below, to speed up the answering process. Required fields are marked *.