
Popular categories
Looking for a yarn?


Comments / Questions (195)
![]() Lola wrote:
Lola wrote:
Podíais explicarlo vuelta a vuelta, así, como esta no hay quien lo entienda
18.02.2022 - 15:30DROPS Design answered:
Hola Lola, nuestros patrones están redactados en un formato mixto, con explicaciones escritas y diagramas. No hacemos patrones personalizados. Puedes leer la siguiente lección para facilitar el trabajo con diagramas: https://www.garnstudio.com/lesson.php?id=69&cid=23
11.03.2022 - 18:48
![]() Imelda wrote:
Imelda wrote:
En espalda . Al tener los 71 puntos .. se termina y corta allí .. la espalda no se teje el A1, a2 y a3.. ? no entiendo ..
17.02.2022 - 20:18DROPS Design answered:
Hola Imelda, la espalda es lisa, no tiene calados.
19.02.2022 - 18:33
![]() Imelda wrote:
Imelda wrote:
La unión se hace con aguja o con el ganchillo ? Y después de realizar la unión no entiendo por dónde empezar .. me ayudas con eso por favor .. no entiendo como hacerlo
17.02.2022 - 05:19DROPS Design answered:
Hola Imelda, el delantero y la espalda se unen a ganchillo, como se explica al principio del cuerpo. "Trabajar 4-4-7-8-12-15 puntos de cadeneta para la sisa, 1 punto alto en cada uno de los 65-71-73-79-83-87 puntos altos de la espalda, trabajar 8-8-14-16-24-30 puntos de cadeneta para la sisa, 1 punto alto en cada uno de los 65-71-73-79-83-87 puntos altos desde el delantero, trabajar 4-4-7-8-12-15 puntos de cadeneta para la sisa y finalizar con 1 punto enano en el 1er punto de cadeneta en el inicio de la vuelta. "
19.02.2022 - 18:37
![]() Danusia wrote:
Danusia wrote:
Utknęłam na początku. Robię w najmniejszym rozmiarze. Początkowe 49 słupków przerobiłam w 4 rzędach do 65, ale na zdjęciu wyraźnie jest węższy pas (na dwa rzędy), chociaż czytając opis wyszło mi 4 rzędy. Czy mogę zrobić to w dwóch rzędach? Druga sprawa, że wg schematu mamy wzór 10+30+9 słupków - co z tymi 16 oczkami? Czy ta wolna taśma jest później zalążkiem rękawka?
07.02.2022 - 20:31DROPS Design answered:
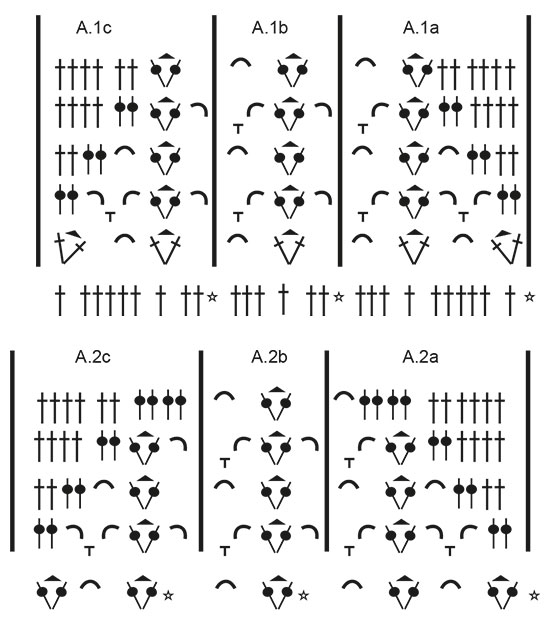
Witaj Danusiu, na samym początku będzie tylko 1 rząd słupków. Drugi rząd słupków, o którym piszesz będzie przerabiany na końcu jako wykończenie dekoltu. Po przerobieniu 1 rzędu słupków (masz 49 sł) zaczynasz dodawać oczka na bokach (jak w opisie) i przerabiać schematy. Dla rozmiaru S będzie to: A.1a na ponad 10 sł, A.1b ponad 30 (czyli powtarzasz A.1b 5 razy) i A.1c ponad 9 sł. Te dodane oczka na bokach nie wchodzą do schematów (czyli boki rozszerzają się, a schematy tworzą na środku kwadrat/prostokąt). Miłej pracy!
08.02.2022 - 14:29
![]() Jone wrote:
Jone wrote:
Tiene un video que lo explique Mejor no entiendo para nada ?
06.02.2022 - 00:25DROPS Design answered:
Hola Jone, debajo de los diagramas puedes encontrar todos los vídeos que pueden ayudarte a realizar la labor. No hacemos vídeos personalizados.
13.02.2022 - 19:17
![]() Gayle Mouritz wrote:
Gayle Mouritz wrote:
Hi, I really like your pattern DROPS 190-21 California Dream but I'm struggling to follow the pattern using the A1 etc graphs. Is the pattern available in written form? I would be happy to purchase it if it is an option. Thanks Gayle
05.02.2022 - 07:49DROPS Design answered:
Dear Gayle, all of our patterns are written in a written instructions + diagram format, so that's the only available format. You can check the following lesson to better understand how to read the crochet diagrams: https://www.garnstudio.com/lesson.php?id=69&cid=19 Happy crocheting!
05.02.2022 - 19:18
![]() Silvia wrote:
Silvia wrote:
Buen día Una vez obtenido los 65, como continúo, si tejo 10 puntos A1a;30 puntos A1b y 9 puntos A1c, da 49 puntos . Cómo se tejen los 16 puntos restantes ? Muchas gracias por su respuesta
14.01.2022 - 15:47DROPS Design answered:
Hola Silvia, A.1a es el inicio de la fila y A.1c es el final de la fila. A.1b se repite sobre los puntos restantes que queden entre estos dos diagramas.
16.01.2022 - 21:43
![]() Laura wrote:
Laura wrote:
Buenas noches. Me gustaria que me explique bien la parte delantera. No entiendo el tema de los aumentos. Hago las cadenas, tejo las varetas y ya en la 2da fila me pierdo con el tema de los aumentos. Desde ya gracias
14.12.2021 - 02:59DROPS Design answered:
Hola Laura, los aumentos se trabajan según TIP-1 PARA LOS AUMENTOS en el 1º y último punto del delantero. Se trabajan 2 puntos altos en 1 punto. Trabajas de esta manera cada fila de 3 a 15 veces (según la talla) y cada 2ª fila de 0-5 veces (según la talla).
18.12.2021 - 22:59
![]() Edith wrote:
Edith wrote:
Con cuantas cadenas se empieza y si lo hago por partes, comenzando por espalda, no desde arriba. Por favor.
17.11.2021 - 02:23DROPS Design answered:
Hola Edith, la labor se trabaja de ida y vuelta, de arriba a abajo, trabajar de ida y vuelta por separado hasta la sisa, después trabajar en redondo sobre ambas partes. Comienzas par el delantero (la parte de arriba). Al principio tienes que trabajar 51-53-53-55-57-59 puntos de cadeneta (elige el número según tu talla). Saludos!
17.11.2021 - 08:12
![]() Inger Jacobsson wrote:
Inger Jacobsson wrote:
Hej! Har köpt drops merino för att virka mönster 190-21. I diagrammet finns rader som är markerade med stjärna. Vad betyder detta.? Vore också bra om varven var markerade med siffra. Symbolen för två luftmaskor skiljer sig åt från de andra som är i fetstil. Varför. Tacksam för svar Vänliga hälsningar Inger
22.09.2021 - 09:13DROPS Design answered:
Hej Inger. Att symbolen för 2 luftmaskor inte är i fetstil har ingen betydelse för mönstret. Raderna som är markerade med stjärna betyder att det varvet redan är virkat och att du ska börja på nästa varv. Mvh DROPS Design
22.09.2021 - 10:44
|
|||||||||||||||||||||||||||||||||||||||||||
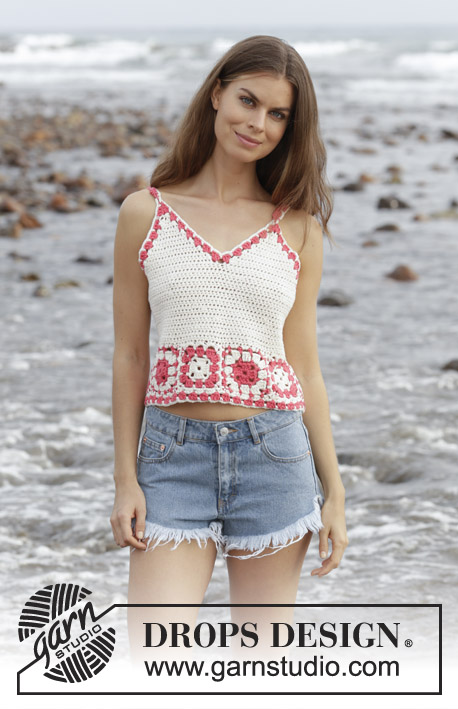
California Dream#californiadreamtop |
|||||||||||||||||||||||||||||||||||||||||||
 |
 |
||||||||||||||||||||||||||||||||||||||||||
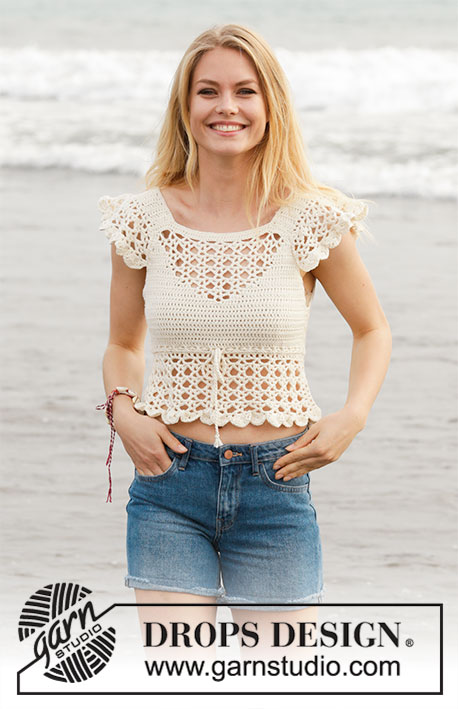
Crocheted top with lace pattern and flounce. Size: S - XXXL Piece is crocheted in DROPS Cotton Merino.
DROPS 190-21 |
|||||||||||||||||||||||||||||||||||||||||||
|
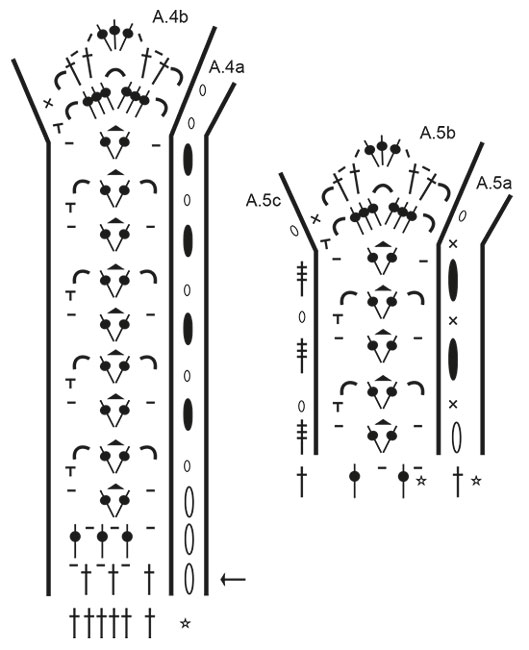
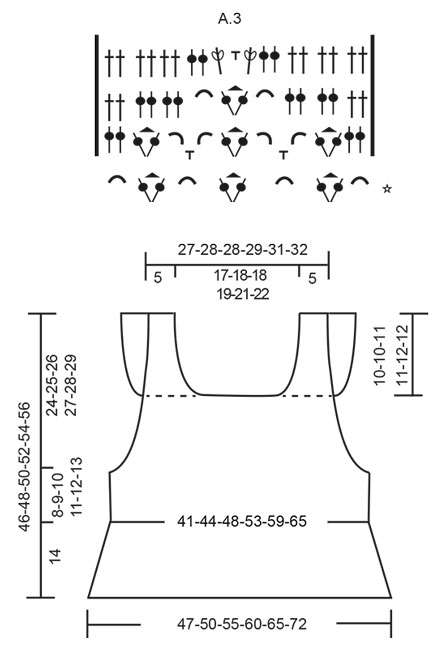
INFORMATION FOR PATTERN: PATTERN: See diagrams A.1 to A.5. INCREASE TIP-1: Increase 1 treble crochet by working 2 treble crochets in same stitch. CROCHET TIP-1 (applies to body but not diagram): Replace first treble crochet at beginning of every row with 3 chain stitches. CROCHET TIP-2 (applies to body but not diagram): When working in the round, replace first treble with 3 chain stitches, finish round with 1 slip stitch in 3rd chain stitch at beginning of round. DECREASE TIP: Decrease by working 2 treble crochets together. INCREASE TIP-2 (evenly): To calculate how to increase evenly, use the total number of treble crochets on row (e.g. 146 treble crochets) and divide treble crochets by number of increases to be done (e.g. 22) = 6.6. In this example increase by working 2 treble crochets in same treble crochet alternately approx. every 6th and 7th treble crochet. ---------------------------------------------------------- TOP: Piece is worked back and forth, top down, work front and back piece separately down to armhole, then work in the round over both parts. Then work straps from bottom up and then work flounces back and forth on straps, fasten flounce to front/back piece. FRONT PIECE: Work 51-53-53-55-57-59 chain stitches (including 3 chain stitches to turn with) on hook size 5 mm with Cotton Merino. Switch to hook size 4 mm, turn and work 1 treble crochet in 4th chain stitch from hook (= 2 treble crochets), work 1 treble crochet in each of the next 47-49-49-51-53-55 chain stitches = 49-51-51-53-55-57 treble crochets. On next row begin increase in each side of piece AT THE SAME TIME work pattern as follows: Increase 1 treble crochet in each side of piece (= 2 treble crochets increased) - read INCREASE TIP-1. Increase like this every row 3-5-8-13-14-15 times in total, and then every other row 5-5-3-0-0-0 times in total = 65-71-73-79-83-87 treble crochets on last row. Work next row as follows, begin from right side: Read CROCHET TIP-1 – work 1 treble crochet in each of the first 0-1-1-2-3-4 treble crochets, A.1a over the next 10 treble crochets, repeat A.1b over the next 30 treble crochets (= 5 times in total in width), A.1c over the next 9 treble crochets and 1 treble crochet in each of the last 0-1-1-2-3-4 treble crochets. Continue until A.1 has been work 1 time vertically. REMEMBER THE CROCHET TENSION! Then work as follows, begin from wrong side: Work 1 treble crochet in every treble crochet until 1 treble crochet remains before first chain space, work A.2c, repeat A.2b 3 times in total in width, A.2a and 1 treble crochet in every treble crochet the entire row. Continue until A.2 has been worked vertically. Then work as follows, begin from wrong side: Work 1 treble crochet in every treble crochet until first chain space, work A.3 and 1 treble crochet in every treble crochet the rest of row. Continue until A.3 has been worked vertically. Now work 1 treble crochet in every stitch until piece measures 14-15-15-16-16-17 cm. Fasten off, turn. Put piece aside. BACK PIECE: Work 51-53-53-55-57-59 chain stitches (including 3 chain stitches to turn with) on hook size 5 mm with Cotton Merino. Switch to hook size 4 mm, turn and work 1 treble crochet in 4th chain stitch from hook (= 2 treble crochets), work 1 treble crochet in each of the next 47-49-49-51-53-55 chain stitches = 49-51-51-53-55-57 treble crochets. Then work 1 treble crochet in every treble crochet - AT THE SAME TIME increase 1 treble crochet in each side of piece - remember INCREASE TIP-1. Increase like this every row 8-10-11-13-14-15 times in total = 65-71-73-79-83-87 treble crochets on last row. When piece measures 14-15-15-16-16-17 cm (adjust according to front piece), fasten off, turn. BODY: Now work the two parts together as follows: Work 4-4-7-8-12-15 chain stitches for armhole, 1 treble crochet in each of the 65-71-73-79-83-87 treble crochets from back piece, work 8-8-14-16-24-30 chain stitches for armhole, 1 treble crochet in each of the 65-71-73-79-83-87 treble crochets from front piece, work 4-4-7-8-12-15 chain stitches for armhole and finish with 1 slip stitch in first chain stitch at beginning of round. Then work piece in the round, continue with 1 treble in every treble/chain stitch = 146-158-174-190-214-234 trebles. When working in the round, turn after every round to work alternately from right side and wrong side. This is so that the texture is the same on the entire top - read CROCHET TIP-2. Insert 1 marker thread in each side, in the middle of the 8-8-14-16-24-30 chain stitches. NOW MEASURE THE PIECE FROM HERE! Continue like this until piece measures 8-9-10-11-12-13 cm. Now work in the round according to diagram A.4 while at the same time increasing on first round (round marked with arrow in diagram) as follows: Work A.4b 28-30-33-36-39-43 times in total on round – A.4a shows how rounds begin and end and is worked in addition to A.4b – AT THE SAME TIME increase 11-11-12-13-10-12 chain spaces (= 1 treble crochet + 1 chain stitch) evenly – read INCREASE TIP-2 = 84-90-99-108-117-129 chain spaces (= 1 treble crochet + 1 chain stitch). Continue in the round, i.e. always work pattern from right side. When A.4 is done vertically, fasten off. STRAPS: Now work a strap back and forth in cast-on edge on front piece over the first 8-9-9-9-10-10 treble crochets. Work 1 treble crochet in every treble crochet until strap measures 10-10-11-11-12-12 cm. Fasten off. Work 1 strap over the first 8-9-9-9-10-10 treble crochets in the other side the same way. Work straps the same way on back piece. Sew tog straps on shoulder. FLOUNCE: Work back and forth over every row on strap (= 20-20-22-22-24-24 cm). Begin from wrong side and work 1 treble crochet in first row, * 1 chain stitch, 1 treble crochet around row *, work from *-* along the entire strap – adjust so that there are 26-26-28-28-30-30 chain spaces (= 1 chain stitch + 1 treble crochet) on this row, finish with 1 treble crochet in last row = 1 treble crochet in each side and 26-26-28-28-30-30 chain spaces (= 1 chain stitch + 1 treble crochet). Turn and work as follows from right side: A.5a, A.5b 13-13-14-14-15-15 times in total in width, finish with A.5c. Continue this pattern until A.5 is done vertically, fasten off. Work flounce on the other strap the same way. NECK EDGE: Work 1 double crochet in every treble crochet/2 double crochets along every treble crochet row along the entire neck. SLEEVE EDGE: Work 1 double crochet in every treble crochet/2 double crochets along every treble crochet row along armhole – start right after flounce, work along armhole and to the flounce. Place flounce edge to edge to this sleeve edge (on both front and back piece) and fasten with small, neat stitches. Work the other sleeve edge the same way and fasten flounce. TIE: Cut 3 lengths of 3 metres each with Cotton Merino. Twine the strands tog until they resist, fold them double so that they twine again. Make a knot at each end. Baste the yarn up and down through first row with eyelet holes - start mid front. Tie a bow at the front. |
|||||||||||||||||||||||||||||||||||||||||||
Diagram explanations |
|||||||||||||||||||||||||||||||||||||||||||
|
|||||||||||||||||||||||||||||||||||||||||||
 |
|||||||||||||||||||||||||||||||||||||||||||
 |
|||||||||||||||||||||||||||||||||||||||||||
 |
|||||||||||||||||||||||||||||||||||||||||||
Have you finished this pattern?Tag your pictures with #dropspattern #californiadreamtop or submit them to the #dropsfan gallery. Do you need help with this pattern?You'll find 10 tutorial videos, a Comments/Questions area and more by visiting the pattern on garnstudio.com. © 1982-2026 DROPS Design A/S. We reserve all rights. This document, including all its sub-sections, has copyrights. Read more about what you can do with our patterns at the bottom of each pattern on our site. |
|||||||||||||||||||||||||||||||||||||||||||


With over 40 years in knitting and crochet design, DROPS Design offers one of the most extensive collections of free patterns on the internet - translated to 17 languages. As of today we count 324 catalogues and 12290 patterns translated into English (UK/cm). 12290
We work hard to bring you the best knitting and crochet have to offer, inspiration and advice as well as great quality yarns at incredible prices! Would you like to use our patterns for other than personal use? You can read what you are allowed to do in the Copyright text at the bottom of all our patterns. Happy crafting!
Post a comment to pattern DROPS 190-21
We would love to hear what you have to say about this pattern!
If you want to leave a question, please make sure you select the correct category in the form below, to speed up the answering process. Required fields are marked *.