
Popular categories
Looking for a yarn?


Comments / Questions (195)
![]() Lydie PEYRICHOUT wrote:
Lydie PEYRICHOUT wrote:
Bonjour je n arrive pas à comprendre comment faire ce modèle Le premier range de Bride se situe où exactement sur le modèle ? Est cau niveau du lien de serrage et l on descend ensuite ?
19.03.2020 - 18:36DROPS Design answered:
Bonjour Mme Peyrichout, ce top se crochète de haut en bas, autrement dit on crochète le haut du devant/du dos (après les bretelles) séparément jusqu'aux emmanchures puis on crochète le dos et le devant ensemble en rond. On fera les bretelles ensuite en les crochetant à partir de la chaînette du devant. Bon crochet!
20.03.2020 - 09:20
![]() Ria Agterberg wrote:
Ria Agterberg wrote:
Ik weet niet zeker wat bedoeld wordt met: "Haak 1 vaste in ieder stokje/2 vasten langs iedere toer " . Wordt daarmee bedoeld dat ik in de stokjes 1 vaste moet haken en om de lossen 2 vasten.
11.03.2020 - 22:11DROPS Design answered:
Dag Ria,
Als je bijv bij de halsrand bent, haak je op het voorpand in ieder stokje een vaste en langs de schouder, waar je zeg maar 'dwars op de stokjes haakt', 2 vasten om ieder stokje.
22.03.2020 - 11:08
![]() Ronja wrote:
Ronja wrote:
Hallo, wieviele Maschen müsste Ich denn bei den Luftmaschenbögen auslassen (falls überhaupt welche, es hat sich allerdings sehr gekräuselt).Ich lasse gerade der Anzahl der Luftmaschen entsprechend die Maschen aus, aber das sieht eher eckig aus, von dem her wäre Ich bei 1 Masche für 2 Luftmaschen und 2 für 3. Falls der Bogen im Diagramm dem dickerem im Muster entspricht, da dieser viel blasser ist. Ich würde mich über eine Antwort freuen :)
26.12.2019 - 11:28
![]() Nora wrote:
Nora wrote:
Podría ser video no entiendo el patron muchas gracias
26.12.2019 - 02:34
![]() Varity wrote:
Varity wrote:
Hello! I've never used a chart before and I have worked to the 65 DC before the A.1a, but I'm not sure how to continue using the chart, could you please explain?
22.09.2019 - 06:19DROPS Design answered:
Dear Varity, you have to work in pattern and increase at the same time, ie the increases start with the first row in A.1 and when A.1 has been worked, continue working A.2 as explained. Read more about diagrams here. Happy crocheting!
23.09.2019 - 09:19
![]() Nadia wrote:
Nadia wrote:
Hello, I have trouble understanding the diagram to this pattern. I am crocheting a size S and I'm currently at 65 DC, just before beginning the A.1a pattern. From which part of the diagram do I start crocheting? And what does the 'work 1 double crochet in each of the first 0-1-1-2-3-4 double crochets' mean? Thank you for your response!
22.08.2019 - 15:11DROPS Design answered:
Dear Nadia, you should start working pattern over the 47 sts, ie at the same time as the first increase row and work the first row of A.1 as described (increasing at the same time). Happy crocheting!
23.08.2019 - 08:20
![]() Paula wrote:
Paula wrote:
Me podrías explicar desde donde hay que hacer las 4 cadenetas para la sisa?
17.08.2019 - 02:24
![]() Kea wrote:
Kea wrote:
Hallo ik ben met de rug bezig in smalle ik begrijp dat ik 14cm moet haken.of moet ik net zoveel haken als de voorkant totaal30?
15.08.2019 - 08:40DROPS Design answered:
Dag Kea,
Klopt het achterpand haak je net als de voorkant, wat neerkomt op ongeveer 14 cm. (Staat er ook bij: 'pas aan volgens het voorpand' :)
01.09.2019 - 14:27
![]() Carmela Rodríguez wrote:
Carmela Rodríguez wrote:
Muy bien explicado , pero me gustaría que en este mismo esquema también esté el video del paso a paso hubiera sido excelente y completo, pero gracias por sus detalles.Mil bendiciones
24.07.2019 - 17:14
![]() Janick wrote:
Janick wrote:
Merci pour votre réponse rapide
17.07.2019 - 15:30
|
|||||||||||||||||||||||||||||||||||||||||||
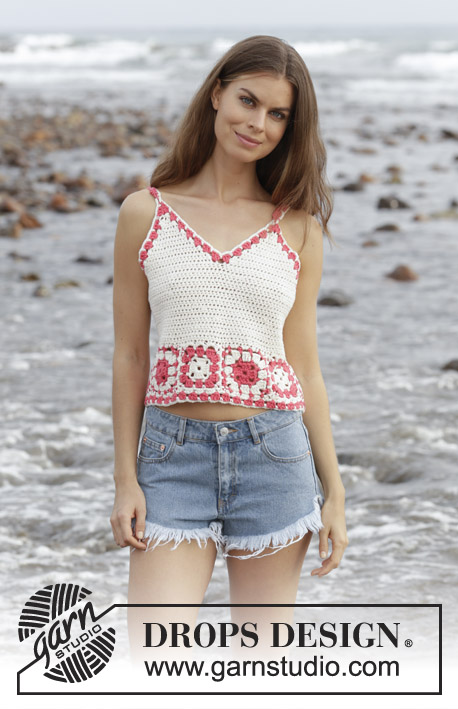
California Dream#californiadreamtop |
|||||||||||||||||||||||||||||||||||||||||||
 |
 |
||||||||||||||||||||||||||||||||||||||||||
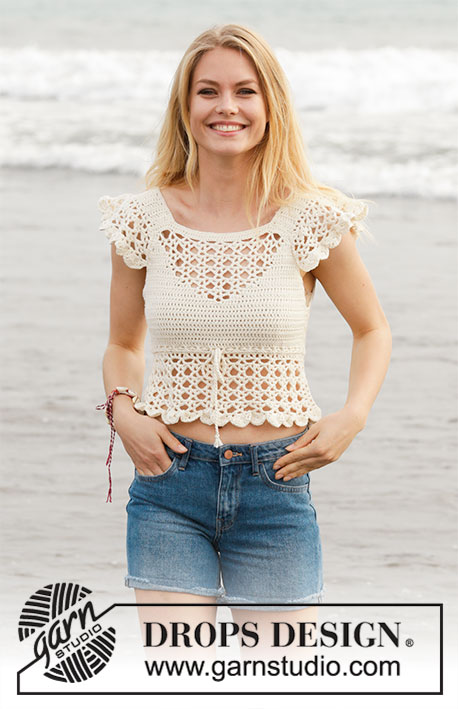
Crocheted top with lace pattern and flounce. Size: S - XXXL Piece is crocheted in DROPS Cotton Merino.
DROPS 190-21 |
|||||||||||||||||||||||||||||||||||||||||||
|
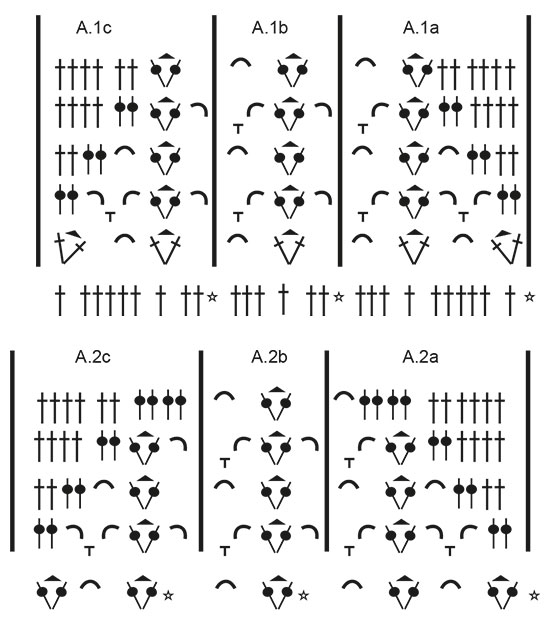
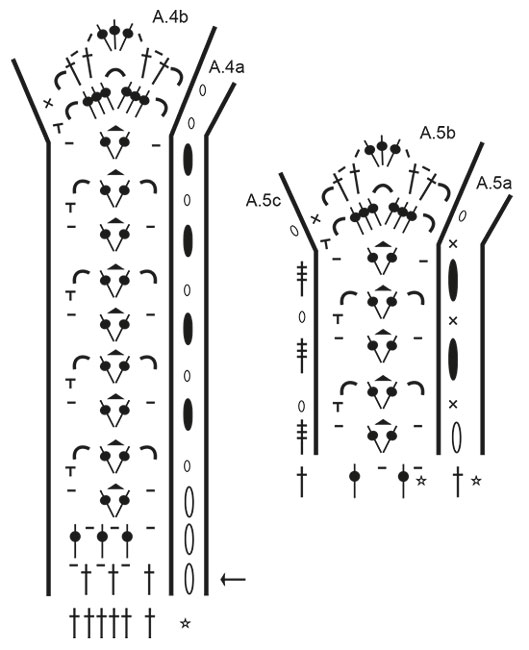
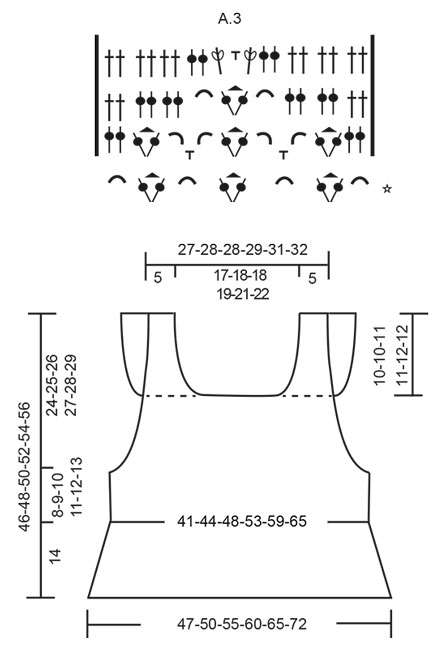
INFORMATION FOR PATTERN: PATTERN: See diagrams A.1 to A.5. INCREASE TIP-1: Increase 1 treble crochet by working 2 treble crochets in same stitch. CROCHET TIP-1 (applies to body but not diagram): Replace first treble crochet at beginning of every row with 3 chain stitches. CROCHET TIP-2 (applies to body but not diagram): When working in the round, replace first treble with 3 chain stitches, finish round with 1 slip stitch in 3rd chain stitch at beginning of round. DECREASE TIP: Decrease by working 2 treble crochets together. INCREASE TIP-2 (evenly): To calculate how to increase evenly, use the total number of treble crochets on row (e.g. 146 treble crochets) and divide treble crochets by number of increases to be done (e.g. 22) = 6.6. In this example increase by working 2 treble crochets in same treble crochet alternately approx. every 6th and 7th treble crochet. ---------------------------------------------------------- TOP: Piece is worked back and forth, top down, work front and back piece separately down to armhole, then work in the round over both parts. Then work straps from bottom up and then work flounces back and forth on straps, fasten flounce to front/back piece. FRONT PIECE: Work 51-53-53-55-57-59 chain stitches (including 3 chain stitches to turn with) on hook size 5 mm with Cotton Merino. Switch to hook size 4 mm, turn and work 1 treble crochet in 4th chain stitch from hook (= 2 treble crochets), work 1 treble crochet in each of the next 47-49-49-51-53-55 chain stitches = 49-51-51-53-55-57 treble crochets. On next row begin increase in each side of piece AT THE SAME TIME work pattern as follows: Increase 1 treble crochet in each side of piece (= 2 treble crochets increased) - read INCREASE TIP-1. Increase like this every row 3-5-8-13-14-15 times in total, and then every other row 5-5-3-0-0-0 times in total = 65-71-73-79-83-87 treble crochets on last row. Work next row as follows, begin from right side: Read CROCHET TIP-1 – work 1 treble crochet in each of the first 0-1-1-2-3-4 treble crochets, A.1a over the next 10 treble crochets, repeat A.1b over the next 30 treble crochets (= 5 times in total in width), A.1c over the next 9 treble crochets and 1 treble crochet in each of the last 0-1-1-2-3-4 treble crochets. Continue until A.1 has been work 1 time vertically. REMEMBER THE CROCHET TENSION! Then work as follows, begin from wrong side: Work 1 treble crochet in every treble crochet until 1 treble crochet remains before first chain space, work A.2c, repeat A.2b 3 times in total in width, A.2a and 1 treble crochet in every treble crochet the entire row. Continue until A.2 has been worked vertically. Then work as follows, begin from wrong side: Work 1 treble crochet in every treble crochet until first chain space, work A.3 and 1 treble crochet in every treble crochet the rest of row. Continue until A.3 has been worked vertically. Now work 1 treble crochet in every stitch until piece measures 14-15-15-16-16-17 cm. Fasten off, turn. Put piece aside. BACK PIECE: Work 51-53-53-55-57-59 chain stitches (including 3 chain stitches to turn with) on hook size 5 mm with Cotton Merino. Switch to hook size 4 mm, turn and work 1 treble crochet in 4th chain stitch from hook (= 2 treble crochets), work 1 treble crochet in each of the next 47-49-49-51-53-55 chain stitches = 49-51-51-53-55-57 treble crochets. Then work 1 treble crochet in every treble crochet - AT THE SAME TIME increase 1 treble crochet in each side of piece - remember INCREASE TIP-1. Increase like this every row 8-10-11-13-14-15 times in total = 65-71-73-79-83-87 treble crochets on last row. When piece measures 14-15-15-16-16-17 cm (adjust according to front piece), fasten off, turn. BODY: Now work the two parts together as follows: Work 4-4-7-8-12-15 chain stitches for armhole, 1 treble crochet in each of the 65-71-73-79-83-87 treble crochets from back piece, work 8-8-14-16-24-30 chain stitches for armhole, 1 treble crochet in each of the 65-71-73-79-83-87 treble crochets from front piece, work 4-4-7-8-12-15 chain stitches for armhole and finish with 1 slip stitch in first chain stitch at beginning of round. Then work piece in the round, continue with 1 treble in every treble/chain stitch = 146-158-174-190-214-234 trebles. When working in the round, turn after every round to work alternately from right side and wrong side. This is so that the texture is the same on the entire top - read CROCHET TIP-2. Insert 1 marker thread in each side, in the middle of the 8-8-14-16-24-30 chain stitches. NOW MEASURE THE PIECE FROM HERE! Continue like this until piece measures 8-9-10-11-12-13 cm. Now work in the round according to diagram A.4 while at the same time increasing on first round (round marked with arrow in diagram) as follows: Work A.4b 28-30-33-36-39-43 times in total on round – A.4a shows how rounds begin and end and is worked in addition to A.4b – AT THE SAME TIME increase 11-11-12-13-10-12 chain spaces (= 1 treble crochet + 1 chain stitch) evenly – read INCREASE TIP-2 = 84-90-99-108-117-129 chain spaces (= 1 treble crochet + 1 chain stitch). Continue in the round, i.e. always work pattern from right side. When A.4 is done vertically, fasten off. STRAPS: Now work a strap back and forth in cast-on edge on front piece over the first 8-9-9-9-10-10 treble crochets. Work 1 treble crochet in every treble crochet until strap measures 10-10-11-11-12-12 cm. Fasten off. Work 1 strap over the first 8-9-9-9-10-10 treble crochets in the other side the same way. Work straps the same way on back piece. Sew tog straps on shoulder. FLOUNCE: Work back and forth over every row on strap (= 20-20-22-22-24-24 cm). Begin from wrong side and work 1 treble crochet in first row, * 1 chain stitch, 1 treble crochet around row *, work from *-* along the entire strap – adjust so that there are 26-26-28-28-30-30 chain spaces (= 1 chain stitch + 1 treble crochet) on this row, finish with 1 treble crochet in last row = 1 treble crochet in each side and 26-26-28-28-30-30 chain spaces (= 1 chain stitch + 1 treble crochet). Turn and work as follows from right side: A.5a, A.5b 13-13-14-14-15-15 times in total in width, finish with A.5c. Continue this pattern until A.5 is done vertically, fasten off. Work flounce on the other strap the same way. NECK EDGE: Work 1 double crochet in every treble crochet/2 double crochets along every treble crochet row along the entire neck. SLEEVE EDGE: Work 1 double crochet in every treble crochet/2 double crochets along every treble crochet row along armhole – start right after flounce, work along armhole and to the flounce. Place flounce edge to edge to this sleeve edge (on both front and back piece) and fasten with small, neat stitches. Work the other sleeve edge the same way and fasten flounce. TIE: Cut 3 lengths of 3 metres each with Cotton Merino. Twine the strands tog until they resist, fold them double so that they twine again. Make a knot at each end. Baste the yarn up and down through first row with eyelet holes - start mid front. Tie a bow at the front. |
|||||||||||||||||||||||||||||||||||||||||||
Diagram explanations |
|||||||||||||||||||||||||||||||||||||||||||
|
|||||||||||||||||||||||||||||||||||||||||||
 |
|||||||||||||||||||||||||||||||||||||||||||
 |
|||||||||||||||||||||||||||||||||||||||||||
 |
|||||||||||||||||||||||||||||||||||||||||||
Have you finished this pattern?Tag your pictures with #dropspattern #californiadreamtop or submit them to the #dropsfan gallery. Do you need help with this pattern?You'll find 10 tutorial videos, a Comments/Questions area and more by visiting the pattern on garnstudio.com. © 1982-2026 DROPS Design A/S. We reserve all rights. This document, including all its sub-sections, has copyrights. Read more about what you can do with our patterns at the bottom of each pattern on our site. |
|||||||||||||||||||||||||||||||||||||||||||


With over 40 years in knitting and crochet design, DROPS Design offers one of the most extensive collections of free patterns on the internet - translated to 17 languages. As of today we count 324 catalogues and 12290 patterns translated into English (UK/cm). 12290
We work hard to bring you the best knitting and crochet have to offer, inspiration and advice as well as great quality yarns at incredible prices! Would you like to use our patterns for other than personal use? You can read what you are allowed to do in the Copyright text at the bottom of all our patterns. Happy crafting!
Post a comment to pattern DROPS 190-21
We would love to hear what you have to say about this pattern!
If you want to leave a question, please make sure you select the correct category in the form below, to speed up the answering process. Required fields are marked *.