
Popular categories
Looking for a yarn?


Comments / Questions (34)
![]() Susanne Hagman wrote:
Susanne Hagman wrote:
Hej Jag skulle vilja sticka denna snygga kofta i ett bomullsgarn? Vilket garn ska jag använda? Tack för en trevlig sida
06.01.2018 - 09:06DROPS Design answered:
Hei Susanne. Vi har dessverre ikke et bomulsgarn i garngruppe D i vårt sortiment. mvh Drops design
10.01.2018 - 11:13
![]() Bernadette wrote:
Bernadette wrote:
Is it possible to adjust the pattern to make the cardigan longer? If so where would I do that?
30.12.2017 - 14:28DROPS Design answered:
Dear Bernadette, of course you can, the how depends how much longer you want this cardigan. This cardigan is knitted from the bottom up, you could add a stripe that is two rows longer than the first one (just to keep the stiping sequence), and add two stitches to the back and 1 to each front, which you decrease at the point where the original pattern would start. I hope this helps. Happy Knitting!
30.12.2017 - 16:01
![]() Elisabeth Kongsvik wrote:
Elisabeth Kongsvik wrote:
Heia.gleder meg til å begynne på denne jakka men får ikke begynt?det står at jeg skal legge opp med 2 tråder.den er grei.mem så står det I oppskrifta at etter at jeg har lagt opp maskene som jeg skal ha,skal jeg ta bort den ene tråden å strikke riller?hvorfor bare med den ene tråden og ikke begge??
23.10.2017 - 14:58
![]() María wrote:
María wrote:
Quisiera hacer esta chaqueta. para una talla M, cuántos ovillos necesito??? Un saludo
05.09.2017 - 22:01DROPS Design answered:
Hola Maria. Para hacer esta chaqueta necesitas 6 ovillos de blanco hueso y 3 ovillos de verde mar claro.
11.09.2017 - 23:56Anne wrote:
Hi, I'd like to know how are the ties supposed to be placed because I just can't imagine where they should be and I can't see it from the pictures. I am sorry if this question is silly, I am a beginner knitter and I have no clue what to do. Thank you for your answer and patience.
19.08.2017 - 00:41DROPS Design answered:
Dear Anne, the ties should be fastened in two different places: one pair of ties should be aprox. 2 cm under the armhole on each side of jacket, the other pair shoud be placed approx. 22-23-24-25-26-27 cm under the shoulder and fastened to the front edge of left/right front piece. (So one pair is supposed to tie whole jacket, the other is mostly for neck/hood.) Happy knitting!
19.08.2017 - 11:43Nga wrote:
What size is the model wearing? Thanks for your answer ^_^
11.08.2017 - 19:21DROPS Design answered:
Dear Nga, the models in the photos usually wear the M size.
13.08.2017 - 20:50
![]() Lucy wrote:
Lucy wrote:
Which yarn can I use instead of the yarn above? Thanks for reply :)
05.08.2017 - 10:31DROPS Design answered:
Dear Lucy, you can substitute DROPS Brushed Alpaca Silk (used doubled up), and get a similar effect. Or you can use any other yarn that is in the yarn group D, but the final effect will be slightly different. And do not forget, you should always make a swatch and check your gauge and change the tension if necessary. Happy Knitting!
06.08.2017 - 10:00
![]() Fa wrote:
Fa wrote:
Modelml-020 geeft geen patroonbeschrijving
31.01.2017 - 10:13
![]() Karin wrote:
Karin wrote:
Cozy!
09.01.2017 - 21:56
![]() Birgit wrote:
Birgit wrote:
Die Jacke sieht sehr bequem und schön aus.
07.01.2017 - 01:18
|
|||||||||||||
Driftwood#driftwoodcardigan |
|||||||||||||
 |
 |
||||||||||||
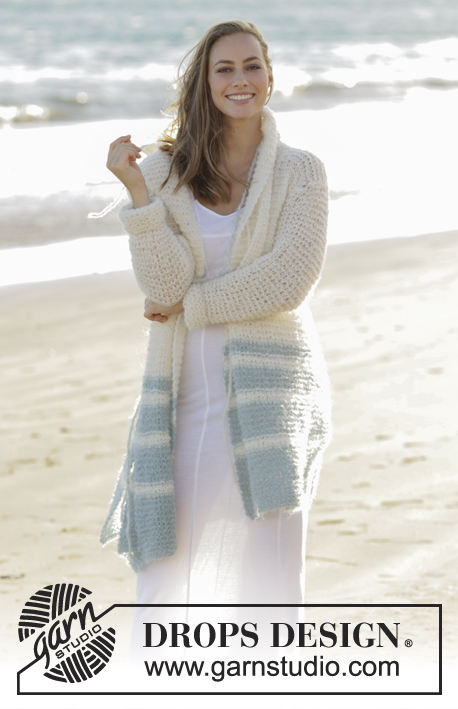
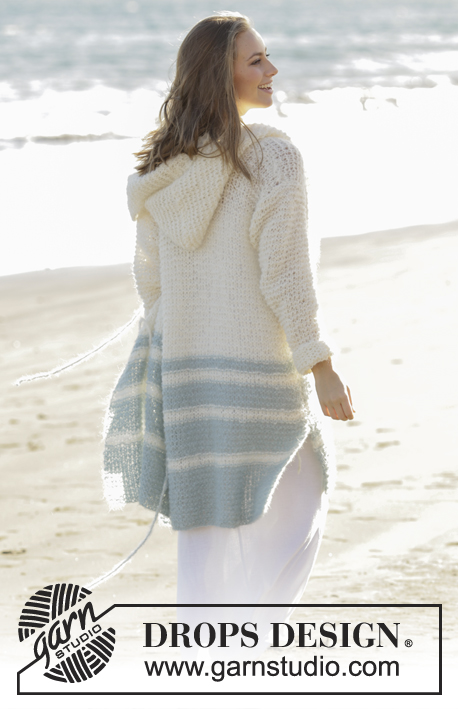
Knitted jacket in garter stitch with stripes and hood in DROPS Melody. Size: S - XXXL
DROPS 175-2 |
|||||||||||||
|
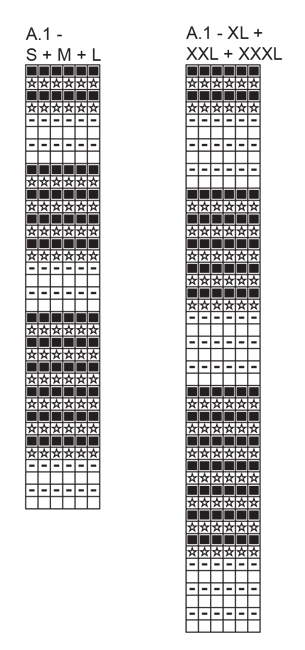
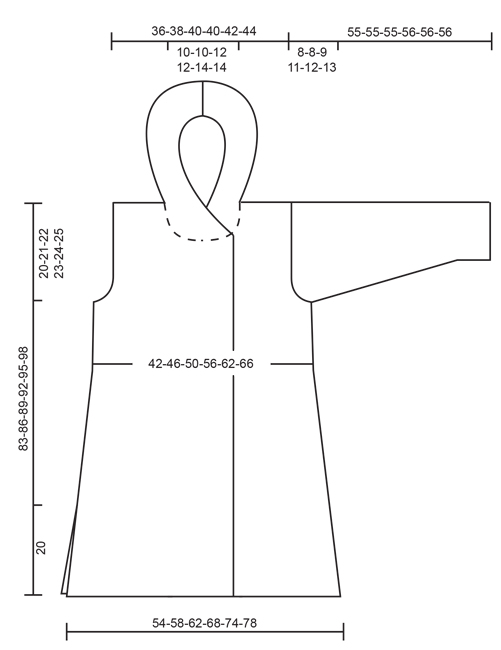
GARTER STITCH (back and forth): 1 ridge = knit 2 rows. STRIPES: See diagram A.1. Diagrams show all rows in pattern seen from the right side. Choose diagram for your size. MEASURING TIP: All length measurements are done when piece is held up, otherwise the jacket will be longer than measurements in chart when worn. This is important because the texture will make the garment longer. DECREASE TIP: Decrease inside 3 edge stitches in garter stitch in each side by knitting 2 stitches together. All decreases are done from the right side. INCREASE TIP-1 (applies to sleeves): Increase 1 stitch inside 2 edge stitches in garter stitch in each side. Increase 1 stitch by making 1 yarn over, on next row knit yarn over twisted to avoid holes. INCREASE TIP-2: To calculate how to increase evenly, use the total number of stitches on row (e.g. 56 stitches), minus 16 band stitches in each side and divide the remaining stitches by number of increases to be done (e.g. 24) = 1.6. In this example increase after alternately approx. every and every other stitch. Increase 1 stitch by making 1 yarn over, on next row knit yarn over twisted to avoid holes. ---------------------------------------------------------- JACKET: Worked back and forth on circular needle in parts and sewn together when finished. BACK PIECE: Cast on 54-58-62-68-74-78 stitches on circular needle size 9 mm with 2 strands light sea green. Remove one strand and work in GARTER STITCH - see explanation above. REMEMBER THE KNITTING TENSION When piece measures 14-15-16-17-18-19 cm - READ MEASURING TIP, work STRIPES as shown in A.1. AT THE SAME TIME when piece measures 24 cm in all sizes, decrease 1 stitch in each side - READ DECREASE TIP (= 2 stitches decreased). Decrease like this every 7-7-7-8-8-8 cm 6 times in total in each side = 42-46-50-56-62-66 stitches. When diagram A.1 has been worked, continue with off white until finished measurements. When piece measures 63-65-67-69-71-73 cm - remember MEASURING TIP, cast off for armholes at the beginning of every row in each side as follows: 3 stitches 0-0-1-1-1-1 time, 2 stitches 1-1-0-1-2-2 times and 1 stitch 1-2-2-3-3-4 times = 36-38-40-40-42-44 stitches. Continue to work until piece measures 81-84-87-90-93-96 cm. Now cast off the middle 8-8-10-10-12-12 stitches for neck and finish each shoulder separately. Cast off 1 stitch on next row from neck = 13-14-14-14-14-15 stitches remain on the shoulder. Work until piece measures 83-86-89-92-95-98 cm – remember MEASURING TIP and cast off with 2 strands off white (this is done to avoid a tight cast-off edge). Work the other shoulder the same way. RIGHT FRONT PIECE: Cast on 43-45-47-50-53-55 stitches (including 16 band stitches towards mid front) on circular needle size 9 mm with 2 strands light sea green. Remove one strand and work in garter stitch. When piece measures 14-15-16-17-18-19 cm, work stripes as shown in A.1 the same way as on back piece. When piece measures 24 cm in all sizes, begin decrease in the side and decrease the same way as on back piece = 37-39-41-44-47-49 stitches. When piece measures 63-65-67-69-71-73 cm, cast off for armholes at the beginning of every row the same way as on back piece = 34-35-36-36-37-38 stitches. When piece measures 77-80-83-86-89-92 cm, slip the outermost 17-17-18-18-19-19 stitches towards mid front on 1 stitch holder for neck (work them before slipping them on stitch holder to avoid cutting the yarn). Continue to cast off for neck at beginning of every row from neck as follows: 2 stitches 1 time and 1 stitch 2 times = 13-14-14-14-14-15 stitches remain for shoulder. Work until piece measures 83-86-89-92-95-98 cm – remember MEASURING TIP and cast off with 2 strands off white. LEFT FRONT PIECE: Cast on and work as right front piece but with decreases in the opposite side. SLEEVE: Cast on 20-22-22-24-24-26 stitches on circular needle size 9 mm with 2 strands off white. Remove one strand and work in garter stitch back and forth. When piece measures 10 cm, increase 1 stitch in each side - READ INCREASE TIP-1! Increase like this every 5-5-4-3½-3-3 cm 8-8-9-10-11-11 times in total = 36-38-40-44-46-48 stitches. When piece measures 47-47-46-45-44-43 cm, cast off for sleeve cap at beginning of every row in each side as follows: 3 stitches 1 time, 2 stitches 1-1-2-2-2-2 times and 1 stitch 3-3-3-5-6-7 times. Then cast off 2 stitches at beginning of every row in each side until piece measures 54-54-54-55-55-55 cm. Cast off 3 stitches at beginning of the next 2 rows before loosely casting off the remaining stitches with 2 strands off white. Entire sleeve measures approx. 55-55-55-56-56-56 cm from top and down. Knit another sleeve the same way. ASSEMBLY: Sew the shoulder seams. Sew in sleeves. Sew underarm seams and side seams in one - sew in outer loops of edge stitches to avoid a chunky seam, but leave approx. 20 cm at the bottom of each side of front and back piece for vents. HOOD: Pick up from right side approx. 56 to 68 stitches around the neck (including stitches on stitch holders at the front) on circular needle size 9 mm with off white. Work in garter stitch back and forth and increase AT THE SAME TIME evenly to 80-82-84-86-88-90 stitches on first row – READ INCREASE TIP-2 (do not increase over the outermost 16 stitches in each side). When hood measures 35-35-36-36-37-37 cm, loosely cast off with 2 strands off white. Place hood double and sew together at the top with grafting/kitchener stitches. TIES: The jacket has 4 ties, 2 ties in 2 strands off white and 2 strands in 1 strand off white + 1 strand light sea green. 1 tie = cut 2 strand of approx. 2.8 meters. Twine the strands tog until they resist, fold the strands double so that they twine. Tie a knot in each end (string should be approx. 1 meter when finished, cut it to correct length if needed). Fasten 1 tie in off white + light sea green on the outside on the left side of jacket approx. 2 cm below armhole (try the jacket on and adjust placement of string). The other tie with off white + light sea green should be fastened to the edge of right front piece approx. 22-23-24-25-26-27 cm from shoulder and down. Fasten 1 tie in off white approx. 2 cm below armhole on the inside of jacket in right side. The other tie in off white should be fastened at the other at the edge of left front piece approx. 22-23-24-25-26-27 cm from shoulder and down. |
|||||||||||||
Diagram explanations |
|||||||||||||
|
|||||||||||||
 |
|||||||||||||
 |
|||||||||||||
Have you finished this pattern?Tag your pictures with #dropspattern #driftwoodcardigan or submit them to the #dropsfan gallery. Do you need help with this pattern?You'll find 16 tutorial videos, a Comments/Questions area and more by visiting the pattern on garnstudio.com. © 1982-2026 DROPS Design A/S. We reserve all rights. This document, including all its sub-sections, has copyrights. Read more about what you can do with our patterns at the bottom of each pattern on our site. |
|||||||||||||


With over 40 years in knitting and crochet design, DROPS Design offers one of the most extensive collections of free patterns on the internet - translated to 17 languages. As of today we count 324 catalogues and 12290 patterns translated into English (UK/cm). 12290
We work hard to bring you the best knitting and crochet have to offer, inspiration and advice as well as great quality yarns at incredible prices! Would you like to use our patterns for other than personal use? You can read what you are allowed to do in the Copyright text at the bottom of all our patterns. Happy crafting!
Post a comment to pattern DROPS 175-2
We would love to hear what you have to say about this pattern!
If you want to leave a question, please make sure you select the correct category in the form below, to speed up the answering process. Required fields are marked *.