
Popular categories
Looking for a yarn?


Comments / Questions (24)
![]() Eliana Sullivan wrote:
Eliana Sullivan wrote:
Please help. I do not understand the instructions for the neck elevation. Where do I start working the 48 stitches ( size XL) before turning? I tried starting at the 1st stitch of the row until 48 stitches remained on my left hand needle but after working all 8 short rows there is a band of stocking stitch between the neck and A1. The markers for the body and sleeves are not inserted until AFTER the short rows. Please explain this more clearly. Thank you very much!
03.02.2021 - 18:47DROPS Design answered:
Hi Eliana, Starting at the beginning of the row, work until you have 48 stitches left on the row, turn and work back until you have 48 stitches left on the row, turn and work until you have 43 stitches left on the row, turn and work back until you have 43 stitches left on the row. Continue like this for 8 short rows, reducing the number of stitches left by 5 each time you work from the right side and the same number working back. After the elevation, you begin the pattern and insert the markers. Hope this helps and happy knitting!
04.02.2021 - 07:25
![]() Nathalie wrote:
Nathalie wrote:
Bonjour je tricote ce modèle en "merino extra fine" je n'ai plus que les manches à tricoter je trouve que l'encolure s'enroule sur elle même est-ce que cela va s'arranger au lavage ou au repassage ou dois-je défaire et modifier l'encolure ?
01.05.2017 - 13:53DROPS Design answered:
Bonjour Nathalie, vous pouvez bloquer votre gilet à la fin (laver et sécher, avec des épingles si besoin). Si le souci persiste, vous pouvez ajouter une petite bordure au crochet pour la maintenir. Bon tricot!
02.05.2017 - 11:32
![]() Tina Borup wrote:
Tina Borup wrote:
Hej, Angående mønster A.2b. Er det korrekt at mønster kun går over 9 pinde.
13.02.2017 - 22:16DROPS Design answered:
Hej Tina. Ja, A.2b gaar over 9 p i alt.
14.02.2017 - 09:44
![]() Julia wrote:
Julia wrote:
Ich finde eure Seite einfach nur super! Habe gerade mit den Stricken und Häkeln angefangen und eure Seite ist eine tolle Motivation mehr auszuprobieren. Kann man eure Produkte (Strickjacken etc.) auch kaufen? Habe so viele schöne Pullover oder Ponchos gesehen 😊 Liebe Grüße, Julia
13.12.2016 - 01:33DROPS Design answered:
Liebe Julia, wir haben in unseren Seiten nur Anleitungen, aber gerne können Sie Ihren DROPS Laden mal fragen, ob sowas möglich wäre. Viel Spaß beim stricken!
13.12.2016 - 08:58
![]() Marina Clé wrote:
Marina Clé wrote:
Hallo, ik heb een vraag over de beschrijving helemaal in het begin. Na de ribbels voor de halsboord brei je verkorte naalden in tricotsteek. Zoals ik het begrijp begin je pas na die verkorte toeren met het telpatroon voor de kabel op de mouwen. Toch lijkt mij het resultaat dan niet wat het zou moeten zijn omdat er dan een stukje tricotsteek zit tussen de halsboord en het kabelpatroon. Wat doe ik fout? grtjs
24.11.2016 - 09:52DROPS Design answered:
Hoi Marina. Je breit zoals er staat in het patroon: halsboord, verkorte toeren en dan patroon. Zo is het model op de foto ook gebreid. Veel plezier :)
24.11.2016 - 12:36
![]() Claudia wrote:
Claudia wrote:
Leider passt mir das Modell gar nicht gut. Von oben nach unten gestrickte Jacken sitzen (bei mir) im Schulterbereich gar nicht gut. Dies war das zweite (und letzte) Modell für mich. Ausserdem sind mir die Ärmel im unteren Bereich viel zu eng und ich habe dünne Arme. Leider kratzt auch noch die Wolle - da kann das Modell jetzt nichts dafür. Schade, denn das Muster ist wirklich schön!
18.11.2016 - 09:39
![]() Emma wrote:
Emma wrote:
Ou alors il faut supprimer le dernier rang du diagramme pour avoir 1 seul rg de chaque côté de celui avec une maille croisée ?
17.11.2016 - 22:22
![]() Emma wrote:
Emma wrote:
Bonjour. Le diagramme A2b est étrange (motif non symétrique). Il faut tricoter le motif de médaillon (sur 5 rgs) / UN rang simple / 1 rg avec m. croisée / DEUX rangs simples / médaillon etc. Il manque 1 rang pour avoir 2 rgs autour de celui avec une maille croisée
17.11.2016 - 22:21
![]() Claudia wrote:
Claudia wrote:
Kann es sein, dass in Diagramm A.2b ein Fehler ist? Nach der Verzopfung werden dort 2 Reihen gestrickt, danach fängt es bei der Spreizung wieder an. Müsste es nicht nur eine Reihe sein? Das wäre konsistent mit A.2a.
26.10.2016 - 13:59DROPS Design answered:
Liebe Claudia, es gibt jetzt in neues Diagram A.2b.
31.10.2016 - 09:52
![]() Birgit Buchloh wrote:
Birgit Buchloh wrote:
Hallo! Ich habe im laufe der Zeit schon viele Ihrer schönen Anleitungen ausgedruckt. Danke dafür! Leider kann ich nach der Neugestaltung Ihrer Webseite die Anleitungen nicht mehr komplett ausdrucken. Mir fehlen immer die letzten 3 Zentimeter am rechten Rand! Haben Sie einen Tipp für mich? Danke im Voraus, Birgit Buchloh
15.10.2016 - 10:52DROPS Design answered:
Liebe Frau Buchloh, wir haben keine Änderungen für das Ausdrücken gemacht, versuchen Sie die Größe anzupassen, dh die Druckereinstellungen anpassen.
17.10.2016 - 14:21
|
||||||||||||||||||||||||||||
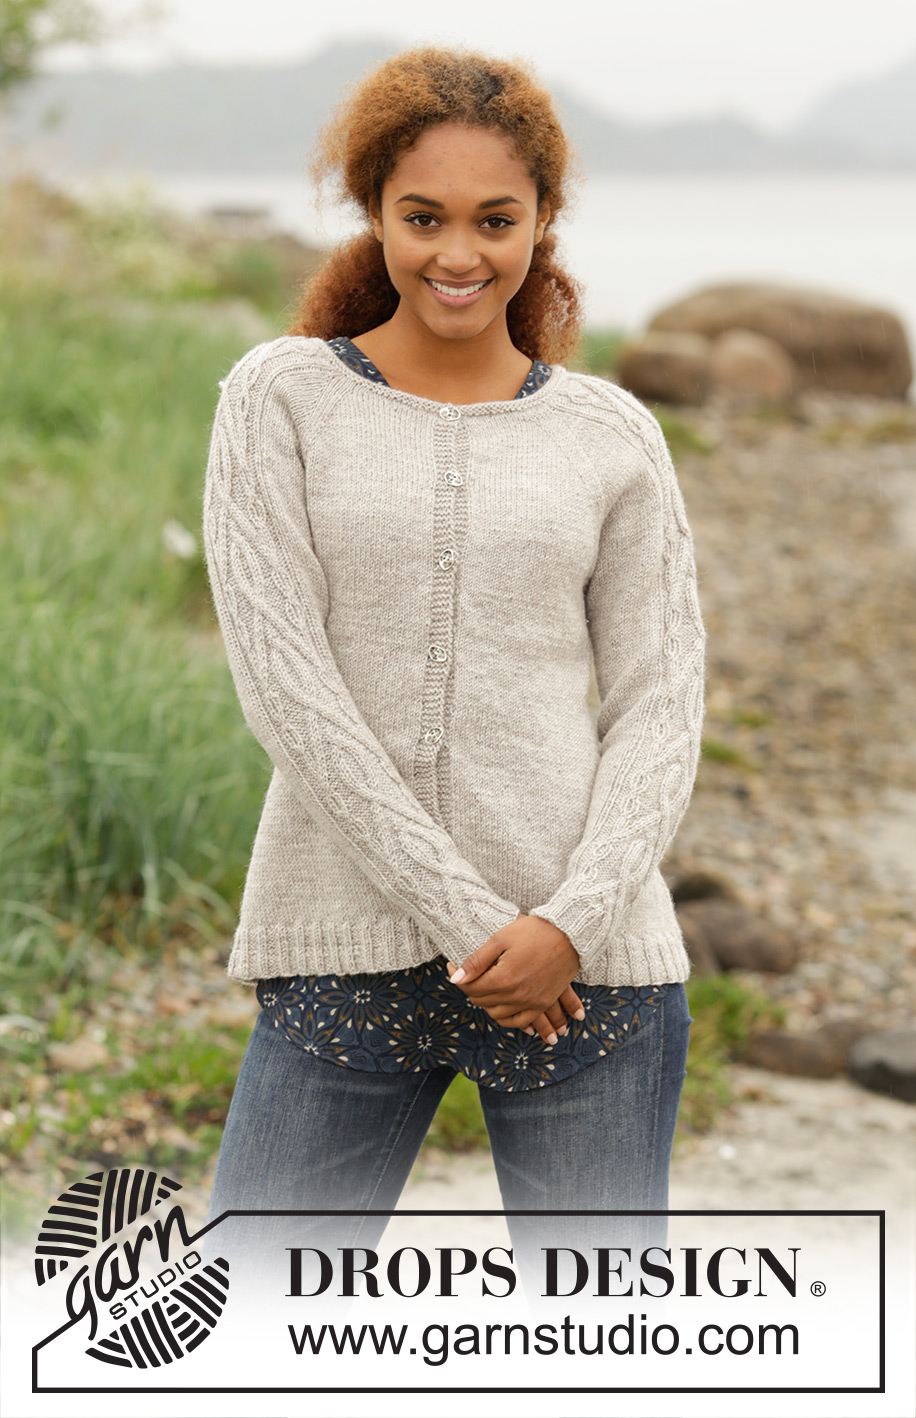
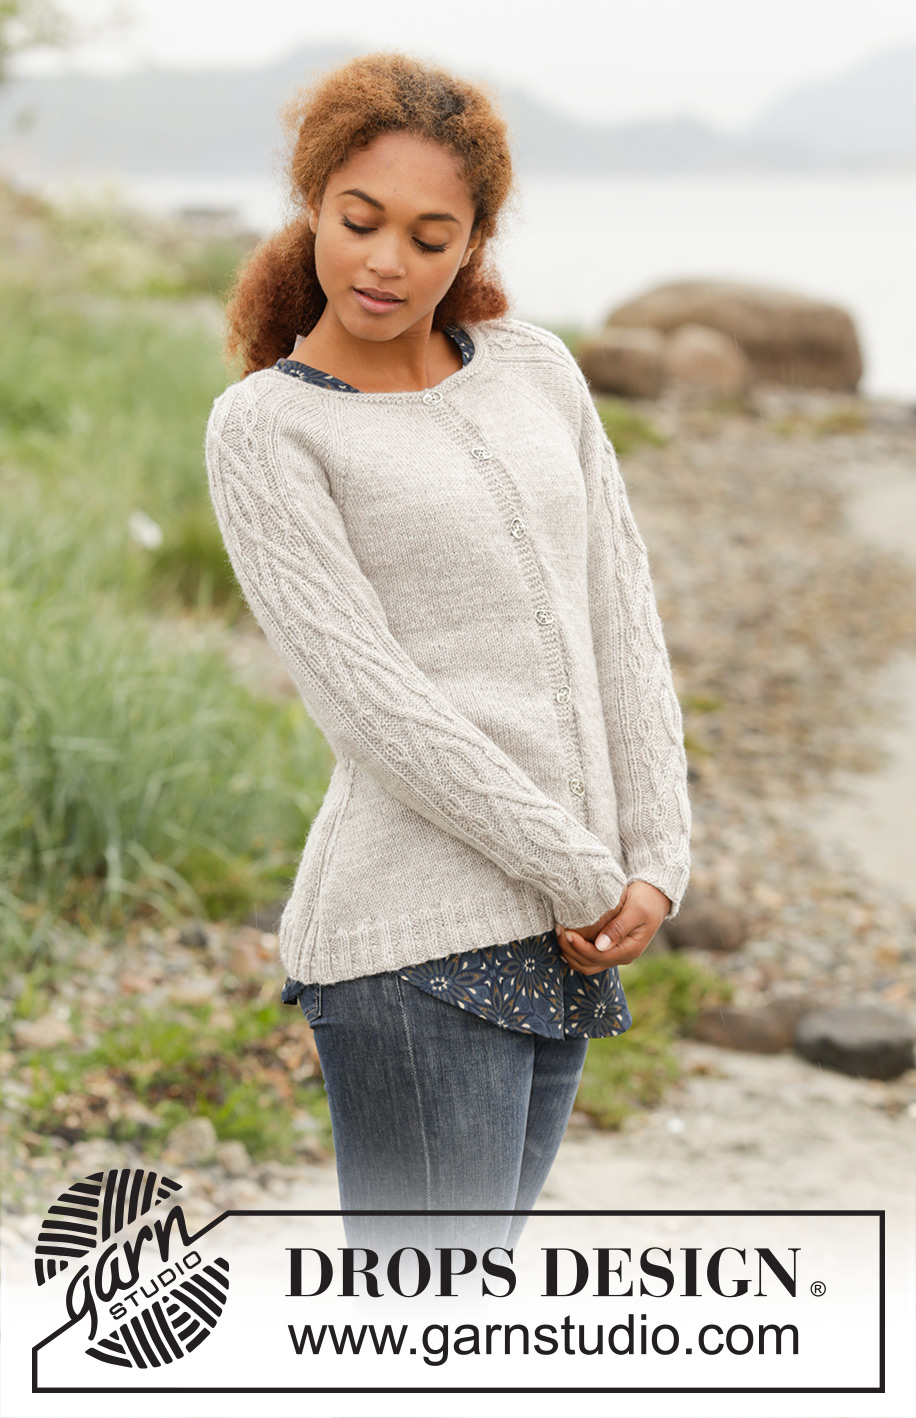
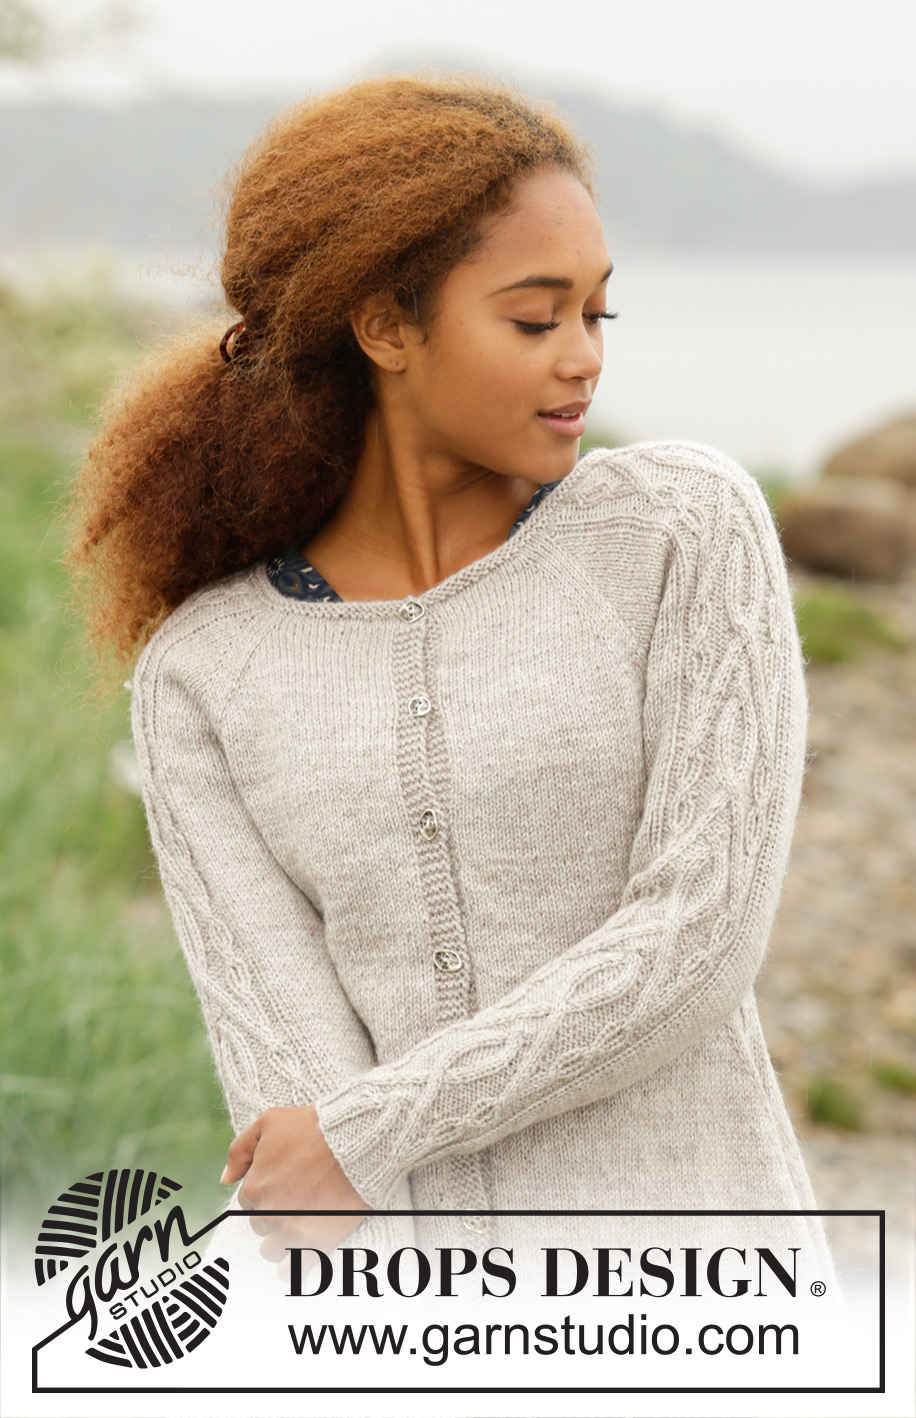
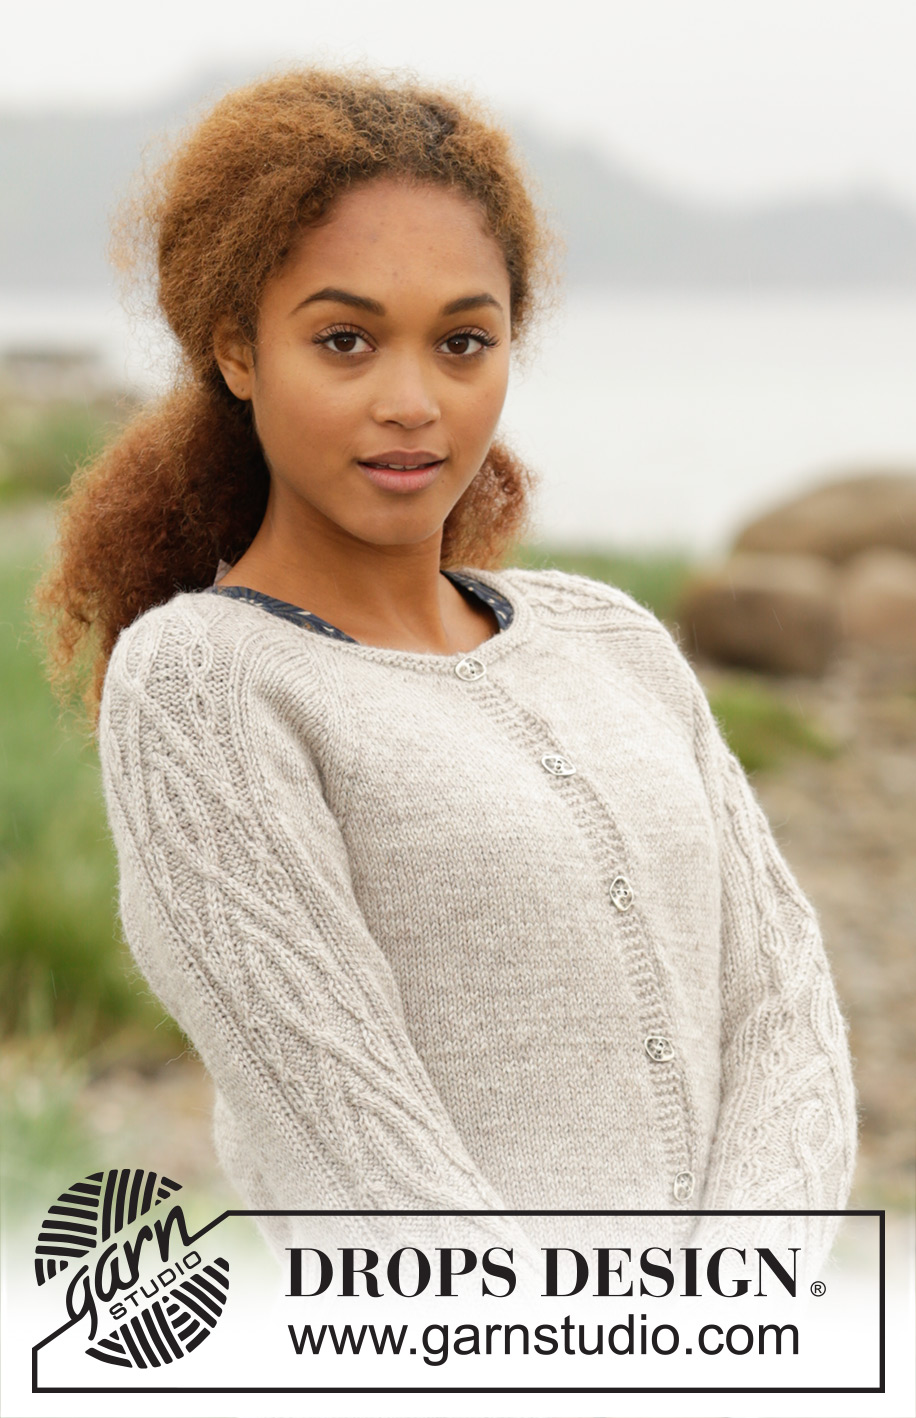
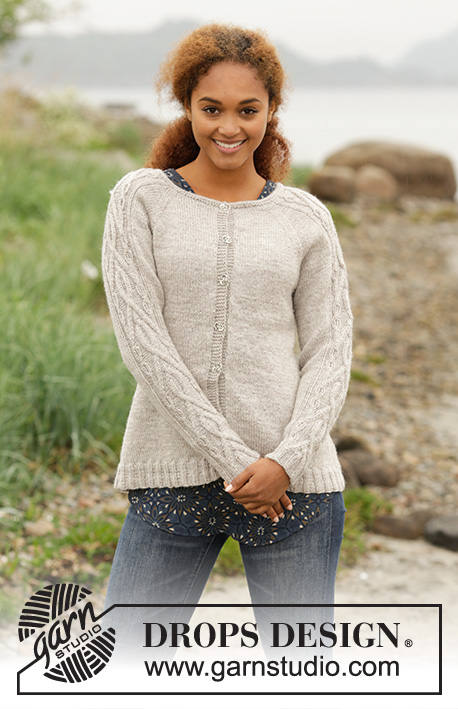
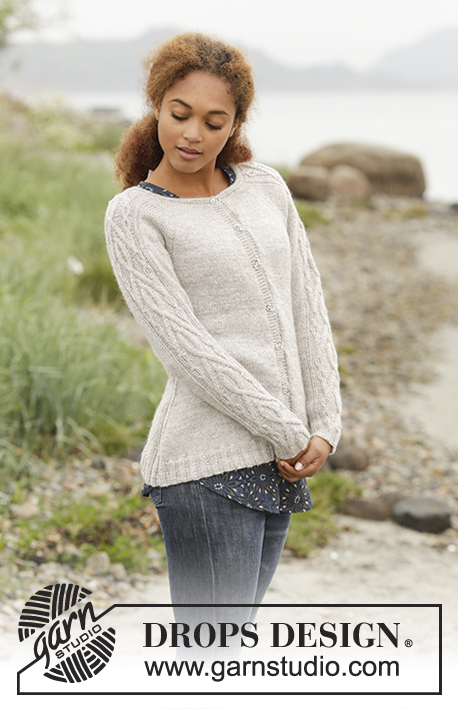
Irish Plaits Cardigan#irishplaitscardigan |
||||||||||||||||||||||||||||
 |
 |
|||||||||||||||||||||||||||
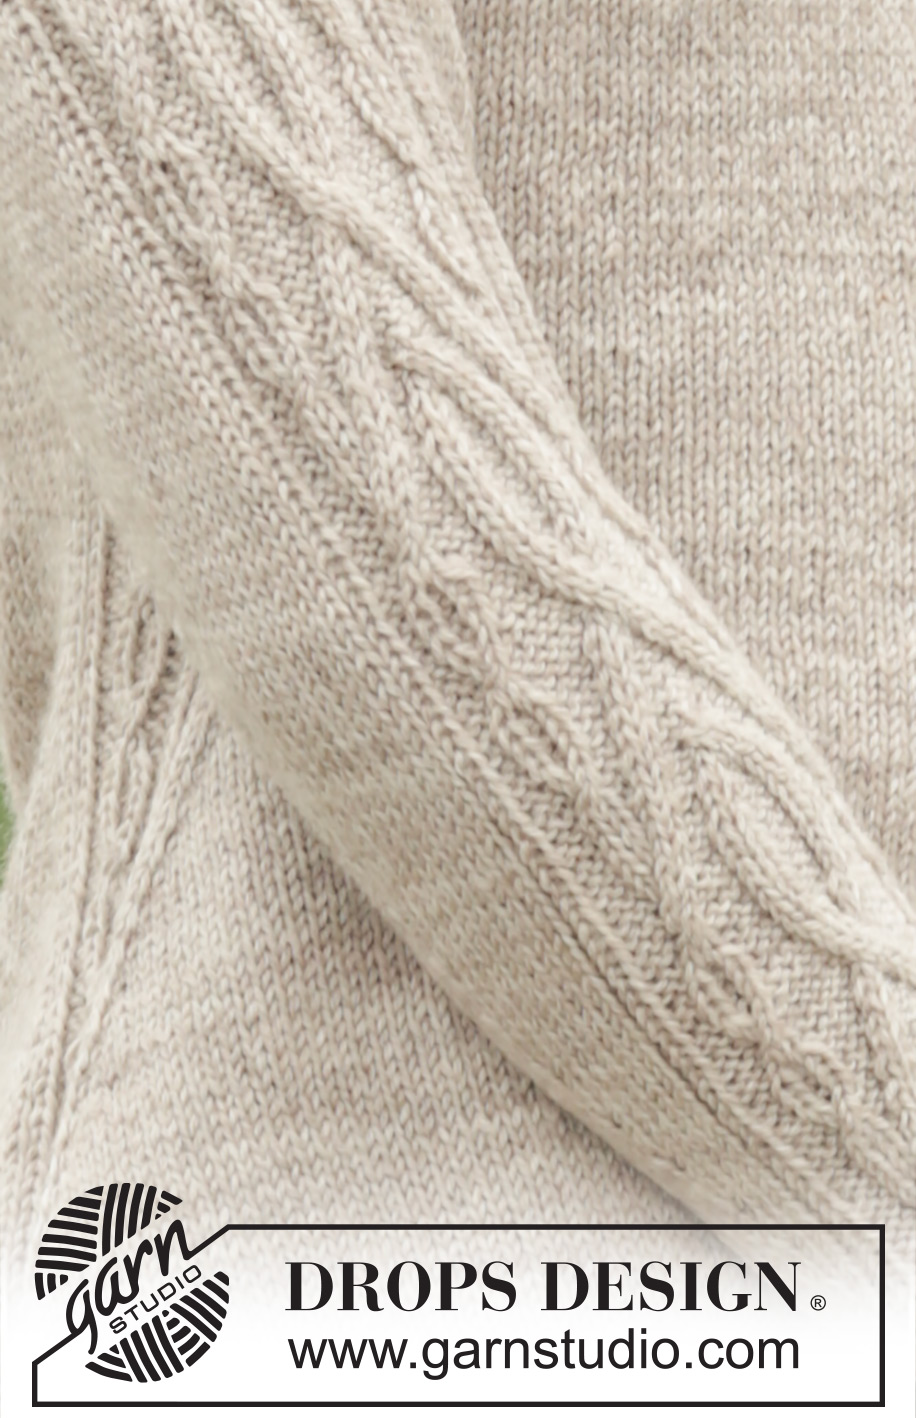
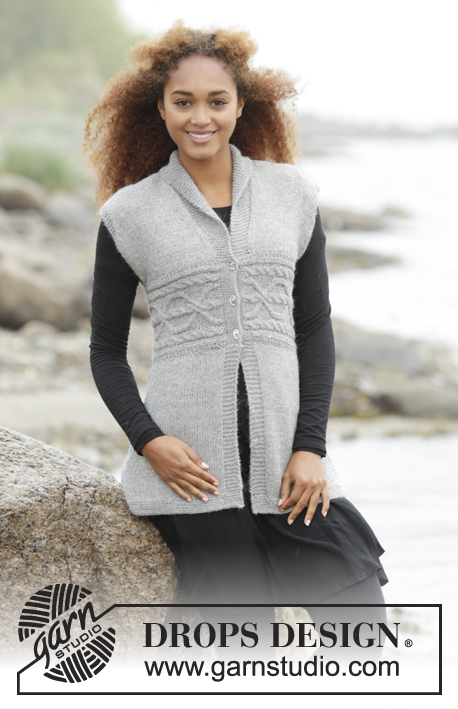
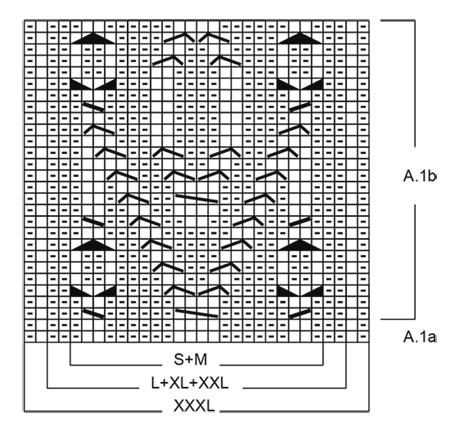
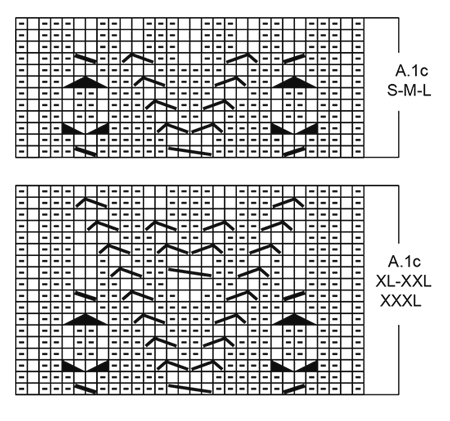
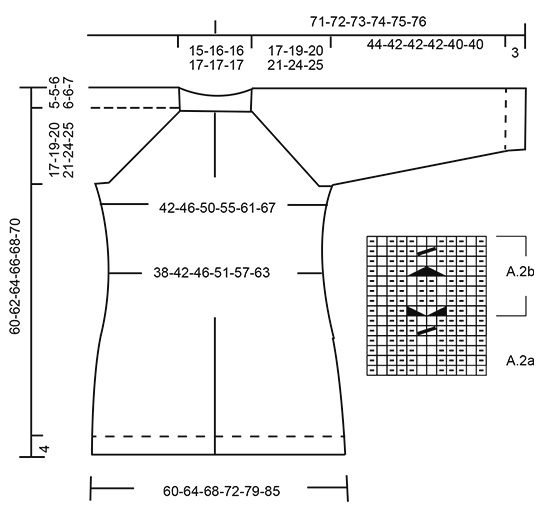
Knitted jacket with raglan and cables on sleeves and in the sides, worked top down in DROPS Karisma or Sky. Size S-XXXL.
DROPS 173-3 |
||||||||||||||||||||||||||||
|
GARTER ST (back and forth): K all rows. 1 ridge = 2 rows K. PATTERN: See diagram A.1 (see diagram for correct size) and A.2. The diagrams show all rows in pattern seen from RS. RAGLAN: Inc for raglan before marker and 2 sts in stocking st. Inc for raglan after marker and 2 sts in stocking st. INC AS FOLLOWS FROM RS: Inc 1 st by making a YO. On next row P YOs twisted to avoid holes. INC AS FOLLOWS FROM WS: Inc 1 st by making a YO. On next row K YO twisted to avoid hole. DECREASE TIP: All dec are done from RS! Work until 4 sts remain before A.2a/A.2b, K 2 tog, K 2, work A.2a/A.2b, K 2, slip 1 st as if to K, K 1, psso. Repeat in the other side (= 4 sts dec). INCREASE TIP-1 (evenly spaced): To calculate how often inc should be done, use the total no of sts on row (e.g. 115 sts), minus bands (e.g. 10 sts) and divide the remaining sts by no of inc to be done (e.g. 11) = 9.5. I.e. in this example inc 1 st alternately approx. every 9th and 10th st (and do not inc over bands). INCREASE TIP-2: All inc are done from RS. Work until 2 st remains before A.2b, 1 YO, K 2, A.2b, K 2, 1 YO. Repeat inc in the other side = 4 sts inc on row. On next row P YO twisted to avoid holes. Then work the new sts in stocking st. SHORT ROWS: For every 10th row work short rows over the 5 sts in garter st in bands as follows (beg from RS): K 5 band sts, turn piece, tighten yarn and K back, turn piece and work as before over all sts, turn piece, K 5 band sts in garter st, turn piece, tighten yarn and K back. That way the ridges in band will not contract as much. CAST-OFF TIP: To avoid a tight cast-off edge, you may use a needle ½ size larger. BUTTONHOLES: Dec for buttonholes on right band. I.e. band at the end of row seen from WS. 1 buttonhole = K tog third and fourth st from edge and make 1 YO. Dec for buttonholes when piece measures (from cast-on edge and along the band): SIZE S: 2, 10, 18, 26, 34, 42 and 51 cm SIZE M: 2, 10, 18, 26, 35, 44 and 53 cm SIZE L: 2, 10, 19, 27, 36, 45 and 54 cm SIZE XL: 2, 11, 20, 29, 38, 47 and 56 cm SIZE XXL: 2, 11, 20, 29, 38, 48 and 58 cm SIZE XXXL: 2, 11, 20, 29, 39, 49 and 59 cm ---------------------------------------------------------- JACKET: Worked top down, back and forth on circular needle. YOKE: Cast on 115-119-123-130-134-140 sts (incl 5 band sts in garter st in each side) on circular needle size 3.5 mm with Karisma or Sky. Work 2 ridges in GARTER ST – see explanation above, then work 1 row in stocking st while inc 11-15-27-32-32-38 sts evenly – READ INCREASE TIP-1, inside 5 band sts in garter st in each side = 126-134-150-162-166-178 sts. Switch to circular needle size 4 mm and work 1 row. Now work an elevation in back of neck in stocking st as follows, beg from RS: Work until 41-43-45-48-49-50 sts remain, turn and work until 41-43-45-48-49-50 sts remain, turn and work until 36-38-40-43-44-45 sts remain, turn and work until 36-38-40-43-44-45 sts remain, turn. Continue back and forth over 5 sts more on every turn until totally 8 short rows have been worked, work the rest of row from WS. Remember BUTTONHOLES AND SHORT ROWS - see explanation above. Now work pattern as follows from RS: Work 5 band sts in garter st, stocking st over the next 16-18-20-23-24-25 sts (= left front piece), insert a marker, 2 sts in stocking st, work A.1a over the next 22-22-26-26-26-30 sts – see diagram for correct size, 2 sts in stocking st (= sleeve), insert a marker, work in stocking st over the next 32-36-40-46-48-50 sts (= back piece), insert a marker, 2 sts in stocking st, work A.1a over the next 22-22-26-26-26-30 sts, 2 sts in stocking st (= sleeve), insert a marker, work in stocking st over the next 16-18-20-23-24-25 sts (= right front piece), work 5 band sts in garter st. REMEMBER THE KNITTING TENSION Work 1 row from WS. Continue pattern like this. When the 2 rows in A.1a have been worked, repeat A.1b over A.1a, AT THE SAME TIME on next row from RS beg inc for RAGLAN – see explanation above, on each side of every marker. NOTE: Inc differently on body and sleeves. RAGLAN BODY: Inc like this every row 0-0-0-2-2-6 times, and every other row 24-26-28-28-32-32 times. Work the new sts in stocking st. RAGLAN SLEEVES: All inc are done from RS. Inc like this every other row 16-24-25-27-25-23 times, and every 4th row 4-1-1-1-4-6 times. In size S-XXL work the new sts in pattern A.1b until there is room for the entire pattern (= 30 sts). Then work the new sts in stocking st. In size XXXL work all the new sts in stocking st. When all inc are done there are 302-338-366-394-418-446 sts on needle. Piece measures 17-19-20-21-24-25 cm along band. Now work as follows from WS: Work the first 45-49-53-58-63-68 sts, slip the next 66-76-82-86-88-92 sts on a stitch holder (= sleeve), cast on 8-8-10-10-12-14 sts under sleeve, work the next 80-88-96-106-116-126 sts, slip the next 66-76-82-86-88-92 sts on a stitch holder (= sleeve), cast on 8-8-10-10-12-14 sts under sleeve, work the remaining 45-49-53-58-63-68 sts on row. BODY: There are now 186-202-222-242-266-290 sts for body. NOW MEASURE THE PIECE FROM HERE. Now work pattern as follows: Work 5 band sts in garter st, work 38-42-47-52-58-64 sts in stocking st, work A.2a (= 12 sts), work 76-84-94-104-116-128 sts in stocking st, work A.2a, work 38-42-47-52-58-64 sts in stocking st, 5 band sts in garter st. When A.2a has been worked vertically, repeat A.2b vertically over A.2a. When piece measures 4 cm, dec on each side of every repetition of A.2a - READ DECREASE TIP! Dec like this every 6th-6th-4th-4th-6th-6th row 4-4-5-5-4-4 times in total = 170-186-202-222-250-274 sts. When piece measures 13 cm in all sizes, inc 1 st in each side of A.2b - READ INCREASE TIP-2! Inc like this every other row a total of 23 times in all sizes = 262-278-294-314-342-366 sts. Continue until piece measures 34-34-34-35-34-34 cm adjust so that one whole repetition of A.2b has been worked vertically. Now inc sts evenly as follows on next row from RS: Work 5 band sts in garter st, work in stocking st over the next 57-61-65-70-77-83 sts while inc 10-11-12-12-15-14 sts evenly, work K over K and P over P over the next 12 sts, work in stocking st over the next 114-122-130-140-154-166 sts while inc 18-15-17-17-18-16 sts evenly, work K over K and P over P over the next 12 sts, work in stocking st over the next 57-61-65-70-77-83 sts while inc 10-11-12-12-15-14 sts evenly, work 5 band sts in garter st = 300-315-335-355-390-410 sts. Switch to circular needle size 3.5 mm and work 1 row. Now work rib as follows from RS: 5 band sts in garter st, (K 2, P 3) over the next 65-70-75-80-90-95 sts, K 2, work K over K and P over P over the next 12 sts, work (K 2, P 3) over the next 130-135-145-155-170-180 sts, K 2, work K over K and P over P over the next 12 sts, work (K 2, P 3) over the next 65-70-75-80-90-95 sts, K 2, 5 band sts in garter st. Continue like this back and forth until rib measures 2 cm. Now inc 1 P st in every section with 3 P = 356-374-398-422-464-488 sts. Continue with rib until rib measures 4 cm in total. Cast off with K over K and P over P - READ CAST-OFF TIP. Fasten off. SLEEVES: Worked in the round on double pointed needles. NOW MEASURE THE PIECE FROM HERE. Slip the 66-76-82-86-88-92 sts from stitch holder back on double pointed needles size 4 mm and pick up 1 st in each of the 8-8-10-10-12-14 new sts cast on under sleeve = 74-84-92-96-100-106 sts. Insert a marker in the middle of these new sts (= 4-4-5-5-6-7 new sts on each side of marker). Continue in the round with pattern A.1b over the 30 sts in the middle of sleeve and work A.2a (= 12 sts) mid under sleeve (i.e. 6 sts of pattern A.2a on each side of marker). Work remaining sts in stocking st. When A.2a has been worked vertically, repeat A.2b vertically over A.2a. When piece measures 4 cm, dec 1 st on each side of A.2b under sleeve - remember decrease tip. Dec like this every 7th-5th-4th-4th-4th-3rd round 14-18-21-22-23-25 times in total = 46-48-50-52-54-56 sts. When A.1b has been worked 6 times in total vertically (incl pattern on yoke), continue with A.1c (- see diagram for correct size). When entire A.1c has been worked vertically, continue with K over K and P over P over these sts. When piece measures 44-42-42-42-40-40 cm – adjust so that A.2b has been worked 1 time vertically (shorter measurements in the larger sizes because of longer yoke). Switch to double pointed needles size 3.5 mm. Now work rib, beg from the 12 sts in A.2b mid under sleeve: Work K over K and P over P over the first 12 sts (= A.2b), P 0-0-0-1-1-2, K 2-3-4-3-4-3, P 0-0-0-1-1-2, work K over K and P over P over the next 30 sts, P 0-0-0-1-1-2, K 2-3-4-3-4-3, P 0-0-0-1-1-2. When rib measures 3 cm, cast off with K over K and P over P. Fasten off. Knit another sleeve the same way. ASSEMBLY: Sew the buttons on to the left band. |
||||||||||||||||||||||||||||
Diagram explanations |
||||||||||||||||||||||||||||
|
||||||||||||||||||||||||||||
 |
||||||||||||||||||||||||||||
 |
||||||||||||||||||||||||||||
 |
||||||||||||||||||||||||||||
Have you finished this pattern?Tag your pictures with #dropspattern #irishplaitscardigan or submit them to the #dropsfan gallery. Do you need help with this pattern?You'll find 30 tutorial videos, a Comments/Questions area and more by visiting the pattern on garnstudio.com. © 1982-2026 DROPS Design A/S. We reserve all rights. This document, including all its sub-sections, has copyrights. Read more about what you can do with our patterns at the bottom of each pattern on our site. |
||||||||||||||||||||||||||||


With over 40 years in knitting and crochet design, DROPS Design offers one of the most extensive collections of free patterns on the internet - translated to 17 languages. As of today we count 324 catalogues and 12290 patterns translated into English (UK/cm). 12290
We work hard to bring you the best knitting and crochet have to offer, inspiration and advice as well as great quality yarns at incredible prices! Would you like to use our patterns for other than personal use? You can read what you are allowed to do in the Copyright text at the bottom of all our patterns. Happy crafting!
Post a comment to pattern DROPS 173-3
We would love to hear what you have to say about this pattern!
If you want to leave a question, please make sure you select the correct category in the form below, to speed up the answering process. Required fields are marked *.