
Popular categories
Looking for a yarn?


Comments / Questions (35)
![]() Kyleigh wrote:
Kyleigh wrote:
If it says "Then work in stockinette st until finished measurements. Work as follows (next row = from RS): K 2 tog, K 34-38-40-40, K 2 tog = 36-40-42-42 sts." What exactly are the finished measurements if it says to k 2 tog and such? I am really unsure of the specific thing i need to be doing to get "finished measurements" accomplished.
09.02.2025 - 04:59DROPS Design answered:
Dear Kyleigh, "Then work in stockinette st until finished measurements" means that the whole piece will be worked in stocking stitch, that is, you will knit on the right side and purl on the wrong side unless otherwise stated. However, it's a reminder; you don't need to work anything according to these instructions (only take them into account as you continue the piece). After the previous instruction, the next row is the RS row, which is worked as indicated (k2 tog, knit 34-38-40-40 stitches, k2 tog). Happy knitting!
10.02.2025 - 00:55
![]() Liesbeth wrote:
Liesbeth wrote:
Is er misschien een tekening beschikbaar van hoe het eindresultaat er uit moet zien (voor het aan elkaar wordt genaaid)? Ik begrijp bijvoorbeeld niet waar die ronding voor de enkel juist moet komen. Bedankt!
10.11.2024 - 16:26DROPS Design answered:
Dag Liesbeth,
Nee, daar is helaas geen tekening van. Je breit het werk heen en weer en op een gegeven moment staat aangegeven dat je de ronding voor de hiel moet breien. Dit doe je aan beide uiteinden van het werk. Eerst aan de ene kant, door verkorte toeren te breien zoals bovenaan aangegeven bij de paragraaf 'RONDING VOOR DE ENKEL'. Dan brei je een volledige naald om vervolgens hetzelfde aan de andere kant te doen. Aan het einde naai je de zijnaad tegen elkaar en zie je waar de ronding voor de enkel ontstaat.
12.12.2024 - 17:26
![]() Nadja wrote:
Nadja wrote:
Vielen Dank für die schnelle Antwort, leider funktioniert der Link nicht!
13.02.2023 - 19:16DROPS Design answered:
Oops Sorry Nadja, der Link wurde aktualisiert- jetzt klappt's. Viel Spaß beim stricken!
14.02.2023 - 13:40
![]() Nadja wrote:
Nadja wrote:
Hallo, ich verstehe nicht ganz, ob ich nach den ersten neun Reihen einmal sozusagen von rechts nach links gestrickt wechseln muss? Erst heißt es ja, dass die Rückreihen rechts gestrickt werden. Ich verstehe, dass die Knöchelerhöhung nachher umgeklappt wird, aber durch das Filzen sieht man auf der Abbildung nicht, ob rechts oder links außen erscheint. Könnten Sie das bitte erklären, vielen Dank!
13.02.2023 - 12:37DROPS Design answered:
Liebe Nadja, vielleicht kann Ihnen dieses Video helfen? Wir zeigen, wie diese Hausschuhen begonnen werden (und dann sind sie weiter glatt rechts gestrickt). Viel Spaß beim stricken!
13.02.2023 - 15:51
![]() Siv Bøhle wrote:
Siv Bøhle wrote:
Hei, Det er feil på denne oppskriften da foten blir alt for smal etter toving. Ankelen blir også litt for lav. Eksperiment litt og funnet ut at om man strikker ankelforhøyning en 1/2 gang til og ikke feller etter felling til hæl, så blir tøffelen mer riktig😊
06.12.2022 - 21:55
![]() Vivian Ickenroth wrote:
Vivian Ickenroth wrote:
Ik heb de pantoffels voor maat 35-37 gebreid en ze zijn na het vilten echt extreem veel te klein geworden (gevilt op een gewoon katoenprogramma op 40 graden, met een handdoek erbij en alleen wasverzachter). Kan ik ze weer oprekken? En als ik een nieuw paar wil breien, moet ik dan het viltproces of de breigrootte aanpassen?
11.10.2022 - 02:43
![]() Vivian Ickenroth wrote:
Vivian Ickenroth wrote:
Ik heb de pantoffels voor maat 35-37 gebreid en ze zijn na het vilten echt extreem veel te klein geworden (gevilt op een gewoon katoenprogramma op 40 graden, met een handdoek erbij en alleen wasverzachter). Kan ik ze weer oprekken? En als ik een nieuw paar wil breien, moet ik dan het viltproces of de breigrootte aanpassen?
11.10.2022 - 02:42
![]() Vivian Ickenroth wrote:
Vivian Ickenroth wrote:
Ik heb de pantoffels voor maat 35-37 gebreid en ze zijn na het vilten echt extreem veel te klein geworden (gevilt op een gewoon katoenprogramma op 40 graden, met een handdoek erbij en alleen wasverzachter). Kan ik ze weer oprekken? En als ik een nieuw paar wil breien, moet ik dan het viltproces of de breigrootte aanpassen?
11.10.2022 - 02:41DROPS Design answered:
Dag Vivian,
Direct nadat je ze uit de wasmachine hebt gehaald lijken ze vaak heel klein, maar je kan ze dan gelijk wat in vorm brengen en een beetje oprekken. Het kan ook goed werken om ze even aan te trekken om in vorm te krijgen terwijl ze nog vochtig zijn. Kijk even hoe dit uitpakt; als ze dan nog te klein zijn kan je voor een volgend paar evt extra steken opzetten of een dikkere naald gebruiken.
12.10.2022 - 20:21
![]() Tournereau Renée wrote:
Tournereau Renée wrote:
Malgré mon entière satisfaction pour la réalisation de plusieurs de vos modèles, je ne parviens pas à réaliser ces chaussons: -beaucoup trop grands même après feutrage, difformes, -feutrage à 40° est-il suffisant ? Le talon en 35/37 est bcp trop grand. Faut-il revoir la taille des aiguilles bien que l'échantillon corresponde ? Merci de donner suite.
26.08.2022 - 15:31DROPS Design answered:
Bonjour Mme Tournereau, effectivement, votre échantillon doit être conforme, ajustez la taille des aiguilles si nécessaire (cf FAQ) - après feutrage, vous devez avoir environ 13 m x 26 rangs jersey après feutrage - retrouvez ici plus d'informations sur le feutrage - selon votre machine, vous devrez peut-être de nouveau les passer au lave-linge s'ils sont toujours trop grands. En espérant que ceci puisse vous aider.
26.08.2022 - 15:48
![]() Lene Poulse wrote:
Lene Poulse wrote:
Hej 🙂 I opskriften står der at "arbejde strikkes i glatstrik til færdig mål" inden ankelforhøjning. Men jeg kan simpelthen ikke finde de færdige mål? Kan i hjælpe? 😊 Mvh Lene
03.12.2021 - 13:26DROPS Design answered:
Hej Lene, du følger bare opskriften med indtagningerne til du kommer til ankelforhøjningen. Det med færdigt mål er kun for at forklare at du strikker resten i glatstrik :)
03.12.2021 - 15:34
|
|
Twist & Shout#twistandshoutslippers |
|
|
|
|
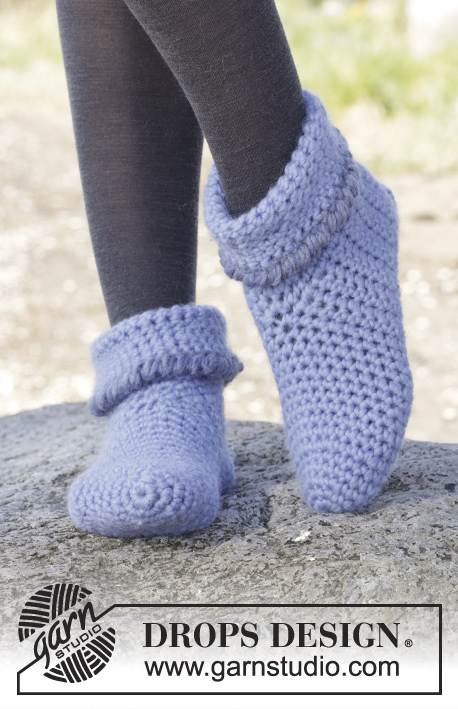
Felted DROPS slippers with fringes in "Snow" Size 35 - 44
DROPS 166-29 |
|
|
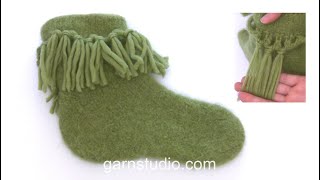
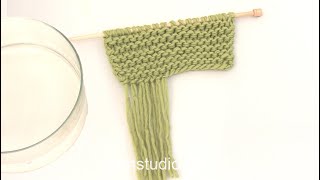
ANKLE ELEVATION: From RS: * Work 6-6-7-7 sts, turn - READ KNITTING TIP - and work 6-6-7-7 sts. Work 10-10-12-12 sts, turn and work 10-10-12-12 sts. Work 6-6-7-7 sts, turn and work 6-6-7-7 sts *. Work 1 row over all sts, repeat from *-* in opposite side, beg from WS. Then work 1 row back over all sts from WS. KNITTING TIP: When turning mid piece slip first st. Tighten yarn and continue as before. There might be a small hole in piece but this will even out after felting. FRINGE TIP: To make the fringes hang nicely they should be moistened, shaken and dried before they are tied on. ---------------------------------------------------------- SLIPPER: The slipper is worked back and forth on needle. Beg at the top of the leg and finish with the toe. Cast on 38-42-44-44 sts on needle size 9 mm with Snow. K 1 row from WS (1st row = from WS), 7 rows in stocking st, K 1 row from WS (work loops in this row later). REMEMBER THE KNITTING TENSION Then work in stocking st until finished measurements. Work as follows (next row = from RS): K 2 tog, K 34-38-40-40, K 2 tog = 36-40-42-42 sts. Work next row as follows (= from WS): P 2 tog, P 32-36-38-38, P 2 tog = 34-38-40-40 sts. Work next row as follows (from RS): Work ANKEL ELEVATION over the outermost sts in each side – see explanation above! Work 6 rows in stocking st over all sts, AT THE SAME TIME on 1st row dec 4-4-4-2 sts evenly = 30-34-36-38 sts. NOW INC FOR HEEL AS FOLLOWS: From RS: * Work 10-10-11-12 sts, turn and work 9-9-10-11 sts, work 2 sts in last st on needle. Work 6-6-7-7 sts, turn and work 5-5-6-6 sts, work 2 sts in last st on needle. Work 1 row over all sts *, repeat from *-* in opposite side, beg from WS. Repeat from *-* 2 more times in each side (= 3 times in total in each side) = 42-46-48-50 sts. NOW DEC FOR HEEL AS FOLLOWS: From RS: * Work 10-10-11-12 sts, turn and work 8-8-9-10 sts, work last 2 sts tog. Work 6-6-7-7 sts, turn and work 4-4-5-5 sts, work last 2 sts tog. Work 1 row over all sts *, repeat from *-* in opposite side, beg from WS. Repeat from *-* 2 more times in each side (= 3 times in total in each side) = 30-34-36-38 sts. NOW WORK THE FOOT AS FOLLOWS: Insert 1 marker in the outermost st on one side, NOW MEASURE PIECE FROM HERE. Then dec from RS on top of foot like this: Work 8-8-9-10 sts, K the next 2 sts tog, work until 10-10-11-12 sts remain, K 2 tog, work remaining sts on row, repeat the dec on every row from RS a total of 3-3-4-4 times = 24-28-28-30 sts. Continue in stocking st without dec until piece measures approx. 18-21-25-29 cm, measured from marker. DEC FOR TOE AS FOLLOWS: Dec 3-4-4-4 sts evenly on next row from RS, repeat the dec on every row from RS 4-4-4-4 times in total = 12-12-12-14 sts on needle. On next row from RS K sts tog the entire row 2 by 2 = 6-6-6-7 sts. Cut the yarn and pull it through the remaining sts, tighten tog and fasten. LOOPS: Crochet loops to fasten fringes in. Work in P sts (i.e. 9th row from cast-on edge). Work on hook size 7 mm with Snow as follows from RS: Work 1 dc in first st, * 2 ch (= loop), skip 1 st, 1 dc in next P-st *, repeat from *-* the entire row. Fasten off. ASSEMBLY: Sew tog mid under foot and up to cast-on row, sew edge to edge in outer loops of edge sts to avoid a chunky seam. Knit another slipper. FELTING: Cut 1 leg of a nylon stocking in 2 (along side). Thread stocking up and down through loops to avoid them felting tog, tie tog the ends of stocking. The piece can be felted either in the washing machine or the tumble dryer – read description below. Remember: Subsequent washes are as for a normal wool garment. IN WASHING MACHINE: Washing machines will vary when felting. If the piece is not felted enough, it can be felted again. If it is felted too much, it can be stretched to the correct size while still wet. DO THE FOLLOWING: Lay the piece in the washing machine, using a programme of approx. 40 minutes (not a wool programme). Wash at 40 degrees without pre-wash, detergent is optional. After washing, shape the piece while it is still wet. IN TUMBLE DRYER: Felting in a tumble dryer gives good control over the degree of felting. The tumble dryer can be opened during drying to check the size of the piece. If it is not felted enough it can be thoroughly wetted and felted again. If it is felted too much it can be stretched to the correct size while still wet. DO THE FOLLOWING: Lay the piece in water so it becomes completely wet, then place it in the tumble dryer and begin the drying process. Dry to the desired size, checking regularly. FRINGES: Fasten 1 fringe in each loop after felting - READ FRINGE TIP. 1 fringe = cut 2 lengths of 20 cm each. Fold them double, thread the loop through the loop on the slipper and pull ends through the fringe. Cut fringes to a length of approx. 7 cm. |
|
Have you finished this pattern?Tag your pictures with #dropspattern #twistandshoutslippers or submit them to the #dropsfan gallery. Do you need help with this pattern?You'll find 19 tutorial videos, a Comments/Questions area and more by visiting the pattern on garnstudio.com. © 1982-2026 DROPS Design A/S. We reserve all rights. This document, including all its sub-sections, has copyrights. Read more about what you can do with our patterns at the bottom of each pattern on our site. |


With over 40 years in knitting and crochet design, DROPS Design offers one of the most extensive collections of free patterns on the internet - translated to 17 languages. As of today we count 324 catalogues and 12291 patterns translated into English (UK/cm). 12291
We work hard to bring you the best knitting and crochet have to offer, inspiration and advice as well as great quality yarns at incredible prices! Would you like to use our patterns for other than personal use? You can read what you are allowed to do in the Copyright text at the bottom of all our patterns. Happy crafting!
Post a comment to pattern DROPS 166-29
We would love to hear what you have to say about this pattern!
If you want to leave a question, please make sure you select the correct category in the form below, to speed up the answering process. Required fields are marked *.