
Popular categories
Looking for a yarn?


Comments / Questions (112)
![]() Moni wrote:
Moni wrote:
Ist bei dem Muster jede Reihe gezeigt, also Hin-und Rückreihe, oder ist immer nur die Hinreihe beschrieben. ?
21.10.2021 - 00:57DROPS Design answered:
Liebe Moni, alle Reihen werden im Diagram gezeichnet, bei Hinreihen lesen Sie rechts nach links und bei Rückreihen lesen Sie links nach rechts - hier lesen Sie mehr über Diagramme. Viel spaß beim stricken!
21.10.2021 - 07:14
![]() Gouince wrote:
Gouince wrote:
Peut on faire se modèle sans faire le col châle mon époux aime pas faire un simple Col merci de votre réponse 😉
31.05.2021 - 13:26DROPS Design answered:
Bonjour Mme Gouince, vous pouvez fort probablement modifier l'encolure pour qu'il plaise à votre époux, n'hésitez pas à demander assistance à votre magasin - même par mail ou téléphone - si besoin. Bon tricot!
31.05.2021 - 15:45
![]() Petra Peeters wrote:
Petra Peeters wrote:
Hallo. Ik ben met de mouw rond aan het breien. Nu moet ik het patroon in breien.rond. Hoe kan ik er voor.zorgen dat het patroon ook onder de arm klopt?? Bij mij berspringt het patroon onder de mouw
07.02.2021 - 20:49DROPS Design answered:
Dag Petra,
Het klopt dat het patroon verspringt, omdat op die plek de naald verspringt. Je kan hier eigenlijk niet veel aan doen. Er is wel een trucje zodat het minder opvalt. Zie deze video.
12.02.2021 - 13:05
![]() Andy Martin wrote:
Andy Martin wrote:
I'm sure I'm being really dense but when it says "at the same time" decrease "evenly" 60 or so stitches, how do I know how often to do this? Is it every row, 3rd row, 8th row? How do I work it out?
10.01.2021 - 11:26DROPS Design answered:
Hi Andy, It means in one row/round (in the same row/round). How to do that see our lesson HERE. Happy knitting!
10.01.2021 - 21:06
![]() Deni wrote:
Deni wrote:
After I've put 40 sts from both side of collar on holder how should I put all of the back to needles?thread is in the middle of row now.Should I cut It perhaps?
08.11.2020 - 14:15DROPS Design answered:
Dear Deni, you can cut the yarn and start again from beg of round or then work next row to the end of the row, turn and work next row to the end of the row and cast off on next row. Happy knitting!
09.11.2020 - 11:04
![]() Deni wrote:
Deni wrote:
I just started increasing for sleeves but I get holes when using kfb right where I'm doing it.The same with yo and I knitted it twisted. Help!
28.09.2020 - 09:24DROPS Design answered:
Dear Deni, you can use any other technique to increase - for example using loop under or with the make 1 technique; Happy knitting!
28.09.2020 - 10:57
![]() Deni wrote:
Deni wrote:
May I ask what type of increase you recommend for the sleaves?
20.09.2020 - 07:59DROPS Design answered:
Dear Deni, in most of the DROPS patterns we increase with making a yarnover which then knitted tisted in teh nect row6 round to avoid holes. That would work nicely with this sweater. Happy Knitting!
21.09.2020 - 00:21
![]() Ingvild wrote:
Ingvild wrote:
Jeg ønsker å strikke denne jakken i et garn som kan vaskes på maskinullvask, hvilket garn kan jeg erstatte med? Er det noe spesielt jeg bør ta hensyn til når jeg bytter garn? Hvor mange gram av erstatningsgarnet i str L
03.09.2020 - 12:26DROPS Design answered:
Hei Ingvild. Du kan evnt strikke den i DROPS Big Merino, denne kvaliteten må vaskes på 40`C finvask og det er veldig viktig å følge strikkefastheten så den ikke siger ved vask. Men du kan bruke 2 tråder av DROPS Fabel. Denne kvaliteten kan vaskes i maskin. Se under Garn/Alle garn/DROPS Fabel for mer informasjon. Bruk vår garnkalkulator for regne ut hvor mye garn du trenger. Å overholde strikkefastheten er viktig ved garnbytte. mvh DROPS design
07.09.2020 - 07:22
![]() Christine wrote:
Christine wrote:
Hallo, ich möchte die Jacke gerne in Merino extra fine stricken. Stricke ich dann von der größe her einfach eine nummer größer? Und wieviel wolle brauche ich ungefähr.? Alaska wolle ist zu dick. Danke und grüße
01.09.2019 - 09:50DROPS Design answered:
Liebe Christine, Merino Extra Fine gehört zur Garngruppe B und Alaska zur Garngruppe C, so ist Merino Extra Fine keine Alternative zu Alaska, Wenn Sie mit Merino Extra Fine stricken möchten, können Sie sich passende Anleitungen mit Garngruppe B heraussuchen, oder Sie können auch Big Merino (= Garngruppe C) benutzen. Viel Spaß beim stricken!
02.09.2019 - 10:25
![]() Dusica wrote:
Dusica wrote:
I'm not sure how to work part of shawl collar where it says "work 1 row as before and slip 10sts worked on holder, turn piece,work the rest of the row..."Can you explain a bit more?TIA
27.05.2019 - 11:47DROPS Design answered:
Dear Dusica, on this row, work the first 10 stitches and slip them on a thread, continue this row to the end, turn, work the first 10 sts and slip them on a thread, continue this row to the end, turn and continue like this until there are 40 sts on the thread on each side. Happy knitting!
27.05.2019 - 11:57
|
||||||||||
Harald#haraldjacket |
||||||||||
 |
 |
|||||||||
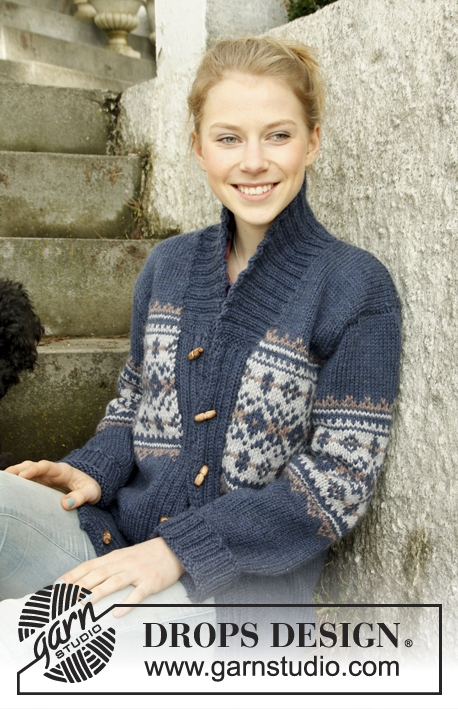
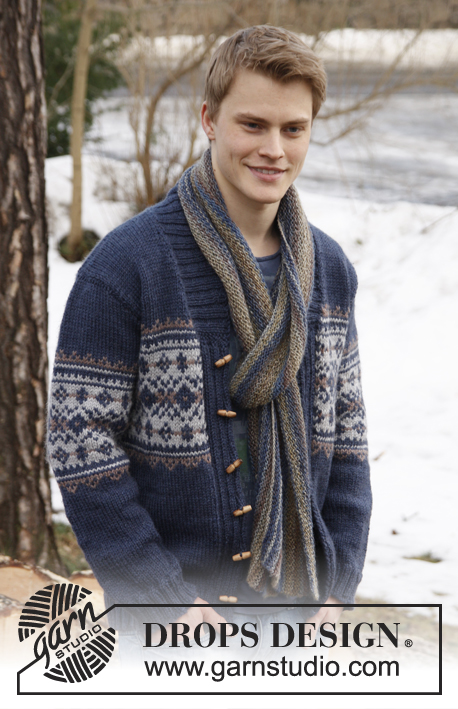
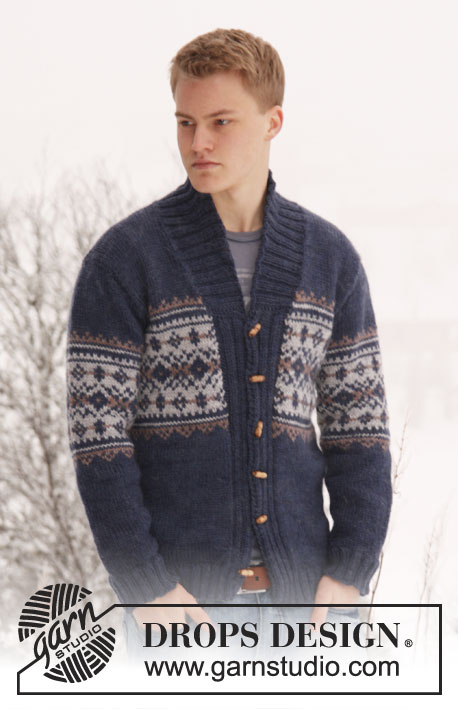
Men's knitted jacket in DROPS Alaska, with pattern and shawl collar. Size: S - XXXL.
DROPS Extra 0-813 |
||||||||||
|
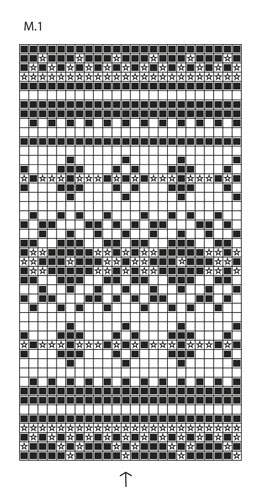
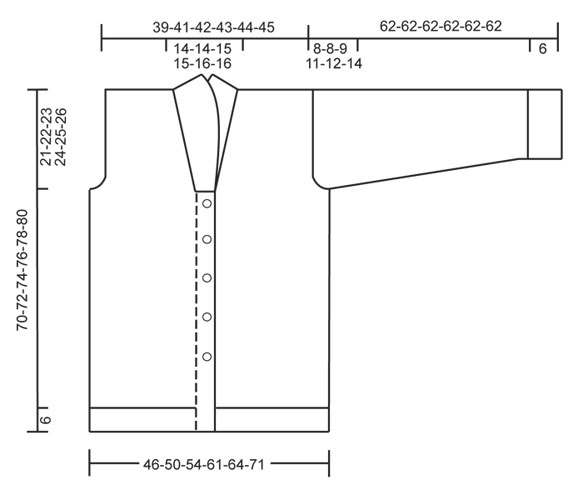
GARTER ST (back and forth on needle): K all rows. BUTTON HOLES: Cast off for button holes on left band, all cast offs are done from RS. 1 button hole = P tog 5th and 6th st from mid front and make 1 YO. On next row K the YO. Cast off for button holes when piece measures: SIZE S: 6, 14, 23, 31, 40 and 48 cm. SIZE M: 6, 15, 24, 32, 41 and 49 cm. SIZE L: 6, 15, 24, 33, 42 and 50 cm. SIZE XL: 6, 13, 21, 28, 36, 43 and 51 cm SIZE XXL: 7, 14, 22, 29, 37, 44 and 52 cm SIZE XXXL: 7, 15, 22, 30, 37, 45 and 53 cm PATTERN: See diagram M.1 – the diagram shows 2 repetitions in breadth. Work entire pattern in stocking st. DECREASE TIP (applies to neckline at the front): Dec inside 1 edge st in garter st. All dec are done from RS. Dec after 1 edge st as follows: Slip 1 st as if to K, K 1, psso. Dec before 1 edge st as follows: K 2 tog. -------------------------------------------------------- BODY: Worked back and forth on circular needle from mid front. Cast on 226-246-262-286-302-330 sts on circular needle size 4 mm with dark blue Alaska. P 1 row from WS. Then work next row as follows from RS: 2 edge sts in GARTER ST - see explanation above - * K 2/P 2 *, repeat from *-* until 4 sts remain and finish with K 2 and 2 edge sts in GARTER ST. Continue rib like this until piece measures 6 cm. AT THE SAME TIME when piece measures 6-6-6-6-7-7 cm, cast off for BUTTON HOLES on left band - see explanation above. After rib, switch to circular needle size 5 mm and work next row from RS as follows: 2 sts in garter st, K 2, P 2, K 2, P 2, K 2, P 2 (= 14 band sts), work in stocking st until 14 sts remain while AT THE SAME TIME dec 53-61-65-65-69-73 sts evenly (do not dec over bands), finish with P 2, K 2, P 2, K 2, P 2, K 2 and 2 sts in garter st = 173-185-197-221-233-257 sts. Insert a marker 47-50-53-59-62-68 sts in from each side (= 79-85-91-103-109-121 sts between markers on back piece). Then work in stocking st with 14 band sts in each side towards mid front as before. REMEMBER THE KNITTING TENSION! When piece measures 32-33-34-35-36-37 cm, work diagram M.1 as follows: Work 14 band sts as before with dark blue, work diagram M.1 until 15 sts remain, work 1st st in diagram M.1 (so that pattern beg and ends the same way on each side of band) and finish with 14 band sts in dark blue as before. When piece measures 49-50-51-52-53-54 cm, work next row from RS as follows: Cast off the first 13 sts, insert a marker (this marks where to start the knit up for collar), work 31-34-37-42-45-51 sts (= right front piece), cast off 6-6-6-8-8-8 sts for armhole, work 73-79-85-95-101-113 sts (= back piece), cast off 6-6-6-8-8-8 sts for armhole and work the rest of row (= 44-47-50-55-58-64 sts on left front piece). Turn and cast off the first 13 sts, insert a marker (this marks where to end the knit up for collar), work the rest of row = 31-34-37-42-45-51 sts. Finish each part separately. BACK PIECE: = 73-79-85-95-101-113 sts. Continue diagram M.1 (when diagram M.1 has been worked 1 time vertically, continue with dark blue until finished measurements) – AT THE SAME TIME cast off for armholes at beg of every row in each side: 3 sts 0-0-0-1-1-2 times, 2 sts 1-1-2-2-3-4 times and 1 st 1-3-3-4-4-4 times = 67-69-71-73-75-77 sts remain on needle. When piece measures 68-70-72-74-76-78 cm, cast off the middle 21-21-23-23-25-25 sts for neck. Now finish each shoulder separately. Continue to cast off 1 st on next row from neck = 22-23-23-24-24-25 sts remain on the shoulder. Cast off when piece measures 70-72-74-76-78-80 cm. RIGHT FRONT PIECE: = 31-34-37-42-45-51 sts. Continue diagram M.1 as on back piece with 1 edge st in garter st towards mid front. AT THE SAME TIME cast off for armhole in the side as on back piece. AT THE SAME TIME when piece measures 50-51-52-53-54-55 cm, dec 1 st towards the neck - SEE DECREASE TIP! Repeat dec on every 4th row a total of 3-3-4-4-6-6 times, and on every 8th row a total of 3-3-3-3-2-2 time. After all cast offs and dec are done, 22-23-23-24-24-25 sts remain on shoulder. Cast off when piece measures 70-72-74-76-78-80 cm. LEFT FRONT PIECE: Work as right front piece but reversed. SLEEVE: Worked in the round on double pointed needles, switch to circular needle when needed. Cast on 52-52-56-56-60-60 sts on double pointed needles size 4 mm with dark blue. K 1 round, then work rib = K 2/P 2. When piece measures 6 cm, switch to double pointed needles size 5 mm. K 1 round while AT THE SAME TIME dec 11-9-11-11-13-13 sts evenly = 41-43-45-45-47-47 sts. Insert a marker at beg of round (= mid under sleeve). Then work in stocking st. When piece measures 7-7-7-7-9-10 cm, inc 1 st on each side of marker mid under sleeve. Repeat inc a total of 11-13-14-16-17-19 times in Size S: On every 10th round, Size M: Every 8th round, Size L: Every 7th round, Size XL: Every 6th round, Size XXL: Every 5th round and Size XXXL: Every 4th round = 63-69-73-77-81-85 sts. AT THE SAME TIME when piece measures 30-30-29-27-26-24 cm, insert a marker in the middle st on round (= mid on top of shoulder). Work diagram M.1 – NOTE: St marked with arrow in diagram should be the st with marker mid on top of sleeve. When diagram M.1 has been worked 1 time vertically, continue with dark blue until finished measurements. AT THE SAME TIME when piece measures 54-54-53-51-50-48 cm (shorter measurements in the larger sizes because of longer sleeve cap and broader shoulder width), cast off 6-6-6-8-8-8 sts mid under sleeve. Then work back and forth on needle until finished measurements. AT THE SAME TIME cast off for sleeve cap at beg of every row in each side: 2 sts 3-3-3-3-3-4 times and 1 st 2-2-2-4-4-5 times. Then cast off 2 sts in each side until piece measures 61 cm in all sizes, then cast off 3 sts 1 time in each side. Cast off the remaining sts, the piece measures approx. 62 cm in all sizes. ASSEMBLY: Sew the shoulder seams. SHAWL COLLAR: Knit up sts (inside 1 edge st) on circular needle size 4 mm with dark blue - start mid front at marker on right front piece: Knit up approx. 34 to 44 sts up to shoulder, then 22 to 28 sts along the neck, and 34 to 44 sts down along left front piece until marker = 90 to 116 sts. K 1 row from WS while AT THE SAME TIME inc no of sts to 126-130-138-142-150-154. Then work rib as follows (seen from RS): 2 sts in garter st, * K 2, P 2 *, repeat from *-* and finish with K 2 and 2 sts in garter st. Continue like this until collar measures approx. 5 cm. Now inc 1 st in each of the middle 12 P-sections, seen from RS (= back of neck) = 138-142-150-154-162-166 sts. Then work K over K and P over P until collar measures approx. 7 cm. Now work as follows: Work 1 row as before and slip the first 10 sts worked on a stitch holder, turn piece, work the rest of row and slip the first 10 sts worked at the beg of row on another stitch holder. Turn piece, work the rest of row and slip the first 10 sts worked at the beg of row on the first stitch holder, turn piece, work the rest of row and slip the first 10 sts worked at the beg of row on the other stitch holder. Continue like this until there are a total of 40 sts on the stitch holders in each side. Then slip sts from stitch holders back on needle and work 1 row as before over all the 138-142-150-154-162-166 sts – NOTE: To avoid holes in every transition where piece was turned, slip loop before next st twisted on needle and work tog with first st on needle. Cast off with K over K and P over P. Neatly fasten collar with stitches in each side towards band – sew edge to edge to avoid a chunky seam. MORE ASSEMBLY: Sew in sleeves and sew on buttons. |
||||||||||
Diagram explanations |
||||||||||
|
||||||||||
 |
||||||||||
 |
||||||||||
Have you finished this pattern?Tag your pictures with #dropspattern #haraldjacket or submit them to the #dropsfan gallery. Do you need help with this pattern?You'll find 28 tutorial videos, a Comments/Questions area and more by visiting the pattern on garnstudio.com. © 1982-2026 DROPS Design A/S. We reserve all rights. This document, including all its sub-sections, has copyrights. Read more about what you can do with our patterns at the bottom of each pattern on our site. |
||||||||||


With over 40 years in knitting and crochet design, DROPS Design offers one of the most extensive collections of free patterns on the internet - translated to 17 languages. As of today we count 324 catalogues and 12290 patterns translated into English (UK/cm). 12290
We work hard to bring you the best knitting and crochet have to offer, inspiration and advice as well as great quality yarns at incredible prices! Would you like to use our patterns for other than personal use? You can read what you are allowed to do in the Copyright text at the bottom of all our patterns. Happy crafting!
Post a comment to pattern DROPS Extra 0-813
We would love to hear what you have to say about this pattern!
If you want to leave a question, please make sure you select the correct category in the form below, to speed up the answering process. Required fields are marked *.