
Popular categories
Looking for a yarn?


Comments / Questions (45)
![]() Tina wrote:
Tina wrote:
Den er virkelig flot
26.02.2026 - 19:36
![]() Helle wrote:
Helle wrote:
Problem i start af p20. Kan ikke følge diagrammet. P19 starter med 2+2 r og slutter med 4 vr, men p20 skal startes med 2 r og 4 vr. Ergo er der 2 r “i overskud”. Hvad gør jeg? Snoninger ser indtil nu fine ud, og der var intet problem med p7 og p8, som er identisk med diagrammet for p19 og p20
22.02.2026 - 21:25DROPS Design answered:
Hei Helle. Når du strikker 18. omgang skal de 2 siste maskene på omgangen strikkes sammen med de 2 første maskene på 19. omgang. Og når du skal strikke 20. omgang starter du med 2 rett (som diagrammet viser). Et tips er å sette 1 maskemarkør mellom hvert diagram, da har man en bedre oversikt. mvh DROPS Design
09.03.2026 - 12:01
![]() Hanne Pedersen wrote:
Hanne Pedersen wrote:
Omg 6 diag 1 a, starter med sæt 2 m på en hjælpepind osv. skal det gentages efter 4 vrang??
22.02.2026 - 07:38
![]() Christel wrote:
Christel wrote:
Mange har problemer med opskriften- ikke alle får svar. Opskriften er revideret iflg note med rødt. Måske nogle ikke har set det.
08.02.2026 - 18:04DROPS Design answered:
Hej Christel, Diagrammet M.1a er opdateret og det er det opdaterede diagram som ligger på nettet :)
09.02.2026 - 13:59
![]() Søs wrote:
Søs wrote:
Hej, opskriften passer overhovedet ikke med de mål der er angivet. Jeg har personligt pillet 24 masker af, dvs 3 mønster rapporter. Det skal man være opmærsom på inden start. Det er en alm damestr. jeg har anvendt str. på :-)
08.02.2026 - 16:45DROPS Design answered:
Hej Søs, Husk at snoningerne bruger flere masker på 10 cm (og trækker altså arbejdet sammen) end hvad de 22 masker glatstrik gør (som vi skriver under strikkefasthed) :)
09.02.2026 - 13:58
![]() Inge Barslev wrote:
Inge Barslev wrote:
Jeg er ved at strikke huen - er kommet til linie 18 på M1a - men hvad menes 19 rapporter ???
06.02.2026 - 17:28DROPS Design answered:
Hej Inge, du starter i diagram M.1a nederst til højre, strikker de 8 masker ifølge diagrammet, starter forfra i diagrammet og gentager de 8 masker ialt 19 gange = 152 masker hele vejen rundt :)
09.02.2026 - 13:52
![]() Anne wrote:
Anne wrote:
Jeg har prøvet at strikke huen, men mønster M1a giver ingen mening, når jeg følger mønstret slavisk ender jeg med noget der ikke ligner den hue der er på billedet. Kan I ikke prøve at tydeliggøre hvordan mønstret skal strikkes?
06.02.2026 - 13:36DROPS Design answered:
Hei Anne. Leser du oppskriften fra nettet eller fra en katalog? Det har vært en rettelse på diagram M.1 i katalogen. Online skal være rettet. For å få en god oversikt kan det være lurt å sette maskemarkører mellom hver gang M.1 strikkes og M.1 strikkes 19 ganger rundt. Når du kommer til 7. omgang "forskyves" litt av omgangen, slik at man strikkes de 2 siste maskene av 6. omgang sammen med de 2 første maskene på 7. omgang. Om du fremdeles har problemer, prøv å kort fortelle hvor i diagrammet dine problemer oppstår. mvh DROPS Design
09.02.2026 - 11:52
![]() Helga Nielsen wrote:
Helga Nielsen wrote:
Hvor finder jeg opskriften på huen?
04.02.2026 - 13:21DROPS Design answered:
Hej Helga - den er der :)
04.02.2026 - 13:28
![]() Dorthe wrote:
Dorthe wrote:
Linie 5 i M1a kan jeg ikke finde forklaring til hvordan strikkes. Er ikke nævnt på side 3 i opskrift med diagram forklaring. Kan I hjælpe mig?
03.02.2026 - 15:17DROPS Design answered:
Hei Dorthe. Du stickar först diagramförklaring 4: "sæt 2 m på hj.p bag arb, 2 ret, 2 vrang fra hj.p." och sedandiagramförklaring 3: "sæt 2 m på hj.p foran arb, 2 vrang, 2 ret fra hj.p". Mvh DROPS Design
06.02.2026 - 12:09
![]() Mie wrote:
Mie wrote:
Kan jeg bruge Drops Baby Merino ? Hvordan med strikke fastheden? Det er jeg ikke så god til
30.01.2026 - 10:26DROPS Design answered:
Hei Mie. Både hue og vanter i denne opskrift er skrevet til DROPS Merino Extra Fine (garngruppe B). Drops Baby Merino blir for tynt garn for denne oppskriften. Anbefaler deg å finne noen vanter som er beregnet til garn i garngruppe A hvis du vil strikke i Baby Merino. mvh DROPS Design
30.01.2026 - 11:17
|
||||||||||||||||||||||
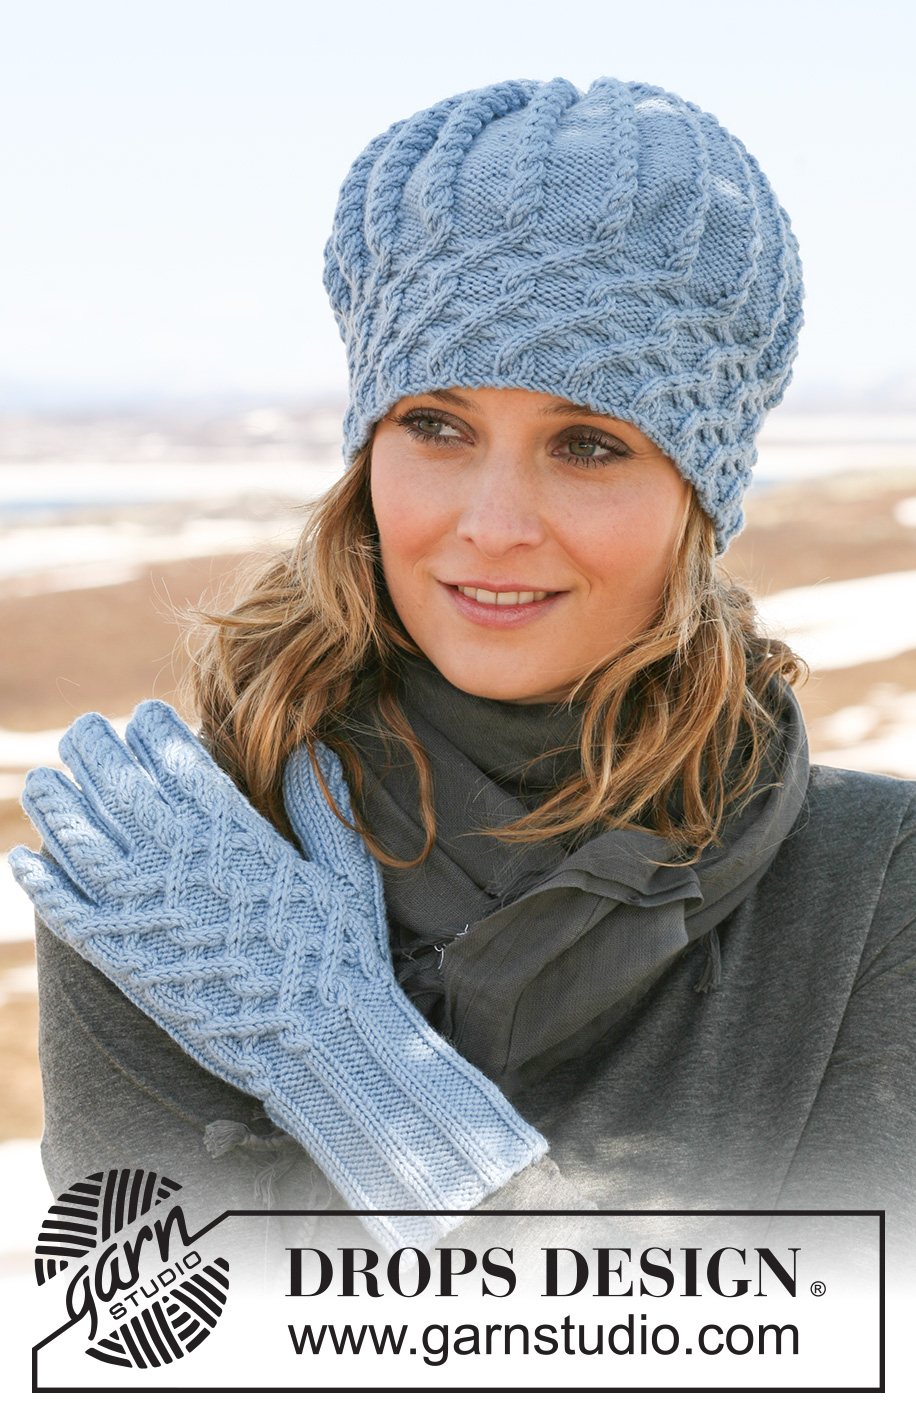
Blueberry Frost Gloves#blueberryfrostgloves |
||||||||||||||||||||||
 |
 |
|||||||||||||||||||||
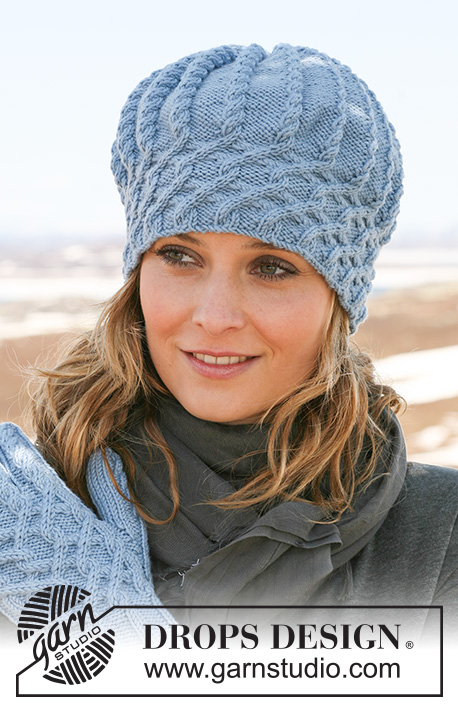
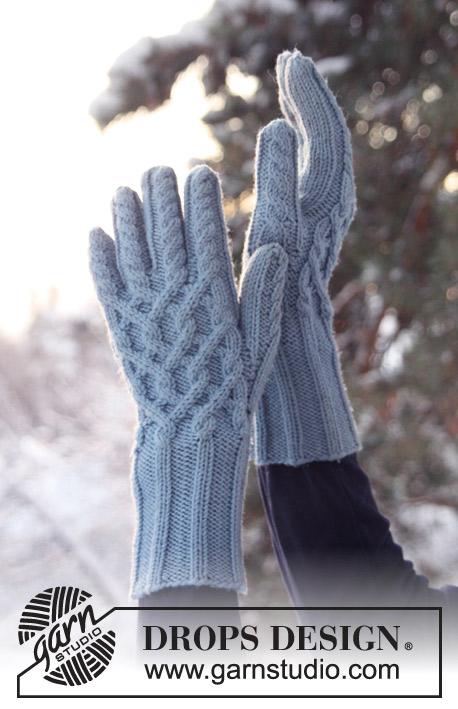
DROPS hat and gloves in ”Merino Extra Fine” with cables.
DROPS 115-13 |
||||||||||||||||||||||
|
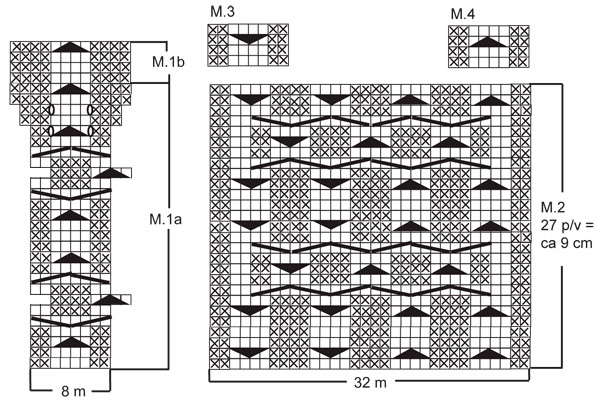
PATTERN: See diagram M.1 for HAT and M.2, M.3 and M.4 for GLOVES. Diagram is seen from RS and shows 1 pattern repeat. INCREASING TIP (apply to thumb on glove): Inc each side of the 2 thumb sts by making 1 YO, on next round K YO into back of loop to avoid a hole. Now inc on each side of the 2 thumb sts + the sts already inc, P the next 2 inc sts each side, and then K the last 2 inc sts each side. NOTE: After 3 inc (thumb sts = P2, K4, P2) incorporate these 8 sts in M.3 ---------------------------------------------------------- HAT: Worked in the round on circular needle. Cast on 114 sts on circular needle size 3.5 mm with Merino. K 1 round and then work 3 rounds as follows: * P2, K3, P1 *, repeat from *-*. Work next round as follows: * P2, K1, 1 YO, K2, 1 YO, P1 *, repeat from *-* = 152 sts. Now work next round as follows: * P2, K4, P2 *, repeat from *-* - K the YO’s from previous round into back of loop to avoid a hole. Continue in M.1a (= 19 repeats across the round). After M.1a there are 228 sts on needle. Continue in M.1b until piece measures 18 cm. On next round dec 1 st in all P-sections by P tog the last 2 sts in each P-section = 209 sts. Repeat the dec on every 3rd round a total of 7 times, but dec by P2 tog at the beg and at the end alternately of all P-sections = 95 sts on needle. Work 1 round with K over K and P over P, AT THE SAME TIME K2 tog on all sts on all cables = 57 sts. On next round K2 tog on all sts on all cables again = 38 sts = K1/P1 all the way round. Now K2 tog all the way round = 19 sts. Cut the thread and pull it through remaining sts, tighten and fasten. Hat measures approx 25 cm. --------------------------------------------------------- RIGHT GLOVE: Worked in the round on double pointed needles. Cast on 48 sts on double pointed needles size 3.5 mm with Merino. Work rib as follows: P2,* K2, P4 *, repeat from *-*, and finish with K2 and P2. When piece measures 10 cm work next round as follows: P2, * K2 in each of the next 2 sts, P4 *, repeat from *-* a total of 3 times, K2 in each of the next 2 sts, P2, * K3, K2 tog *, repeat from *-* a total of 4 times, and finish with K4 = 52 sts on needle. Continue as follows: M.2 on the first 32 sts and stocking st on the last 20 sts. Insert a marker between the 2 first stocking sts (these 2 sts = thumb sts). 4 rounds after the rib inc 1 st each side of the 2 thumb sts – SEE INCREASING TIP! Repeat the inc on every 3rd round a total of 5 times = 12 thumb sts. When piece measures 16 cm slip the 12 thumb sts on a stitch holder, cast on 2 new sts behind these = 52 sts and work the 2 new sts in stocking st. Continue in pattern and stocking st as before until M.2 is completed - piece measures approx 19 cm in total. Now keep the first 8 sts on needle, slip the next 40 sts on a stitch holder and keep the last 4 sts on needle. LITTLE FINGER = 12 sts, cast on 1 new st towards the hand = 13 sts. Continue in M.4 on the 8 sts on top of finger and stocking st on the 5 sts under finger. When finger measures 6 cm K2 tog all the way round. Cut the thread and pull it through remaining sts, tighten and fasten. HAND: Slip sts from stitch holder back on needle, pick up 3 sts towards little finger = 43 sts. Work 2 rounds with K over K and P over P. Keep the 3 sts picked up towards little finger + 8 sts from upper hand and 5 sts from palm of hand on needle and slip the remaining 27 sts back on stitch holder. RING FINGER = 16 sts, cast on 1 new st towards sts on stitch holder = 17 sts. Work M.4 on the 8 sts on top of finger (make sure pattern fits pattern on hand, i.e. 3 rounds stocking st between each cable-round) and stocking st on remaining sts. When finger measures 7.5 cm K2 tog all the way round. Cut the thread and pull it through remaining sts, tighten and fasten. MIDDLE FINGER: Slip 8 sts from upper hand and 5 sts from palm of hand back on needle, pick up 3 sts towards ring finger and cast on 1 new st towards sts on stitch holder = 17 sts. Work M.3 on the 8 sts on top of finger and stocking st on remaining sts. When finger measures 8.5 cm K2 tog all the way round. Cut the thread and pull it through remaining sts, tighten and fasten. INDEX FINGER: Slip the remaining 14 sts from stitch holder back on needle, pick up 3 sts towards middle finger = 17 sts. Work M.3 on the 8 sts on top of finger and stocking st on remaining sts. When finger measures 7 cm K2 og all the way round. Cut the thread and pull it through remaining sts, tighten and fasten. THUMB: Slip thumb sts back on needle and pick up 5 sts in the edge behind thumb sts = 17 sts. Work M.3 on the middle 8 sts and stocking st on remaining sts. When thumb measures 6 cm K2 tog all the way round. Cut the thread and pull it through remaining sts, tighten and fasten. LEFT GLOVE: Like right glove, but mirrored, i.e. inc for thumb gusset on each side of the last 2 stocking sts on round. Work M.4 on thumb instead of M.3. Work little finger as follows: Slip the first 24 sts on stitch holder (= upper hand), keep the next 12 sts on needle and slip the last 16 sts on stitch holder (palm of hand). |
||||||||||||||||||||||
Diagram explanations |
||||||||||||||||||||||
|
||||||||||||||||||||||
 |
||||||||||||||||||||||
Have you finished this pattern?Tag your pictures with #dropspattern #blueberryfrostgloves or submit them to the #dropsfan gallery. Do you need help with this pattern?You'll find 19 tutorial videos, a Comments/Questions area and more by visiting the pattern on garnstudio.com. © 1982-2026 DROPS Design A/S. We reserve all rights. This document, including all its sub-sections, has copyrights. Read more about what you can do with our patterns at the bottom of each pattern on our site. |
||||||||||||||||||||||


With over 40 years in knitting and crochet design, DROPS Design offers one of the most extensive collections of free patterns on the internet - translated to 17 languages. As of today we count 325 catalogues and 12298 patterns translated into English (UK/cm). 12298
We work hard to bring you the best knitting and crochet have to offer, inspiration and advice as well as great quality yarns at incredible prices! Would you like to use our patterns for other than personal use? You can read what you are allowed to do in the Copyright text at the bottom of all our patterns. Happy crafting!
Post a comment to pattern DROPS 115-13
We would love to hear what you have to say about this pattern!
If you want to leave a question, please make sure you select the correct category in the form below, to speed up the answering process. Required fields are marked *.