
Popular categories
Looking for a yarn?


Comments / Questions (18)
![]() Birgitte wrote:
Birgitte wrote:
Hvilken sværhedsgrad har denne opskrift
26.02.2026 - 14:07DROPS Design answered:
Hdi Birgitte. Vi oppgir ikke sværhedsgrad på plaggene, da noen vil syns den er lett, mens andre vanskelig. Denne strikkes med blandt annet Europeisk bærestykke, stolpe i I-cord og ulike måter å øke masker på (både fra retten og fra vrangen). MEN alt dette har vi video på. Så ta en titt på alle videoene som er linket til denne oppskriften og se om det er overkommenlig for deg. Ellers så er både butikker og vi her for å hjelpe om du lurer på noe, mvh DROPS Design
03.03.2026 - 13:56
![]() Lia wrote:
Lia wrote:
Hallo, ich stricke Größe M und bin an der Stelle, wo ich die 22 Maschen an der Seite des li. Vorderteils aufnehmen soll. Ab dem Makierer bis zur Aufnahme der Halsausschnittmaschen sind es 11cm, dann nochmal 14cm ( ab dem Stricken der Blende)= insgesamt 25cm! Die Angabe, dass man in 4 Maschen 3 aufnehmen soll, dass es sich nicht wellt, funktioniert nicht. Müssen die 22 Maschen bis zum Makierer aufgenommen werden? Bitte helfen Sie mir weiter, herzlichen Dank! Liebe Grüße Lia
26.01.2026 - 20:12DROPS Design answered:
Liebe Lia, diese 22 Maschen für die Ärmel werden an der Seite vom Vorderteil aufgefassen - siehe dieses Video time code ca 1:09 - when die Arbeit 14 cm ab Markierer/aufgefassenen Maschen für Vorderteil, nicht 11 cm Halsauschnitt + 14 cm danach. Viel Spaß beim Stricken!
27.02.2026 - 15:48
![]() MARIE-LOUISE wrote:
MARIE-LOUISE wrote:
Je souhaiterais avoir un tuto. Je ne comprends pas la marche à suivre merci Sinon laine très jolie de
17.01.2026 - 22:37DROPS Design answered:
Bonjour Marie-Louise, vous retrouverez sous l'onglet "Vidéos" (à droite de l'onglet "Explications"), différentes vidéos montrant comment réaliser ce type d'empiècement. Si vous avez des questions, n'hésitez pas. Bon tricot!
19.01.2026 - 09:58
![]() Marianne wrote:
Marianne wrote:
Hej, jag stickar denna kofta i en blandning av garnerna Baby Merino och Kid silk. Jag undrar hur jag ska blocka plagget då det ena garnet ska tvättas i maskin (superwash, max 40 grader) och det andra för hand (max 30 grader).
11.01.2026 - 21:21DROPS Design answered:
Hei Marianne. Hvis du skal vaske et plagg med 2 ulike vaskeanvisninger, er den generelle retningslinjen å følge vaskeinstruksjon til det fineste/mest følsomme av garnene du jobber med. I ditt tilfelle: Kid-Silk. mvh DROPS Design
12.01.2026 - 12:37
![]() Franca Domes wrote:
Franca Domes wrote:
Ich glaube gerade wurde noch was korrigiert. Ich hatte ein Foto der Anleitung gemacht, da stand dass das bevor Ärmel und Oberteil getrennt werden auf dem Rückenteil 90 Maschen für den Rückenteil sind, jetzt stehen da 82, was auch eher stimmt. Leider habe ich gerade den Maschen Zahl auf 90 angepasst……
10.01.2026 - 14:45
![]() Barbara wrote:
Barbara wrote:
Guten Tag. Ich stricke Größe L. Bin an der Stelle, wo ich die 24 Maschen an der Seite des li. Vorderteils aufnehmen soll. Von Beginn bis zur Aufnahme der Halsausschnittmaschen sind es 11cm, dann nochmal 15cm ( ab dem Stricken der Blende)= insgesamt 26cm! Also sehr lang( 60 Reihen bei mir in der Höhe des Vorderteils). Ihre Angabe dass man in 4 Maschen 3 aufnehmen soll, dass es sich nicht wellt, klappt so nicht. Bitte helfen Sie mir weiter, herzlichen Dank! Freundliche Grüße, Barbara
04.01.2026 - 18:10
![]() Katrin wrote:
Katrin wrote:
Hallo! Ich habe eine Frage bezüglich der Größe. Normalerweise trage ich Größe M oder L. In der Maßskizze kommen mir diese Größen beim Bund jedoch sehr groß vor (54 bzw. 58 cm). Kann es vielleicht sein, dass da ein Fehler vorliegt? Oder habe ich die Skizze nicht richtig verstanden? Vielen Dank!
16.12.2025 - 11:08DROPS Design answered:
Liebe Katrin, die 54-58 cm sind wirklich die Breite der Jacke (flach gelegen), hier lesen Sie mehr, wie man seine Größe auswählt. Viel Spaß beim Stricken!
17.12.2025 - 10:17
![]() Véronique wrote:
Véronique wrote:
Bonsoir. Il me semble qu’en général pour un tricot avec 2 fils, le métrage est sensiblement le même pour les 2. Or ici, le métrage du Kid Silk est le double de celui du Nord. Est-ce normal ? Merci d’avance. Cordialement. Véronique
14.12.2025 - 20:05DROPS Design answered:
Bonjour Véronique, notez qu'1 pelote Nord = 50 g pour 170 m alors qu'une pelote Kid-Silk = 25 g pour 210 m, et on tricote ici avec 2 fils Kid-Silk, on aura ainsi en taille XS par ex 200 g Nord/50 g= 4 pelotes x 170 m = 680 m et 175 g Kid-Silk/25 g= 7 pelotes x 210 =1470 / 2 (car on tricote en double) = 735 m, on a ainsi approximativement le même métrage pour les 2 laines. Bon tricot!
15.12.2025 - 15:22
![]() Thea Van Houten wrote:
Thea Van Houten wrote:
Ik zoek patronen die niet met de rondbreinaald gebreid worden.
14.11.2025 - 14:37
![]() Kirsten Jensen wrote:
Kirsten Jensen wrote:
Hej. Jeg mener der er to fejl i denne opskrift. Der står: ..eller 2 tråde DROPS Kid-Silk og 1 tråd DROPS Baby Merino (= 3 tråde). Hvis man bruger 2 tråde Kid-Silk sammen med DROPS Baby Merino er der ikke nok i 4 nøgler til en str. M. Det fandt jeg først ud af da jeg var halvvejs og der ikke var mere Kids-Mohair. Ret Øv. Og så er antallet af rygmasker efter udtagning forkert: 74-80-86-90-96-100 masker på bagstykket. Det skal være: 68-72-78-82-90-96-100 Har jeg ret??
14.11.2025 - 11:20DROPS Design answered:
Hei Kirsten. Garnmengden er riktig. 175 gram Kid-Silk = 7 nøster (25 gram nøster). Har du kjøp 4 nøster er det bare 100 gram og du vil få altfor lite Kid-Silk, som du oppdaget. Maskeantallet er oversendt Design avd. slik at de kan dobbeltsjekke hvilket tall som mangler (og om det er noe feil). mvh DROPS Design
17.11.2025 - 20:29
|
|
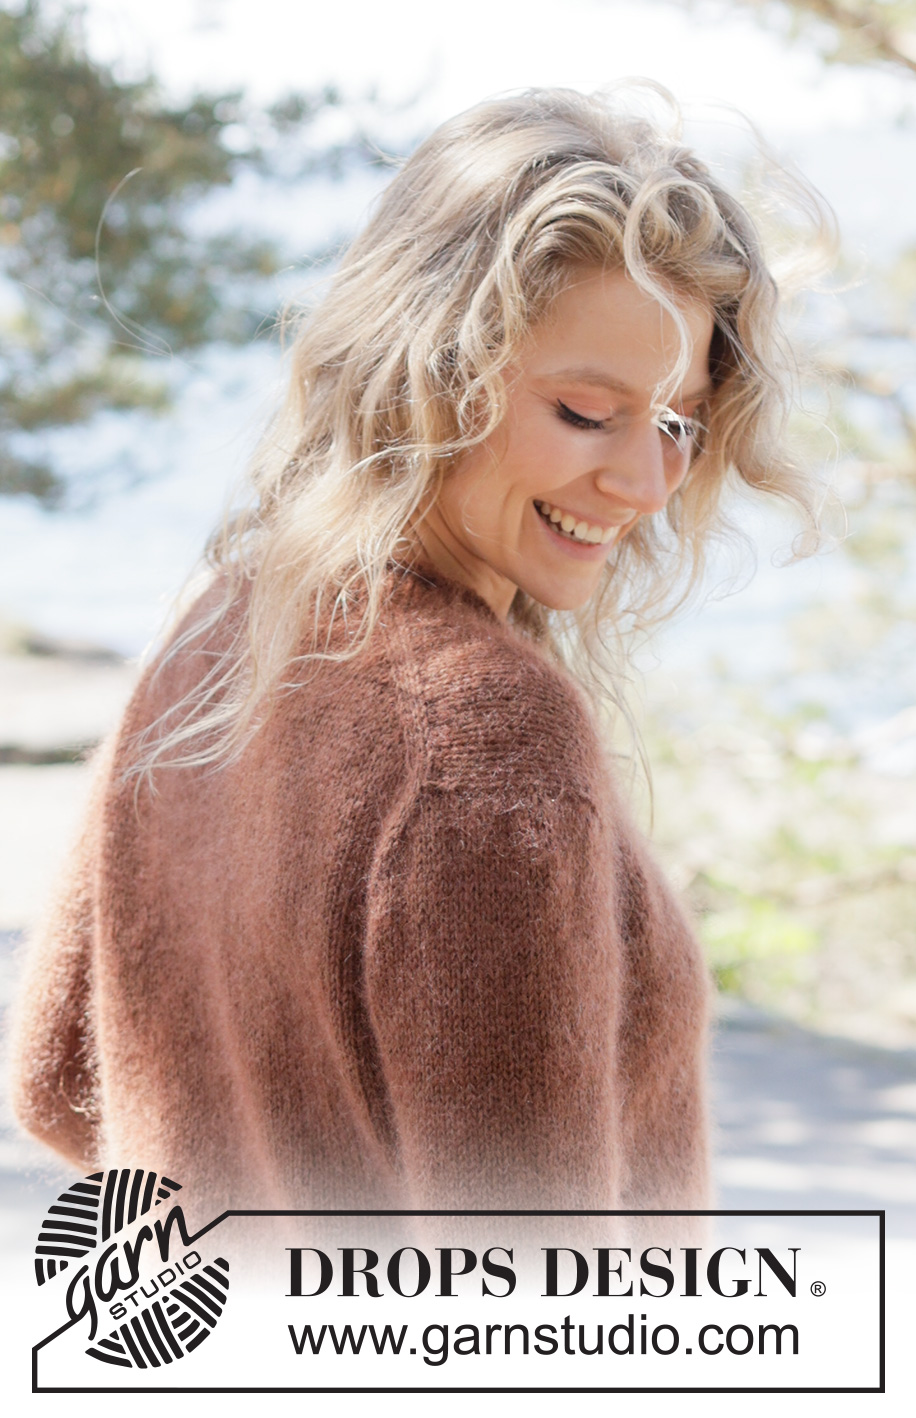
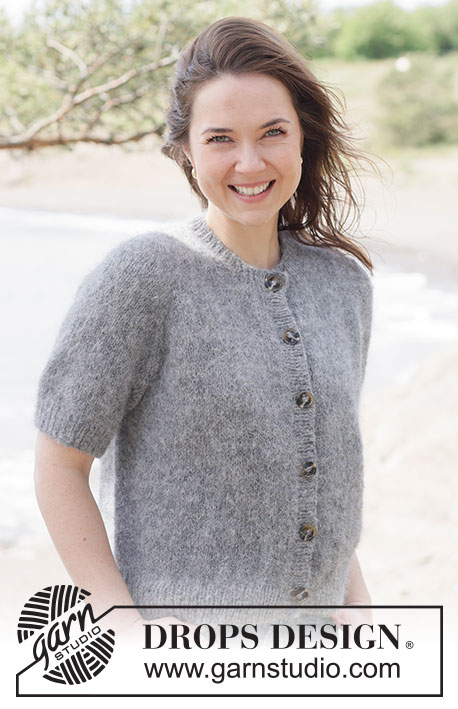
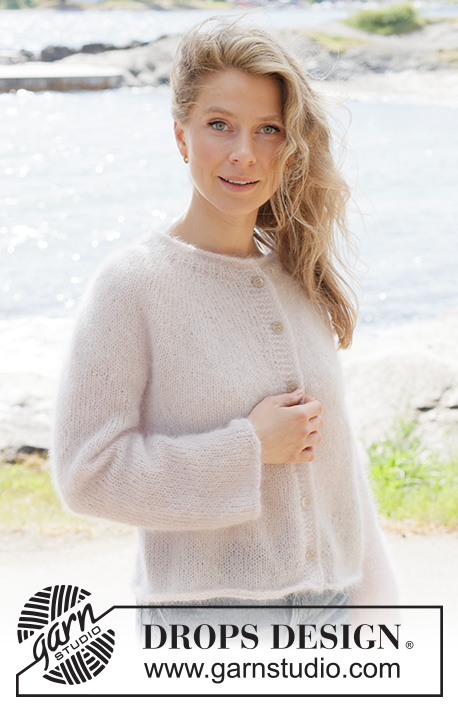
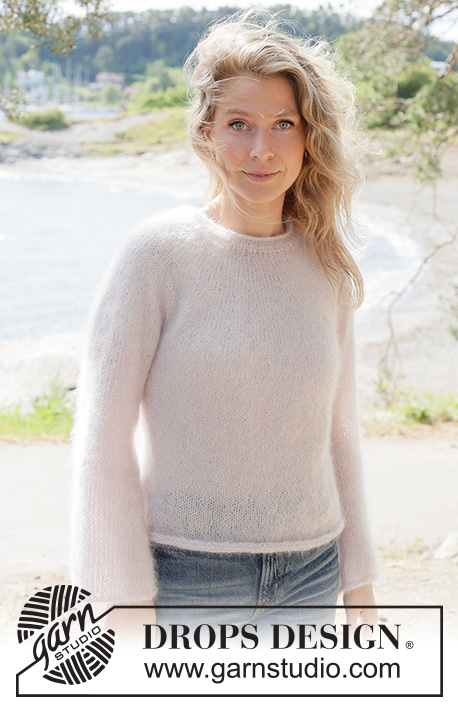
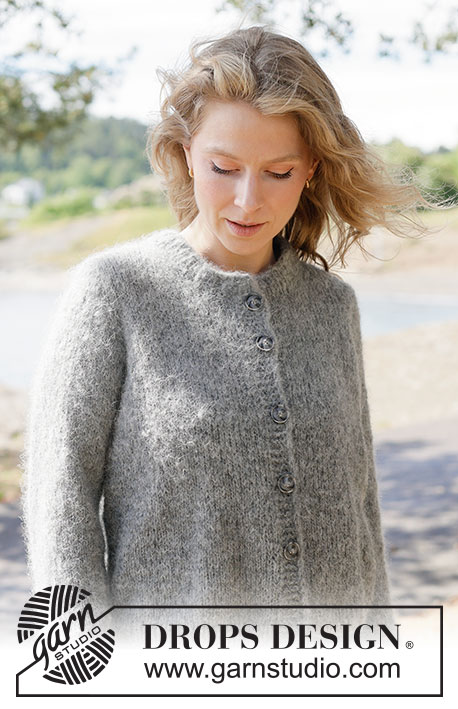
Autumn Nutmeg Cardigan#autumnnutmegcardigan |
|
 |
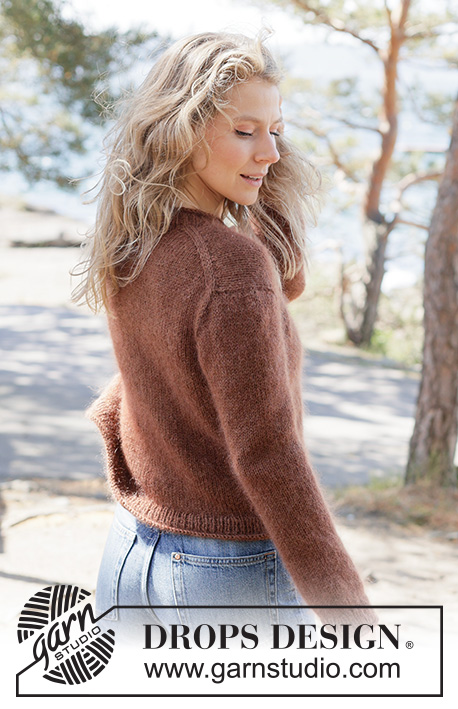 |
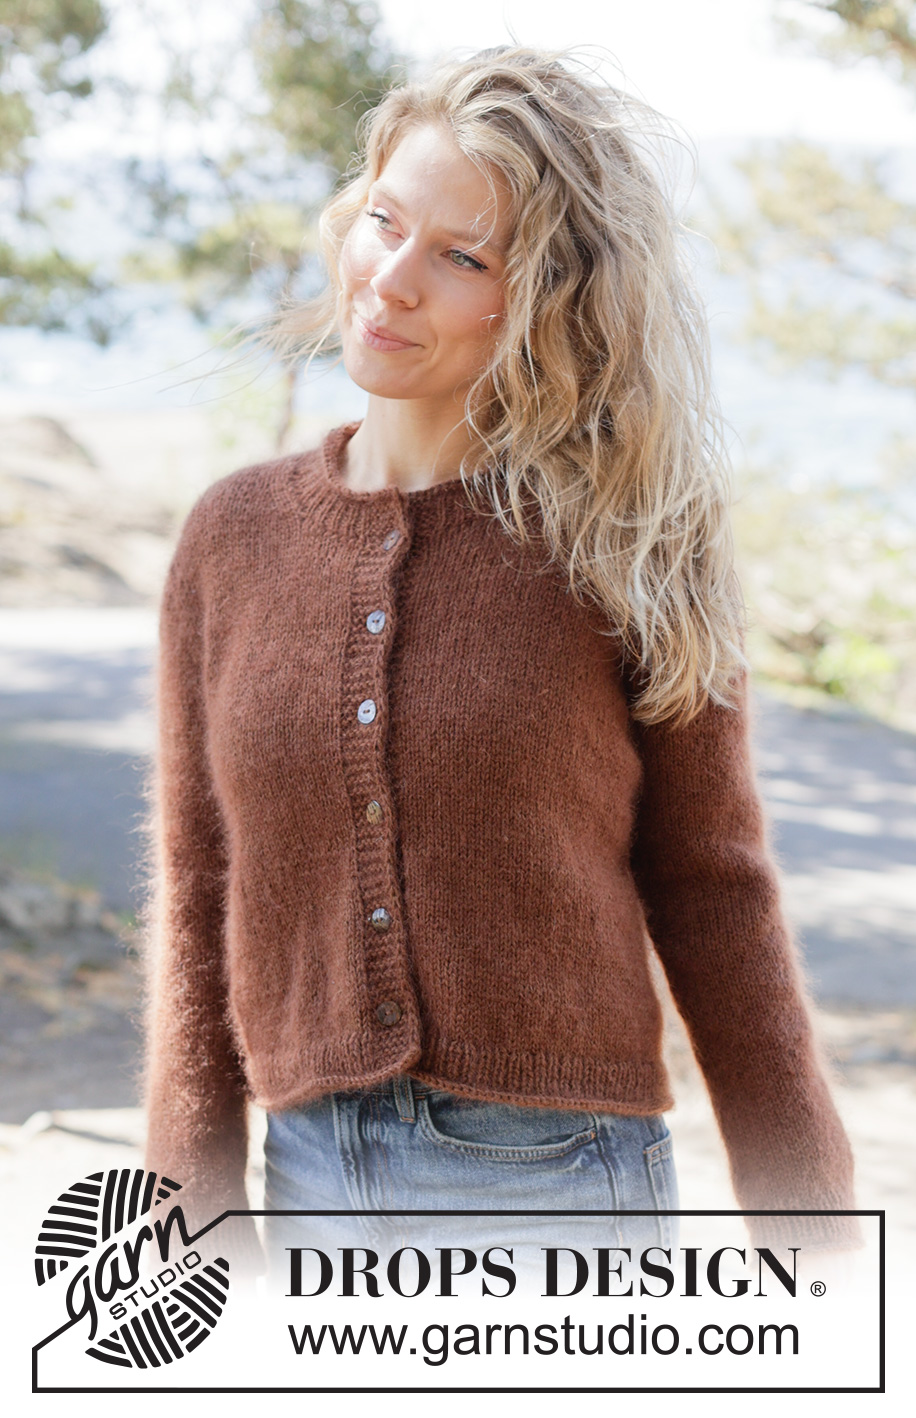
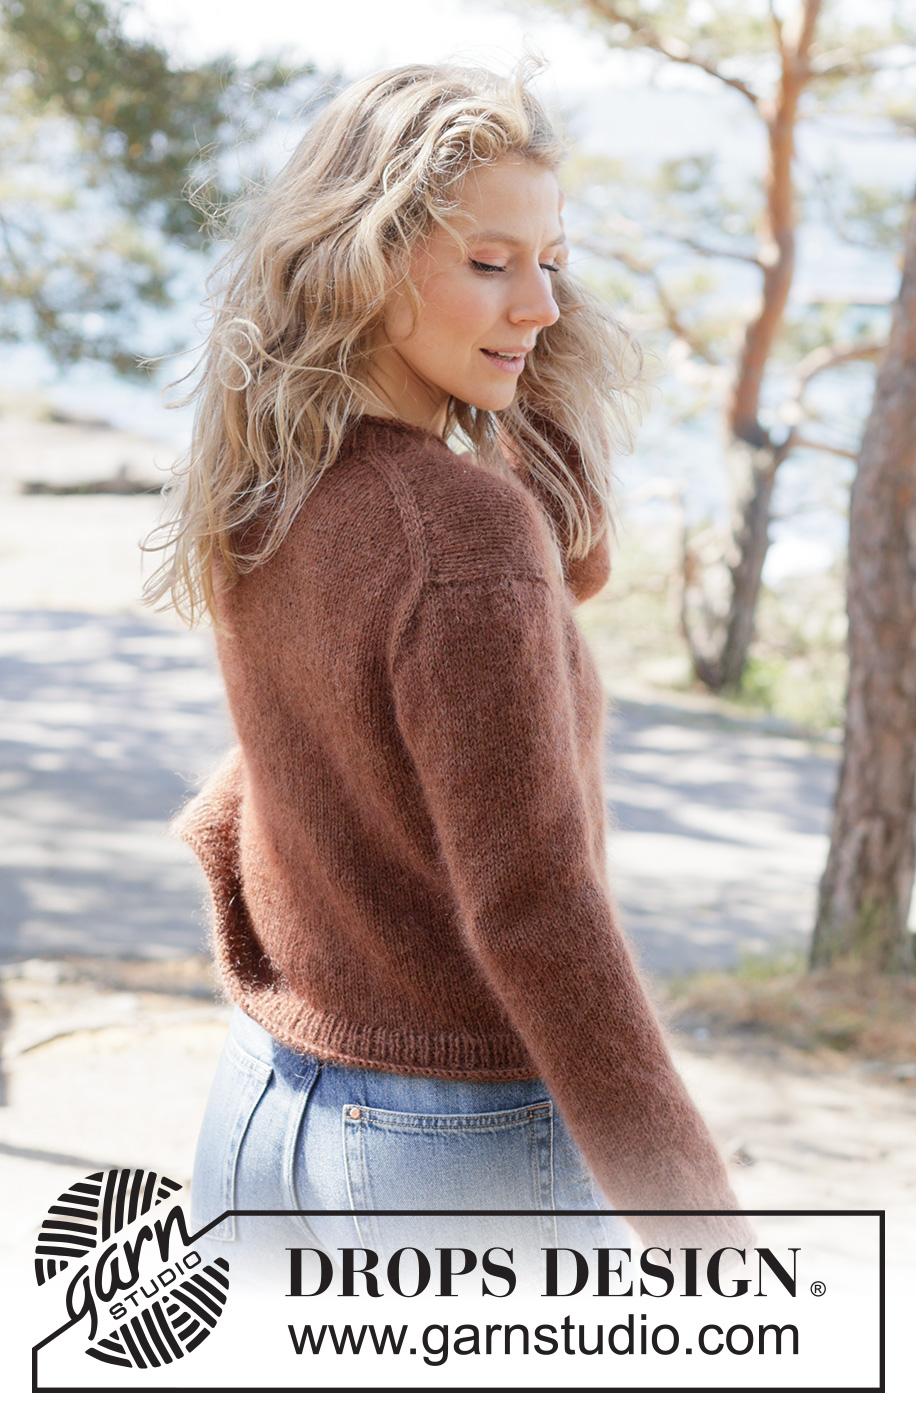
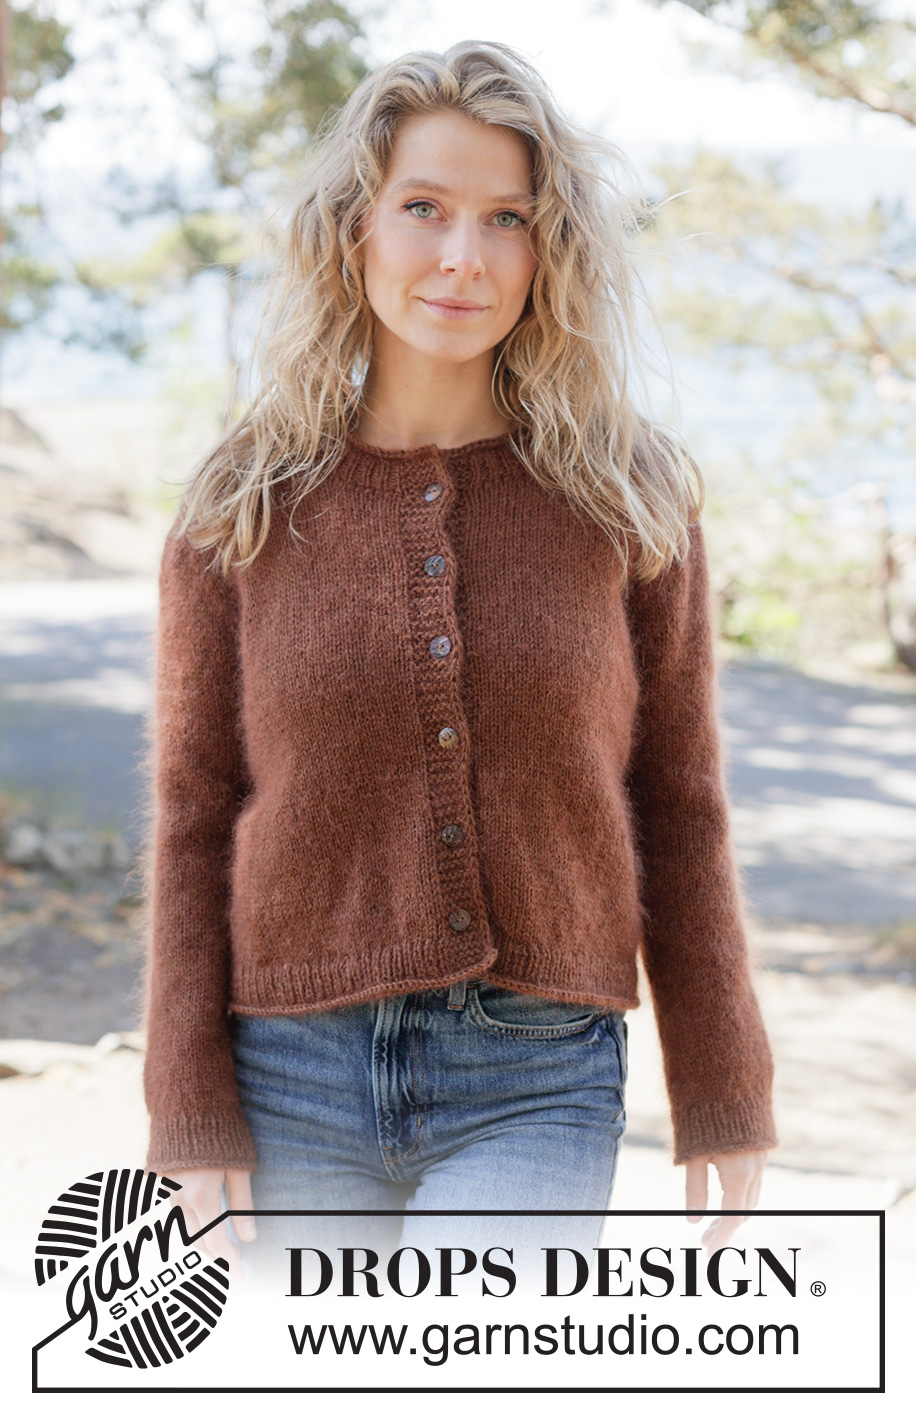
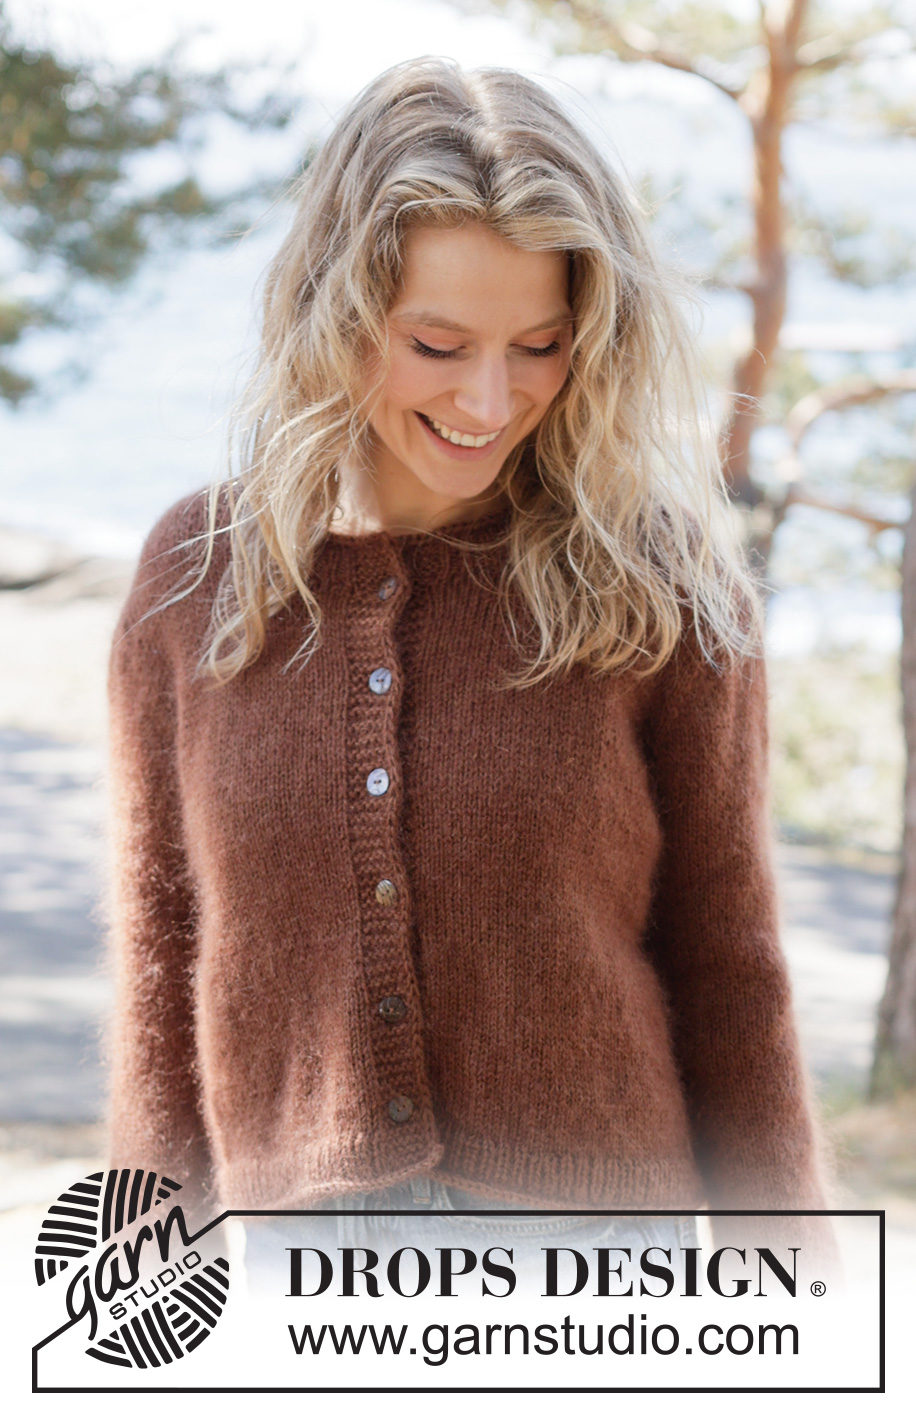
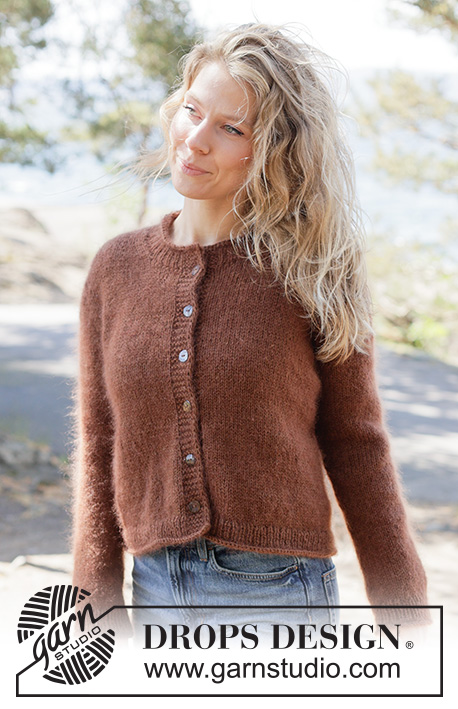
Knitted jacket in 1 strand DROPS Nord and 2 strands DROPS Kid-Silk or 1 strand DROPS Baby Merino and 2 strands DROPS Kid-Silk. Piece is knitted top down with European yoke. Size XS – XXXL.
DROPS 262-8 |
|
|
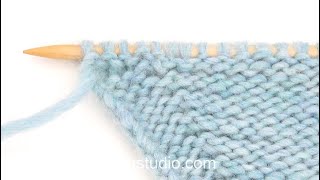
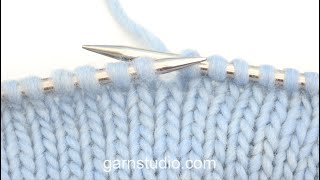
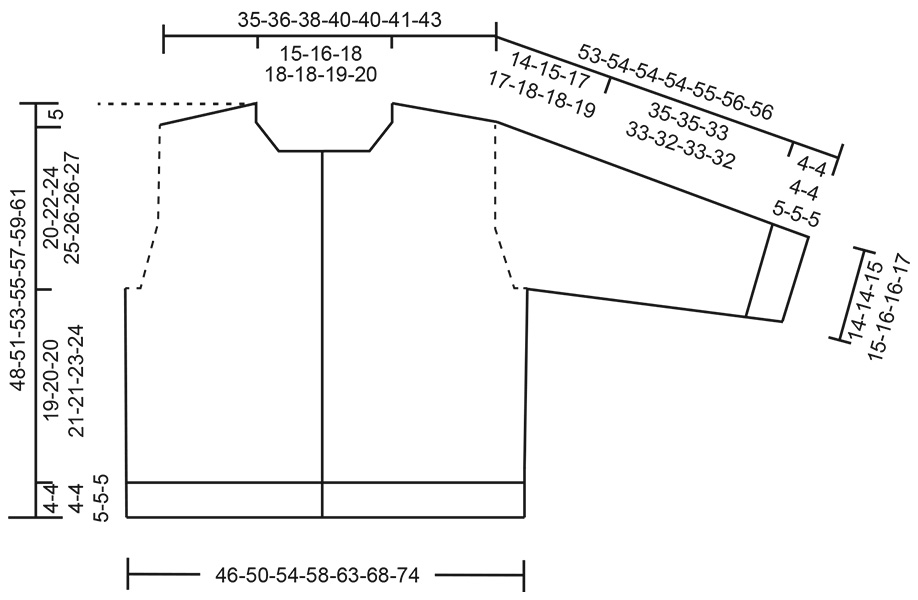
---------------------------------------------------------- EXPLANATION FOR THE PATTERN: ---------------------------------------------------------- INCREASE TIP-1: INCREASE 1 STITCH TOWARDS THE LEFT - from RIGHT SIDE: Use left needle to pick up yarn between 2 stitches from row below, pick up yarn from the front and knit in the stitch loop that is on the back of the needle. INCREASE 1 STITCH TOWARDS THE RIGHT - from RIGHT SIDE: Use left needle to pick up yarn between 2 stitches from row below, pick up yarn from the back and knit in the stitch loop that is on the front side of the needle. . INCREASE TIP-2: INCREASE 1 STITCH TOWARDS THE RIGHT - from WRONG SIDE: Use left needle to pick up yarn between 2 stitches from row below, pick up yarn from the back and purl in the stitch loop that is on the front side of the needle. INCREASE 1 STITCH TOWARDS THE LEFT - from WRONG SIDE: Use left needle to pick up yarn between 2 stitches from row below, pick up yarn from the front and purl in the stitch loop that is on the back side of the needle. GARTER STITCH (back and forth): Knit all rows. BAND WITH I-CORD: BEGINNING OF ROW: Work band as follows: Slip 1 stitch purlwise with strand in front of piece, knit 1 and work 5 stitches in garter stitch. END OF ROW: Work band as follows: Work until 7 stitches remain on row, work 5 stitches in garter stitch, slip 1 stitch purlwise with strand in front of piece, knit 1. Work the same way both from right side and wrong side. SLEEVE TIP: When picking up stitches mid under sleeve, there will be a small hole in the transition between stitches on body and sleeves. The holes can be closed by picking up the strand between two stitches - work this strand twisted together with the first stitch between body and sleeve to close the hole. DECREASE TIP: Decrease 1 stitch on each side of marker thread as follows: Work until 3 stitches remain before marker thread, knit 2 together, knit 2 (marker thread is between these 2 stitches), slip 1 stitch knitwise, knit 1, pass slipped stitch over stitch worked (= 2 stitches decreased). BUTTONHOLES: Decrease for buttonholes on right band (when garment is worn). Decrease from right side when 5 stitches remain on row as follows: ROW 1 (= right side): Make 1 yarn over, knit 2 together, knit 1, slip 1 stitch purlwise with strand in front of piece, knit 1. ROW 2 (= wrong side): Work band as before and knit yarn over to make a buttonhole. Decrease for first buttonhole on first row from right side after all stitches for V-neck have been cast on on right front piece. Then decrease the next 5-5-5-6-6-6-6 buttonholes, approx. 7-7½-8-7-7-7½-7½ cm apart. ---------------------------------------------------------- START THE PIECE HERE: ---------------------------------------------------------- JACKET - SHORT OVERVIEW OF THE PIECE: In this pattern needles of different length have been used, begin with fitting length for number of stitches and switch as needed. Garment is worked as point 1 - 5. 1 BACK PIECE: Cast on stitches in the back of neck and work back piece back and forth downwards while at the same time increasing in each side of piece until number of stitches for shoulder width is reached. Back piece has a slight diagonal shoulder. 2 FRONT PIECES: Begin by picking up stitches along one shoulder from back piece, work front piece downwards while increasing towards the neck. Repeat on the other shoulder. 3 YOKE: On next row work all stitches on to same circular needle - work as follows: Work one front piece, pick up stitches for sleeve along the side of front piece, work stitches on back piece, pick up stitches for sleeve along the side of the other front piece and work stitches on last front piece = work yoke over all stitches back and forth from mid front. 4 INCREASES FOR BODY AND SLEEVES: When working the yoke, increase stitches for body and sleeves, first increase for sleeves and then increase for body and sleeves. 5 BODY AND SLEEVES: When all stitches have been increased and yoke is knitted to given measurements, divide the piece for body and sleeves. Work body downwards back and forth on circular needle while putting the sleeves aside. Then work sleeves downwards in the round on needle. Finish by picking up stitches around the neck and work the neck edge back and forth. If 0 is given for the chosen size, it means that you skip the information until next information. BACK PIECE: Work piece back and forth on circular needle. Cast on 26-28-30-30-30-32-34 stitches on circular needle size 5.5 mm with 2 strands DROPS Kid-Silk and 1 strand DROPS Nord or 2 strands DROPS Kid-Silk and 1 strand DROPS Baby Merino (= 3 strands). ROW 1 (= wrong side): Purl all stitches. ROW 2 (= right side): Read INCREASE TIP-1 and knit 3, increase 1 stitch towards the left, knit until 3 stitches remain, increase 1 stitch towards the right, knit 3. ROW 3 (= wrong side): Read INCREASE TIP-2 and purl 3, increase 1 stitch towards the right, purl until 3 stitches remain, increase 1 stitch towards the left, purl 3. AFTER 3RD ROW: Work 2nd and 3rd ROW 8-8-8-9-9-9-9 times in total (= 16-16-16-18-18-18-18 rows have been worked), after increase there are = 58-60-62-66-66-68-70 stitches on needle. Remember to follow the knitting tension! Cut the yarn, slip stitches on a thread or an stitch holder. RIGHT FRONT PIECE: Find right front piece on back piece as follows: Place back piece flat with right side up, place back piece so that stitches on thread/stitch holder is towards you, right side of piece = right front piece. Now pick up stitches along right diagonal shoulder on back piece - begin from right side at the armhole and pick up stitches in towards the neck as follows: Pick up 1 stitch in every worked row inside outermost stitch = 16-16-16-18-18-18-18 stitches for front piece. Insert 1 marker in piece in towards the neck. All length measurements are done from this marker, measured in stitch direction. Work in stocking stitch (work first row from wrong side). When piece measures 5-5-6-6-7-7-8 cm from marker, increase stitches towards the neck as follows: ROW 1 (= right side): Knit until 3 stitches remain, increase 1 stitch towards the right, knit 3 – remember INCREASE TIP-1. ROW 2 (= wrong side): Purl all stitches. Work 1st and 2nd ROW 4-4-4-4-4-4-4 times (= 8-8-8-8-8-8-8 rows have been worked) = 20-20-20-22-22-22-22 stitches. At the end of next row from right side cast on 16-17-18-18-18-19-20 new stitches = 36-37-38-40-40-41-42 stitches. Work 1 row from wrong side, work the first 7 stitches as BAND WITH I-CORD - read explanation above. Increases for neck are now done. Piece now measures 10-10-11-11-12-12-13 cm from marker. Some of the neck depth will be over on back piece. Neck depth at the front = 8-7-8-8-9-8-9 cm. Neck depth at the back = 2-3-3-3-3-4-4 cm. Work in stocking stitch with band as explained above, decrease for BUTTONHOLES - read explanation above. Work until right front measures 11-13-14-15-15-16-16 cm from where stitches were picked up. Cut the yarn, slip stitches on a thread or stitch holder, now work left front piece along the left diagonal shoulder on back piece as explained below. LEFT FRONT PIECE: Pick up stitches along left diagonal shoulder on back piece - begin from right side at the neck and pick up stitches out towards the armhole as follows: Pick up 1 stitch in every worked row inside outermost stitch = 16-16-16-18-18-18-18 stitches for front piece. Insert 1 marker in piece in towards the neck. All length measurements are done from this marker, measured in stitch direction. Work in stocking stitch (work first row from wrong side). When piece measures 5-5-6-6-7-7-8 cm from marker, increase stitches towards the neck as follows: ROW 1 (= right side): Remember INCREASE TIP-1 and knit 3, increase 1 stitch towards the left, knit the rest of row. ROW 2 (= wrong side): Purl all stitches. Work 1st and 2nd ROW 4-4-4-4-4-4-4 times (= 8-8-8-8-8-8-8 rows have been worked) = 20-20-20-22-22-22-22 stitches. At the end of next row from wrong side cast on 16-17-18-18-18-19-20 new stitches = 36-37-38-40-40-41-42 stitches. Increases for neck are now done. Piece now measures 10-10-11-11-12-12-13 cm from marker. Some of the neck depth will be over on back piece. Neck depth at the front = 8-7-8-8-9-8-9 cm. Neck depth at the back = 2-3-3-3-3-4-4 cm. Continue with stocking stitch with band as explained above until left front piece measures 11-13-14-15-15-16-16 cm from marker. Now slip front pieces and back piece together and pick up stitches for sleeve as explained below. ROW 1 (= right side): Begin from right side with stitches from left front piece: Work 7 stitches BAND with I-CORD -read explanation above, work until 2 stitches remain on front piece, slip 1 stitch, knit 1, pass slipped stitch over (= 1 stitch decreased), insert 1 marker, pick up 18-20-22-24-24-26-26 stitches along the side on left front piece (= stitches for sleeve - pick up stitches inside outermost stitch), insert 1 marker, knit the first 2 stitches from back piece together (= 1 stitch decreased), knit until 2 stitches remain on back piece, slip 1 stitch, knit 1, pass slipped stitch over (= 1 stitch decreased), insert 1 marker, pick up 18-20-22-24-24-26-26 stitches along the side on right piece (= stitches for sleeve - pick up stitches inside outermost stitch), insert 1 marker, slip stitches from right front piece back on needle, knit the first 2 stitches together (= 1 stitch decreased), work until 7 stitches remain, work band as before = 162-170-178-190-190-198-202 stitches. ROW 2 (= wrong side): Purl and work band as before until first marker, move marker on to right needle, increase 1 stitch towards the left, purl until next marker (= sleeve), increase 1 stitch towards the right, move marker on to right needle, purl until next marker, move marker on to right needle, increase 1 stitch towards the left, purl until next marker, increase 1 stitch towards the right, purl until 7 stitches remain, work band = 166-174-182-194-194-202-206 stitches. ROW 3 (= right side): Work as before until first marker, move marker on to right needle, increase 1 stitch towards the left, work until next marker (= sleeve), increase 1 stitch towards the right, move marker on to right needle, work until next marker, move marker on to right needle, increase 1 stitch towards the left, work until next marker (= sleeve), increase 1 stitch towards the right, move marker on to right needle, work the rest of row as before = 170-178-186-198-198-206-210 stitches. ROW 4 (= wrong side): Purl and work band as before until first marker, move marker on to right needle, increase 1 stitch towards the left, purl until next marker (= sleeve), increase 1 stitch towards the right, move marker on to right needle, purl until next marker, move marker on to right needle, increase 1 stitch towards the left, purl until next marker, increase 1 stitch towards the right, purl until 7 stitches remain, work band = 174-182-190-202-202-210-214 stitches. ROW 5 (= right side): Work band as before until first marker, move marker on to right needle, increase 1 stitch towards the left, work until next marker (= sleeve), increase 1 stitch towards the right, move marker on to right needle, work until next marker, move marker on to right needle, increase 1 stitch towards the left, work until next marker (= sleeve), increase 1 stitch towards the right, move marker on to right needle, work the rest of row as before = 178-186-194-206-206-214-218 stitches. ROW 6 (= wrong side): Purl with 7 stitches band in each side as before without increasing. AFTER 6TH ROW: Work 5th and 6th row 5-5-5-5-2-0-0 more times (= 10-10-10-10-4-0-0 rows worked). 9-9-9-9-6-4-4 increases have been done in total for sleeves = 36-38-40-42-36-32-34-34 stitches on each sleeve, 35-36-37-39-39-40-41 stitches on each front piece and 56-58-60-64-64-66-68 stitches on back piece = 198-206-214-226-214-214-218 stitches. Then increase on both sleeves and body, increase on body 2 stitches inside marker so that there are 2 stitches between increase for body and increase for sleeve - work next row as follows: ROW 1 (= right side): Work band and stocking stitch until 2 stitches remain on front piece before first marker, increase 1 stitch towards the right, work 2 stitches, move marker on to right needle, increase 1 stitch towards the left, work until next marker, increase 1 stitch towards the right, move the marker on to right needle, work 2 stitches, increase 1 stitch towards the left, work until 2 stitches on back piece remain before next marker, increase 1 stitch towards the right, work 2 stitches, move marker on to right needle, increase 1 stitch towards the left, work until next marker (= sleeve), increase 1 stitch towards the right, move marker on to right needle, work 2 stitches, increase 1 stitch towards the left, work until 6 stitches remain, work band as before (= 8 stitches increased and increases have been done on each side of 2 stitches in every transition between body and sleeve). ROW 2 (= wrong side): Purl with 7 stitches band in each side as before. Work 1st and 2nd ROW 6-7-9-9-13-15-16 times (= 12-14-18-18-26-30-32 rows worked). 15-16-18-18-19-19-20 increases have been done in total on sleeves and 6-7-9-9-13-15-16 increases on body = 48-52-58-60-62-64-66 stitches on each sleeve, 41-43-46-48-52-55-57 stitches on each front piece and 68-72-78-82-90-96-100 stitches on back piece = 246-262-286-298-318-334-346 stitches. Sleeve measures approx. 14-15-17-17-18-18-19 cm - NOTE: When the jacket is folded double at the shoulder, piece should measure approx. 20-22-24-25-26-26-27 cm from the top of shoulder and down along the armhole. If the garment is shorter than this, continue until correct measurements without increases. Now divide yoke for body and sleeves. DIVIDING FOR BODY AND SLEEVES: AT THE SAME TIME as next row is worked divide yoke for body and sleeves as follows: Work 41-43-46-48-52-55-57 stitches as before (= front piece), slip the next 48-52-58-60-62-64-66 stitches on a thread for sleeve, cast on 6-8-8-10-10-12-16 new stitches on row (= in the side mid under sleeve), and work the next 68-72-78-82-90-96-100 stitches in stocking stitch (= back piece), slip the next 48-52-58-60-62-64-66 stitches on a thread for sleeve, cast on 6-8-8-10-10-12-16 new stitches on row (= in the side mid under sleeve), work the last 41-43-46-48-52-55-57 stitches as before (= front piece). Finish body and sleeves separately. BODY: = 162-174-186-198-214-230-246 stitches. Work stocking stitch and bands as before until piece measures 19-20-20-21-21-23-24 cm from division. On next row from right side begin rib while AT THE SAME TIME increasing 37-39-43-47-51-55-59 stitches evenly on row (do not increase over bands), work as follows: Switch to needle size 3.5 mm, work 7 stitches band as before, work rib (= knit 1/purl 1) – remember increase until 8 stitches remain, finish with knit 1 and band 7 stitches as before = 199-211-229-245-265-285-305 stitches. Work rib and band for 4-4-4-4-5-5-5 cm - finish after a row from wrong side. Work 2 rounds in stocking stitch (work the 2 outermost stitches in each side as before) (= rolling edge). Cast off somewhat loosely by knitting from the right side. Jacket measures approx. 48-51-53-55-57-59-61 cm from the top of shoulder. SLEEVES: Slip 48-52-58-60-62-64-66 sleeve stitches from one thread on to circular needle size 5.5 mm and pick in addition up 1 stitch in each of the 6-8-8-10-10-12-16 stitches cast on under sleeve - read SLEEVE TIP = 54-60-66-70-72-76-82 stitches. Insert 1 marker in the middle of the 6-8-8-10-10-12-16 new stitches under sleeve - round begins at the marker thread. Work in stocking stitch in the round on needle - AT THE SAME TIME when sleeve measures 1-1-1-1-1-1-1 cm from division, decrease mid under sleeve – read DECREASE TIP and decrease as follows: Decrease 2 stitches 2-2-2-3-3-3-4 times on every other round, then decrease 2 stitches every 13-6½-4-3-3-3-2 cm 3-5-7-8-8-9-10 times in total = 44-46-48-48-50-52-54 stitches on needle. Work until sleeve measures 35-35-33-33-32-33-32 cm from division. Switch to double pointed needles size 3.5 mm and work rib (= knit 1/purl 1) while AT THE SAME TIME increasing 12-12-12-12-12-12-14 stitches evenly on 1st round = 56-58-60-60-62-64-68 stitches. Work until rib measures 4-4-4-4-5-5-5 cm. Work 2 rounds in stocking stitch (= rolling edge). Cast off somewhat loosely by knitting. Sleeve measures approx. 39-39-37-37-37-38-37 cm from division. NECK EDGE: Pick up approx. 95-99-109-109-111-115-121 stitches around the neck from right side on circular needle size 3.5 mm (make sure to pick up 1 stitch in every band stitch, number of stitches should be divisible by 2 stitches + 1 stitch). Work next row as follows from wrong side: Work 7 stitches band as before, then work * purl 1, knit 1 *, repeat from *-* until 8 stitches remain on row, purl 1 and finish with 7 stitches band as before. Continue neck edge like this for 4-4-4-5-5-5-5 cm, finish after a row from wrong side. Work 2 rows in stocking stitch (work the 2 outermost stitches in each side as before). Cast off somewhat loosely by knitting from the right side. ASSEMBLY: Sew the buttons on to left band. |
|
 |
|
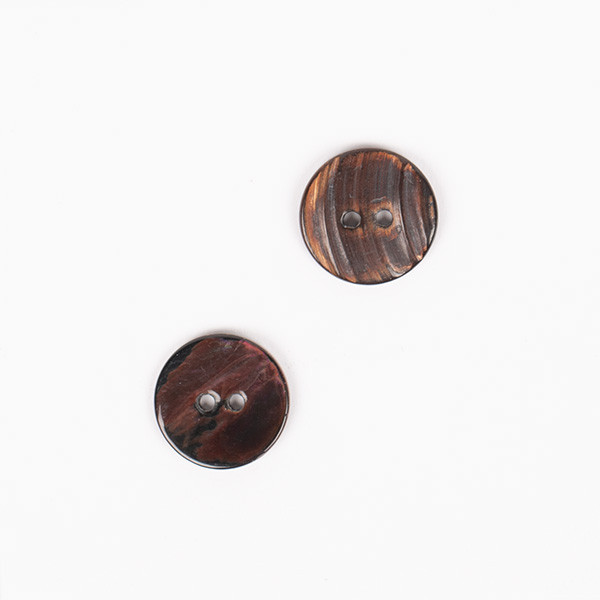
Have you finished this pattern?Tag your pictures with #dropspattern #autumnnutmegcardigan or submit them to the #dropsfan gallery. Do you need help with this pattern?You'll find 45 tutorial videos, a Comments/Questions area and more by visiting the pattern on garnstudio.com. © 1982-2026 DROPS Design A/S. We reserve all rights. This document, including all its sub-sections, has copyrights. Read more about what you can do with our patterns at the bottom of each pattern on our site. |
|


With over 40 years in knitting and crochet design, DROPS Design offers one of the most extensive collections of free patterns on the internet - translated to 17 languages. As of today we count 325 catalogues and 12298 patterns translated into English (UK/cm). 12298
We work hard to bring you the best knitting and crochet have to offer, inspiration and advice as well as great quality yarns at incredible prices! Would you like to use our patterns for other than personal use? You can read what you are allowed to do in the Copyright text at the bottom of all our patterns. Happy crafting!
Post a comment to pattern DROPS 262-8
We would love to hear what you have to say about this pattern!
If you want to leave a question, please make sure you select the correct category in the form below, to speed up the answering process. Required fields are marked *.