
Popular categories
Looking for a yarn?


Comments / Questions (80)
![]() Isabelle wrote:
Isabelle wrote:
Bonjour. Je fais ce gilet en taille 11/12 ans. Après les 20 augmentations, j'arrive à 113 mailles centrales +7+7 de bordure donc 127 mailles. Or, le diagramme fantaisie est sur 8 mailles. 113 :8 ne fait pas un compte rond.Il faudrait 112 mailles pour que ça tombe juste. Je ne comprends pas. Pouvez-vous m'éclairer s'il vous plaît. Bonne journée.
23.08.2025 - 15:43DROPS Design answered:
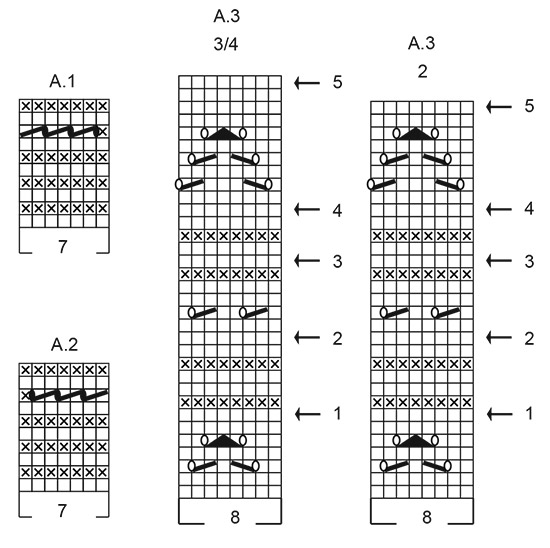
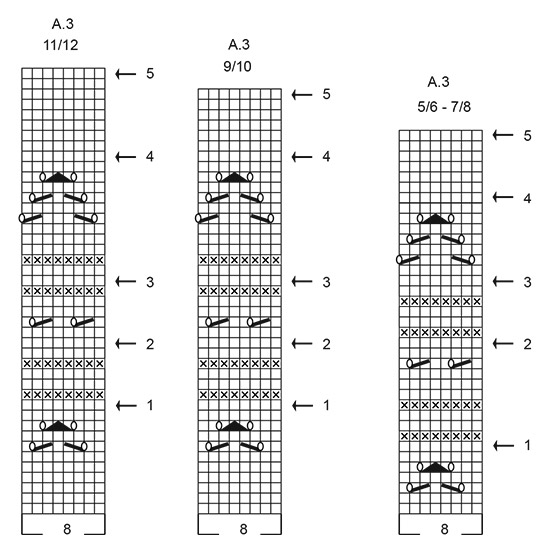
Bonjour Isabelle, tricotez ainsi: 7 m point mousse, répétez 14 fois les 8 mailles de A.3 , terminez par 1 m comme la 1ère maille de A.3 (ainsi le motif est symétrique) et 7 m point mousse = 7+(14x8)+1+7=127. Bon tricot!
25.08.2025 - 09:30
![]() Defferrard Monique wrote:
Defferrard Monique wrote:
Bonjour , pourriez_ vous m'expliquer, pour les manches du modèle Drops Children 47-7 si je dois prendre en une seule fois les 6 mailles ou en plusieurs fois ? Je suis perdue dans ce montage de manche. Merci de votre réponse .Cordialement
22.08.2025 - 12:55DROPS Design answered:
Bonjour Mme Defferrard, retrouvez cette étape de la manche dans cette leçon, à partir de la photo 18B (où on relève les mailles, les photos suivantes montre cette étape version A18A = en montant de nouvelles mailles qui seront cousues à celles montées pour le bas du vêtement). Bon tricot!
22.08.2025 - 15:09
![]() Johanna Meier wrote:
Johanna Meier wrote:
Werden da 3x2 Maschen zusammengestrickt und jeweils ein Umschlag dazwischen?
08.08.2025 - 07:56DROPS Design answered:
Liebe Frau Meier, in jeder 8. Reihe ja genauso wie in den Diagrammen A.1 (linke Blende) und A.2 (rechte Blende) gezeigt. Viel Spaß beim Stricken!
08.08.2025 - 08:11
![]() Meier Johanna wrote:
Meier Johanna wrote:
Bei den Knopflöchern ist nicht beschrieben, wie si abgenommen werden?
07.08.2025 - 17:39DROPS Design answered:
Liebe Johanna, es sind keine Extra Knopflöcher gestrickt, die Knöpfe werden durch die Löcher der rechten Blende zugeknöpft. Viel Spaß beim Stricken!
08.08.2025 - 07:40
![]() Lena Hellquist wrote:
Lena Hellquist wrote:
Hur gör man när man lägger upp 6 m i sidan under ärmen?
03.08.2025 - 13:54DROPS Design answered:
Hei Lena. Ta en titt på hjelpevideoene til genseren, se på: Hvordan strikke opp masker under erme (istedenfor å legge opp) OG Hvordan legge opp nye masker i siden på et arbeid (se på hvordan legge opp, deretter strikk maskene på bakstykket, før det legges opp nye masker til det andre ermet). mvh DROPS Design
04.08.2025 - 13:28
![]() Catherine wrote:
Catherine wrote:
Bonsoir Je ne comprends pas le démarrage : tricoter en cotes en aller et retours pendant 3cm.a la fin des 2 rangs suivant, monter 7 mailles.... Est ce à dire qu'il faut terminer les 3 cm avant de monter les 7 mailles? Merci de votre réponse
15.07.2025 - 20:26DROPS Design answered:
Bonjour Catherine, exactement. Il faut terminer les 3 cm avant de monter les 7 mailles de chaque cote des cotes. Bon tricot!
16.07.2025 - 14:49
![]() Jannie Mejer wrote:
Jannie Mejer wrote:
Skal til at strikke Running Circle cardigan i str. 104. Hvis strikkeprøven passer på pind nr. 3, betyder det så, at man skal strikke på på pind 3 og 2. Normalt står pind 3 og 4. Men ikke hvad pind prøven skal strikkes på.
12.07.2025 - 15:14
![]() Christiane wrote:
Christiane wrote:
Hallo, irgendwie mach ich was falsch. Das Muster A3 3/4 klappt mit 111 maschen nicht. 14 Bund und 97 Rest. Teilt sich nicht durch 8. komme mit dem Muster nicht hin.
01.07.2025 - 21:51DROPS Design answered:
Liebe Christiane, so stricken Sie in die 2. Größe: 7 BlendenMaschen, die 8 Maschen A.3 wiederholen bis 8 Maschen übrig sind (= 12 Mal), dann stricken Sie die 1. Masche A.3 (damit das Muster symmetrisch wird), und stricken Sie die 7 BlendenMaschen. Viel Spaß beim Stricken!
02.07.2025 - 16:19
![]() Christiane wrote:
Christiane wrote:
Ich komme mit den Diagramme nicht klar Werden sie von oben gelesen? Sind sie für die einzelnen großen angepasst? Welche gehört zu 98/104 ?
28.06.2025 - 22:08DROPS Design answered:
Liebe Christiane, die Diagramme werden von unten nach oben gelesen, die Hinreihen rechts nach links und die Rückreihen links nach rechts; schauen Sie mal die Symbolbeschreibung (1. und 2. Symbol), um zu wissen, wie die Maschen bei den Hin- und bei den Rückreihen gestrickt werden. Größe 98-104 ist 3/4 Jahre, so folgen Sie das Diagram A.3 für 3/4 Jahre. Viel Spaß beim Stricken!
30.06.2025 - 08:38
![]() Mühlenbeck Martha wrote:
Mühlenbeck Martha wrote:
Was heißt bei A1 und A2 die Wellenlänge,wie w ird das gestrickt?..Ich bedanke mich im voraus für Ihre Hilfe.
01.05.2025 - 13:22DROPS Design answered:
Liebe Frau Mühlenbeck, meinen Sie das 5. und das 6. Symbol? Die sind Abnahmen, mit dem 4. Symbol (Umschläge ) bleibt so die Maschenanzahl immer die gleiche. Viel Spaß beim Stricken!
02.05.2025 - 08:18
|
|||||||||||||||||||||||||
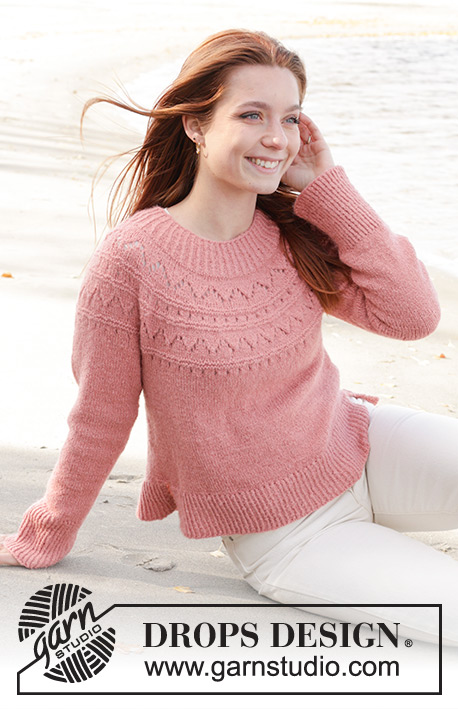
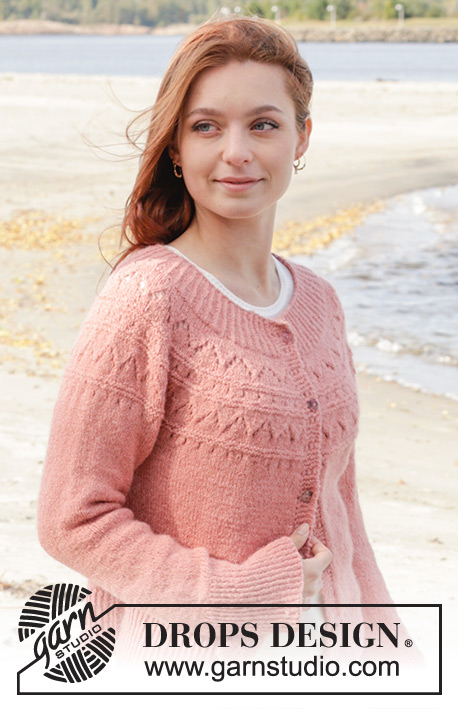
Running Circles Cardigan#runningcirclescardigan |
|||||||||||||||||||||||||
 |
 |
||||||||||||||||||||||||
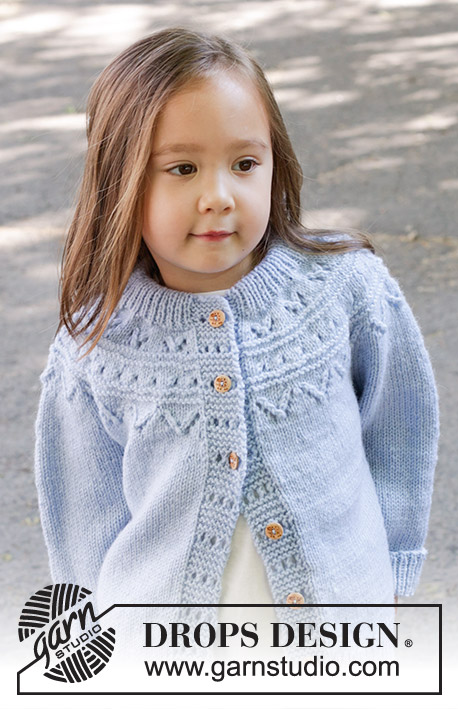
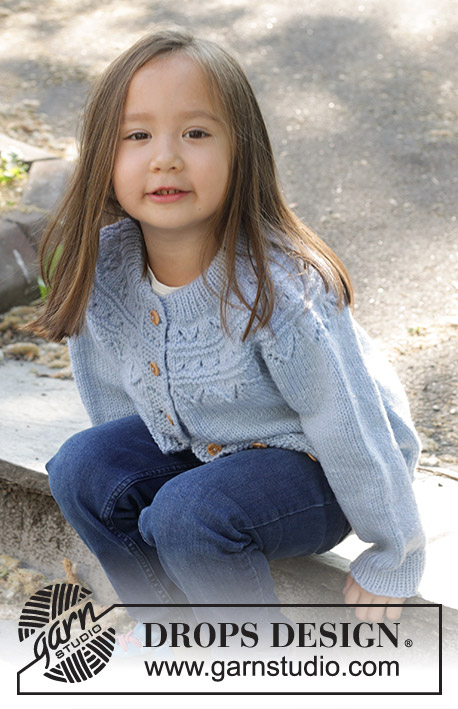
Knitted jacket for children in DROPS Karisma. The piece is worked top down with round yoke, lace pattern and double neck. Sizes 2 - 12 years.
DROPS Children 47-7 |
|||||||||||||||||||||||||
|
------------------------------------------------------- EXPLANATIONS FOR THE PATTERN: ------------------------------------------------------- GARTER STITCH (worked back and forth): Knit all rows. 1 ridge = knit 2 rows. PATTERN: See diagrams A.1 to A.3. Choose diagram for your size (applies to A.3). The diagrams show all rows in the pattern from the right side. When working A.3, the last stitch before the band is worked as the first stitch in A.3 so the pattern is symmetrical. INCREASE TIP: Increase 1 stitch by making 1 yarn over which is then worked twisted on the next row to avoid a hole. DECREASE TIP (for sleeves): Decrease 1 stitch on each side of the marker-thread as follows: Work until there are 3 stitches left before the marker-thread, knit 2 together, knit 2 (marker-thread sits between these 2 stitches), slip 1 stitch knit-wise, knit 1 and pass the slipped stitch over the knitted stitch. ------------------------------------------------------- START THE PIECE HERE: ------------------------------------------------------- JACKET – SHORT OVERVIEW OF THE PIECE. The neck and yoke are worked back and forth with circular needle, from mid front and top down as far as the armholes, then the body and sleeves are finished separately. The body is finished back and forth with circular needle. The sleeves are worked in the round with double pointed needles. Buttonholes are not worked, as the buttons are buttoned in the lace pattern on the band. DOUBLE NECK: Cast on 75-79-85-87-89-93 stitches with circular needle size 4 mm and DROPS Karisma. Change to circular needle size 3 mm. Purl 1 row from the wrong side. Work rib (knit 1, purl 1) until there is 1 stitch left, knit 1. Work this rib back and forth for 3 cm. At the end of the next 2 rows cast on 7 stitches in garter stitch for the bands = 89-93-99-101-103-107 stitches. On the next row from the right side work as follows: A.1 over the 7 band stitches, continue the rib as before until there are 7 stitches left, A.2 over the 7 band stitches. Continue this pattern until the rib measures 6½ cm from the cast-on edge and the next row is from the right side. YOKE: Work the 7 band stitches as before, knit until there are 7 stitches left, increasing 14-18-20-18-24-20 stitches evenly over these stitches - read INCREASE TIP, work the 7 band stitches as before = 103-111-119-119-127-127 stitches. Insert a marker; the yoke is measured from here. Change to circular needle size 4 mm. Purl 1 row from the wrong side (bands worked as before). Now work A.3 - read PATTERN in explanations above, and at the same time increase on each row marked with an arrow in A.3 as follows (bands worked as before): ARROW 1: Increase 24 stitches evenly spaced = 127-135-143-143-151-151 stitches. REMEMBER THE KNITTING TENSION! ARROW 2: Increase 24-24-28-28-32-32 stitches evenly spaced = 151-159-171-171-183-183 stitches. ARROW 3: Increase 24-24-28-28-32-32 stitches evenly spaced =175-183-199-199-215-215 stitches. ARROW 4: Increase 24-24-26-32-28-36 stitches evenly spaced = 199-207-225-231-243-251 stitches. ARROW 5: Increase 26-30-26-32-32-36 stitches evenly spaced = 225-237-251-263-275-287 stitches Continue with stocking stitch (bands worked as before) until the yoke measures 13-14-15-16-17-18 cm from the marker. Now divide for the body and sleeves as follows from the right side: Work the first 37-39-42-44-46-48 stitches as before (left front piece), place the next 44-46-48-50-52-54 stitches on a thread, without working them (sleeve), cast on 6 stitches under the sleeve, knit 63-67-71-75-79-83 (back piece), place the next 44-46-48-50-52-54 stitches on a thread, without working them(sleeve), cast on 6 stitches under the sleeve, work the last 37-39-42-44-46-48 stitches as before (right front piece). The piece is now measured from here! BODY: = 149-157-167-175-183-191 stitches. Continue back and forth as before for a further 13-15-18-21-24-25 cm, with the next row from the right side (approx. 4 cm left; try the jacket on and work to desired length). Work the bands in GARTER STITCH – see explanation above, and stocking stitch over the other stitches, increasing 28-30-30-32-33-36 stitches evenly over the stocking stitches = 177-187-197-207-216-227 stitches. Purl back from the wrong side (bands in garter stitch). Change to circular needle size 3 mm and work rib as follows from the right side: 7 band stitches in garter stitch, rib (knit 1, purl 1) until there are 8 stitches left, knit 1, worked 7 band stitches in garter stitch. Continue this rib for 4 cm. Cast off a little loosely with knit over knit and purl over purl. The jacket measures approx. 33-36-40-44-48-50 cm from the shoulder. SLEEVES: Place the 44-46-48-50-52-54 stitches from the thread on the one side of the piece on double pointed needles size 4 mm and knit up 1 stitch in each of the 6 stitches cast on under the sleeve = 50-52-54-56-58-60 stitches. Insert a marker-thread in the middle of the new stitches under the sleeve and allow it to follow your work onwards. Work stocking stitch in the round. When the sleeve measures 4 cm, decrease 1 stitch on each side of the marker-thread – read DECREASE TIP. Decrease like this every 2½-3½-4½-5-6-7 cm a total of 5 times = 40-42-44-46-48-50 stitches. Work until the sleeve measures 16-20-24-28-31-35 cm from the division (or to desired length. There is approx. 4 cm left). Knit 1 round and increase 4 stitches evenly spaced = 44-46-48-50-52-54 stitches. Change to double pointed needles size 3 mm and work rib (knit 1, purl 1) for 4 cm. Cast off with knit over knit and purl over purl. Work the other sleeve in the same way. ASSEMBLY: Fold the neck double to the inside and sew down. To avoid the neck being tight and rolling outwards, it is important that the seam is elastic. Sew the openings together mid-front with small stitches. Sew the buttons onto the left band; the top button is positioned so it can be buttoned through the first row of the lace pattern on the band and the other buttons positioned evenly down the band. |
|||||||||||||||||||||||||
Diagram explanations |
|||||||||||||||||||||||||
|
|||||||||||||||||||||||||
 |
|||||||||||||||||||||||||
 |
|||||||||||||||||||||||||
 |
|||||||||||||||||||||||||
Have you finished this pattern?Tag your pictures with #dropspattern #runningcirclescardigan or submit them to the #dropsfan gallery. Do you need help with this pattern?You'll find 31 tutorial videos, a Comments/Questions area and more by visiting the pattern on garnstudio.com. © 1982-2026 DROPS Design A/S. We reserve all rights. This document, including all its sub-sections, has copyrights. Read more about what you can do with our patterns at the bottom of each pattern on our site. |
|||||||||||||||||||||||||


With over 40 years in knitting and crochet design, DROPS Design offers one of the most extensive collections of free patterns on the internet - translated to 17 languages. As of today we count 324 catalogues and 12290 patterns translated into English (UK/cm). 12290
We work hard to bring you the best knitting and crochet have to offer, inspiration and advice as well as great quality yarns at incredible prices! Would you like to use our patterns for other than personal use? You can read what you are allowed to do in the Copyright text at the bottom of all our patterns. Happy crafting!
Post a comment to pattern DROPS Children 47-7
We would love to hear what you have to say about this pattern!
If you want to leave a question, please make sure you select the correct category in the form below, to speed up the answering process. Required fields are marked *.