
Popular categories
Looking for a yarn?


Comments / Questions (76)
![]() Melusson wrote:
Melusson wrote:
Je ne comprends pas le point fantaisie du motif A.1. rang 3. peut-on m'expliquer ? Merci beaucoup
23.10.2025 - 14:32DROPS Design answered:
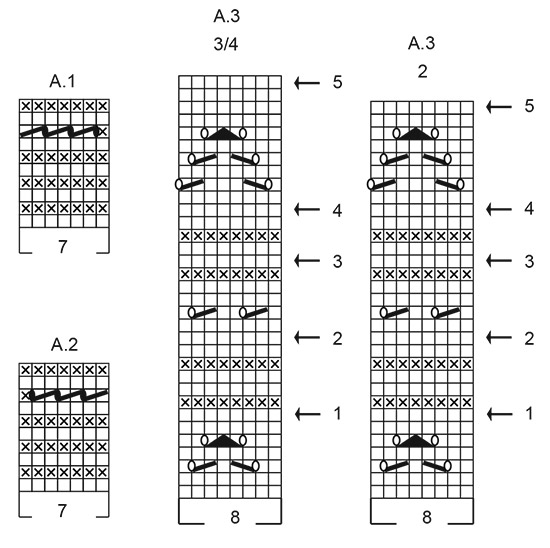
Bonjour Mme Melusson, les diagrammes A.1 et A.2 se tricotent au point mousse (lisez les diagrammes de bas en haut, pas de haut en bas), et, au 8ème rang, tricotez ainsi (sur l'envers): A.1 = (2 m ens à l'end, 1 jeté) x 3, 1 m end; et A.2 = 1 m end, (1 jeté, 2 m ens à l'end)x3. Bon tricot!
29.10.2025 - 14:37
![]() Patricia wrote:
Patricia wrote:
How do I print this pattern?
13.10.2025 - 19:59DROPS Design answered:
Hi, Patricia, you can click the printer icon to the right of the pattern title and choose "Print pattern". Regards, DROPS Design
21.10.2025 - 11:42
![]() Anne Marie wrote:
Anne Marie wrote:
I am at the point dividing for the body and sleeves. How do I cast on 6 stitches under the sleeve?
11.10.2025 - 04:49DROPS Design answered:
Dear Anne Marie, you simply cast on stitches on the hole left by the sleeve stitches in the thread, in order to connect the front piece and back piece. You can cast on as indicated in this video. Happy knitting!
12.10.2025 - 18:44
![]() Françoise wrote:
Françoise wrote:
Pour le modèle Running circles cardigan, je ne comprends pas le diagramme A1. A quoi correspond la ligne en forme de vague noire? Merci
07.10.2025 - 16:33DROPS Design answered:
Bonjour Françoise, au 8ème rang de A.1 (sur l'envers), tricotez ainsi (en lisant de gauche à droite): (2 mailles ensemble à l'endroit, 1 jeté) x 3, et terminez par 1 maille endroit. Au même rang de A.2, tricotez: 1 maille endroit, (1 jeté, 2 mailles ensemble à l'endroit) x 2. Au rang suivant (sur l'endroit), tricotez les jetés à l'endroit. Bon tricot!
07.10.2025 - 16:59
![]() María José, Alférez Piquer wrote:
María José, Alférez Piquer wrote:
Quisiera el patrón de 3/4 sños
03.10.2025 - 07:45
![]() Anne Marie wrote:
Anne Marie wrote:
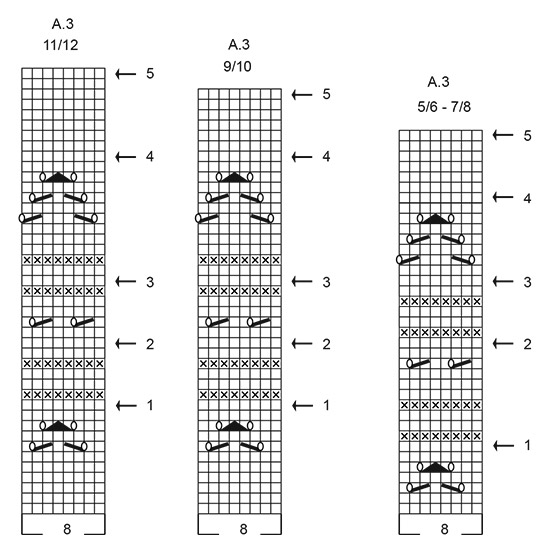
I am having a great deal of difficulty understanding the pattern grid. When when knitting row 9 in A3 size 9/10 is it Knit 3, make 1 yarn over, slip 2 stitches as if to knit together, knit 1 and pass the slipped stitches over the knitted stitch, 1 yarn over, Knit 2 ? 02.10.2025 - 21:01
02.10.2025 - 22:26DROPS Design answered:
Hi Anne Marie, Row 9 in A.3 for your size is, as you say: Knit 3, make 1 yarn over, slip 2 stitches as if to knit together, knit and pass both slipped stitches over the knitted stitch, make 1 yarn over and knit 2. Regards, Drops Team.
03.10.2025 - 06:22
![]() Anne Marie wrote:
Anne Marie wrote:
I am having a great deal of difficulty understanding the pattern grid. When when knitting row 9 in A3 size 9/10 is it Knit 3, make 1 yarn over, slip 2 stitches as if to knit together, knit 1 and pass the slipped stitches over the knitted stitch, 1 yarn over, Knit 2 ?
02.10.2025 - 21:01DROPS Design answered:
Hi Anne Marie, exactly: Knit 3, make 1 yarn over, [slip 2 stitches as if to knit together, knit 1 and pass the slipped stitches over the knitted stitch > 1 stitch out from 3 remains; 2 sts decreased], 1 yarn over, Knit 2. Happy knitting!
03.10.2025 - 09:47
![]() Anne Marie wrote:
Anne Marie wrote:
Thank you! So when knitting row 9 in A3 size 9/10 is it Knit 3, make 1 yarn over, slip 2 stitches as if to knit together, knit 1 and pass the slipper stitches over the knitted stitch, 1 yarn over, Knit 2 ?
01.10.2025 - 14:58DROPS Design answered:
Hi Anne Marie, exactly. Happy knitting!
03.11.2025 - 08:03
![]() Anne Marie wrote:
Anne Marie wrote:
Hi! I am knitting row7 of A3 ( size 9/10). Please confirm if I am reading this correctly: K1, YO, (slip stitch then K1 and pass the slip stitch over the knitted one)x2, K2tog, YO.
01.10.2025 - 03:02DROPS Design answered:
Hi Anne Marie, Row 7 is : Knit 2, make 1 yarn over, (slip stitch, knit 1 pass slipped stitch over), knit 1, knit 2 together, make 1 yarn over, knit 1. Regards, Drops Team.
01.10.2025 - 06:48
![]() Anne Marie wrote:
Anne Marie wrote:
I don't understand the increase tip on how to increase in the work that I'm doing. Is there a video /tutorial that I can view?
25.09.2025 - 14:17
|
|||||||||||||||||||||||||
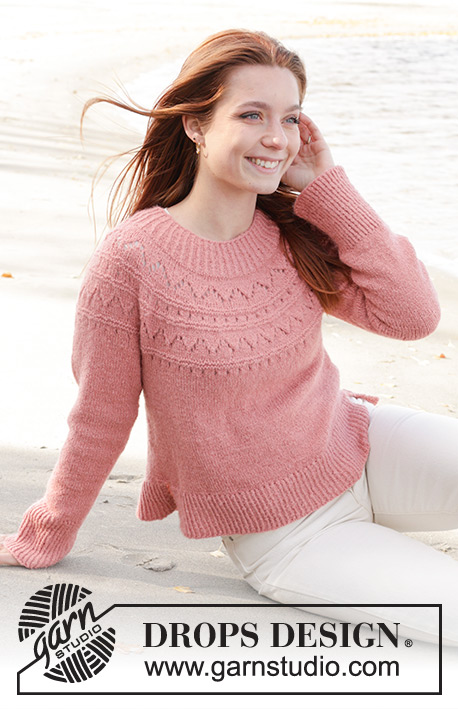
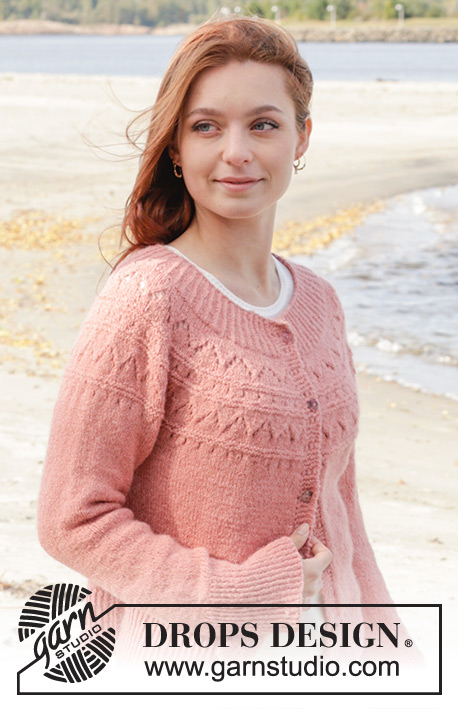
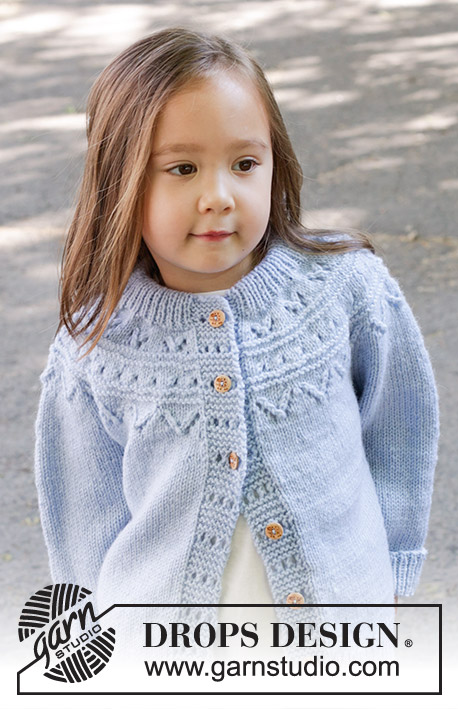
Running Circles Cardigan#runningcirclescardigan |
|||||||||||||||||||||||||
 |
 |
||||||||||||||||||||||||
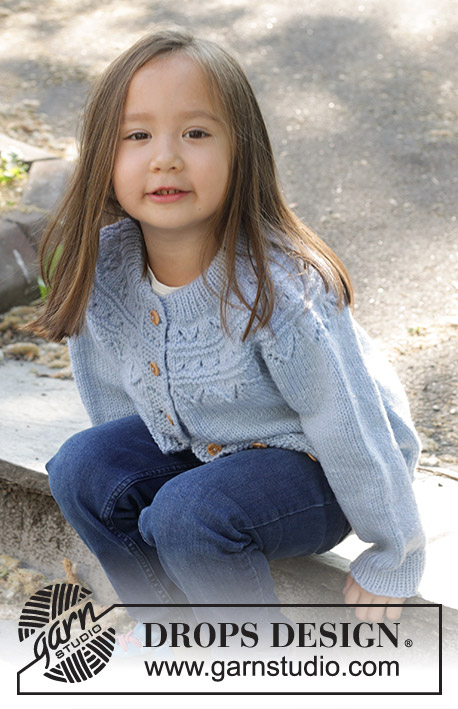
Knitted jacket for children in DROPS Karisma. The piece is worked top down with round yoke, lace pattern and double neck. Sizes 2 - 12 years.
DROPS Children 47-7 |
|||||||||||||||||||||||||
|
------------------------------------------------------- EXPLANATIONS FOR THE PATTERN: ------------------------------------------------------- GARTER STITCH (worked back and forth): Knit all rows. 1 ridge = knit 2 rows. PATTERN: See diagrams A.1 to A.3. Choose diagram for your size (applies to A.3). The diagrams show all rows in the pattern from the right side. When working A.3, the last stitch before the band is worked as the first stitch in A.3 so the pattern is symmetrical. INCREASE TIP: Increase 1 stitch by making 1 yarn over which is then worked twisted on the next row to avoid a hole. DECREASE TIP (for sleeves): Decrease 1 stitch on each side of the marker-thread as follows: Work until there are 3 stitches left before the marker-thread, knit 2 together, knit 2 (marker-thread sits between these 2 stitches), slip 1 stitch knit-wise, knit 1 and pass the slipped stitch over the knitted stitch. ------------------------------------------------------- START THE PIECE HERE: ------------------------------------------------------- JACKET – SHORT OVERVIEW OF THE PIECE. The neck and yoke are worked back and forth with circular needle, from mid front and top down as far as the armholes, then the body and sleeves are finished separately. The body is finished back and forth with circular needle. The sleeves are worked in the round with double pointed needles. Buttonholes are not worked, as the buttons are buttoned in the lace pattern on the band. DOUBLE NECK: Cast on 75-79-85-87-89-93 stitches with circular needle size 4 mm and DROPS Karisma. Change to circular needle size 3 mm. Purl 1 row from the wrong side. Work rib (knit 1, purl 1) until there is 1 stitch left, knit 1. Work this rib back and forth for 3 cm. At the end of the next 2 rows cast on 7 stitches in garter stitch for the bands = 89-93-99-101-103-107 stitches. On the next row from the right side work as follows: A.1 over the 7 band stitches, continue the rib as before until there are 7 stitches left, A.2 over the 7 band stitches. Continue this pattern until the rib measures 6½ cm from the cast-on edge and the next row is from the right side. YOKE: Work the 7 band stitches as before, knit until there are 7 stitches left, increasing 14-18-20-18-24-20 stitches evenly over these stitches - read INCREASE TIP, work the 7 band stitches as before = 103-111-119-119-127-127 stitches. Insert a marker; the yoke is measured from here. Change to circular needle size 4 mm. Purl 1 row from the wrong side (bands worked as before). Now work A.3 - read PATTERN in explanations above, and at the same time increase on each row marked with an arrow in A.3 as follows (bands worked as before): ARROW 1: Increase 24 stitches evenly spaced = 127-135-143-143-151-151 stitches. REMEMBER THE KNITTING TENSION! ARROW 2: Increase 24-24-28-28-32-32 stitches evenly spaced = 151-159-171-171-183-183 stitches. ARROW 3: Increase 24-24-28-28-32-32 stitches evenly spaced =175-183-199-199-215-215 stitches. ARROW 4: Increase 24-24-26-32-28-36 stitches evenly spaced = 199-207-225-231-243-251 stitches. ARROW 5: Increase 26-30-26-32-32-36 stitches evenly spaced = 225-237-251-263-275-287 stitches Continue with stocking stitch (bands worked as before) until the yoke measures 13-14-15-16-17-18 cm from the marker. Now divide for the body and sleeves as follows from the right side: Work the first 37-39-42-44-46-48 stitches as before (left front piece), place the next 44-46-48-50-52-54 stitches on a thread, without working them (sleeve), cast on 6 stitches under the sleeve, knit 63-67-71-75-79-83 (back piece), place the next 44-46-48-50-52-54 stitches on a thread, without working them(sleeve), cast on 6 stitches under the sleeve, work the last 37-39-42-44-46-48 stitches as before (right front piece). The piece is now measured from here! BODY: = 149-157-167-175-183-191 stitches. Continue back and forth as before for a further 13-15-18-21-24-25 cm, with the next row from the right side (approx. 4 cm left; try the jacket on and work to desired length). Work the bands in GARTER STITCH – see explanation above, and stocking stitch over the other stitches, increasing 28-30-30-32-33-36 stitches evenly over the stocking stitches = 177-187-197-207-216-227 stitches. Purl back from the wrong side (bands in garter stitch). Change to circular needle size 3 mm and work rib as follows from the right side: 7 band stitches in garter stitch, rib (knit 1, purl 1) until there are 8 stitches left, knit 1, worked 7 band stitches in garter stitch. Continue this rib for 4 cm. Cast off a little loosely with knit over knit and purl over purl. The jacket measures approx. 33-36-40-44-48-50 cm from the shoulder. SLEEVES: Place the 44-46-48-50-52-54 stitches from the thread on the one side of the piece on double pointed needles size 4 mm and knit up 1 stitch in each of the 6 stitches cast on under the sleeve = 50-52-54-56-58-60 stitches. Insert a marker-thread in the middle of the new stitches under the sleeve and allow it to follow your work onwards. Work stocking stitch in the round. When the sleeve measures 4 cm, decrease 1 stitch on each side of the marker-thread – read DECREASE TIP. Decrease like this every 2½-3½-4½-5-6-7 cm a total of 5 times = 40-42-44-46-48-50 stitches. Work until the sleeve measures 16-20-24-28-31-35 cm from the division (or to desired length. There is approx. 4 cm left). Knit 1 round and increase 4 stitches evenly spaced = 44-46-48-50-52-54 stitches. Change to double pointed needles size 3 mm and work rib (knit 1, purl 1) for 4 cm. Cast off with knit over knit and purl over purl. Work the other sleeve in the same way. ASSEMBLY: Fold the neck double to the inside and sew down. To avoid the neck being tight and rolling outwards, it is important that the seam is elastic. Sew the openings together mid-front with small stitches. Sew the buttons onto the left band; the top button is positioned so it can be buttoned through the first row of the lace pattern on the band and the other buttons positioned evenly down the band. |
|||||||||||||||||||||||||
Diagram explanations |
|||||||||||||||||||||||||
|
|||||||||||||||||||||||||
 |
|||||||||||||||||||||||||
 |
|||||||||||||||||||||||||
 |
|||||||||||||||||||||||||
Have you finished this pattern?Tag your pictures with #dropspattern #runningcirclescardigan or submit them to the #dropsfan gallery. Do you need help with this pattern?You'll find 30 tutorial videos, a Comments/Questions area and more by visiting the pattern on garnstudio.com. © 1982-2026 DROPS Design A/S. We reserve all rights. This document, including all its sub-sections, has copyrights. Read more about what you can do with our patterns at the bottom of each pattern on our site. |
|||||||||||||||||||||||||


With over 40 years in knitting and crochet design, DROPS Design offers one of the most extensive collections of free patterns on the internet - translated to 17 languages. As of today we count 324 catalogues and 12239 patterns translated into English (UK/cm). 12239
We work hard to bring you the best knitting and crochet have to offer, inspiration and advice as well as great quality yarns at incredible prices! Would you like to use our patterns for other than personal use? You can read what you are allowed to do in the Copyright text at the bottom of all our patterns. Happy crafting!
Post a comment to pattern DROPS Children 47-7
We would love to hear what you have to say about this pattern!
If you want to leave a question, please make sure you select the correct category in the form below, to speed up the answering process. Required fields are marked *.