
Popular categories
Looking for a yarn?


Comments / Questions (61)
![]() Carlotta wrote:
Carlotta wrote:
Salve, nella lavorazione del collo c'è scritto: "lavorare ogni 4° maglia insieme alla maglia corrispondente sul bordo di avvio". Significa ogni 4 maglie? Il collo così realizzato rimane aperto, come se ci fosse una taschina ogni 4 maglie.
26.03.2024 - 13:09DROPS Design answered:
Buonasera Carlotta, si esatto. la 4° maglia viene lavorata insieme alla corrispondente. Buon lavoro!
28.03.2024 - 19:14
![]() Susanne wrote:
Susanne wrote:
Er det mulig og strikke genseren uten fortkortede pinner og heller bare vanlig raglan økning?
11.03.2024 - 17:01DROPS Design answered:
Hei Susanne, Det kan du gjøre. Det betyr at bak- og forstykket blir like lange. Du hopper over Halsringning og går direkte til riktige størrelse, strikke rundt og øke til raglan riktige antall ganger (totalt) på begge sidene av alle merkene. God fornøyelse!
12.03.2024 - 10:59
![]() Amy Weiss wrote:
Amy Weiss wrote:
In making the neckline, the video, and the explanation for the video, show 8 stitches increased row one, and none on the short purl rows. The written pattern is different?
02.03.2024 - 23:28DROPS Design answered:
Dear Amy, unless a video specifically mentions the pattern in its title it will be a general use video, which is applied to many patterns. They are there to serve as guides to understand how a technique or structure is generally worked but not a step-by-step tutorial of the pattern. Always follow the written instructions of the pattern first. Happy knitting!
04.03.2024 - 00:14
![]() Amy Weiss wrote:
Amy Weiss wrote:
Disregard my previous question, I see it is still the 6” from the video
01.03.2024 - 05:01
![]() Amy Weiss wrote:
Amy Weiss wrote:
Probably dumb question, but is this the 16", or 32" size 8 needle I change to "NECKLINE: Change to circular needle size 5 MM = US 8
29.02.2024 - 23:28DROPS Design answered:
Hi Amy, If you have too few stitches for the 32" needle, then begin with the 16" and change to the longer needle when necessary. Happy knitting!
01.03.2024 - 08:14
![]() Amy Weiss wrote:
Amy Weiss wrote:
Is the gauge with the larger, or smaller needles?
23.02.2024 - 23:07DROPS Design answered:
Dear Mrs Weiss, tension is measured with larger needles. Happy knitting!
26.02.2024 - 07:50
![]() Glenis wrote:
Glenis wrote:
I have a problem with the increase row for medium you start with 92 stitches and increase 4 so therefore should finish at 96 stitches. But you knit 12 Add. 1 Knit 21 Knit 23 Add 2 Knit. 21 Knit. 11 Add. 1 TOTAL. =. 92 stitches NOT 96 I am confused please can you help me.
14.02.2024 - 19:29DROPS Design answered:
Hi Glenis, As you say, you start with 92 stitches, increase 1 on half back piece, 2 on front pieceand 1 stitch on the other half of back piece. This is 4 increased stitches and leaves you with 96 stitches. Happy knitting!
15.02.2024 - 06:47
![]() Pia wrote:
Pia wrote:
Hej ,jag vill sticka denna tröja i Drops snow och stickor 8 eller 9 mm. Hur går jag tillväga? Stickar mot hårdare hållet. Skall jag lägga upp lika många maskor som i uppskriften eller måste jag öka? Hur mycket behöver jag öka antalet maskor i sådana fall? Skall sticka st.XL Tacksam för råd .
10.02.2024 - 23:01DROPS Design answered:
Hej Pia Det blir svårt att sticka just denna med Snow eftersom det är en helt annan stickfasthet, men vi har flera mönster i garngrupp E som liknar denna som du kan sticka i Snow. Se t.ex. på mönster 236-22. Mvh DROPS Design
15.02.2024 - 13:39
![]() Mercè Crosas wrote:
Mercè Crosas wrote:
Al final lo he deducido con los videos. No se pone el marcador entre puntos, sino en un punto que tambien se teje. Deveriais explicarlo asi.
30.01.2024 - 21:46
![]() Mercè Crosas wrote:
Mercè Crosas wrote:
Una vez tengo el cuello doblado, con 88 puntos , en la siguiente vuelta al dividir en 4 partes y hacer los aumentos tendria que dar 92, pero da 88
30.01.2024 - 16:39DROPS Design answered:
Hola Mercè, ten en cuenta que cada marcapuntos se inserta dentro de un punto. Tejer 10 puntos derechos y aumentar 1 punto (mitad pieza de la espalda), insertar el marcador-1 en el punto siguiente (=1), tejer 21 puntos derechos (manga), insertar el marcador-2 en el punto siguiente (=1), tejer 21 puntos derechos y aumentar 2 puntos distribuidos equitativamente (pieza del frente), insertar el marcador-3 en el punto siguiente (=1), tejer 21 puntos derechos (manga), insertar el marcador-4 en el punto siguiente (=1), tejer de derecho sobre los últimos 11 puntos y aumentar 1 punto (mitad pieza de la espalda) = 92 puntos.
04.02.2024 - 23:51
|
|
Meet the Captain#meetthecaptainsweater |
|
 |
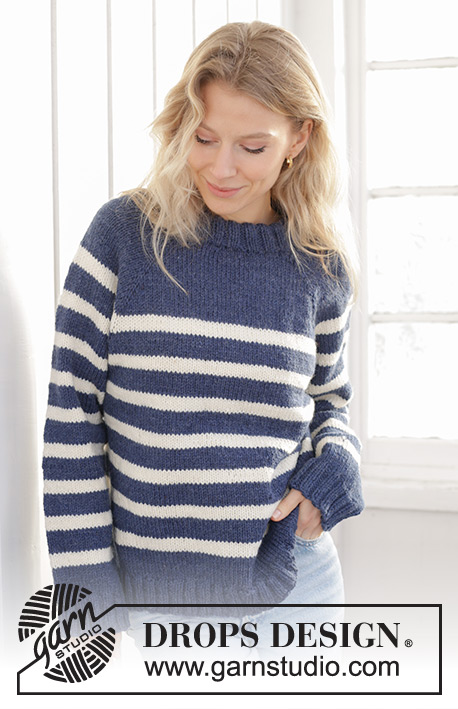 |
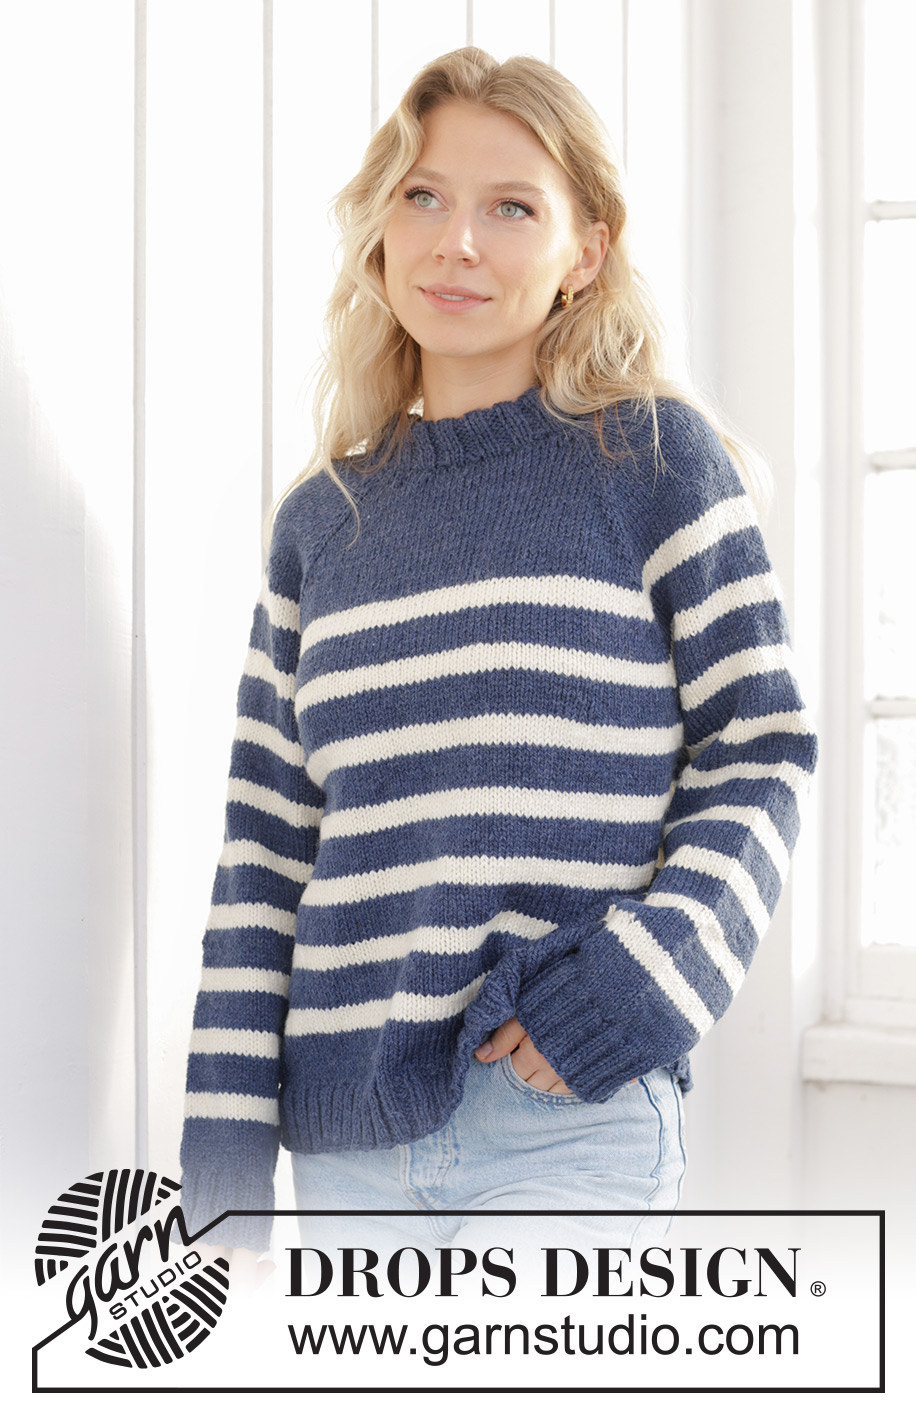
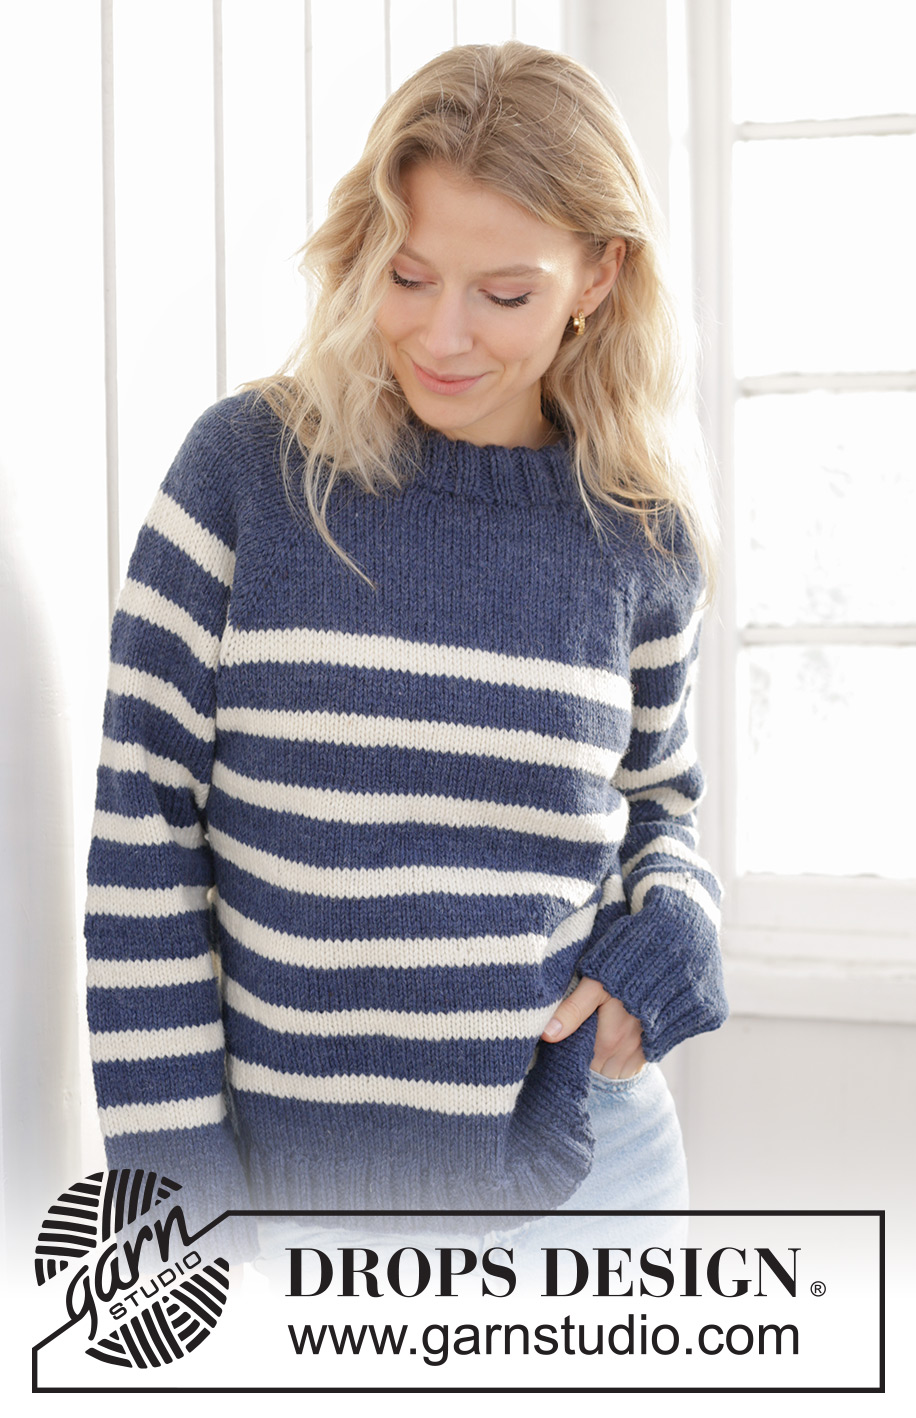
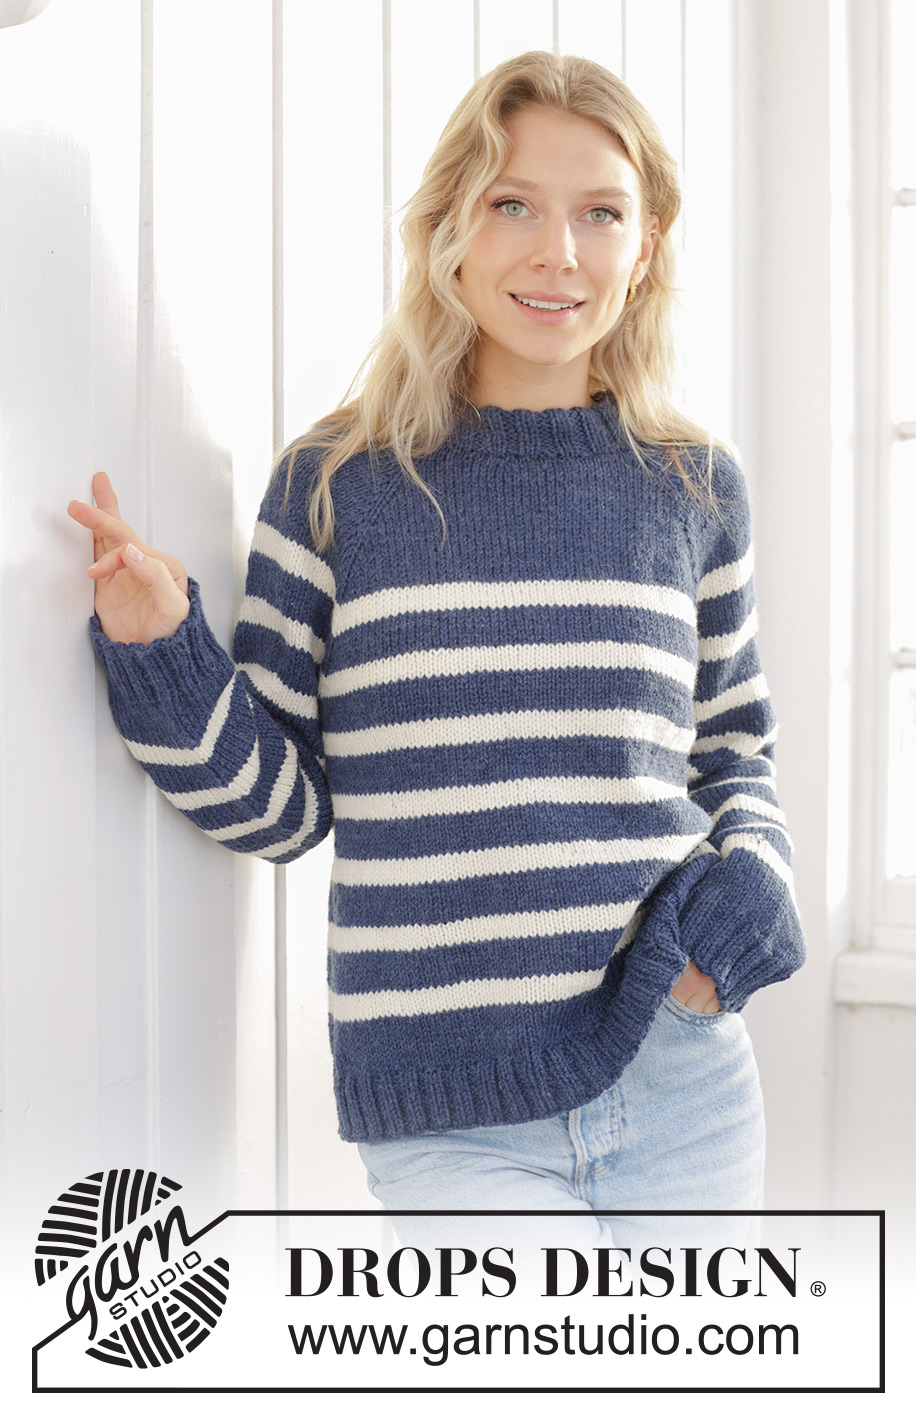
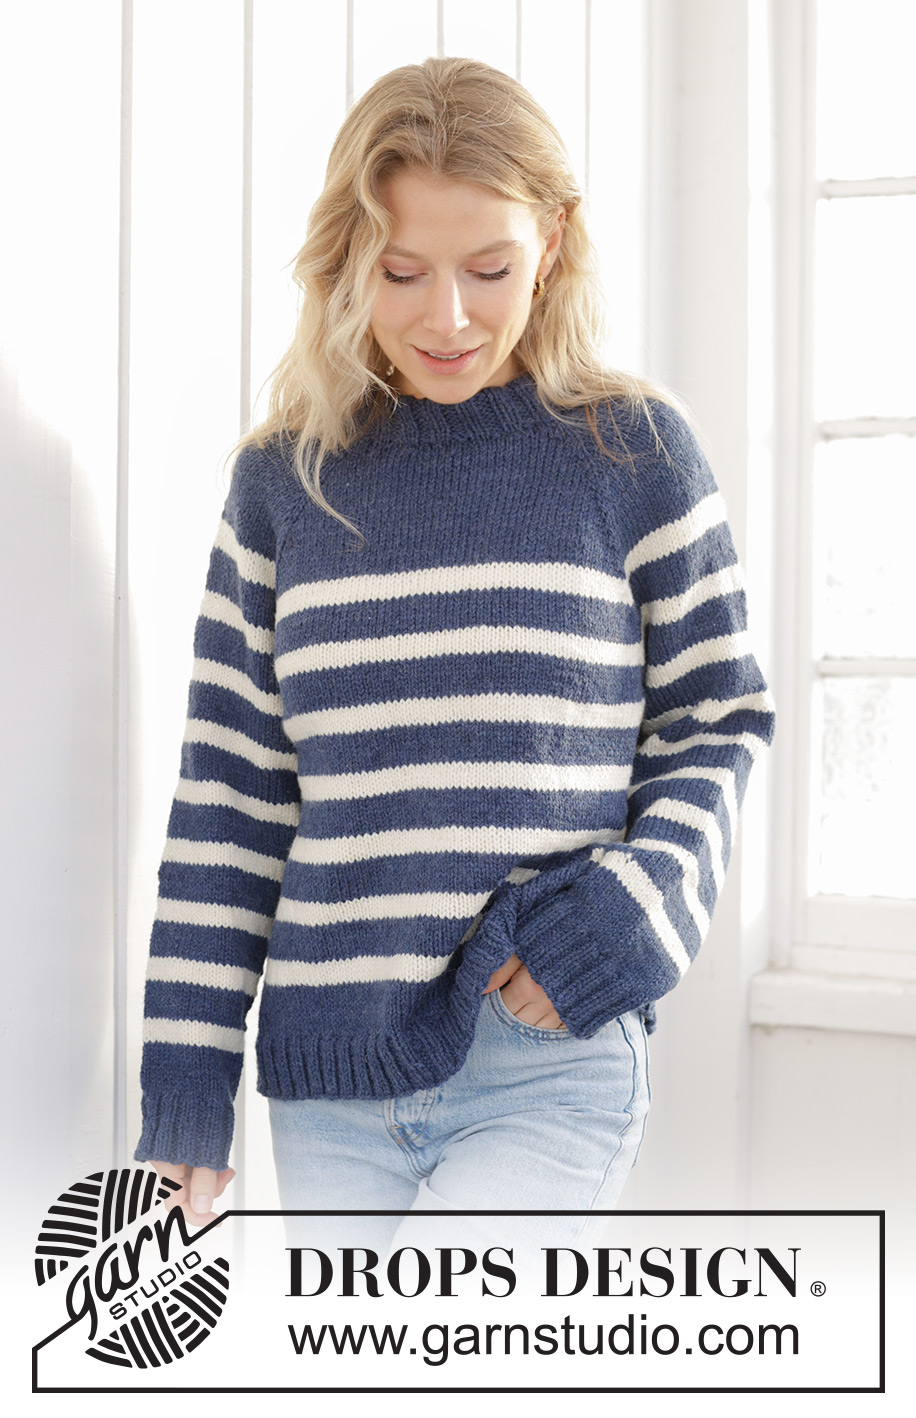
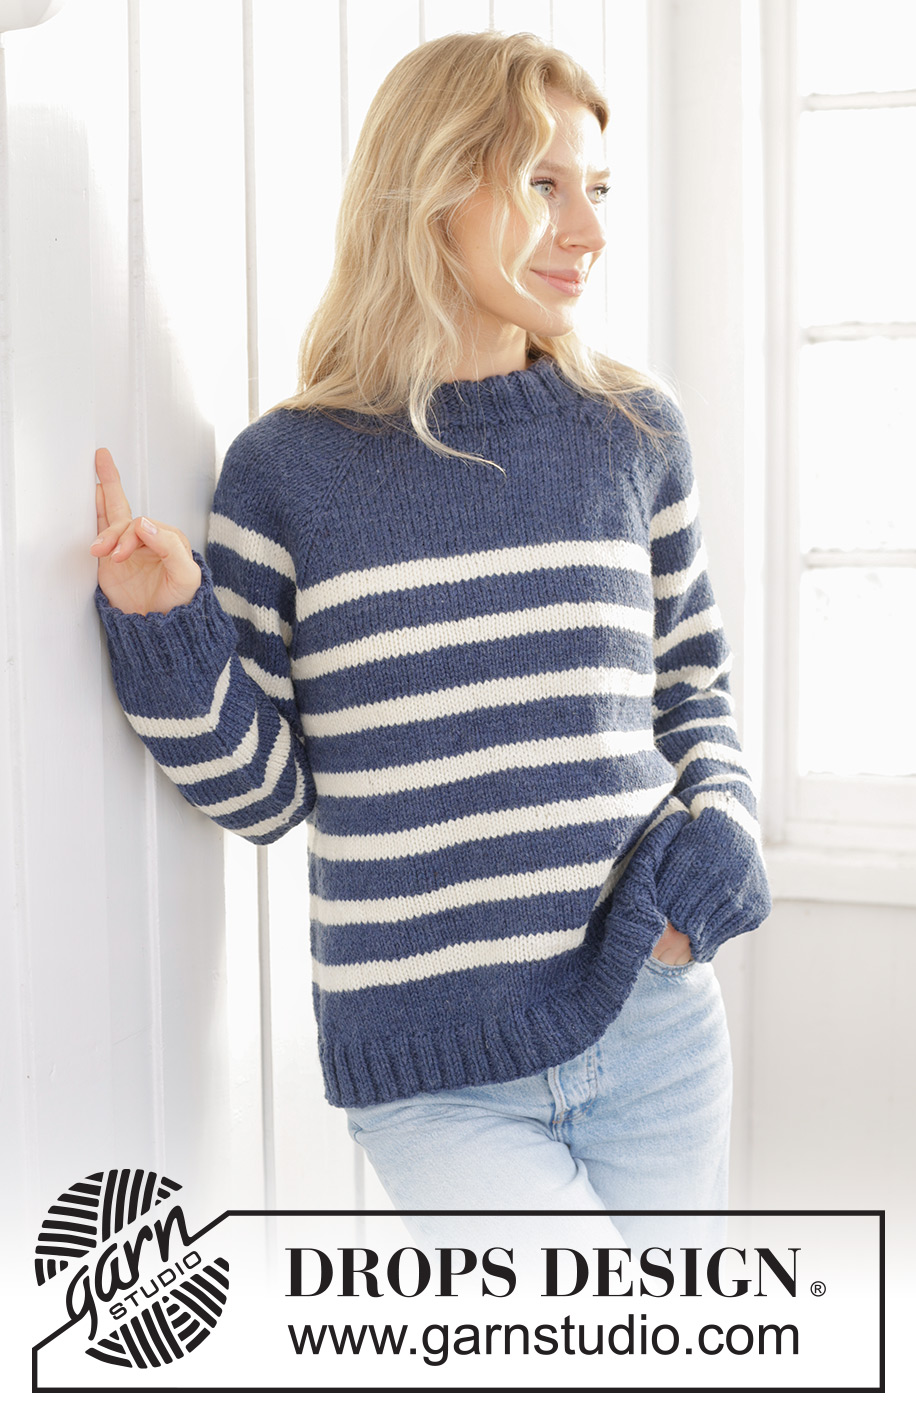
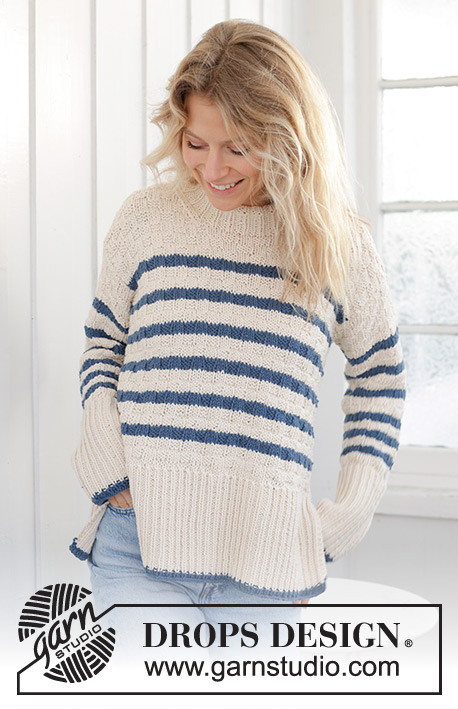
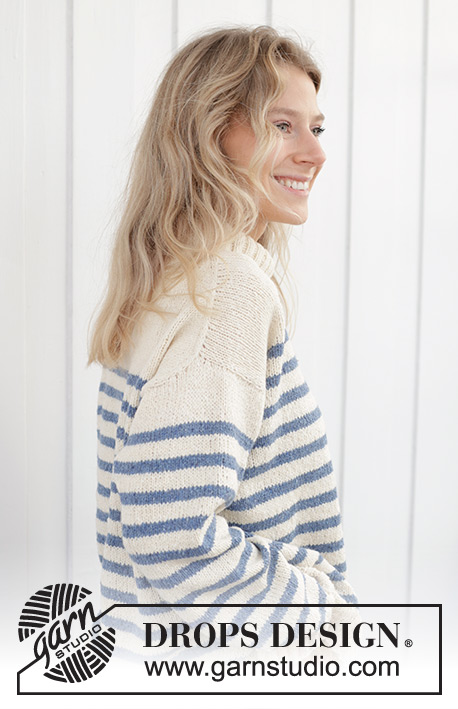
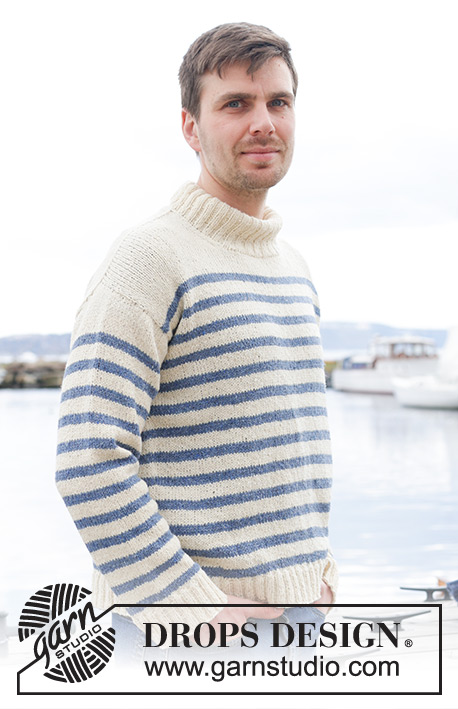
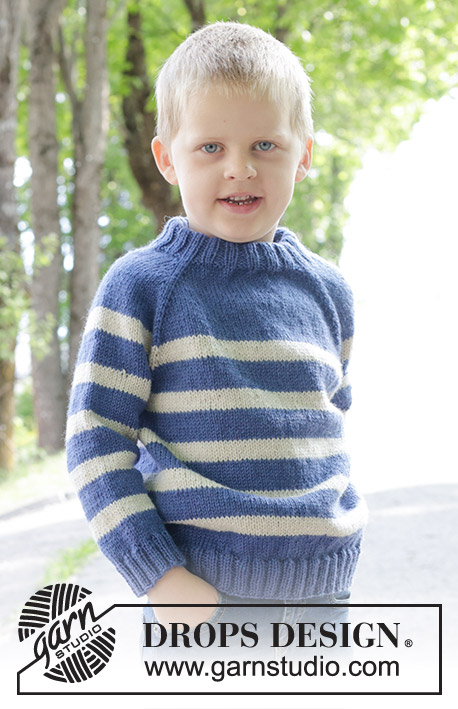
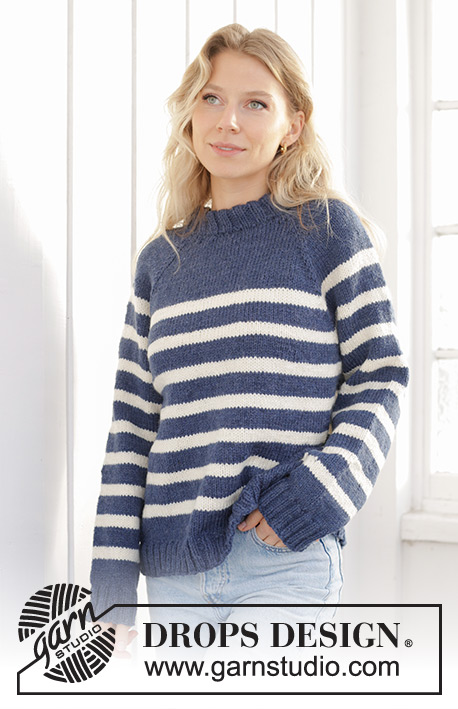
Knitted jumper in DROPS Alaska. The piece is worked top down with stocking stitch, stripes, double neck and raglan. Sizes S - XXXL.
DROPS 239-38 |
|
|
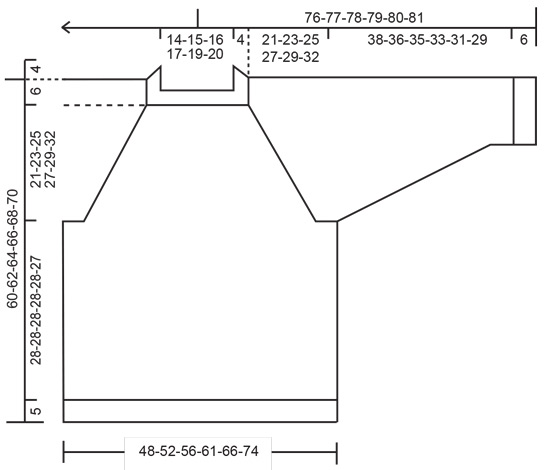
------------------------------------------------------- EXPLANATIONS FOR THE PATTERN: ------------------------------------------------------- RAGLAN: All increases are worked before/after 1 stocking stitch (marker-stitch). Increase for the body before markers 1 and 3 and after markers 2 and 4 when working from the right side; after markers 1 and 3 and before markers 2 and 4 when working from the wrong side. Increase for the sleeves after markers 1 and 3 and before markers 2 and 4 when working from the right side / after markers 2 and 4 and before markers 1 and 3 when working from wrong side Increase 1 stitch by making 1 yarn over. Yarn overs are worked as follows from the wrong side: BEFORE MARKER: Purl in back loop avoiding a hole. AFTER MARKER: Slip yarn over off the left needle and place it back the other way round (insert the left needle from the back when replacing it). Purl in front loop avoiding a hole. Yarn overs are worked as follows from the right side: BEFORE MARKER: Slip yarn over off the left needle and place it back the other way round (insert the left needle from the back when replacing it). Knit in front loop avoiding a hole (stitch leans to the right). AFTER MARKER: Knit in back loop (stitch leans to the left) to avoid a hole. STRIPES: Start at marker-1 (so the change of colours is not visible on the back piece) and work as follows: * 5 rounds of colour off white (approx. 2 cm), 8 rounds of colour dark blue (approx. 3.5 cm) *, repeat from *-*. DECREASE TIP (for sleeves): Start 3 stitches before the marker-thread, knit 2 together, knit 2 (marker-thread sits between these 2 stitches), slip 1 stitch as if to knit, knit 1 and pass the slipped stitch over the knitted stitch. ------------------------------------------------------- START THE PIECE HERE: ------------------------------------------------------- JUMPER – SHORT OVERVIEW OF THE PIECE: The neck and yoke are worked in the round with circular needle, from mid back and top down. The yoke is divided for body and sleeves and the body is continued in the round with circular needle. The sleeves are worked with short circular needle/double pointed needles. DOUBLE NECK: Cast on 88-92-96-100-104-108 stitches with colour dark blue DROPS Alaska, using short circular needles size 5 and 4 mm held together. Remove the needle size 5 mm (this gives you an elastic cast-on edge) keeping stitches on needle size 4 mm. Work rib in the round (knit 2, purl 2) for 8 cm. Fold the neck double to the inside and work 1 more round of rib, working every 4th stitch together with its corresponding stitch on the cast-on edge. You now have a double neck. The yoke is measured from here. Insert 4 markers at the same time as you increase 4 stitches on the next round as follows: Knit 10-12-12-14-14-16 and increase 1 stitch (half back piece), insert marker-1 in the next stitch, knit 21 (sleeve), insert marker-2 in the next stitch, knit 21-23-25-27-29-31 and increase 2 stitches evenly spaced (front piece), insert marker-3 in the next stitch, knit 21 (sleeve), insert marker-4 in the next stitch, knit the last 11-11-13-13-15-15 stitches and increase 1 stitch (half back piece) = 92-96-100-104-108-112 stitches. NECKLINE: Change to circular needle size 5 mm and work short rows at the back of the neck, starting mid-back: ROW 1 (right side): Knit and increase for RAGLAN – read description above, on each side of the first 2 markers (4 stitches increased), turn when you have knitted 3 stitches past marker-2. ROW 2 (wrong side): Purl and increase to raglan on each side of all markers (8 stitches increased), turn when you have purled 3 stitches past the last marker. ROW 3: Knit and increase to raglan on each side of all markers (8 stitches increased), turn when you have knitted 2 stitches after the previous turn. ROW 4: Purl and increase to raglan on each side of all markers (8 stitches increased), turn when you have purled 2 stitches after the previous turn. ROW 5: Knit and increase for raglan on each side of the first 2 markers (4 stitches increased), work to mid-back. The short rows are finished and you have increased 4 times for raglan at each marker = 124-128-132-136-140-144 stitches. YOKE: Work now yoke in the round over all stitches as explained below. SIZES S, M, L and XL: Start mid-back, work stocking stitch and increase for raglan on the body and sleeves (i.e. on each side of all 4 marker-stitches) every 2nd round 2-8-10-11 times = 140-192-212-224 stitches. AT THE SAME TIME when the yoke measures 13 cm from the neck, work STRIPES - read description above. Continue working and increasing for raglan but every 2nd increase is only on the body (4 stitches increased; i.e. increase for the body every 2nd round, for the sleeves every 4th round). Increase 18-15-14-16 times on the body (9-7-7-8 times on the sleeves). A total of 24-27-28-31 times on the body and 15-19-21-23 times on the sleeves. There are 248-280-296-320 stitches. Go to ALL SIZES. SIZES XXL and XXXL: Start mid-back, work stocking stitch and increase for raglan every round on the body 2-6 times and every 2nd round on the sleeves 1-3 times = 152-180 stitches. AT THE SAME TIME when the yoke measures 13 cm from the neck, work STRIPES - read description above. Now increase for the body and sleeves (on each side of all 4 marker-stitches) every 2nd round 10-7 times = 232-236 stitches. Continue working and increasing for raglan, but every 2nd increase is only on the body (4 stitches increased; i.e. increase for the body every 2nd round, for the sleeves every 4th round). Increase 18-22 times on the body (9-11 times on the sleeves). A total of 34-39 times on the body and 24-25 times on the sleeves. There are 340-368 stitches. Go to ALL SIZES. ALL SIZES: = 248-280-296-320-340-368 stitches. Continue with stocking stitch and stripes but without further increases until the yoke measures 21-23-25-27-29-32 cm measured from the neck mid-front. On the next round divide for the body and sleeves as follows: Work the first 37-42-43-48-51-58 stitches (half back piece), place the next 49-57-61-65-67-69 stitches on a thread for the sleeve, cast on 6-6-8-8-10-10 stitches (in side under sleeve), work 75-83-87-95-103-115 stitches (front piece), place the next 49-57-61-65-67-69 stitches on a thread for the sleeve, cast on 6-6-8-8-10-10 stitches (in side under sleeve), work the last 38-41-44-47-52-57 stitches (half back piece). BODY: = 162-178-190-206-226-250 stitches. Continue in the round with stocking stitch and stripes for a further 28-28-28-28-28-27 cm, finishing after a round of colour dark blue (there is 5 cm left to finished length and finish with colour dark blue). Knit 1 round and increase 18-22-22-26-26-34 stitches evenly spaced = 180-200-212-232-252-284 stitches. Change to circular needle size 4 mm. Work rib (knit 2, purl 2) for 5 cm. Cast off a little loosely with knit over knit and purl over purl. The jumper measures approx. 60-62-64-66-68-70 cm from the shoulder. SLEEVES: Place the 49-57-61-65-67-69 stitches from the thread on the one side of the piece on short circular needle/double pointed needles size 5 mm and knit up 1 stitch in each of the new stitches cast on under the sleeve = 55-63-69-73-77-79 stitches. Insert a marker-thread in the middle of the new stitches under the sleeve; allow it to follow your work onwards, it is used when decreasing under the sleeve. Continue in the round with stocking stitch and stripes. When the sleeve measures 4 cm decrease 2 stitches on each side of the marker-thread – read DECREASE TIP. Decrease like this every 8-4½-3-2½-2-2 cm a total of 5-8-10-11-12-12 times = 45-47-49-51-53-55 stitches. Continue working until the sleeve measures 38-36-35-33-31-29 cm from the division, finishing after a round of colour dark blue (there is approx. 6 cm left and the rest of the sleeve is worked with colour dark blue). Change to double pointed needles size 4 mm. Knit 1 round and increase 7-5-7-5-7-5 stitches evenly spaced = 52-52-56-56-60-60 stitches. Work rib (knit 2, purl 2) for 6 cm. Loosely cast off with knit over knit and purl over purl. The sleeve measures approx. 44-42-41-39-37-35 cm from the division. Work the other sleeve in the same way. |
|
 |
|
Have you finished this pattern?Tag your pictures with #dropspattern #meetthecaptainsweater or submit them to the #dropsfan gallery. Do you need help with this pattern?You'll find 32 tutorial videos, a Comments/Questions area and more by visiting the pattern on garnstudio.com. © 1982-2026 DROPS Design A/S. We reserve all rights. This document, including all its sub-sections, has copyrights. Read more about what you can do with our patterns at the bottom of each pattern on our site. |
|


With over 40 years in knitting and crochet design, DROPS Design offers one of the most extensive collections of free patterns on the internet - translated to 17 languages. As of today we count 325 catalogues and 12298 patterns translated into English (UK/cm). 12298
We work hard to bring you the best knitting and crochet have to offer, inspiration and advice as well as great quality yarns at incredible prices! Would you like to use our patterns for other than personal use? You can read what you are allowed to do in the Copyright text at the bottom of all our patterns. Happy crafting!
Post a comment to pattern DROPS 239-38
We would love to hear what you have to say about this pattern!
If you want to leave a question, please make sure you select the correct category in the form below, to speed up the answering process. Required fields are marked *.