
Popular categories
Looking for a yarn?


Comments / Questions (35)
![]() Sandra wrote:
Sandra wrote:
I would be grateful for some clarification on the instructions for knitting A5 pattern on the sleeve. The instructions state to count out from mid-top and that the marker stitch should match the mid stitch marked on the pattern. Is the marker stitch mentioned the marker for the mid top or the start point (ie the start of a new round) under the arm?
06.02.2026 - 11:25
![]() Marie Hélène wrote:
Marie Hélène wrote:
Bonjour je commence A1 où l'on demande d'augmenter de 56 mailles en L. Ces augmentations se font en 1 seul tour ou tout au long de la réalisation du motif A1? Après avoir augmenté de 56 mailles on arrive à 240 mailles qui n'est pas divisible par 23 alors qu'il faut répéter 23 fois le motif merci pour votre aide :-)
24.01.2026 - 14:49DROPS Design answered:
Bonjour Marie Hélène, vous allez effectivement augmenter 56 mailles sur le tour indiqué par la flèche dans A.1, vous avez ainsi 240 mailles quand ce tour avec augmentations est fait; A.1 est terminé, vous tricotez maintenant A.2, vous avez maintenant suffisamment de mailles pour tricoter 30 fois les 8 m de A.2. Retrouvez les différentes étapes de réalisation de ce pull en photos ici. Bon tricot!
26.01.2026 - 08:19
![]() Jan Gardner wrote:
Jan Gardner wrote:
Hi, following on from Gerry Hill’s question, I also don’t understand the part about cutting the yarn and starting the body from the side. I don’t really understand the answer either. My question is, would it matter if I used the original starting point, i.e. mid back, to knit the body? (I’m unsure if doing that would have implications later on.)
28.11.2025 - 15:49DROPS Design answered:
Dear Mrs Gardner, you can start on mid back but note that the pattern will not fit in the round, so starting mid under one sleeve might help to start from mid under sleeve and work the first half of piece in pattern to the other sleeve, than start again from mid under sleeve to the end of the round. Happy knitting!
01.12.2025 - 06:44
![]() Gerry Hill wrote:
Gerry Hill wrote:
Hi, Two questions please firstly what is yarn group B I am using english double knitting wool.Secondly I have just got to the dividing point and I don\'t understand why I had to break of the yarn and start again under the arm, I am on circular needles and am obviously in the wrong place in the row now, why can\'t I just carry on from the original starting point ? I need to know soon please as I am knitting this for charity and I need to get it done, Thanks
20.11.2025 - 19:43DROPS Design answered:
Hi Gerry, Our yarn group B is a selection of 8 ply double knit yarns (click on Yarns & Needles at the top of the page, then Yarn groups lower right to see our selection). When dividing, you finish mid-back and the new round for the body begins under one sleeve. If you do not wish to cut the yarn, you can work forwards to mid-under one sleeve, then continue the body starting the new round from there. However make sure you follow the pattern on from the yoke and work it as far as it will go under each sleeve (it will not always fit under the sleeve). Regards, Drops Team
21.11.2025 - 06:32
![]() Andrea Döppenschmitt wrote:
Andrea Döppenschmitt wrote:
Die Möglichkeit, die Größe bei Modellen zu markieren ist eine große Erleichterung! Vielen Dank dafür!
15.11.2025 - 07:07
![]() Dorys Blouin wrote:
Dorys Blouin wrote:
Bonjour, Est-ce que vous avez les dimensions pour les grandeurs, svp? Je ne sais pas trop quelle grandeur que je dois choisir. Merci et bonne journée!
30.08.2025 - 21:27
![]() Pascale wrote:
Pascale wrote:
Bonjour, Je viens de comprendre le tour avec la flèche ! Belle journée
26.08.2025 - 08:34
![]() Pascale wrote:
Pascale wrote:
Bonjour, Je suis au niveau du jacquard A1, je ne comprends pas ce que signifie augmenter 44 mailles au tour avec la flèche . Vous remerciant par avance
25.08.2025 - 22:24DROPS Design answered:
Bonjour Pascale, cette leçon explique comment augmenter à intervalles réguliers (pensez à utiliser la calculette disponible sur cette page) - vous trouverez cette étape en photo ici, réalisée lors d'un knit-along - la version photographiée est pour les enfants mais la technique est la même. Bon tricot!
26.08.2025 - 16:03
![]() Jean Wilson wrote:
Jean Wilson wrote:
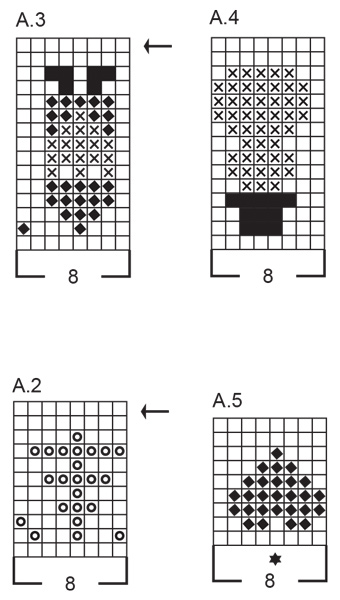
I have downloaded this pattern DROPS 235-39 the diagrams A1 A2 A3 A4 and A5 seam to me be upside down so confused how to knit
13.04.2025 - 15:37DROPS Design answered:
Hi Jean, All diagrams are read from the bottom up (even when you are working top down), and are read from right to left when working in the round. Happy Easter!
13.04.2025 - 17:45
![]() Cécile wrote:
Cécile wrote:
Bonjour, je fais la taille XL. A la fin de l'empiècement j'ai 154 mailles, et je dois augmenter 46 mailles pour atteindre 200 mailles. D'après le calculateur, je tricote 1 maille, j'augmente 1 maille, puis j'augmente en alternant toutes les 3 et 4 ème mailles , à la fin il doit me rester 2 mailles ... Le souci c'est que dans ce cas, je n'arrive a faire que 44 augmentations et non 46... Et je n'obtiens que 198 mailles et non 200. Je suis perdue...
11.04.2025 - 13:47DROPS Design answered:
Bonjour Cécile, en procédant ainsi: 1 m, (1 augm), [3 m, (1 augm)]x15, [4 m, (1 augm)]x16, [3 m, (1 augm)]x14, 2 m, vous aurez: 1+(3x15)+(4*16)+(3x14)+2=154m tricotées et 2+(4x15)+(5x16)+(4x14)+2=200 mailles. Vous avez augmenté 1+15+16+14=46 fois. Bon tricot!
11.04.2025 - 16:16
|
||||||||||||||||||||||
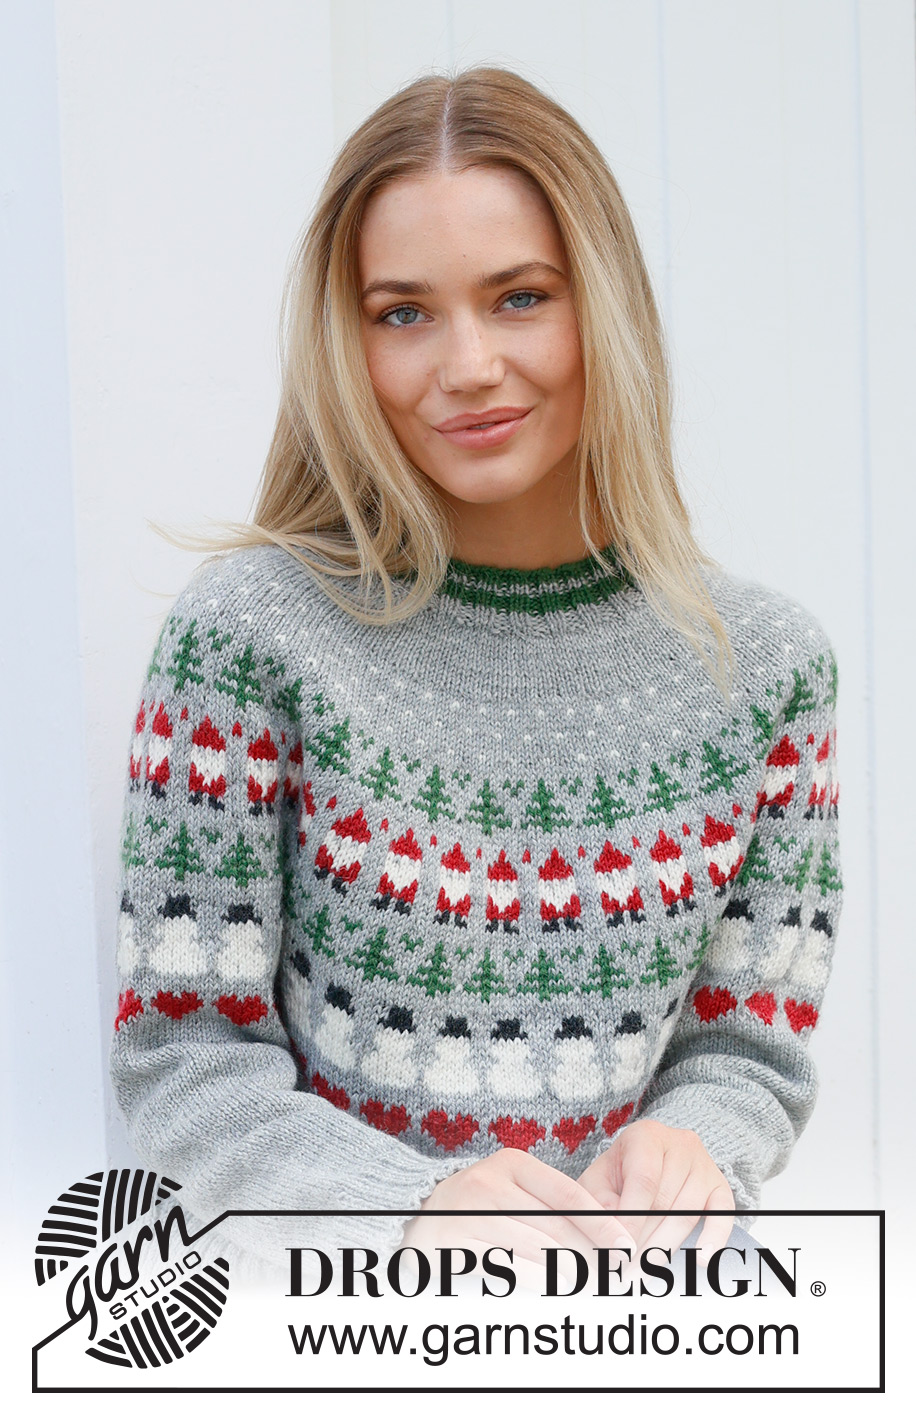
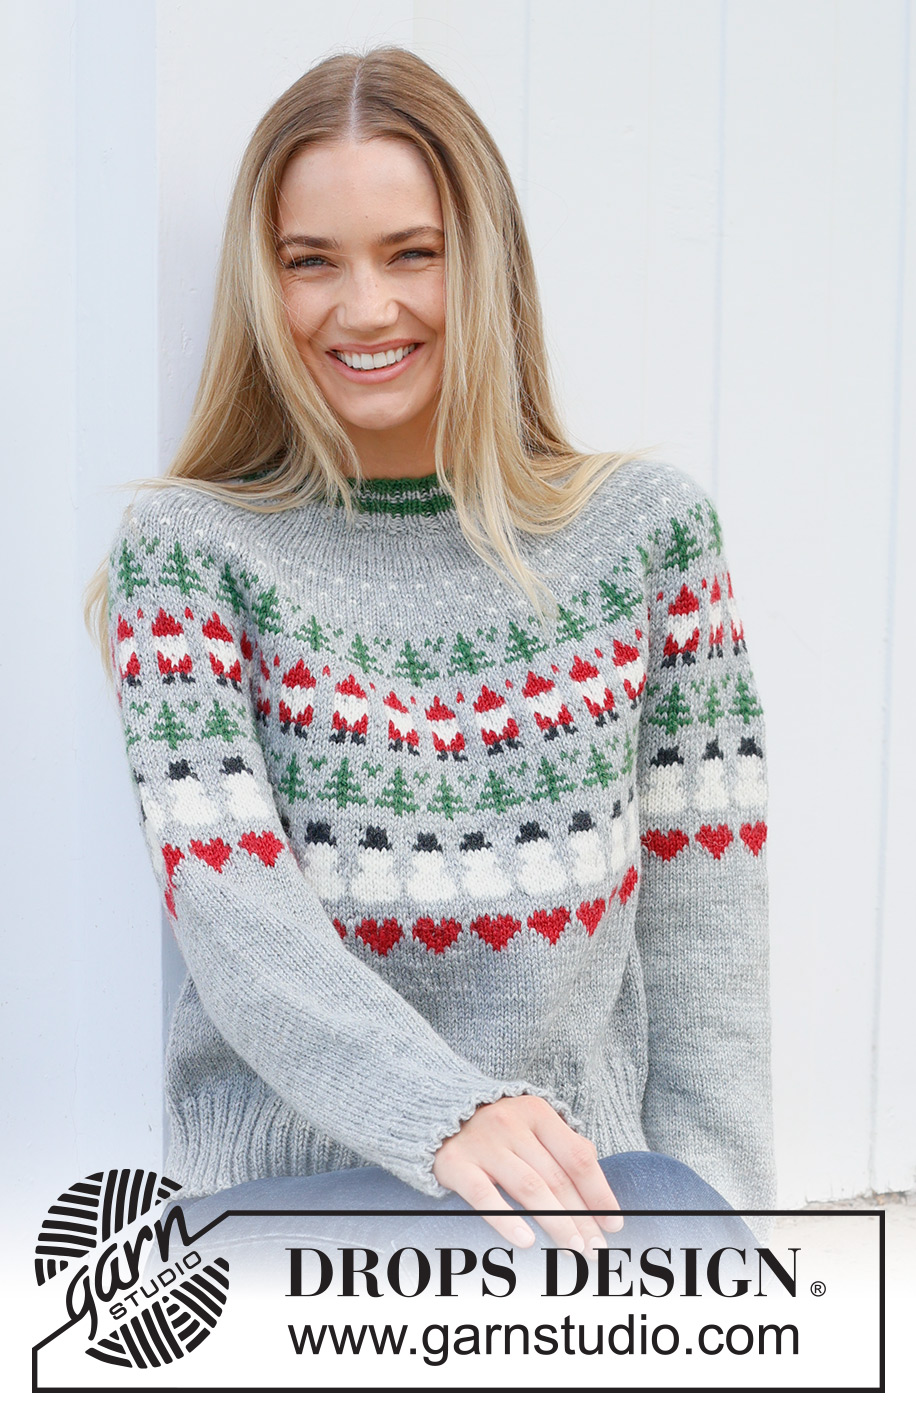
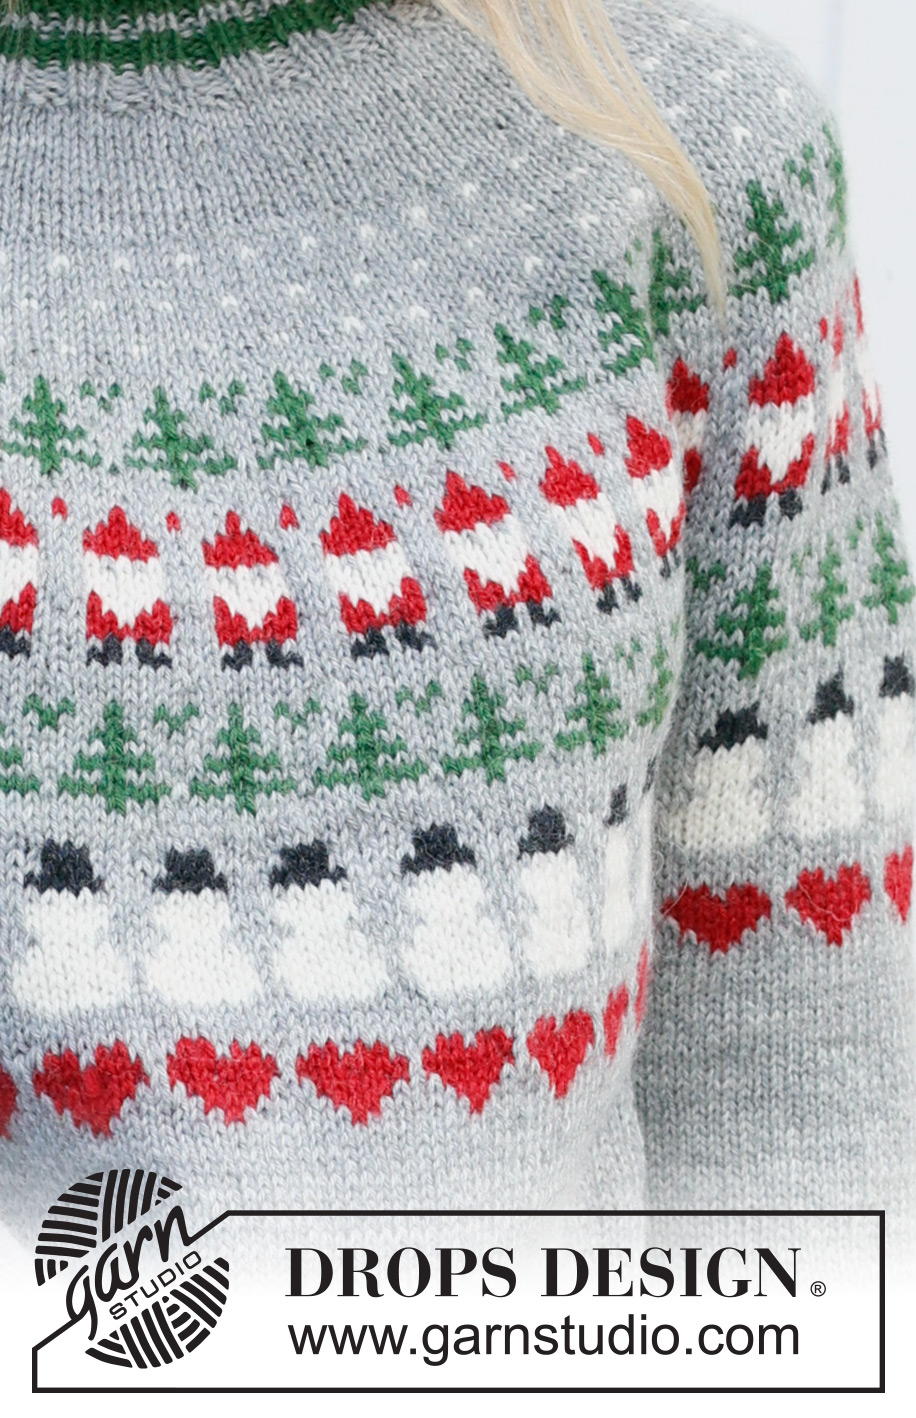
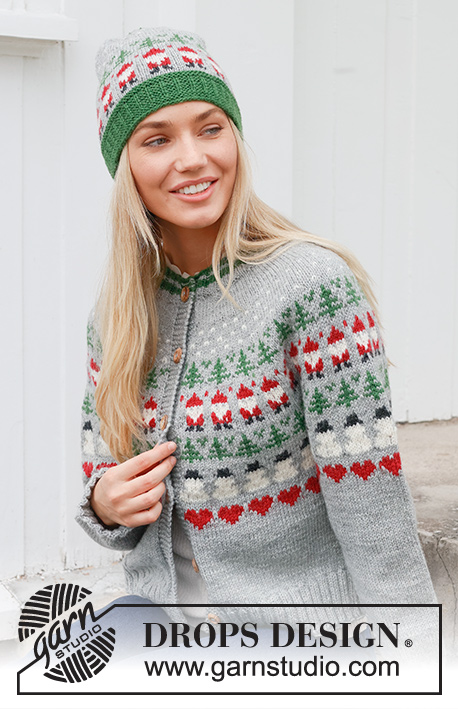
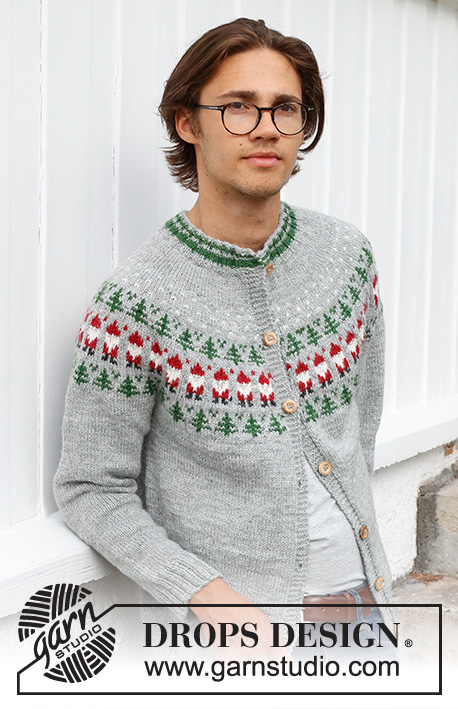
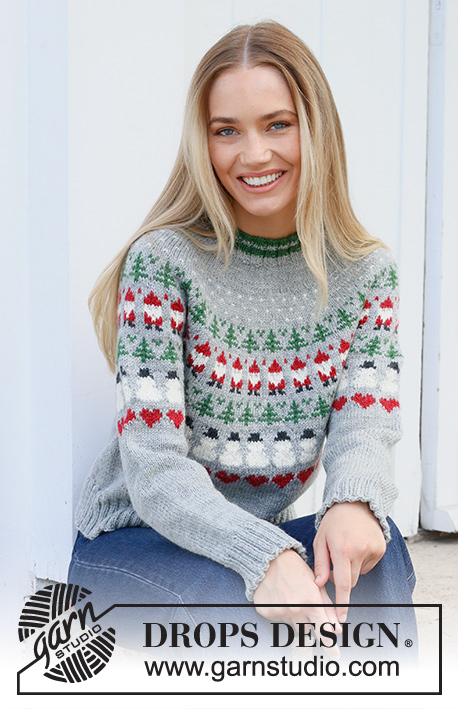
Christmas Time Sweater#christmastimesweater |
||||||||||||||||||||||
 |
 |
|||||||||||||||||||||
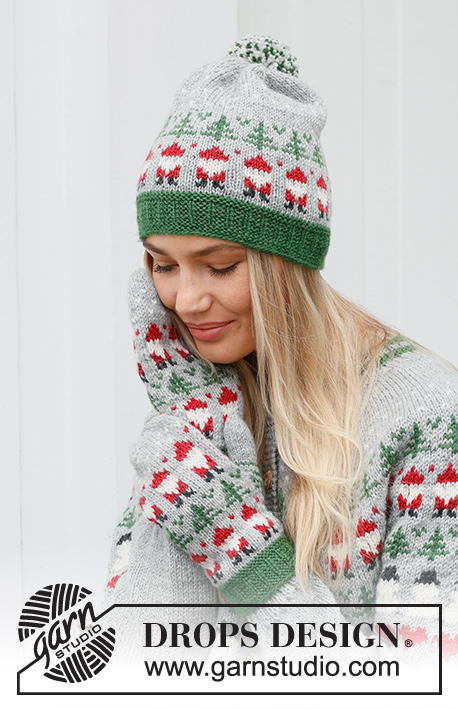
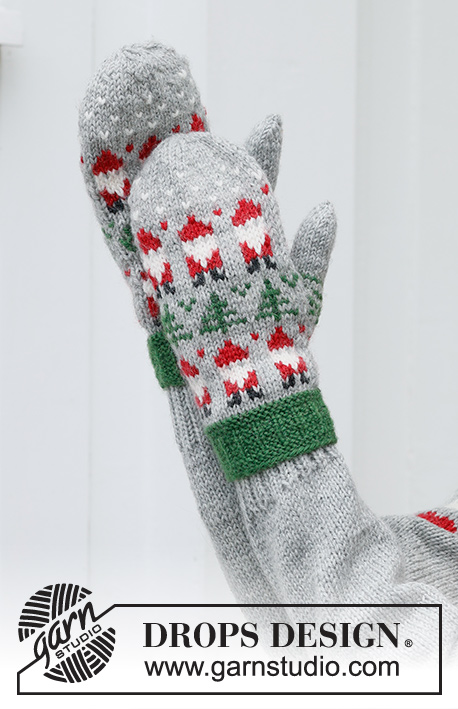
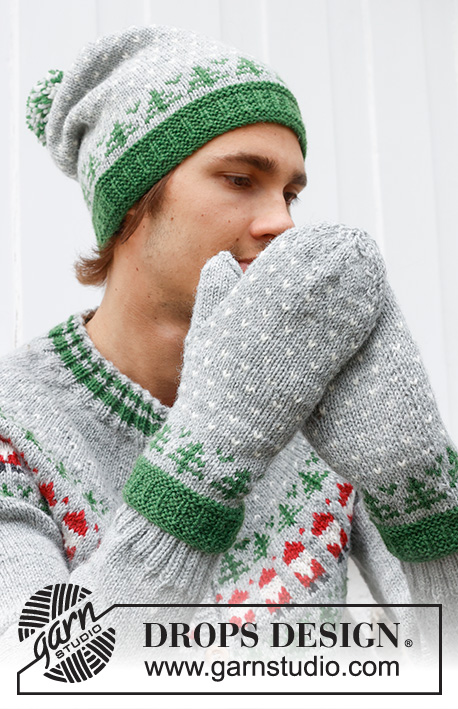
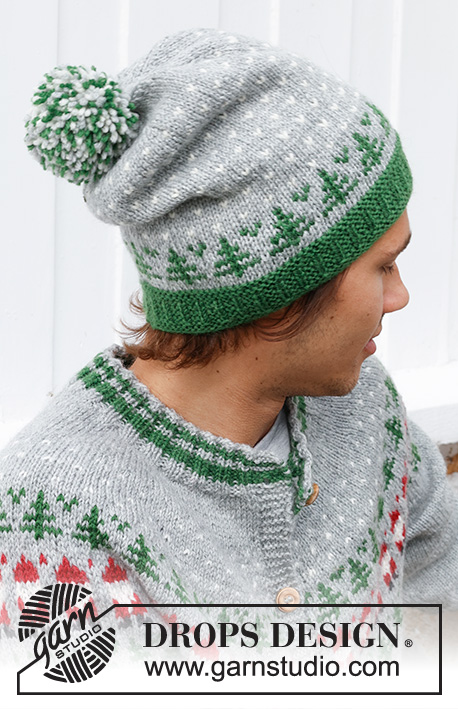
Knitted jumper in DROPS Karisma. The piece is worked top down, with round yoke and coloured pattern of Santa, Christmas tree, snowman and heart. Sizes S - XXXL. Theme: Christmas.
DROPS 235-39 |
||||||||||||||||||||||
|
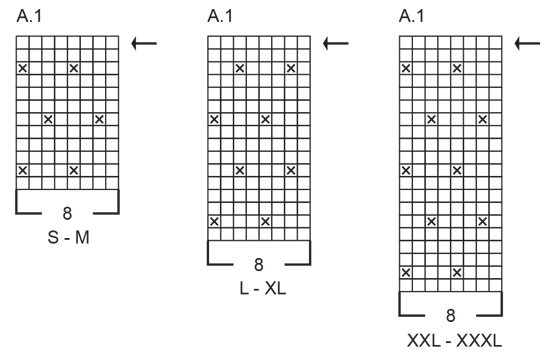
------------------------------------------------------- EXPLANATIONS FOR THE PATTERN: ------------------------------------------------------- PATTERN: See diagrams A.1 to A.5. Choose diagram for your size (applies to A.1). The patterns are worked in stocking stitch KNITTING TIP-1: To avoid the knitting tension losing its elasticity when working pattern it is important that the strands at the back are not tight. Use a size larger needle when working pattern if the piece becomes tight. KNITTING TIP-2: If you want more pattern on body and sleeves continue with the diagrams in your desired order but remember this will affect the yarn amounts. On the sleeves, position the motif mid-top of the sleeve and count out from there where to start the diagram under the sleeve. INCREASE TIP (evenly spaced): Increase 1 stitch by making 1 yarn over, which is worked twisted on the next round to avoid a hole. DECREASE TIP (for sleeves): Decrease 1 stitch on either side of the marker-stitch as follows: Work until there are 2 stitches left before the marker, knit 2 together with colour light grey, knit the stitch with marker with colour light grey and knit 2 twisted together with colour light grey (2 stitches decreased). ------------------------------------------------------- START THE PIECE HERE: ------------------------------------------------------- JUMPER – SHORT OVERVIEW OF THE PIECE: The neck and yoke are worked in the round with circular needle, from mid back and top down. The yoke is divided for body and sleeves and the body is continued in the round with circular needle. The sleeves are worked with short circular needle/double pointed needles. NECK: Cast on 104-108-112-120-124-128 stitches with short circular needle size 3 mm and colour forest green DROPS Karisma. Knit 1 round, then work rib (knit 2, purl 2) and stripes as follows: 2 rounds with colour forest green, 2 rounds with colour light grey, 4 rounds with colour forest green then continue the rib with colour light grey until the neck measures 4 cm. Knit 1 round with colour light grey and increase 26-27-28-34-40-42 stitches evenly spaced – read INCREASE TIP = 130-135-140-154-164-170 stitches. Insert 1 marker mid-front – the yoke is measured from this marker! YOKE: Change to circular needle size 4 mm. Work stocking stitch with colour light grey. REMEMBER THE KNITTING TENSION! When the yoke measures 4-4-5-5-6-7 cm from the marker, increase 38-41-44-46-52-54 stitches evenly spaced – remember INCREASE TIP = 168-176-184-200-216-224 stitches. Now work pattern and continue to increase as described below – read KNITTING TIP-1 and PATTERN in explanations above. A.1: Work A.1, 21-22-23-25-27-28 times on the round. AT THE SAME TIME on the round marked with an arrow increase 48-48-56-56-64-72 stitches evenly spaced = 216-224-240-256-280-296 stitches. A.2: When A.1 is finished in your size, work A.2, 27-28-30-32-35-37 times on the round. AT THE SAME TIME on the round marked with an arrow increase 40-48-48-56-64-64 stitches evenly spaced = 256-272-288-312-344-360 stitches. A.3: When A.2 is finished, work A.3, 32-34-36-39-43-45 times on the round. AT THE SAME TIME on the round marked with an arrow increase 32-40-48-48-48-56 stitches evenly spaced = 288-312-336-360-392-416 stitches. A.2: When A.3 is finished, work A.2 again 36-39-42-45-49-52 times on the round. AT THE SAME TIME on the round marked with an arrow increase 16-16-24-40-40-48 stitches evenly spaced = 304-328-360-400-432-464 stitches. A.4: When A.2 is finished, work A.4, 38-41-45-50-54-58 times on the round. Continue the pattern – at the same time divide for the sleeves and body as described below. DIVIDE FOR SLEEVES AND BODY: Work until the yoke measures 22-24-25-27-29-31 cm from the marker. The increases are finished but not the pattern, which you continue on the body and sleeves. On the next round divide as follows: Work 46-50-54-60-66-72 stitches as before (half back piece), place the next 60-64-72-80-84-88 stitches on a thread for the sleeve, cast on 8 stitches with colour light grey (in side under sleeve), work 92-100-108-120-132-144 stitches as before (front piece), place the next 60-64-72-80-84-88 stitches on a thread for the sleeve, cast on 8 stitches with colour light grey (in side under sleeve), work the last 46-50-54-60-66-72 stitches as before (half back piece). Cut the strand. Body and sleeves are finished separately. The piece is now measured from here! BODY: = 200-216-232-256-280-304 stitches. Start the round on one side – in the middle of the 8 cast-on stitches and continue the pattern from the yoke – repeats (A.4) will not fit under the sleeves so work them as far as they fit then finish with light grey under each sleeve. When A.4 is finished, work A.5, 25-27-29-32-35-38 times on the round. When A.5 is finished continue with stocking stitch and colour light grey – read KNITTING TIP-2. Work until the body measures 21-21-22-22-22-22 cm from the division. Knit 1 round and increase 40-40-44-52-56-60 stitches evenly spaced = 240-256-276-308-336-364 stitches. Change to circular needle size 3 mm and work rib (knit 2, purl 2) for 7 cm. Cast off slightly loosely. The jumper measures approx. 54-56-58-60-62-64 cm from the shoulder down. SLEEVES: Place the 60-64-72-80-84-88 stitches from the thread on the one side of the piece on short circular needle/double pointed needles size 4 mm and knit up 1 stitch in each of the new stitches cast on under the sleeve using colour light grey = 68-72-80-88-92-96 stitches. Insert a marker in the 5th of the 8 new stitches under the sleeve (mid-under sleeve) and a marker in the 35th-37th-41st-45th-47th-49th stitch (mid-top of sleeve). Start at the first marker and continue the pattern from the yoke. The repeats of A.4 will not fit under the sleeve, so work the remaining stitches with colour light grey. When A.4 is finished, work A.5 – count out from mid-top where the pattern should start under the sleeve – the marker-stitch should match the mid-stitch marked on the diagram. When A.5 is finished continue with colour light grey and stocking stitch – read KNITTING TIP-2. AT THE SAME TIME, when the sleeve measures 3-3-3-2-2-2 cm, decrease 2 stitches under the sleeve – read DECREASE TIP. Decrease like this every 4½-4-2½-2-1½-1½ cm a total of 7-8-11-14-15-16 times = 54-56-58-60-62-64 stitches. Continue working until the sleeve measures 34-33-32-30-29-28 cm from the division (or to desired length. There is approx. 7 cm left). Knit 1 round and increase 10-8-10-12-10-12 stitches evenly spaced = 64-64-68-72-72-76 stitches. Change to double pointed needles size 3 mm and work rib (knit 2, purl 2) for 7 cm. Loosely cast off. The sleeve measures approx. 41-40-39-37-36-35 cm from the division. Work the other sleeve in the same way. |
||||||||||||||||||||||
Diagram explanations |
||||||||||||||||||||||
|
||||||||||||||||||||||
 |
||||||||||||||||||||||
 |
||||||||||||||||||||||
 |
||||||||||||||||||||||
Have you finished this pattern?Tag your pictures with #dropspattern #christmastimesweater or submit them to the #dropsfan gallery. Do you need help with this pattern?You'll find 29 tutorial videos, a Comments/Questions area and more by visiting the pattern on garnstudio.com. © 1982-2026 DROPS Design A/S. We reserve all rights. This document, including all its sub-sections, has copyrights. Read more about what you can do with our patterns at the bottom of each pattern on our site. |
||||||||||||||||||||||


With over 40 years in knitting and crochet design, DROPS Design offers one of the most extensive collections of free patterns on the internet - translated to 17 languages. As of today we count 324 catalogues and 12290 patterns translated into English (UK/cm). 12290
We work hard to bring you the best knitting and crochet have to offer, inspiration and advice as well as great quality yarns at incredible prices! Would you like to use our patterns for other than personal use? You can read what you are allowed to do in the Copyright text at the bottom of all our patterns. Happy crafting!
Post a comment to pattern DROPS 235-39
We would love to hear what you have to say about this pattern!
If you want to leave a question, please make sure you select the correct category in the form below, to speed up the answering process. Required fields are marked *.