
Popular categories
Looking for a yarn?


Comments / Questions (62)
![]() Anne Louise Holm wrote:
Anne Louise Holm wrote:
Når jeg starter på forstykket ser det ud til at man skal begynde på snoningerne med det samme, men der er da en ribkant ligesom bagpå, sådan ser det da ud på billedet. Er der ikke en fejl i opskriften her?
30.11.2024 - 14:05DROPS Design answered:
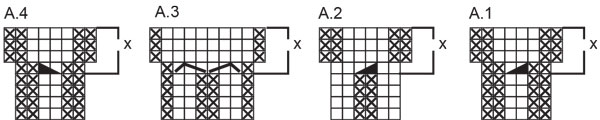
Hei Anne Louise. På bakstykket er det ingen fletter etter vrangborden, så da strikkes vrangborden bare 2 rett / 2 vrang. Men for å få en pent overgang mellom vrangborden og flettene på forstykket strikkes det slik det er forklart i oppskriften og etter diagrammene. Om du ser på diagram A.1 til A.5 og strikker de 4 første pinnene i 5 cm (vrangbord som bakstykket), så strikkes det 2 rett / 2 vrang , før det økes masker. Vrangborden og flettene vil da gå i ett og det vil bli veldig pent :) mvh DROPS Design
02.12.2024 - 10:44
![]() Margo wrote:
Margo wrote:
Voor het voorpand moet je (2) steken minderen terwijl er uiteindelijk (10) meer steken op de naald komen. Of lees ik het niet goed? Uw hulp graag!
25.11.2024 - 22:38DROPS Design answered:
Dag Margo,
In de telpatronen zijn ook meerderingen opgenomen in de 5e naald, vandaar dat er steken bij komen.
27.11.2024 - 11:41
![]() Howard,s wrote:
Howard,s wrote:
Thank you for your reply. the difficult part is transitioning from a1 is there three purls or two the x in the diagrams are to represent the purls from the previous diagram the cables are off center in the front
31.10.2024 - 20:52DROPS Design answered:
Dear Howards, you can insert markers between each diagram so that you are sure you will ge the correct number of stitches; when working the x section, A.1 will still start and finish with P2 (but you increased on first row in P so that you get now K4 in between), and A.3 still starts and end with P1 but you now knit the middle stitches, including the 2 sts increased on first row in x. Happy knitting!
01.11.2024 - 08:36
![]() Howard,s wrote:
Howard,s wrote:
What are the X for on the diagrams what is the meaning
31.10.2024 - 02:10DROPS Design answered:
Dear Howard, you first repeat the 4 rows in the diagram until piece measures 5 cm then work stocking stitch on each side decreasing stitches over rib and work the section with the x in each diagram increasing stitches for cables next diagrams. Happy knitting!
31.10.2024 - 09:32
![]() Howard ,S wrote:
Howard ,S wrote:
Hello, I am having trouble transitioning between A1 and A3 diagrams. How many purls and knits are between the diagrams? is the ribbing all the way around?
30.10.2024 - 19:31DROPS Design answered:
Dear Howard, there are no extra stitches between diagrams, so when working A.1 and A.3 next to each other you will have (P2, K2, P2) for A.1, and (P1, K2, P2, K2, P1) for A.3 (on the rounds before the x section). Hope it can help. Happy knitting!
31.10.2024 - 09:17
![]() Maraym wrote:
Maraym wrote:
I have another question! For size 3XL, binding off the armholes, first binding off 4 stitches one time, and then 3 stitches 0 time. Does the 0 times means that I should knit the rows, without binding off, or skip this and go binding off 2 stitches three times?
27.10.2024 - 15:21DROPS Design answered:
Hi Maraym, the 0 means, that for size 3XL you do not bind off this 3 sts (it is for another sizes only). Happy knitting!
27.10.2024 - 18:24
![]() Eve wrote:
Eve wrote:
Bonjour, Je ne comprends pas. Pour une taille M, si on augmente de 14 mailles à chaque premier rang des A(...)x, le nombre de mailles sur l'aiguille ne cesse de grandir, même en diminuant une maille de chaque côté à chaque rang. Comment faire pour que l'avant du pull reste rectangulaire et non un trapèze de plus en plus grand ? Je suis désolée si ma question n'est pas très claire, bonne journée :)
14.10.2024 - 08:29DROPS Design answered:
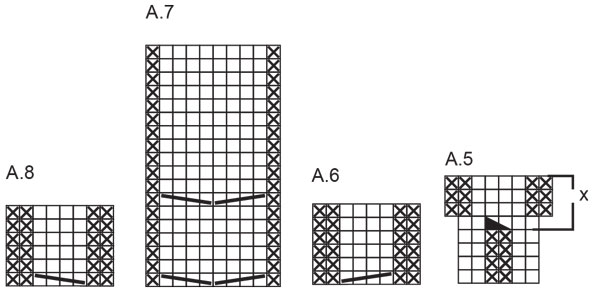
Bonjour Eve, les augmentations du 1er rang de la partie x des diagrammes n'est tricotée qu'une seule fois (pour compenser le nombre de mailles nécessaire pour les torsades et ainsi conserver la bonne largeur); quand les 3 rangs x (A.1x à A.4x) sont faits, vous tricotez les torsades des diagrammes A.6,A.6, A.6, A.7, A.8, A.8, A.8 (le 1er tour est directement une torsade). Le devant restera ainsi bien droit avec le bon nombre (le même nombre) de mailles jusqu'aux emmanchures. Bon tricot!
14.10.2024 - 09:47
![]() Maryam wrote:
Maryam wrote:
Hello. I’m knitting the largest size sleeves. When I increased every 2 cm, the length would be more than 46 cm. Can you explain this?
23.09.2024 - 21:52DROPS Design answered:
Hi Maryam. You increase every 3 cm x 13 = 39 cm + 8 cm = 47 cm. Then you continue working in the round until the sleeve measures 49 cm before working the sleeve cap. Happy knitting!
24.09.2024 - 07:00
![]() Ben Von Brock wrote:
Ben Von Brock wrote:
Liebes Team! Ich habe eine Frage zum Halsausschnitt an der Vorderseite. Es wird beschrieben, dass 30 Maschen abgekettet werden sollen aber gleichzeitig 22 Maschen (aufgrund der 8 Abnahmen über den Zöpfen) für den Kragen stillgelegt werden sollen. Wie passt das zusammen? Vielen Dank für eure Hilfe!
21.09.2024 - 14:21DROPS Design answered:
Lieber Herr Von Brock, stricken Sie diese 30 mittleren Maschen und gleichzeitig nehmen Sie 2 M im Zopf A.6 + 4 Maschen im Zopf A.7 + 2 M im Zopf A.8 (mit 2 Rechts zusammen in den Glattrechts gestrickten Maschen); so sind es nur noch 22 M in der Mitte vorne, diese 22 M legen Sie still (und so wird der Halsausschnitt auch nicht zu weit). Viel Spaß beim Stricken!
23.09.2024 - 07:59
![]() Edith wrote:
Edith wrote:
Bonjour, J'ai tricoté deux fois ce pull. Pour le premier, je n'ai pas compris que les côtes du bas du devant étaient irrégulières pour implanter le motif à torsades. Pour le second, j'ai mis du temps à le comprendre. Peut être aurait-il fallu l'expliquer dans votre petit aperçu de l'ouvrage, bien utile. Et également expliquer que les augm. servent à l'implantation du motif. On a besoin de comprendre pourquoi on fait les choses, et pas seulement comment on les fait ;) merci.
02.07.2024 - 10:57
|
|||||||||||||||||||||||||
Fisher’s Moon#fishersmoonsweater |
|||||||||||||||||||||||||
 |
 |
||||||||||||||||||||||||
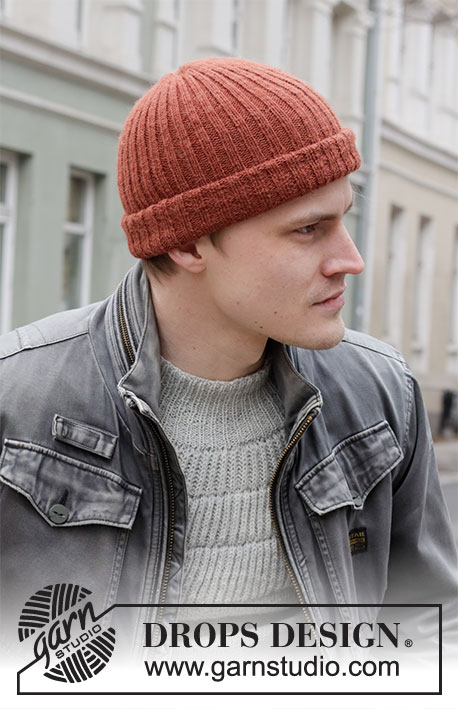
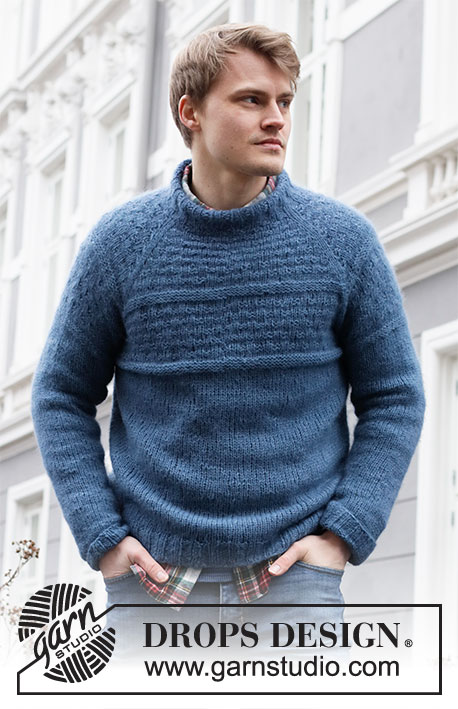
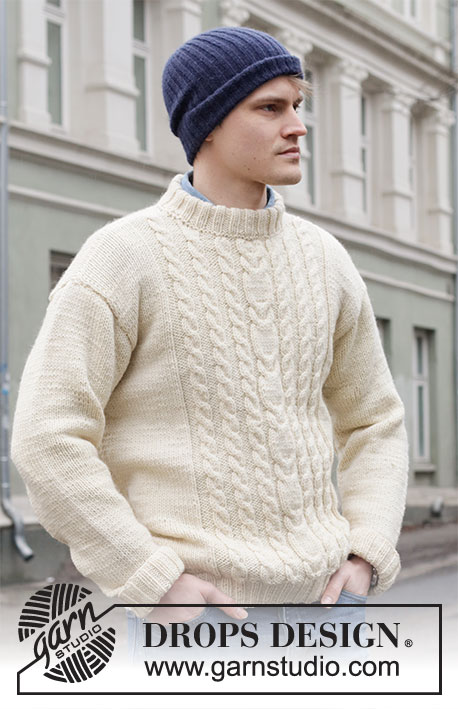
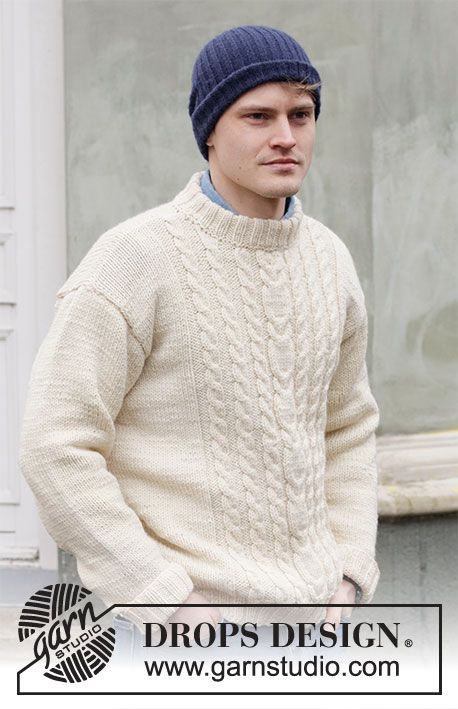
Knitted jumper for men with cables in DROPS Alaska. Size: S - XXXL
DROPS 219-9 |
|||||||||||||||||||||||||
|
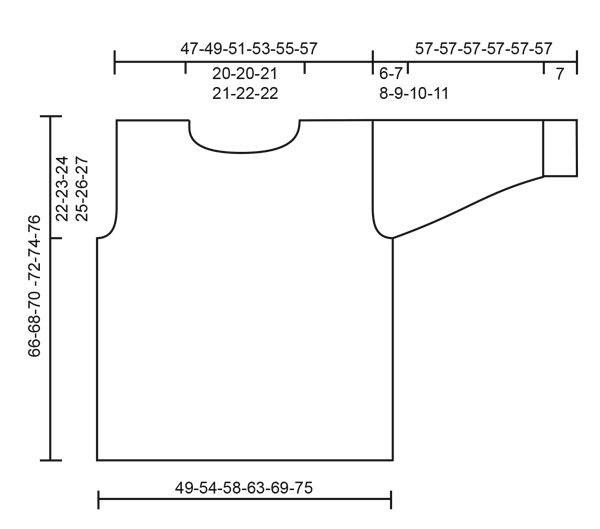
---------------------------------------------------------- EXPLANATION FOR THE PATTERN: ---------------------------------------------------------- GARTER STITCH (back and forth): Knit all rows. 1 ridge vertically = knit 2 rows. PATTERN: See diagrams A.1 to A.8. INCREASE TIP (applies to sleeve): Make 1 yarn over in each side inside 1 edge stitch in garter stitch. On next row work yarn overs twisted to avoid holes. Then work the new stitches in stocking stitch. ----------------------------------------------------- START THE PIECE HERE: ---------------------------------------------------------- JUMPER - SHORT OVERVIEW OF THE GARMENT: Worked back and forth on circular needle in parts and sewn together when finished. Work back piece in stocking stitch and front piece with cables and stocking stitch. Work sleeves back and forth on needle. Work neck edge in the round. BACK PIECE: Cast on 84-88-96-104-112-124 stitches on circular needle size 5 mm with Alaska. Work back and forth as follows – first row is from right side: 1 edge stitch in GARTER STITCH - read explanation above, * purl 2 and knit 2 *, work from *-* until 3 stitches remain, purl 2 and 1 edge stitch in garter stitch. Work rib like this until piece measures 5 cm. Switch to circular needle size 5.5 mm. Work in stocking stitch with 1 stitch in garter stitch in each side. On first row adjust number of stitches to 82-88-94-102-110-122. REMEMBER THE KNITTING TENSION! When piece measures 44-45-46-47-48-49 cm, cast off for armholes in each side. Cast off stitches at beginning of every row in each side: Cast off 4 stitches 0-1-1-1-1-1 time, 3 stitches 1-0-0-0-0-0 times, 2 stitches 0-0-0-1-2-3 times and 1 stitch 0-1-2-3-3-5 times = 76-78-82-84-88-92 stitches. Continue in stocking stitch. When piece measures 64-66-68-70-72-74 cm, cast off the middle 30-30-32-32-34-34 stitches for neck. Then cast off 1 stitch on next row from neck = 22-23-24-25-26-28 stitches for shoulder. Continue until piece measures 66-68-70-72-74-76 cm and cast off. Work the other shoulder the same way. FRONT PIECE: Cast on 82-90-98-106-114-122 stitches on circular needle size 5 mm with Alaska. Work back and forth as follows – first row is from right side: 1 edge stitch in garter stitch, * knit 2, purl 2 *, work from *-* over the next 16-20-24-28-32-36 stitches, knit 2, A.1 (= 6 stitches), A.2 (= 6 stitches), A.1, A.3 (= 8 stitches), A.4 (= 6 stitches), A.5 (= 6 stitches), A.4, * knit 2, purl 2 *, work from *-* over the next 16-20-24-28-32-36 stitches, finish with knit 2 and 1 edge stitch in garter stitch. Continue rib like this (repeat the first 4 rows in A.1 to A.5) until piece measures 5 cm. Switch to circular needle size 5.5 mm. Then work as follows from right side: 1 edge stitch in garter stitch, stocking stitch over the first 16-20-24-28-32-36 stitches, AT THE SAME TIME decrease 0-1-2-2-2-0 stitches evenly, purl 2, A.1x, A.2x. A.1x, A.3x, A.4x, A.5x, A.4x, purl 2, stocking stitch over the next 16-20-24-28-32-36 stitches, AT THE SAME TIME decrease 0-1-2-2-2-0 stitches evenly, 1 edge stitch in garter stitch. There are now 96-102-108-116-124-136 stitches on needle. When A.1x to A.5x have been worked 1 time vertically, continue as follows: 1 edge stitch in garter stitch, 16-19-22-26-30-36 stitches in stocking stitch, purl 2, A.6, A.6, A.6, A.7, A.8, A.8, A.8, purl 2, 16-19-22-26-30-36 stitches in stocking stitch, 1 edge stitch in garter stitch. Continue this pattern. When piece measures 44-45-46-47-48-49 cm, cast off for armhole in each side as on back piece = 90-92-96-98-102-106 stitches. When piece measures 60-62-64-66-68-70 cm, work next row as follows: Work the first 30-31-33-34-36-38 stitches as before, work the next 30 stitches - at the same time decrease 2 stitch evenly over each cable (= decrease 2 stitches over cable in A.6, 4 stitches over cables in A.7, and 2 stitches over cable in A.8, 8 stitches decreased in total), then slip these stitches on a stitch holder for neck (= 22 stitches on stitch holder), work the remaining 30-31-33-34-36-38 stitches as before. Now work each shoulder separately. Continue to cast off for neck at beginning of every row from neck as follows: Cast off 2 stitches 1-1-1-1-2-2 times and 1 stitch 2-2-3-3-2-2 times - NOTE: When working over cables in A.6/A.8, decrease at the same time 2 stitches over every cable = 24-25-26-27-28-30 stitches. Continue until piece measures 65-67-69-71-73-75 cm– decrease 2 stitches over cable in last repetition of A.6/A.8 = 22-23-24-25-26-28 stitches on shoulder. Cast off when piece measures 66-68-70-72-74-76 cm. Work the other shoulder the same way. SLEEVE: Cast on 42-46-46-50-50-50 stitches (including 1 edge stitch in each side) on circular needle size 5 mm with Alaska. Work back and forth as follows – first row is from right side: 1 edge stitch in garter stitch, * knit 2 and purl 2 *, work from *-* until 1 stitch remains, work 1 edge stitch in garter stitch. Work rib like this until piece measures 7 cm. Switch to circular needle size 5.5 mm. Purl 1 row from wrong side while decreasing 0-2-0-4-2-0 stitches evenly = 42-44-46-46-48-50 stitches. Then work in stocking stitch with 1 edge stitch in garter stitch in each side. When piece measures 8-8-8-8-8-10 cm, increase 1 stitch inside 1 edge stitch in each side - read INCREASE TIP. Increase like this every 3½-3½-3-2½-2½-2 cm 12-12-13-15-15-16 times in total = 66-68-72-76-78-82 stitches. When piece measures 51-50-49-48-47-46 cm, cast off 4 stitches in each side. Cast off for sleeve cap at beginning of every row in each side as follows: 2 stitches 2-2-3-3-4-4 times, 1 stitch 0-1-0-1-0-1 time. Then cast off 2 stitches in each side until piece measures 56 cm in all sizes, cast off 3 stitches in each side, then cast off the remaining stitches. Sleeve measures 57 cm in all sizes. Work another sleeve the same way. ASSEMBLY: Sew shoulder seams with grafting/kitchener stitches inside cast-off edge. Sew in sleeve cap. Sew underarm and side seams in one inside 1 edge stitch in garter stitch. NECK EDGE: Work neck edge in the round. Use circular needle size 5 mm and begin from right side at one shoulder seam. Pick up 72 to 84 stitches (including stitches on stitch holder at the front and divisible by 4). Purl 1 round and knit 1 round. Work rib with knit 2 and purl 2 for 9 cm. Cast off stitches with knit over knit and purl over purl. Fold rib at the top of neck down on the inside of garment. Fasten rib to form a folding edge. To avoid a tight neck edge and avoiding the edge to tip outwards, it is important to make the seam elastic. |
|||||||||||||||||||||||||
Diagram explanations |
|||||||||||||||||||||||||
|
|||||||||||||||||||||||||
 |
|||||||||||||||||||||||||
 |
|||||||||||||||||||||||||
 |
|||||||||||||||||||||||||
Have you finished this pattern?Tag your pictures with #dropspattern #fishersmoonsweater or submit them to the #dropsfan gallery. Do you need help with this pattern?You'll find 25 tutorial videos, a Comments/Questions area and more by visiting the pattern on garnstudio.com. © 1982-2026 DROPS Design A/S. We reserve all rights. This document, including all its sub-sections, has copyrights. Read more about what you can do with our patterns at the bottom of each pattern on our site. |
|||||||||||||||||||||||||


With over 40 years in knitting and crochet design, DROPS Design offers one of the most extensive collections of free patterns on the internet - translated to 17 languages. As of today we count 324 catalogues and 12290 patterns translated into English (UK/cm). 12290
We work hard to bring you the best knitting and crochet have to offer, inspiration and advice as well as great quality yarns at incredible prices! Would you like to use our patterns for other than personal use? You can read what you are allowed to do in the Copyright text at the bottom of all our patterns. Happy crafting!
Post a comment to pattern DROPS 219-9
We would love to hear what you have to say about this pattern!
If you want to leave a question, please make sure you select the correct category in the form below, to speed up the answering process. Required fields are marked *.