
Popular categories
Looking for a yarn?


Comments / Questions (62)
![]() Marianne wrote:
Marianne wrote:
Goedenavond..het patroon voorpand klopt niet: start met 122 st. Dan totaal 2 x 0 st minderen...je hebt 136 st op de naald?? Greetz Marianne
26.03.2026 - 20:02
![]() Ely wrote:
Ely wrote:
È possibile lavorare con i ferri lineari?
01.02.2026 - 20:13DROPS Design answered:
Buonasera Ely, questo modello è lavorato in parti separate, per cui può lavorarlo con i ferri dritti. Buon lavoro!
01.02.2026 - 20:17
![]() Bente Marie Thorsrud wrote:
Bente Marie Thorsrud wrote:
På str L legges opp 98 m til forstykket. Etter vrangbord skal det felles 4 masker. Hvordan kan man da ha 108 m ??
07.12.2025 - 18:27DROPS Design answered:
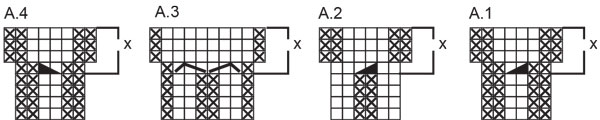
Hei Bente Marie, I diagrammene A.1-A.5 øker du 2 masker på 6. rad i hver rapport. Du strikker 7 rapporter (når man teller alle diagrammene) slik at du øker 14 masker. Samtidig feller du 4 masker som beskrevet i teksten. Da øker du 10 masker totalt og har 108 masker når diagrammene er ferdige. Hilsen Drops Team.
08.12.2025 - 07:32
![]() Rossella wrote:
Rossella wrote:
Buonasera Michela, dopo aver cambiato la misura dei ferri circolari, si lavora sulle ultime righe dei diagrammi (indicate con X), in cui ci sono degli aumenti. Buon lavoro! 22.09.2022 - 16:25 questa la vostra risposta ma non sta scritto da nessuna parte che si devono fare aumenti, se si legge il diagramma sembra di doverlo lavorare sulle maglie presenti. non è spiegato per nulla bene scusate!!!
06.12.2025 - 17:47DROPS Design answered:
Buongiorno Rossella, gli aumenti non sono indicati nel testo perchè sono inclusi nei diagrammi. Deve seguire la successione dei diagrammi come indicato nel testo. Buon lavoro!
07.12.2025 - 14:01
![]() Rossella wrote:
Rossella wrote:
Allora non capisco. sul modello xl sul davanti avvio 106 maglie, dopo le diminuzioni secondo quanto è scritto dovrei averne 116???
06.12.2025 - 17:44DROPS Design answered:
Buongiorno Rossella, insieme alle diminuzioni deve lavorare anche le parti X dei diagrammi, in cui ci sono degli aumenti. Buon lavoro!
07.12.2025 - 13:59
![]() Christine Lefebvre wrote:
Christine Lefebvre wrote:
Cou J’ai un doute 🤔 Sur l’aiguille avec 102 mailles : rabattre pour les emmanchures au début de chaque rang de chaque côté : 1 fois 4 mailles, 0 fois 3 mailles, 0 fois 2 mailles 1 fois 1 maille = reste 92 mailles On doit tricoter la séquence sur 4 rangs ou 8 rangs pour rabattre les 10 mailles au total ? Merci d’avance pour votre aide précieuse.
14.11.2025 - 10:13DROPS Design answered:
Bonjour Mme Lefebvre, vous devez rabattre ces mailles au début de chaque rang de chaque côté, autrement dit, vous allez rabattre 4 m au début des 2 rangs suivants (4 sur l'endroit, 4 sur l'envers), puis 1 m au début des 2 rangs suivants (1 sur l'endroit, 1 sur l'envers) vous avez rabattu 5 m de chaque côté, en début de rang sur l'endroit et en début de rang sur l'envers = 92 mailles. Bon tricot!
14.11.2025 - 16:05
![]() Lefebvre Christine wrote:
Lefebvre Christine wrote:
Rebonjour Grâce aux questions réponses précédentes avec traduction Google j’ai compris comment débuter le devant en tricotant les cotes tout en suivant les explications et les diagrammes.
24.10.2025 - 07:35
![]() Lefebvre Christine wrote:
Lefebvre Christine wrote:
Bonjour, Pour débuter le devant, contrairement aux explications du dos il n’est pas explicite qu'il faut tricoter 5 cm de côtes 🤔 J’en déduis que les premières explications sont à appliquer après avoir tricoté les 5 cm de côtes ? Merci d’avance pour votre avis en retour.
22.10.2025 - 22:09DROPS Design answered:
Bonjour Mme Lefebvre, pour le bas du devant, vous tricotez 5 cm comme expliqué au 1er rang: en côtes 2/2 et en suivant les diagrammes. Sur l'envers, tricotez les mailles comme elles se présentent. Bon tricot!
28.10.2025 - 19:03
![]() Maria Cristina wrote:
Maria Cristina wrote:
TAGLIA L NEL DIETRO DEL LAVORO QUANDO SI PARLA DI INTRECCIARE LE MAGLIE COSA INTENDE PER 4 MAGLIE 1 VOLTA, 3 MAGLIE 0 VOLTE, 2 MALGIE 0 VOLTE E 1 MAGLIA 2 VOLTE? PER ARRIVARE A CALARNE 12 (DA94 A 82 MAGLIE TOTALI)
07.07.2025 - 12:41DROPS Design answered:
Buonasera Maria Cristina, quelli indicati sono i numeri di maglie da intrecciare all'inizio di ogni ferro. Buon lavoro!
12.07.2025 - 14:47
![]() JM Van Den Akker wrote:
JM Van Den Akker wrote:
Vraag en opmerking: voorpand boord brei ik niet in boordsteek? Wat gek. Bij inzoomen op de foto zie ik duidelijk een gewone 5 cm hoge boord. Zo gedaan. Dan begint de puzzel. Net als een andere vragensteller snap ik niets van A1x A 2 x enz. En uw antwoord blijft ook vaag. De link naar een telpatroon hoe te lezen verschilt duidelijk van deze patronen. De X is wat? En het lege hokje? Welke steken brei ik in eerste pen na 2 avr. kijkende naar A1? En dan A2? Enz. Misschien dat ik er dan uitkom.
14.03.2025 - 22:42DROPS Design answered:
Dag JM,
Bij het voorpand staat dat je eerst steken opzet en dan in boorsteek breit (3 recht, 2 averecht), maar je begint ook direct al met de telpatronen zodat de kabels straks mooi doorlopen met de boordsteek. De kruisjes zijn steken die averecht gebreid worden aan de goede kant en recht aan de verkeerde kant, de lege hokjes recht aan de goede kant en averecht aan de verkeerde kant. Boven het telpatroon staat ook een uitleg van alle symbolen. Je leest de telpatronen van onder naar boven en alle naalden (dus zowel de heengaande als de teruggaande) zijn in de telpatronen getekend.
16.03.2025 - 19:57
|
|||||||||||||||||||||||||
Fisher’s Moon#fishersmoonsweater |
|||||||||||||||||||||||||
 |
 |
||||||||||||||||||||||||
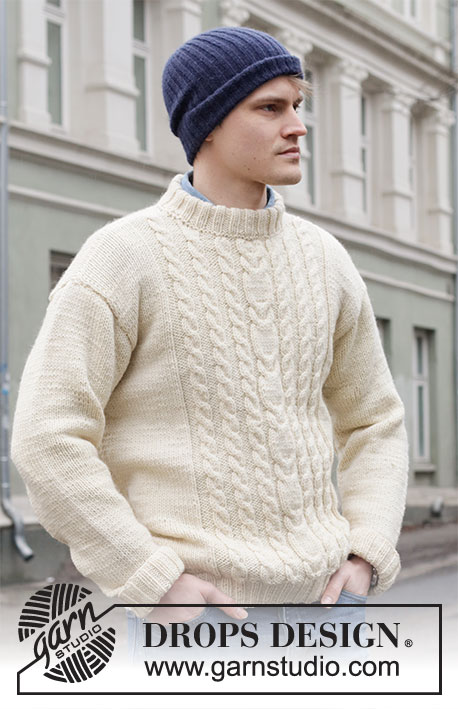
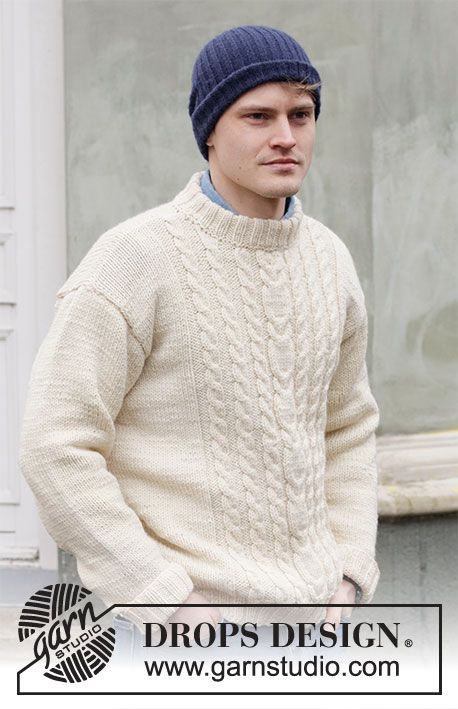
Knitted jumper for men with cables in DROPS Alaska. Size: S - XXXL
DROPS 219-9 |
|||||||||||||||||||||||||
|
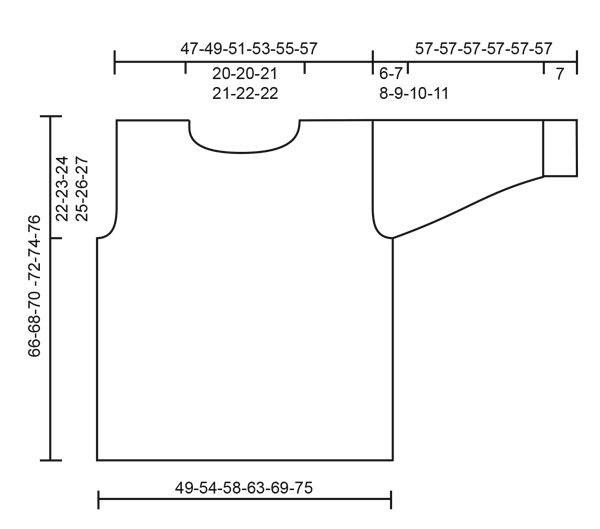
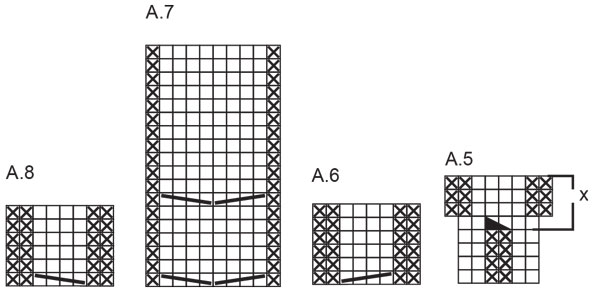
---------------------------------------------------------- EXPLANATION FOR THE PATTERN: ---------------------------------------------------------- GARTER STITCH (back and forth): Knit all rows. 1 ridge vertically = knit 2 rows. PATTERN: See diagrams A.1 to A.8. INCREASE TIP (applies to sleeve): Make 1 yarn over in each side inside 1 edge stitch in garter stitch. On next row work yarn overs twisted to avoid holes. Then work the new stitches in stocking stitch. ----------------------------------------------------- START THE PIECE HERE: ---------------------------------------------------------- JUMPER - SHORT OVERVIEW OF THE GARMENT: Worked back and forth on circular needle in parts and sewn together when finished. Work back piece in stocking stitch and front piece with cables and stocking stitch. Work sleeves back and forth on needle. Work neck edge in the round. BACK PIECE: Cast on 84-88-96-104-112-124 stitches on circular needle size 5 mm with Alaska. Work back and forth as follows – first row is from right side: 1 edge stitch in GARTER STITCH - read explanation above, * purl 2 and knit 2 *, work from *-* until 3 stitches remain, purl 2 and 1 edge stitch in garter stitch. Work rib like this until piece measures 5 cm. Switch to circular needle size 5.5 mm. Work in stocking stitch with 1 stitch in garter stitch in each side. On first row adjust number of stitches to 82-88-94-102-110-122. REMEMBER THE KNITTING TENSION! When piece measures 44-45-46-47-48-49 cm, cast off for armholes in each side. Cast off stitches at beginning of every row in each side: Cast off 4 stitches 0-1-1-1-1-1 time, 3 stitches 1-0-0-0-0-0 times, 2 stitches 0-0-0-1-2-3 times and 1 stitch 0-1-2-3-3-5 times = 76-78-82-84-88-92 stitches. Continue in stocking stitch. When piece measures 64-66-68-70-72-74 cm, cast off the middle 30-30-32-32-34-34 stitches for neck. Then cast off 1 stitch on next row from neck = 22-23-24-25-26-28 stitches for shoulder. Continue until piece measures 66-68-70-72-74-76 cm and cast off. Work the other shoulder the same way. FRONT PIECE: Cast on 82-90-98-106-114-122 stitches on circular needle size 5 mm with Alaska. Work back and forth as follows – first row is from right side: 1 edge stitch in garter stitch, * knit 2, purl 2 *, work from *-* over the next 16-20-24-28-32-36 stitches, knit 2, A.1 (= 6 stitches), A.2 (= 6 stitches), A.1, A.3 (= 8 stitches), A.4 (= 6 stitches), A.5 (= 6 stitches), A.4, * knit 2, purl 2 *, work from *-* over the next 16-20-24-28-32-36 stitches, finish with knit 2 and 1 edge stitch in garter stitch. Continue rib like this (repeat the first 4 rows in A.1 to A.5) until piece measures 5 cm. Switch to circular needle size 5.5 mm. Then work as follows from right side: 1 edge stitch in garter stitch, stocking stitch over the first 16-20-24-28-32-36 stitches, AT THE SAME TIME decrease 0-1-2-2-2-0 stitches evenly, purl 2, A.1x, A.2x. A.1x, A.3x, A.4x, A.5x, A.4x, purl 2, stocking stitch over the next 16-20-24-28-32-36 stitches, AT THE SAME TIME decrease 0-1-2-2-2-0 stitches evenly, 1 edge stitch in garter stitch. There are now 96-102-108-116-124-136 stitches on needle. When A.1x to A.5x have been worked 1 time vertically, continue as follows: 1 edge stitch in garter stitch, 16-19-22-26-30-36 stitches in stocking stitch, purl 2, A.6, A.6, A.6, A.7, A.8, A.8, A.8, purl 2, 16-19-22-26-30-36 stitches in stocking stitch, 1 edge stitch in garter stitch. Continue this pattern. When piece measures 44-45-46-47-48-49 cm, cast off for armhole in each side as on back piece = 90-92-96-98-102-106 stitches. When piece measures 60-62-64-66-68-70 cm, work next row as follows: Work the first 30-31-33-34-36-38 stitches as before, work the next 30 stitches - at the same time decrease 2 stitch evenly over each cable (= decrease 2 stitches over cable in A.6, 4 stitches over cables in A.7, and 2 stitches over cable in A.8, 8 stitches decreased in total), then slip these stitches on a stitch holder for neck (= 22 stitches on stitch holder), work the remaining 30-31-33-34-36-38 stitches as before. Now work each shoulder separately. Continue to cast off for neck at beginning of every row from neck as follows: Cast off 2 stitches 1-1-1-1-2-2 times and 1 stitch 2-2-3-3-2-2 times - NOTE: When working over cables in A.6/A.8, decrease at the same time 2 stitches over every cable = 24-25-26-27-28-30 stitches. Continue until piece measures 65-67-69-71-73-75 cm– decrease 2 stitches over cable in last repetition of A.6/A.8 = 22-23-24-25-26-28 stitches on shoulder. Cast off when piece measures 66-68-70-72-74-76 cm. Work the other shoulder the same way. SLEEVE: Cast on 42-46-46-50-50-50 stitches (including 1 edge stitch in each side) on circular needle size 5 mm with Alaska. Work back and forth as follows – first row is from right side: 1 edge stitch in garter stitch, * knit 2 and purl 2 *, work from *-* until 1 stitch remains, work 1 edge stitch in garter stitch. Work rib like this until piece measures 7 cm. Switch to circular needle size 5.5 mm. Purl 1 row from wrong side while decreasing 0-2-0-4-2-0 stitches evenly = 42-44-46-46-48-50 stitches. Then work in stocking stitch with 1 edge stitch in garter stitch in each side. When piece measures 8-8-8-8-8-10 cm, increase 1 stitch inside 1 edge stitch in each side - read INCREASE TIP. Increase like this every 3½-3½-3-2½-2½-2 cm 12-12-13-15-15-16 times in total = 66-68-72-76-78-82 stitches. When piece measures 51-50-49-48-47-46 cm, cast off 4 stitches in each side. Cast off for sleeve cap at beginning of every row in each side as follows: 2 stitches 2-2-3-3-4-4 times, 1 stitch 0-1-0-1-0-1 time. Then cast off 2 stitches in each side until piece measures 56 cm in all sizes, cast off 3 stitches in each side, then cast off the remaining stitches. Sleeve measures 57 cm in all sizes. Work another sleeve the same way. ASSEMBLY: Sew shoulder seams with grafting/kitchener stitches inside cast-off edge. Sew in sleeve cap. Sew underarm and side seams in one inside 1 edge stitch in garter stitch. NECK EDGE: Work neck edge in the round. Use circular needle size 5 mm and begin from right side at one shoulder seam. Pick up 72 to 84 stitches (including stitches on stitch holder at the front and divisible by 4). Purl 1 round and knit 1 round. Work rib with knit 2 and purl 2 for 9 cm. Cast off stitches with knit over knit and purl over purl. Fold rib at the top of neck down on the inside of garment. Fasten rib to form a folding edge. To avoid a tight neck edge and avoiding the edge to tip outwards, it is important to make the seam elastic. |
|||||||||||||||||||||||||
Diagram explanations |
|||||||||||||||||||||||||
|
|||||||||||||||||||||||||
 |
|||||||||||||||||||||||||
 |
|||||||||||||||||||||||||
 |
|||||||||||||||||||||||||
Have you finished this pattern?Tag your pictures with #dropspattern #fishersmoonsweater or submit them to the #dropsfan gallery. Do you need help with this pattern?You'll find 25 tutorial videos, a Comments/Questions area and more by visiting the pattern on garnstudio.com. © 1982-2026 DROPS Design A/S. We reserve all rights. This document, including all its sub-sections, has copyrights. Read more about what you can do with our patterns at the bottom of each pattern on our site. |
|||||||||||||||||||||||||


With over 40 years in knitting and crochet design, DROPS Design offers one of the most extensive collections of free patterns on the internet - translated to 17 languages. As of today we count 324 catalogues and 12290 patterns translated into English (UK/cm). 12290
We work hard to bring you the best knitting and crochet have to offer, inspiration and advice as well as great quality yarns at incredible prices! Would you like to use our patterns for other than personal use? You can read what you are allowed to do in the Copyright text at the bottom of all our patterns. Happy crafting!
Post a comment to pattern DROPS 219-9
We would love to hear what you have to say about this pattern!
If you want to leave a question, please make sure you select the correct category in the form below, to speed up the answering process. Required fields are marked *.