
Popular categories
Looking for a yarn?


Comments / Questions (100)
![]() Helena wrote:
Helena wrote:
Jag har nu kommit fram till den delen då jag ska börja sticka bakstycket. Vad jag inte förstår är hur jag nu har stickat fram till halva bakstycket och klippt av tråden. Så nu ligger det två likadana maskor bredvid varandra (slutmaska från förra varvet och första maskan från nya) mitt bak på ryggen. Det gör ingen referens till hur jag ska gå vidare härifrån? Ska jag föra över alla maskor så att jag startar från sidan och sen stickar två identiska mitt bak?
25.04.2021 - 12:17DROPS Design answered:
Hei Helena. Så bra du fant ut av det selv. Lykke til videre. mvh DROPS design
03.05.2021 - 11:35
![]() Cathryn wrote:
Cathryn wrote:
Are English rib and brioche the same thing?
14.04.2021 - 04:57DROPS Design answered:
Dear Cathryn, yes, they are. Happy Knitting!
14.04.2021 - 05:12
![]() Louise wrote:
Louise wrote:
Hej jag har stickat A.3a och A.2a nio ggr på höjden och har nu 148 maskor. Nu ska jag sticka A.1a över alla maskor tills arbetet mäter 25 cm. Men jag förstår inte vart jag ska börja mäta? Ska jag mäta från första varvet eller ska jag mäta från där jag börjar öka första ggn? Dvs direkt efter de första 9 centimeterna?
18.03.2021 - 21:22DROPS Design answered:
Hei Louise. Du skal måle langs skulderen (ikke halskanten), altså etter de første 9 cm. mvh DROPS design
07.04.2021 - 10:24
![]() Grete Nytrøen wrote:
Grete Nytrøen wrote:
Jeg er ferdig med bærestykket og prøver å følge oppskriften videre. Hva menes når det står "fell av kastene som egne masker"? Vil det si at en maske med kast skal felles som to masker? Skal jeg felle av de neste 15 maskene og de tilhørende kastene i tillegg? Eller skal kastene felles sammen med masken de hører til?
03.03.2021 - 17:00DROPS Design answered:
Hei Grete, Når det står at kasten skal felles av som vanlige masker, betyr dette at kastet er løftet over neste masken som om det var en vanlig maske (så for seg). Håper dette hjelper og god fornøyelse!
04.03.2021 - 07:42
![]() Cathrine wrote:
Cathrine wrote:
Jeg har felt av til begge skuldre og står nå midt på bakstykket hvor jeg starter omgangen. Så står det bryt tråden? Jeg forstår ikke hvordan jeg kommer videre og strikker bakstykket?
25.02.2021 - 17:48DROPS Design answered:
Hei Cathrine, Du starter på den ene siden av bakstykket, på retten, og strikker fram og tilbake over maskene på bakstykket. Masken på forstykket skal du strikke etterpå. God fornøyelse!
26.02.2021 - 08:37
![]() Ann Baardvik wrote:
Ann Baardvik wrote:
Hei! Vet dere at det er et nettsted som heter Strikk.no som sekger dette og andre mønster som er gratis hos dere! Jeg har kommentert det hos dem, men de svarer ikke! Mvh Ann Baardvik
31.01.2021 - 19:04
![]() Karen Mortensen wrote:
Karen Mortensen wrote:
Hej.bærestykke. Første afsnit er forstået.Derefter har jeg problem med at forstå:NårA1er strikket 1 gang i højden,repeteresA.1a i højden . Hele dette afsnit forstår jeg ikke. Vær rar at udpensle fremgangsmåden i dette afsnit af mønsteret.
31.01.2021 - 13:58DROPS Design answered:
Hei Karen. Du strikker A.1, A. 2 og A.3 samtidig. A.1 er ferdig i høyden før A.2 og A.3 er ferdig strikket i høyden, du fortsetter da med A.1a over A.1, mens A.2 og A.3 strikkes som før. Altså A.1a repeteres i høyden. Når A.2 og A.3 er strikket 1 gang i høyden, repeteres A.2a over A.2 og A.3b over A.3. mvh DROPS design
01.02.2021 - 15:07
![]() Christina Vestergaard wrote:
Christina Vestergaard wrote:
Hvor mange nøgle Air garn fra Garnius skal jeg brug til en str. L
25.01.2021 - 21:42
![]() Ivana wrote:
Ivana wrote:
Hellou.you recommand this pattern for new yarn wish, but sky is thiner.i would like to try both, wish and this pattern, but not sure, how to adapte.and especially, how much yarn i will need.
23.01.2021 - 22:58DROPS Design answered:
Dear Ivana, DROPS Wish is not an option to this pattern - you will find all patterns in Yarn Group E that you can make with DROPS Wish too here. Happy knitting!
25.01.2021 - 09:49
![]() Riitta Haukka wrote:
Riitta Haukka wrote:
En ymmärrä miten kaarrokseen tehdään A1, A2, A3,(A4) neuleita, ja kuinka monella silmukalla??? Onko ohjeessa virhettä, kun silmukoiden lukumääräkään ei vastaa luotuja kauluksen silmukoita? Miten etenee takakpl olkapäälle, olkapää etukpleeseen, taas toiseen olkapäähän ja takakappaleen loppuun? Millaisia välisilmukoita heti alkuun laitetaan, vai laitetaanko ollenkaan??? Vastauksesta kiitollinen .
21.01.2021 - 15:14DROPS Design answered:
Hei, ohjeen silmukkaluvut ovat oikeat. Esim koossa S mallineuletta neulotaan 56 silmukalla: 6 + 2 + 14 + 2 + 10 + 2 + 14 + 2 + 4 = 56.
24.03.2021 - 16:49
|
||||||||||||||||||||||||||||
Easy Over#easyovervest |
||||||||||||||||||||||||||||
 |
 |
|||||||||||||||||||||||||||
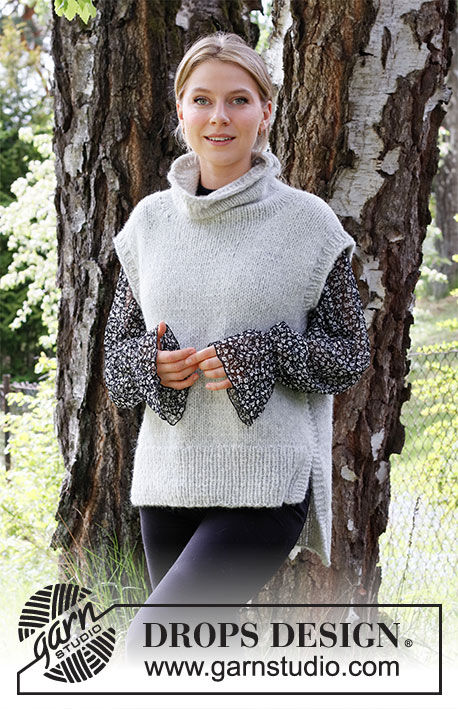
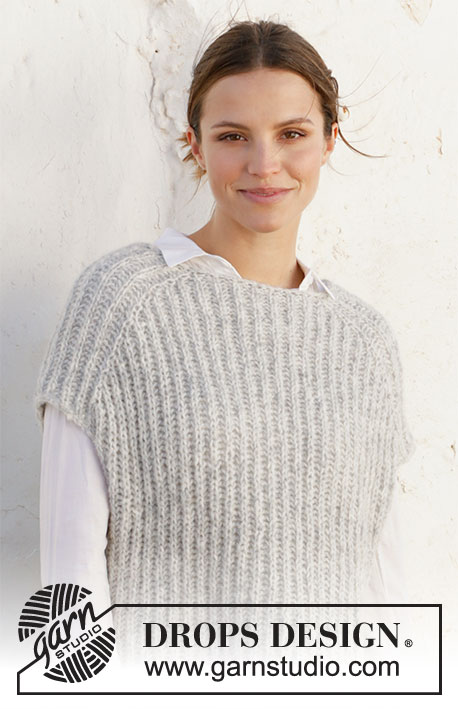
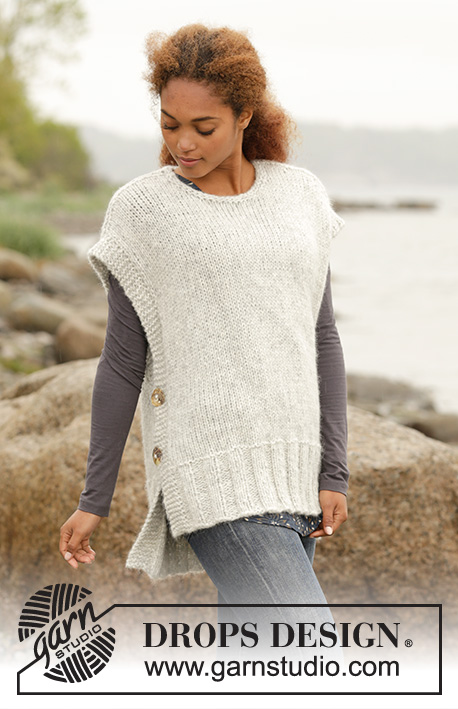
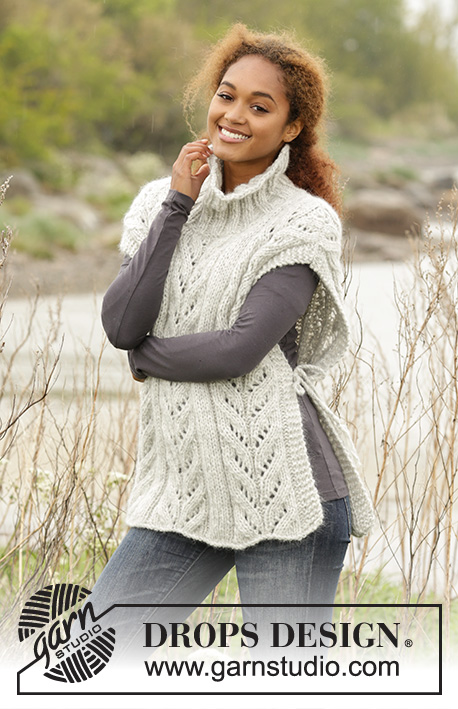
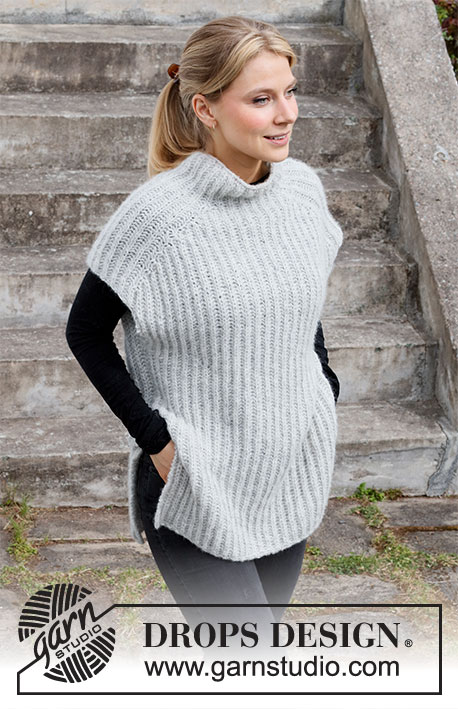
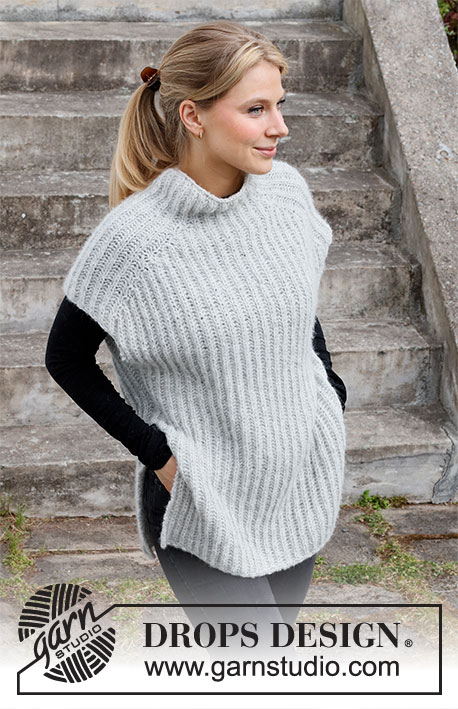
Knitted vest with English rib in DROPS Air. Worked top down. Size: XS - XXL
DROPS 217-13 |
||||||||||||||||||||||||||||
|
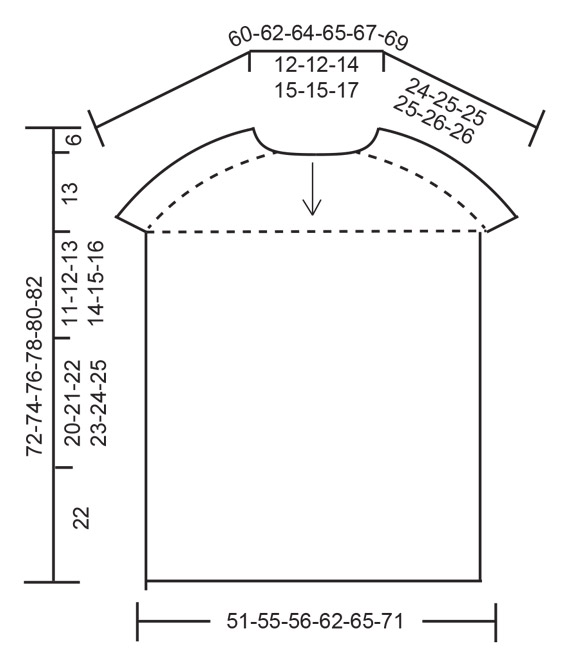
------------------------------------------------------- EXPLANATION FOR THE PATTERN: ------------------------------------------------------- GARTER STITCH (back and forth): Knit all rows. 1 ridge vertically = knit 2 rows. PATTERN: See diagrams A.1 to A.4 (worked in English rib). DECREASE TIP (evenly): To calculate how to decrease evenly, use the total number of stitches on round (e.g. 62 stitches) and divide stitches by number of decreases to be done (e.g. 10) = 6.2. In this example decrease by purling approx. every 5th and 6th stitch together. ------------------------------------------------------- START THE PIECE HERE: ------------------------------------------------------- VEST - SHORT OVERVIEW OF THE PIECE: Work neck edge and yoke in the round on circular needle from mid back, top down. Increase stitches for shoulder on yoke before dividing the piece, and work front and back piece separately until finished measurements. NECK EDGE: Cast on 66-66-70-74-74-78 stitches on circular needle size 6 mm = US 10 with Air. Purl 1 round and decrease 10 stitches evenly – read DECREASE TIP = 56-56-60-64-64-68 stitches. Switch to circular needle size 7 mm = US 10,75. Work A.1 over all stitches. Continue until piece measures 9 cm = 3½". YOKE: Work pattern as follows: Work A.1 (= 2 stitches) over the first 6-6-6-8-8-8 stitches (= half back piece), A.2 (= 2 stitches), A.1 over 14 stitches, A.3 (= 2 stitches) (= shoulder), A.1 over 10-10-12-14-14-16 stitches (= front piece), A.2 over 2 stitches, A.1 over 14 stitches, A.3 over 2 stitches (= shoulder), and A.1 over the last 4-4-6-6-6-8 stitches (= half back piece). REMEMBER THE KNITTING GAUGE! When A.1 has been worked 1 time vertically, repeat A.1a vertically. When 2 and A.3 have been worked 1 time vertically, repeat A.2a and A.3a vertically, i.e. continue increases every 6th round, work the increased stitches in English rib. When A.2 and A.3a have been worked 8-9-9-10-11-12 times vertically in total, there are 136-144-148-160-168-180 stitches on needle. Work A.1a over all stitches until piece measures 24-25-25-25-26-26 cm = 9½"-9¾"-9¾"-9¾"-10¼"-10¼" on the longest (i.e. measured along the shoulder), adjust so that next round is a purl round. Now divide piece into front and back piece and bind off shoulder stitches as follows: Work 26-28-28-32-34-36 stitches in English rib, 1 stitch in GARTER STITCH – read explanation above (= half back piece), bind off the next 15 stitches (bind off yarn overs as separate stitches), 1 stitch in garter stitch, work 51-55-57-63-67-73 stitches in English rib, 1 stitch in garter stitch (= front piece), bind off the next 15 stitches (bind off yarn overs as separate stitches), 1 stitch in garter stitch and work English rib over the last 25-27-29-31-33-37 stitches (= half back piece). Cut the yarn. Let the stitches on front piece sit on needle. BACK PIECE: = 53-57-59-65-69-75 stitches. Work as follows from right side: Work 1 stitch in garter stitch, A.4 (= 2 stitches) until 1 stitch remains (i.e. English rib begins and ends with 1 purl English rib stitch), and finish with 1 stitch in garter stitch. Continue pattern back and forth. When piece measures 11-12-13-14-15-16 cm = 4⅜"-4¾"-5⅛"-5½"-6"-6¼" from division, insert 1 marker in each side, use this for side seam later. When piece measures 66-68-70-72-74-76 cm = 26"-26⅜"-27½"-29⅛"-29⅛"-30" from the neck, bind off by knitting, bind off yarn overs as separate stitches (this is done to avoid a tight bind-off edge). FRONT PIECE: Work the 53-57-59-65-69-75 stitches on front piece as on back piece. ASSEMBLY: Begin at the marker in the side and sew back and front piece together from marker and approx. 20-21-22-23-24-25 cm = 8"-8¼"-8¾"-9"-9½"-9¾" downwards. Bottom 22 cm = 8¾" = vent. |
||||||||||||||||||||||||||||
Diagram explanations |
||||||||||||||||||||||||||||
|
||||||||||||||||||||||||||||
 |
||||||||||||||||||||||||||||
 |
||||||||||||||||||||||||||||
Have you finished this pattern?Tag your pictures with #dropspattern #easyovervest or submit them to the #dropsfan gallery. Do you need help with this pattern?You'll find 17 tutorial videos, a Comments/Questions area and more by visiting the pattern on garnstudio.com. © 1982-2026 DROPS Design A/S. We reserve all rights. This document, including all its sub-sections, has copyrights. Read more about what you can do with our patterns at the bottom of each pattern on our site. |
||||||||||||||||||||||||||||


With over 40 years in knitting and crochet design, DROPS Design offers one of the most extensive collections of free patterns on the internet - translated to 17 languages. As of today we count 324 catalogs and 12290 patterns - 12280 of which are translated into English (US/in).
We work hard to bring you the best knitting and crochet have to offer, inspiration and advice as well as great quality yarns at incredible prices! Would you like to use our patterns for other than personal use? You can read what you are allowed to do in the Copyright text at the bottom of all our patterns. Happy crafting!
Post a comment to pattern DROPS 217-13
We would love to hear what you have to say about this pattern!
If you want to leave a question, please make sure you select the correct category in the form below, to speed up the answering process. Required fields are marked *.