
Popular categories
Looking for a yarn?


Comments / Questions (135)
![]() Maija Linnakko wrote:
Maija Linnakko wrote:
R-698 Mitä tarkoittaa ohjeessa sivulla 4 lause ”Toista jokaisen lisäyskerroksen jälkeen piirroksen A.1a mallikertaa yhden ylimäärisen kerran krs:lla”?
08.11.2022 - 17:01
![]() Anne wrote:
Anne wrote:
I have found this pattern very difficult to understand. Instructions are not clear . I have read instructions multiple times, watched videos with no help in understanding instructions. Even with tension square correct the sizing is too small for what pattern indicates. I would not recommend this pattern at all.
11.10.2022 - 23:13
![]() Ashley wrote:
Ashley wrote:
I understand the author’s native language isn’t English, but I still think this pattern, as beautiful as it is, is so poorly written. I shouldn’t have to sift through every page of comments to figure it out and then still be confused. The pattern needs a lot of work to be user friendly at all.
27.03.2022 - 18:30
![]() Stefanie Nocker wrote:
Stefanie Nocker wrote:
Hallo. Ich häkle Gr. XL. und habe jetzt 300 Stb. (passe in S fertig). Ich soll nun 3 Rd weiter häkeln. in A3 beim Pfeil starten. 3Stb,2Lm,3Stb. Ich habe in meiner letzten runde nur Stb. wo soll ich 6 Stb. unterbringen?. In A.1a sind beim pfeil XL nur 2 runden übrig. und auch da passt die runde nicht auf meine letzte Runde. Wie und wo im Diagramm fahre ich nun fort?
02.03.2022 - 13:14DROPS Design answered:
Liebe Frau Nocker, in A.1 haben Sie mit der Runde mit dem Pfeil gehäkelt dann häkeln Sie die 3 ersten Runde in A.3 - letzte Runde in A.2 /A.1 wurde mit Stäbchen, dann häkeln Sie die 3 ersten Runde in A.3 (bei der Reihe mit dem schwarzen Quadrat anfangen). Viel Spaß beim häkeln!
02.03.2022 - 17:30
![]() Gisela wrote:
Gisela wrote:
Rd11 and 100 2ch spaces. For A1 Front and back l need 72 each so 144 x 3= 48 spaces.for A1 between A2 l need 24 x2 sts = 16 spaces. That leaves 36 soaces for 4x A2, 9 each. How does that work out?
23.10.2021 - 08:49DROPS Design answered:
Dear Gisela, could you specify which size you are working, so that we can better answer your questions. Also, which spaces do you mean and cause you trouble: tr, ch2, 2tr or tr,ch2, dc?
01.11.2021 - 12:19
![]() Susan wrote:
Susan wrote:
I’m on what I’ve figured out is the 8th round, and it says to work A2 as before. I’m assuming it’s A2 for the entire round without switching to A1,correct? Then it goes to the all sizes it says to place 4 markers. Could you explain what I’m supposed to do clearer?
20.09.2021 - 05:56DROPS Design answered:
Dear Susan, you have to work A.1 and A.2 as before, rounds are almost the same in both diagrams, but you will increase in A.2 as shown in the diagram while you will increase in A.1 only when explained in the written pattern. The 4 markers should have been placed on the first row working A.1/A.2, and you will then increase in some sizes in the stitches worked between markers. Can this help?
20.09.2021 - 11:23
![]() Sue wrote:
Sue wrote:
I’m having a really hard time following your pattern. On the yolk I see there are three rounds. Then it skips to all sizes for round six. What happened to four and five? I would love to read your comments but they are not in English, Which doesn’t help me. I looked at your videos for help, it didn’t help me. I look forward to your response. I did take it upon myself to follow chart A 1 and A2 for the next round but it seems to be quite ruffly which I don’t think is correct.
08.09.2021 - 21:39DROPS Design answered:
Dear Sue, just work round 4 and 5 as explained previously, ie increase in A.2 as shown in the diagram and work A.1 as previously. Then you will increase on 6th round as explaindd, and continue diagram as before, follow the section appropriate to the size since increases will differ, If you have any doubt, bring your work to your store or show them a picture, it will help them to check together with you. Hope this will help, happy crocheting!
09.09.2021 - 08:42
![]() Svenja wrote:
Svenja wrote:
Und was ist nach Runde 6, wird in A 1 immer auf den darauf folgenden zugenommen?
21.07.2021 - 12:29DROPS Design answered:
Liebe Svenja, bei der Passe wird es in M nur bei der 6. Runde in A.1 zugenommen, andere Zunahmen für die Passe sind in A.2 inbegriffen/gehäkelt - siehe ALLE GR.: In der 6. Rd von A.1 (Rd mit Stb) ... . Viel Spaß beim häkeln!
21.07.2021 - 14:30
![]() Svenja wrote:
Svenja wrote:
Muss zwischen Makierer 2 und 4 4 und 5, 6-7 und 8 und 1 immer Diagramm A1 gemacht werden? Ich häkel das Oberteil in Größe M. Vielen Dank für die Hilfe
20.07.2021 - 17:03DROPS Design answered:
Liebe Svenja, A.1 wird zwischen Markierer (-2 und -3), (-4 und -5), (-6 und -7) und (-8 bis -1 =Ende der Runde) gehäkelt und A.2 wird zwischen Markierer (-1 und -2), (-3 und -4), (-5 und -6) und (-7 und -8) gehäkelt. In A.2 wird es wie im Diagram zugenommen; in A.1 wird es bei 6. Reihe regelmäßig zugnommen. Viel Spaß beim häkeln!
21.07.2021 - 07:50
![]() NatJ wrote:
NatJ wrote:
Bonjour, je fais la taille L. J'ai un pb avec les 7 augmentations à répéter tous les 1.5 cm, c'est à dire tous les 2 tours, sur des tours de brides : il ya des passages de A1a sans tours de brides tous les 2 tours, vers la fin notamment. Merci de votre aide !
20.06.2021 - 19:39DROPS Design answered:
Bonjour Natj, vous pouvez augmenter autrement que dans les rangs de brides, mais si vous préférez les rangs de brides, ajustez la hauteur entre les augmentations pour qu'elles restent harmonieuses. Bon crochet!
21.06.2021 - 08:10
|
||||||||||||||||||||||||||||
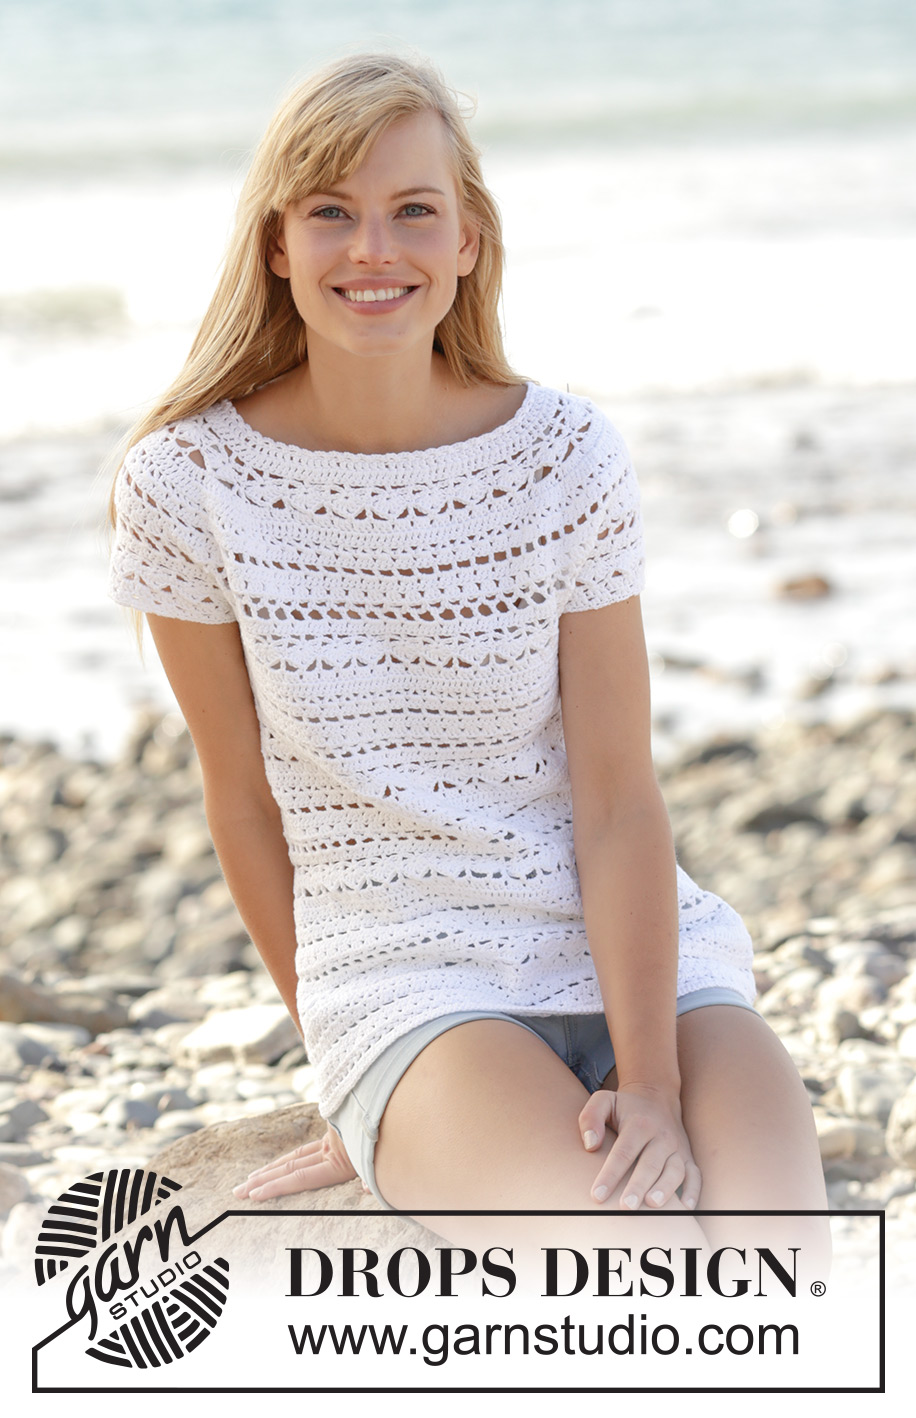
Seashore Bliss Top#seashoreblisstop |
||||||||||||||||||||||||||||
|
|
||||||||||||||||||||||||||||
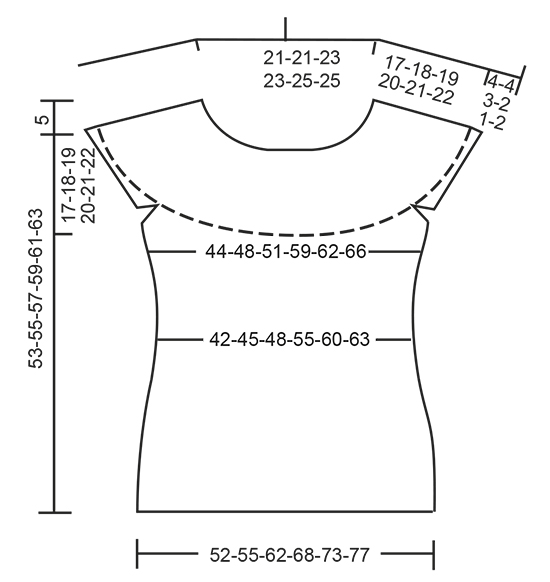
Crochet DROPS top with lace pattern and round yoke in ”Muskat”. The piece is worked top down. Size: S - XXXL.
DROPS 169-26 |
||||||||||||||||||||||||||||
|
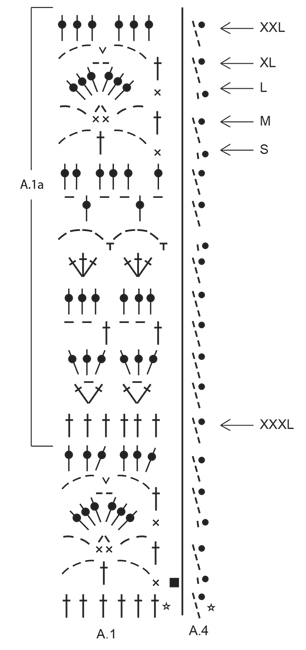
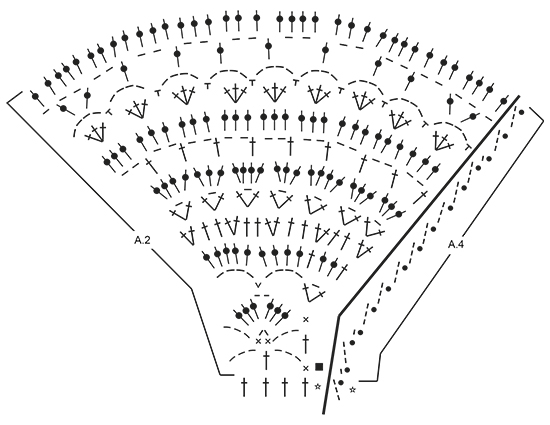
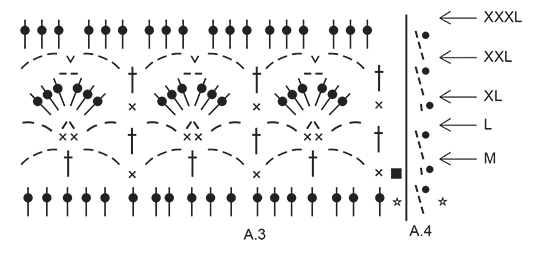
PATTERN: See diagrams A.1 to A.4. Diagram A.4 shows how round beg and ends. CROCHET INFO: Replace first dc at beg of every dc round with 3 ch. Finish round with 1 sl st in 3rd ch at beg of round. Replace first sc at beg of every sc round with 1 ch. Finish every round with 1 sl st in ch from beg of round. INCREASE TIP: Inc 1 dc by working 2 dc in same dc. DECREASE TIP: Dec 1 dc by working 2 dc tog as follows: Work 1 dc but wait with last pull through (= 2 sts on hook), then work next dc but on last pull through, pull yarn through all 3 sts on hook. TIP ARMHOLE: Size S, M and XL: In the last repeat of A.1 before marker 1 and marker 3 (= beginning of armhole), replace the last chain stitch with a double crochet in the last stitch of the same repeat on previous row. ---------------------------------------------------------- TOP: The piece is worked top down. NOTE: It is important to keep the crochet gauge vertically so that the measurements on yoke will be correct. YOKE: Work 108-108-117-117-124-124 ch on hook size 4 mm / G/6 with Muskat and form 1 ring with 1 sl st in first ch. Work first round as follows: Work 3 ch (= 1 dc) - READ CROCHET INFO, 1 dc in each of the next 3-3-5-5-5-5 ch, * skip ch 1, 1 dc in each of the next 6 ch *, repeat from *-* the entire row = 94-94-102-102-108-108 dc. Work 1 round with 1 dc in every dc and inc 18-18-22-22-28-40 dc evenly - READ INCREASE TIP = 112-112-124-124-136-148 dc. Work next round and insert 8 markers in the piece as follows: A.4 shows how round beg and ends. Insert 1st marker at beg of round, work A.2 over the first 4 dc, insert 2nd marker, A.1 over the next 12 dc (= 2 times in width), insert 3rd marker, A.2 over the next 4 dc, insert 4th marker, work A.1 over the next 36-36-42-42-48-54 dc (= 6-6-7-7-8-9 times in width), insert 5th marker, A.2 over the next 4 dc, insert 6th marker, A.1 over the next 12 dc (= 2 times in width), insert 7th marker, A.2 over the next 4 dc, insert 8th marker, A.1 over the last 36-36-42-42-48-54 dc (= 6-6-7-7-8-9 times in width). REMEMBER THE CROCHET GAUGE! SIZE XXL-XXXL: On 5th round (round with dc) in A.1 inc evenly as follows: Between 2nd and 3rd marker and 6th and 7th marker: Inc 6-6 dc. 12-12 dc have been inc in total on round (= 18-18 dc between 2nd and 3rd marker and 6th and 7th marker). Repeat A.1 3-3 times between 2nd and 3rd marker and between 6th and 7th marker: ALL SIZES: On 6th round (round with dc) in A.1 inc evenly as follows: Between 2nd and 3rd marker and 6th and 7th marker: Inc 0-0-6-6-6-6 dc (= 12-12-18-18-24-24 dc between these markers). Between 4th and 5th marker and 8th and 1st marker: Inc 0-6-6-6-6-6 dc (= 36-42-48-48-54-60 dc between each of these markers). Then repeat diagram A.1 2-2-3-3-4-4 times between 2nd and 3rd marker, 6-7-8-8-9-10 times between 4th and 5th marker, 2-2-3-3-4-4 times between 6th and 7th marker and 6-7-8-8-9-10 times between 8th and 1st marker. Work A.2 as before. SIZE XL-XXL-XXXL: On 8th round (round with dc) in A.1 inc evenly as follows: Between 4th and 5th marker and 8th and 1st marker: Inc 6-6-6 dc (= 54-60-66 dc between each of these markers). 12-12-12 dc have been inc in total on round. Repeat A.1 9-10-11 times between 4th and 5th marker and between 8th and 1st marker. Repeat inc on 10th round in A.1 (= 60-66-72 dc between each of these markers). Repeat diagram A.1 10-11-12 times between 4th and 5th marker and between 8th and 1st marker. ALL SIZES: On last round in A.2 insert 1 new marker in the middle of each A.2 (i.e. 18 dc on each side of marker in A.2 = 4 markers). Remove the old markers (= 4 markers remain in piece). Sts between markers are for sleeves (= 48-48-54-54-60-60 dc on each sleeve). When A.2 has been worked 1 time vertically, there are 240-252-276-300-324-336 dc on round. Yoke is now done in size S. SIZE M-L-XL-XXL-XXXL: Continue with pattern A.1 as before but over dc in A.2 (= 36 dc) work A.3 2 times in total in width (marker is in the middle of these repetitions). Work 1-2-3-4-5 rounds of A.3 (see arrow in diagram for correct size). Piece now measures 17-18-19-20-21-22 cm / 6¾"-7"-7½"-8"-8¼"-8¾" vertically. ALL SIZES: Work A.1a (see arrow on where pattern beg in the different sizes) 3 times in total in width until first marker - SEE ARMHOLE TIP, work 8-8-8-10-10-10 ch, skip sts between the 2 markers (= sleeve), work A.1a 12-13-14-16-17-18 times in total in width until next marker (= front piece), work 8-8-8-10-10-10 ch, skip sts between the 2 markers (= sleeve), work A.1a 9-10-11-13-14-15 times in total in width (= 160-172-184-212-224-236 sts). Fasten off. BODY: Beg round mid under sleeve as follows: Size S-L: Work 1 sl st in 5th ch, ch 1, work 1 sc in each of the next 3-3 ch, work A.1a as before until ch under 2nd sleeve, 1 sc in each of the 8-8 ch under sleeve, work A.1a as before the rest of round. Work the 8-8 sts under each sleeve as 1st st in A.1a. SIZE M-XL-XXL-XXXL: Work 1 sl st in 5th ch, ch 3, work 1 dc in each of the next 3-5-5-5 ch, work A.1a as before until ch under 2nd sleeve, 1 dc in each of the 8-10-10-10 ch under sleeve, work A.1a as before the rest of round. Work the 8-10-10-10 sts under each sleeve as 1st st in A.1a. ALL SIZES: Insert 1 marker in piece, NOW MEASURE PIECE FROM HERE. On first round with dc dec 4-4-4-2-2-2 dc evenly - READ DECREASE TIP = 156-168-180-210-222-234 dc. Then repeat A.1a 26-28-30-35-37-39 times in width. Repeat A.1a vertically. When piece measures 12 cm / 4¾", adjust so that next round is with dc, dec 6 dc evenly = 150-162-174-204-216-228 dc. Now repeat A.1a 25-27-29-34-36-38 times in width. SIZE XL: Repeat dec when piece measures 16 cm / 6¼" from marker = 198 dc. Now repeat A.1a 33 times in width. ALL SIZES: When piece measures 20-21-22-23-24-25 cm / 8"-8¼"-8¾"-9"-9½"-9¾" from marker – adjust so that next round is with dc, inc 6 dc evenly. Repeat inc every 2-2-1½-1½-1½-1½ cm / ¾"-¾"-½"-½"-½"-½ 5-5-7-7-7-7 more times = 186-198-222-246-264-276 dc. Repeat A.1a 1 more in width on every inc. When all inc are done, repeat A.1a 31-33-37-41-44-46 times in width. Work until piece measures 36-37-38-39-40-41 cm / 14¼"-14½"-15"-14¼"-15¾"-16⅛" from marker, adjust to finish nicely according to pattern. Fasten off. SLEEVE EDGE: SIZE S: Beg by working mid under sleeve as follows: Work 1 sl st in 4th ch of the 8 ch worked in armhole on body. Work 1 ch (= 1 sc). Then work with 1 sc in each of the next ch 4, work A.3 over the next 18 dc, work A.1 (adjust pattern according to A.3) 2 times in total in width as before, work A.3 over the next 18 dc, finish with 1 sc in each of the last 3 ch. Work as 1st st in A.3 in the 8 sts under sleeve. On last round in A.3 dec 10 dc evenly = 46 dc. SIZE M-XL-XXL: Beg by working mid under sleeve as follows: Work 1 sl st in 4th ch of the 8-10-10 ch worked in armhole on body. Work 3 ch (= 1 dc). Then work with 1 dc in each of the next 4-6-6 ch, work A.3 as before, work A.1 (adjust pattern according to A.3) 2-3-4 times in total in width as before, work A.3, finish with 1 dc in each of the last 3 ch. Work as 1st st in A.3 in the 8-10-10 sts under sleeve. On last round in A.3 dec 10 dc evenly = 46-54-60 dc. SIZE L: Beg by working mid under sleeve as follows: Work 1 sl st in 4th ch of the 8 ch worked in armhole on body. Work 1 ch (= 1 sc). Then work 1 sc in each of the next ch 4, work A.3 as before, work A.1 (adjust pattern according to A.3) 3 times in total in width as before, work A.3, finish with 1 sc in each of the last 3 ch. Work as 1st st in A.3 in the 8 sts under sleeve. On last round in A.3 dec 10 dc evenly = 52 dc. SIZE XXXL: Beg by working mid under sleeve as follows: Work 1 sl st in 4th ch of the 10 ch worked in armhole on body. Work 3 ch (= 1 dc). Then work 1 dc in each of the next ch 6, work 1 dc in each of the 60 dc, finish with 1 dc in each of the last 3 ch. Work 1 dc in every dc and dec 10 dc evenly = 60 dc. ALL SIZES: Work * 1 sc in first/next dc, 1 ch, skip approx. 1 cm / ⅜" *, repeat from *-* around the entire sleeve. Fasten off. Work the other sleeve the same way. NECK EDGE: Crochet an edge around the neck. Beg mid back. Work * 1 sc in first/next dc, ch 3, skip approx. 1 cm / ⅜" *, repeat from *-* around the entire neck. Make sure to avoid a tight neck edge, adjust to finish with 1 sl st in first ch. Fasten off. |
||||||||||||||||||||||||||||
Diagram explanations |
||||||||||||||||||||||||||||
|
||||||||||||||||||||||||||||
 |
||||||||||||||||||||||||||||
 |
||||||||||||||||||||||||||||
 |
||||||||||||||||||||||||||||
 |
||||||||||||||||||||||||||||
Have you finished this pattern?Tag your pictures with #dropspattern #seashoreblisstop or submit them to the #dropsfan gallery. Do you need help with this pattern?You'll find 11 tutorial videos, a Comments/Questions area and more by visiting the pattern on garnstudio.com. © 1982-2026 DROPS Design A/S. We reserve all rights. This document, including all its sub-sections, has copyrights. Read more about what you can do with our patterns at the bottom of each pattern on our site. |
||||||||||||||||||||||||||||


With over 40 years in knitting and crochet design, DROPS Design offers one of the most extensive collections of free patterns on the internet - translated to 17 languages. As of today we count 325 catalogs and 12298 patterns - 12288 of which are translated into English (US/in).
We work hard to bring you the best knitting and crochet have to offer, inspiration and advice as well as great quality yarns at incredible prices! Would you like to use our patterns for other than personal use? You can read what you are allowed to do in the Copyright text at the bottom of all our patterns. Happy crafting!
Post a comment to pattern DROPS 169-26
We would love to hear what you have to say about this pattern!
If you want to leave a question, please make sure you select the correct category in the form below, to speed up the answering process. Required fields are marked *.