
Popular categories
Looking for a yarn?


Comments / Questions (41)
![]() Dawn wrote:
Dawn wrote:
I am really enjoying this pattern! I need help with the increase within the A2 repetitions. The pattern reads, "inc 1 repetition of A.2 in 9th repetition in ch-space as follows: Work ch 2, 1 sc in ch-space, ch 2, 1dc in same ch-space,ch 2, 1 sc in same ch-space." I have just finished the dc of the 8th rep. Can you please tell me each step of the entire 9th repetition-plus inc, before I continue with the 1st ch 2 of 10th rep? and is this done in the single ch-sp of A2 (not the 3 ch-sp) Thnx!
08.04.2023 - 19:09DROPS Design answered:
Dear Dawn, work as follows in the 9th repeat: ch 2, in the chain-3 space of the previous row work (1 dc in ch-space, ch 2, 1 tr in same ch-space, ch 2, 1 dc in same ch-space), 1 tr in the next chain-1 space of the previous row. Happy crochetting!
08.04.2023 - 23:09
![]() Dawn Roehrs wrote:
Dawn Roehrs wrote:
Concerning instructions of the BODY : ...1 dc in each of the next ch 2, * skip ch 1, 1 dc in each of the next 4 ch *, repeat from *-* = 88-92-96-104-108-116 dc I am wondering about the "skip ch 1" . It is not clear to me if I should ch 1 and skip the chain st below or if I just skip the ch st below and dc in the next 4 ch sts. I find it confusing that it first uses "ch 2" and "ch 1" language and then switches to "4 ch". (switching the order of abbr.)
20.01.2023 - 15:13DROPS Design answered:
Dear Mrs Roehrs, on the very first row you should just skip 1 chain from the foundation chain and crochet 1 dc in each of the next 4 chains from the foundation chain; most of the time the chains are always tighten on the foundation chain as when crocheting the dc afterwards, reason why we crochet here more chains than you need stitches on first row. Happy crocheting!
20.01.2023 - 16:41
![]() Christine wrote:
Christine wrote:
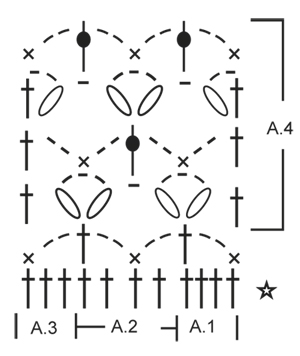
Hello, I am going to attempt yesterday cardigan and have briefly looked at the diagram please would you tell me what (tr around st) means? and where can I find the meaning of the black dot? I have been doing crochet for a long time but have never followed a pattern. thank you, Christine
03.01.2023 - 17:40DROPS Design answered:
Hello Christine! A symbol with black dot is "tr in st" meaning you have to make treble crochet in stitch. Please look at step-by-step tutorials, videos and a very handy technical dictionary below the pattern. How to read crochet diagrams . Hope it helps!
03.01.2023 - 20:37
![]() Dawn Roehrs wrote:
Dawn Roehrs wrote:
Starting with the BODY of the piece (size M), I am asking for clarity on the following instructions: " ... AT THE SAME TIME inc 1 dc at all markers as follows: Inc every other row 5-6-6-5-5-6 times, and every 4th row 2-2-2-3-3-3 times." I do not understand what 6 and 2 "times" means. Is this the amount of rows or the amount of markers I inc at? Will I inc at each of the 19 markers- every other row? Then how does that work with the 4th row? Thank you.
01.01.2023 - 09:40DROPS Design answered:
Hi Dawn, You increase at all the markers every other row 6 times (you have worked 12 rows with 6 rows of increases), then every 4th row 2 times (you have worked 8 rows with 2 rows of increases). Hope this helps. Happy New Year!
02.01.2023 - 06:50
![]() LES GRANDS CHAMPS wrote:
LES GRANDS CHAMPS wrote:
Bonjour, je reviens vers vous concernant le modele Drops 156-17 et je ne comprends pas la partie concernant les augmentations. Quel motif faut il augmenter ? A quoi correspond A2 ? Merci beaucoup.
02.10.2022 - 21:55DROPS Design answered:
Bonjour Mme Les Grands Champs, vous devez augmenter pour l'empiècement 1 bride à chaque marqueur (la 1ère fois que vous augmentez, crochetez 2 brides avant les marqueurs, la fois suivante, crochetez 2 brides après les marqueurs) vous allez ainsi augmenter 19-20-21-23-24-26 brides à chaque rang d'augmentations, et augmenter ainsi tous les 2 rangs puis tous les 4 rangs. A.1 correspond au début du point fantaisie, vous répétez ensuite A.2 et vous terminez le point fantaisie par A.3. Bon crochet!
03.10.2022 - 10:03
![]() Rits wrote:
Rits wrote:
Kan dere legge ut en video av hvordan man hekler selve mønsteret fra diagrammer?
15.07.2022 - 21:48DROPS Design answered:
Hej, Her ser du :) Det er lidt andre symboler, men teknikken er den samme: Vifter ifølge diagram
02.08.2022 - 14:31
![]() CATTANEO wrote:
CATTANEO wrote:
Bonjour, je ne comprends pas le diagrammes, pourriez vous me donner plus d'explications ?
07.05.2022 - 16:39DROPS Design answered:
Bonjour Mme Cattaneo, chaque symbole représente 1 maille ou 1 groupe de mailles, vous lisez les diagrammes sur l'endroit ainsi: commencez par A.1, repétez A.2 et terminez par A.3; sur l'envers, commencez par A.3, répétez A.2 (en le lisant de gauche à droite) et terminez par A.1. Lorsque vous avez crocheté le diagramme en hauteur, répétez A.4 = les 4 derniers rangs. Bon crochet!
09.05.2022 - 08:30
![]() Cattaneo wrote:
Cattaneo wrote:
Je vous remercie pour tous ces beaux modèles avec les explications a la clé !
06.05.2022 - 20:15
![]() CATTANEO wrote:
CATTANEO wrote:
Bonjour, sur le modèle Yesterday Cardigan, apres avoir fait les augmentations et commencé la séparation pour les manches (36 brides pour les 2 parties du devant et 59 pour le dos = 131 brides), il est noté après de diminuer de 8 ml pour avoir 139 brides. Pourriez vous m'expliquer ce passage car je ne comprends pas et je suis bloquée. Merci encore pour tous ces beaux modèles, j ai beaucoup de plaisir à les crocheter. J'attends impatiemment votre réponse.🙂
06.05.2022 - 20:12DROPS Design answered:
Bonjour Mme Cattaneo, lorsque vous divisez l'empiècement vous avez: 36 brides (devant), 8 ml, 59 brides (dos), 8 ml et 36 brides (devant ) soit: 36+8+59+8+36=147 mailles au total; vous crochetez 1 bride dans chaque maille en diminuant 8 mailles à intervalles réguliers soit 147-8=139 mailles. Bon crochet!
09.05.2022 - 08:05
![]() Camila wrote:
Camila wrote:
Fortsätt mönstret så. När A.1-A.3 har virkats 1 gång på höjden repeteras A.4 på höjden till färdigt mått. Jag….När arb mäter 14-14-14-15-15-15 cm från markören, avpassa så att nästa v är sista v i A.4,det 1 rapport av A.2 i…. Jag förstår inte” a1-A3 på höjden,” vad är det? Ska jag vara göra ett varv och sedan bara A4 hela vägen eller är det a1-a3 på ett varv och sedan A4 som ska repeteras om och om igen som ett paket? Men vaddå höjden?
27.03.2022 - 21:41DROPS Design answered:
Hej Camila. Du virkar 1 st i var och en av de 6 första st (= framkant), A.1, A.2 totalt 30-34-37-40-44-51 rapporter på bredden, avsluta med A.3 och 1 st i var och en av de sista 6 st. När du virkat hela diagrammet så fortsätter du att virka endast de varv där det står A.4 (men med samma ordning som tidigare av delarna i A.4). Du virkar A.4 tills arbetet mäter 14-14-14-15-15-15 cm från markören och fortsätter då enligt beskrivningen. Mvh DROPS Design
30.03.2022 - 09:04
|
|||||||||||||||||||
Yesterday Cardigan#yesterdaycardigan |
|||||||||||||||||||
 |
 |
||||||||||||||||||
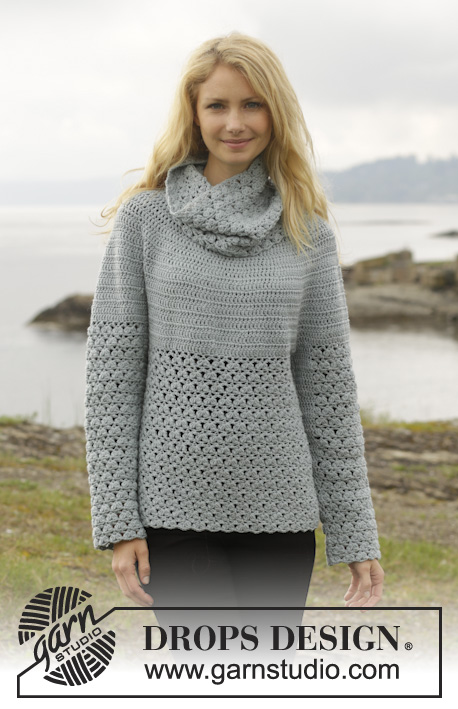
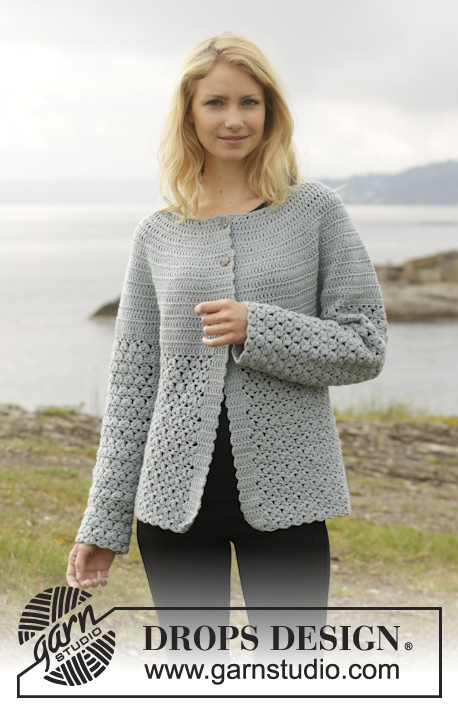
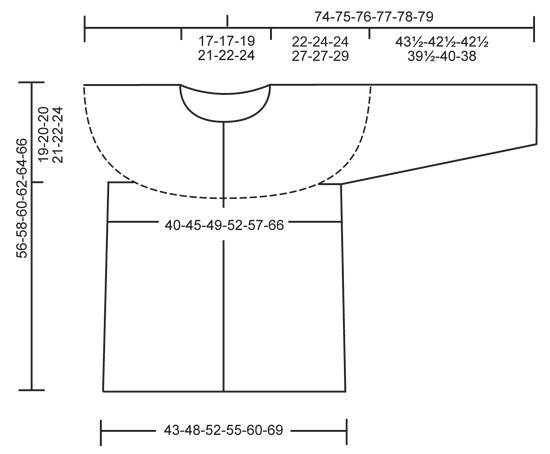
Crochet DROPS jacket with round yoke and lace pattern, worked top down in ”Merino Extra Fine”. Size: S - XXXL.
DROPS 156-17 |
|||||||||||||||||||
|
PATTERN: See diagrams A.1-A.4. The diagrams show all rows in pattern seen from RS. CROCHET INFO: Replace first dc on every round/row with 3 ch. Replace first sc on every round/row with 1 ch. Finish every dc round with 1 sl st in 3rd ch from beg of round. Finish every sc round with 1 sl st in 1st ch on round. INCREASE TIP: Inc 1 st by working 2 dc in 1 dc, first on one side of all markers on row, next time on the other side of all markers on row, continue inc like this. DECREASE TIP: Work 1 dc but wait with last pull through (= 2 sts on hook), then work next dc but on last pull through, pull yarn through all sts on hook = 1 st dec. ---------------------------------------------------------- BODY: The piece is worked top down. Worked back and forth from mid front. Work 111-116-121-131-136-146 ch (includes 3 ch to turn with) on hook size 4.5 mm with Merino Extra Fine. Work next row as follows: 1 dc in 4th ch (= 2 dc), 1 dc in each of the next ch 2, * skip ch 1, 1 dc in each of the next 4 ch *, repeat from *-* = 88-92-96-104-108-116 dc - READ CROCHET INFO. Insert 19-20-21-23-24-26 markers in the piece as follows: Insert 1st marker after 8th dc, then insert 18-19-20-22-23-25 markers 4 dc apart, after last marker there are 8 dc. Work back and forth with dc AT THE SAME TIME inc 1 dc at all markers as follows: Inc every other row 5-6-6-5-5-6 times, and every 4th row 2-2-2-3-3-3 times - READ INCREASE TIP = 221-252-264-288-300-350 dc. Work a row and inc 14-7-7-7-19-5 dc evenly (do not inc over the first and last 6 dc = band) = 235-259-271-295-319-355 dc. REMEMBER THE CROCHET GAUGE! On next round work as follows: 36-40-43-47-51-58 dc (front piece), 8 ch (under sleeve), skip 52-56-56-60-64-68 dc from previous row (to be used for sleeve later), 59-67-73-81-89-103 dc (back piece), 8 ch (under sleeve), skip 52-56-56-60-64-68 dc from previous row (to be used for sleeve later) and 36-40-43-47-51-58 dc (front piece). Insert a marker, now measure piece from here! Work 1 dc in every dc/ch AT THE SAME TIME dec 8-8-8-12-12-12 sts evenly – READ DECREASE TIP = 139-155-167-179-195-223 dc. Continue to work as follows: Work 1 dc in each of the first 6 dc (= band), A.1, A.2 30-34-37-40-44-51 repetitions in total in width, finish with A.3 and 1 dc in each of the last 6 dc. Continue pattern like this. When A.1-A.3 have been worked 1 time vertically, repeat A.4 vertically until finished measurements. When piece measures 14-14-14-15-15-15 cm / 5½"-5½"-5½"-6"-6"-6" from marker, adjust so that next row is last row in A.4, inc 1 repetition of A.2 in 8th-9th-9th-10th-11th-13th repetition in ch-space as follows: Work ch 2, 1 sc in ch-space, ch 2, 1 dc in same ch-space, ch 2, 1 sc in same ch-space. Work 14-16-19-20-22-25 repetitions of A.2, in next repetition of A.2 inc the same way. Then continue as before = 32-36-39-42-46-53 repetitions of A.2 in width. Fasten off when piece measures 34-34-36-35-37-37 cm / 13½"-13½"-14¼"-13¾"-14½"-14½" from marker, adjust to finish with next to last row in A.4, piece measures 56-58-60-62-64-66 cm / 22"-22¾"-23⅝"-24⅜"-25¼"-26" in total. SLEEVE: Sleeve is worked in the round, top down. Insert a marker, now measure piece from here! Beg by working mid under sleeve as follows: Work 1 sc in 5th ch of the 8 ch work in armhole on body, 3 ch (= 1 dc), work 1 dc in each of the next ch 3, 1 dc in every dc over sleeve, then work 1 dc in each of the remaining 4 ch under sleeve = 60-64-64-68-72-76 dc. Insert 1 marker mid under sleeve. Continue to work as follows: 1 dc in each of the first 11-11-11-13-13-15 dc AT THE SAME TIME dec 1 dc (= 10-10-10-12-12-14 dc), A.1, A.2 8-9-9-9-10-10 times in width, A.3, work 1 dc in each of the last 10-10-10-12-12-14 dc. Continue with 1 dc in each of the 20-20-20-24-24-28 dc mid under sleeve and A.1-A.3 over sleeve. When A.1-A.3 have been worked 1 time vertically, repeat A.4 vertically until finished measurements. Continue this pattern AT THE SAME TIME when piece measures 4 cm / 1½", dec 1 dc on each side of marker - Remember DECREASE TIP. Repeat dec every 3½-3½-3½-2½-2½-2 cm / 1¼"-1¼"-1¼"-⅞"-⅞"-¾" 9-9-9-11-11-13 more times. Now work only A.1-A.3 over sleeve. Fasten off when sleeve measures 43½-42½-42½-39½-40-38 cm / 17"-16¾"-16¾"-15½"-15¾"-15", adjust to finish with next to last round in A.4 – NOTE – shorter measurements in the larger sizes because of wider neck and shoulders. Work the other the same way. NECK EDGE: Work neck edge in ch-row. Work on hook size 4.5 mm / US 7 with Merino Extra Fine as follows: 1 sc in 1st st, * ch 2, skip 2 sts, 1 sc in next st *, repeat from *-* around the entire neck. Fasten off. ASSEMBLY: Fasten the buttons on left front piece, the top button approx. 1 cm / ⅜" from neck edge, the bottom button in transition between dc and pattern. Button between 2 dc on right front piece. |
|||||||||||||||||||
Diagram explanations |
|||||||||||||||||||
|
|||||||||||||||||||
 |
|||||||||||||||||||
 |
|||||||||||||||||||
Have you finished this pattern?Tag your pictures with #dropspattern #yesterdaycardigan or submit them to the #dropsfan gallery. Do you need help with this pattern?You'll find 11 tutorial videos, a Comments/Questions area and more by visiting the pattern on garnstudio.com. © 1982-2026 DROPS Design A/S. We reserve all rights. This document, including all its sub-sections, has copyrights. Read more about what you can do with our patterns at the bottom of each pattern on our site. |
|||||||||||||||||||


With over 40 years in knitting and crochet design, DROPS Design offers one of the most extensive collections of free patterns on the internet - translated to 17 languages. As of today we count 324 catalogs and 12278 patterns - 12268 of which are translated into English (US/in).
We work hard to bring you the best knitting and crochet have to offer, inspiration and advice as well as great quality yarns at incredible prices! Would you like to use our patterns for other than personal use? You can read what you are allowed to do in the Copyright text at the bottom of all our patterns. Happy crafting!
Post a comment to pattern DROPS 156-17
We would love to hear what you have to say about this pattern!
If you want to leave a question, please make sure you select the correct category in the form below, to speed up the answering process. Required fields are marked *.