
Popular categories
Looking for a yarn?


Comments / Questions (101)
![]() Anna wrote:
Anna wrote:
Ik maak het patroon in mt 5/6 jaar. Ik begrijp dit stuk in het patroon niet helemaal. Herhaal dit meerderen om de toer 5-5-3-3-nog 2 keer en dan elke 4e toer 0-0-2-2-3 keer = 147-159-165-177-189 st. Betekent dit dat ik telkens de 5e toer moet meerderen bij de markeringen en dit 2 keer moet doen? Ik kom dan namelijk niet uit op genoeg meerderingen voor 159 steken voordat ik verder kan met A2. Alvast bedankt!
20.01.2016 - 09:54DROPS Design answered:
Hoi Anna. Je meerdert 1 st bij elke markeerder (15 stk) totaal 6 keer om de nld = + 90 st = 159. Het vertaalfoutje met "nog" is verwijderd).
26.01.2016 - 14:55
![]() Goorts Francine wrote:
Goorts Francine wrote:
Hallo,ik ben begonnen aan de kleinste maat maar als ik in de tweede rij 14 markeringen moet aanbrengen om de 4 steken komt het niet uit,er gaan maar 11 markeringen in.
05.12.2015 - 09:32Annick wrote:
Hello, I'm doing size 5/6 and was just wondering how many times A1 needs to be repeated vertically (if at all) before starting A2. This in relation to the number of increases that need to be made at the start (5 in all on alternate rows). If A1 is crocheted only once vertically, increases have to be made at the beginning of A2? Thanks for your help. Annick
17.11.2015 - 10:59DROPS Design answered:
Dear Annick, you are working A.1 until all inc at markers are done for your size. You should then get 147-189 sts. Then work A.2. Happy crocheting!
17.11.2015 - 13:46
![]() Monica wrote:
Monica wrote:
Hallo, jetzt ergeben sich mit 18 M und 16 Runden die 10x10 cm. Die 16.te Runde ist eine Runde fM. Müsste ich für den Rumpfteil dann 5 Maschen mehr anschlagen ? Bitte um Rückmeldung ! Danke.
16.11.2015 - 09:05DROPS Design answered:
Sie sollten besser noch eine halbe Nadelstärke mehr wählen, um auf die für die Maschenprobe passende Maschenzahl zu kommen. Ihre Maschenprobe weicht ja sowohl in der Breite als auch in der Höhe noch etwas ab. Sie können die Maschenprobe auch waschen und in Form ziehen, eventuell kommen Sie damit auch auf die 17 Maschen. Ein wenig dehnt sich die Jacke ja auch noch beim Tragen.
18.11.2015 - 14:07
![]() Christina Bjerregaard wrote:
Christina Bjerregaard wrote:
Jeg er nået til række 7 hvor jeg skal tage ud og lave til ærmer. men der står jeg skal have 187 masker nu, jeg har 270 altså næsten 100 for meget. jeg har fuldt opskriften og kan simpelthen ikke tyde hvor det skulle være gået galt...
11.11.2015 - 15:45DROPS Design answered:
Hej Christina, det må være gået galt endnu tidligere end række 7, er du sikker på at du har markeret den rigtige størrelse med hensyn til antal udtagninger? Prøv at spørge hos din lokale DROPS butik, det er lettere når man har arb foran sig. God fornøjelse!
20.11.2015 - 13:53
![]() Monica wrote:
Monica wrote:
Hallo, ich habe leider nicht das Originalgarn nehmen können da meine Tochter sich was anderes gewünscht hat. Jetzt geht sich jedoch die Maschenprobe (Muster A1 - 17Mx15R) nicht aus. Statt 10x10cm ergeben sich bei mir 8x8cm. Was kann ich tun ? Meine Tochter braucht Größe 110-116 häkeln. Soll ich einfach die nächste Größe nehmen ? Bitte um Info. Danke.
09.11.2015 - 12:30DROPS Design answered:
Sie sollten unbedingt die Maschenprobe einhalten, damit die Proportionen stimmen. Wenn die Maschenprobe kleiner ausfällt, müssen Sie eine dickere Nadel nehmen. Ggf., wenn das Garn sehr viel dünner als das Originalgarn ist, könnten Sie auch versuchen, mit doppeltem Faden zu arbeiten und damit die Maschenprobe zu erhalten. Fertigen Sie die Maschenprobe ausreichend groß an, d.h. schlagen Sie ca. 25 M an und häkeln Sie ca. 13 cm hoch, dann messen Sie in der Mitte aus, wie viele M und R Sie auf 10 x 10 cm haben.
12.11.2015 - 20:30
![]() Szilvia Kljajic wrote:
Szilvia Kljajic wrote:
Hallo, ich häkle für 5/6 Jahre. Ich habe die richtige MZahl und auch das Muster geht sich aus, vorne ist es ok, hinten sind die Stäbchen nicht genau unter denen vom Kragen, aber ich denke das ist kein Problem, oder? Ich habe auch schöne Blumenknöpfe, allerdings zu groß für die St, daher werde ich einen Rand um den Hals und Vorderteile häkeln. Ich denke ich kann hier mit fM arbeiten und für die Knopflöcher entsprechend viele Lm auslassen... Danke für die Rückmeldung!
08.09.2015 - 21:20DROPS Design answered:
Wenn das Muster aufgeht, sollte es passen. An sich können Sie einen Rand um die Jacke häkeln, mit Knopflöchern wie von Ihnen beschrieben (achten Sie darauf, dass sich nichts wellt), allerdings wird die Jacke dadurch ein klein wenig weiter, weil dadurch ja ein Stück überlappende Blende fehlt.
13.09.2015 - 13:45
![]() Szilvia wrote:
Szilvia wrote:
Hallo, wie werden die 6 Lm beim Armloch beim Häkeln des Rumpfteils behäkelt? Wenn man das Muster A2 beibehält, verschiebt sich das Muster um einiges gegenüber dem bisherigen Muster?! Vielen Dank für eine rasche Hilfe!
01.09.2015 - 13:07DROPS Design answered:
An sich sollte sich nichts verschieben, für die kleinste Größe exemplarisch berechnet passt es: Sie haben am Rumpf nach dem Überspringen der Ärmelmaschen 28 + 6 + 49 + 6 + 28 M. Das sind 117 M. Davon sind 2 x 4 Blenden-M, also bleiben noch 109 M für A.2 übrig. Das geht in dieser M-Zahl auf: a 1 x (= 7 M), b 16 x (= 96 M) und c 1 x (= 6 M). Welche Größe häkeln Sie?
08.09.2015 - 10:49
![]() Mariann Kleiven wrote:
Mariann Kleiven wrote:
Vedr.bolen str.9-10 år. Får ikke antall masker til å stemme: Starter med 92 masker, etter 1 omgang skal jeg ha 75. Så etter 5 økninger a 17 masker har jeg 160. I oppskriften står det at jeg skal ha 177. Feil i oppskriften?
01.08.2015 - 11:52DROPS Design answered:
Hej Mariann, det står at du skal øke først 3 gange TIL (nu har du øket 4 gange) og deretter på hver 4.rad 0-0-2-2-3 ganger (IALT 6 ØKNINGER) = 147-159-165-177-189 m. God fornøjelse!
03.08.2015 - 10:52
![]() Kristin wrote:
Kristin wrote:
Thanks ^^ I already made short sleeve cardigan based on this pattern and doing another one for long sleeve. I have question in the sleeve part pattern. Would you explain the meaning of these lines "No of sts will now fit the repetition so next time you atart A.2, no dc are worked mid under sleeve in any size"? To make sure.. that i need to continue whole part of A.2 on the sleeve, right? Thanks
10.06.2015 - 21:12DROPS Design answered:
Dear Kristin, when you first work A.2 row starts and ends with some extra dc (3-1-2-0-1 dc worked over the sc from previous row). After you have dec 5-1-3-0-2 sts evenly, you can work A.2 around, there will be no dc any more mid under sleeve, ie row will start with A.2a and end with A.2c. Happy crocheting!
11.06.2015 - 09:42
|
||||||||||
Amelie Smiles#ameliesmilescardigan |
||||||||||
|
|
||||||||||
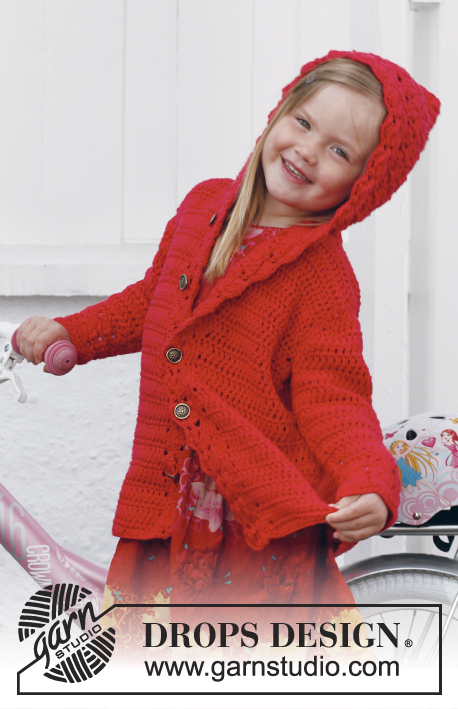
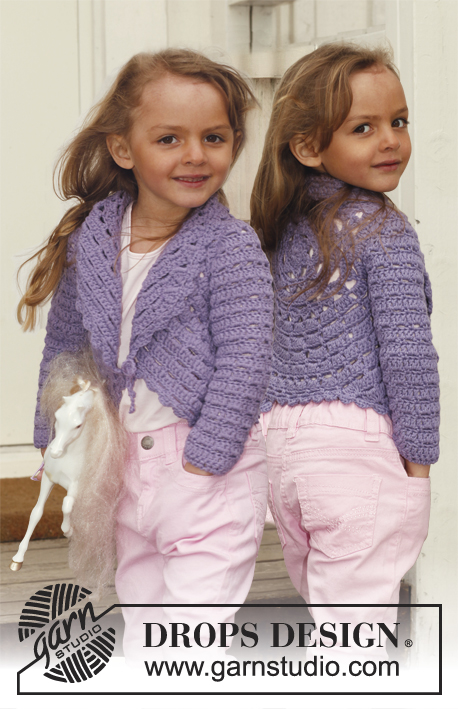
Crochet jacket with lace pattern and round yoke, worked top down in DROPS Karisma. Size children 3 - 12 years.
DROPS Children 24-38 |
||||||||||
|
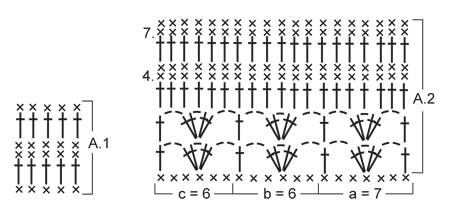
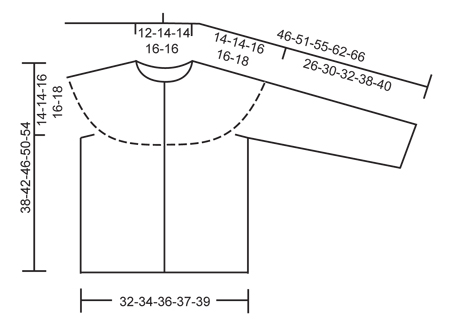
CROCHET INFO: Replace first sc on every sc row with 1 ch. Replace first dc on every dc row with 3 ch. PATTERN: See diagrams A.1 and A.2. INCREASE TIP: Inc by working 2 sts in 1 st, first on the one side of all markers on row, next time on the other side of all markers on row, continue inc like this alternately before and after markers. DECREASE TIP: Dec 1 st by working 2 sts tog. Work 2 sc tog as follows: Insert hook in first st and pull thread through, insert hook in next st and pull thread through, make 1 YO and pull yarn through all 3 loops on hook. Work 2 dc tog as follows: Work 1 dc in first st but wait with last pull through, work 1 dc in next st but on last pull through, pull yarn through all 3 loops on hook. ---------------------------------------------------------- BODY: The piece is worked top down. Worked back and forth from mid front. Ch 77-85-85-92-100 (includes 1 ch to turn with) on hook size 4 mm / G/6 with Karisma. Work next row as follows: 1 sc in 2nd ch, 1 sc in each of the next 5-3-3-5-3 ch, * skip ch 1, 1 sc in each of the next 4 ch *, repeat from *-* the entire row = 63-69-69-75-81 sc (ch at beg of row = 1 sc) – READ CROCHET INFO! Insert 14-15-16-17-18 markers in the piece as follows: First marker after 5-6-4-5-6 sts, then insert 13-14-15-16-17 markers 4 sts apart, after last marker there are 6-7-5-6-7 sts. Work back and forth according to diagram A.1 - AT THE SAME TIME on next row inc 1 st at all markers – READ INCREASE TIP! Repeat inc every other row 5-5-3-3-2 more times and then every 4th row 0-0-2-2-3 times = 147-159-165-177-189 sts. REMEMBER THE CROCHET GAUGE! Continue to work A.2 as follows: 1 dc in each of the first 4 sc (= band), a over the next 7 sc, then b until 10 sc remain, c over the next 6 sc and 1 dc in each of the last 4 sc (= band). Work diagram 1 time vertically – NOTE: On the first 2 rows work the four first and the last 4 sts in each side in dc, then work the pattern as before - inc at the markers as before on 4th row in diagram. On 7th row in diagram inc 16-13-16-15-12 sts evenly (do not inc over the first and last 4 band sts) = 177-187-197-209-219 sts. Work last row in A.2 as follows: 28-30-31-33-34 sc (= front piece), 6 ch (= under sleeve), skip 36-38-40-43-45 sc (to be used for sleeve later), work 49-51-55-57-61 sc (= back piece), 6 ch (= under sleeve), skip 36-38-40-43-45 sc (to be used for sleeve later) and work 28-30-31-33-34 sc (= front piece). There are now 117-123-129-135-141 sts on body. Remove all markers on yoke and insert a new marker in the middle of the 6 ch under each sleeve. Beg on 1st row in A.2 again and work a, b and c the same way as last time (every ch under sleeve = 1 sc) - the first and last 4 sts in each side = bands, only work these in dc on the first 2 rows. Continue A.2 until repetition has been worked 4-4-4-5-5 times in total after yoke, piece measures now approx. 24-24-24-30-30 cm / 9½"-9½"-9½"-11¾"-11¾" from armhole and down. The smallest size is now done. Continue with diagram A.1 for 0-4-6-4-6 cm / 0-1½"-2½"-1½"-2½", i.e. piece measures 24-28-30-34-36 cm / 9½"-11"-11¾"-13½"-14¼" from armhole and down. Fasten off. SLEEVE: To get the same texture as on body, work back and forth. There are now 42-44-46-49-51 sts in total on sleeve. Beg to work mid under sleeve in 3rd ch worked for armhole on body – work first row from WS. Work 1 row with 1 sc in every ch/sc, AT THE SAME TIME dec 6 sc evenly = 36-38-40-43-45 sc. Work next row as follows – from RS: Work 1 dc in each of the first 3-1-2-0-1 sc, then work diagram A.2 as follows: a over 7 sts, then b until 8-6-7-6-7 sts remain, c over 6 sts and finish with 1 dc in each of the last 2-0-1-0-1 sc. Turn and work as follows: On 4th row first time diagram is worked, dec 5-1-3-0-2 sts evenly – SEE DECREASE TIP = 31-37-37-43-43 sts. No of sts will now fit the repetition so next time you start A.2, no dc are worked mid under sleeve in any size. Continue with A.2 downwards 3-4-4-5-5 more times – AT THE SAME TIME, third time repetition is worked, dec 0-6-6-6-6 sts evenly = 31-31-31-37-37 sts. When A.2 are worked a total of 4-5-5-6-6 times on sleeve (piece measures approx. 24-30-30-36-36 cm / 9½"-11¾"-11¾"-14¼"-14¼"), continue with diagram A.1 until sleeve measures 26-30-32-38-40 cm / 10¼"-11¾"-12½"-15"-15¾". Cut the yarn – make it long and use it to sew tog sleeve mid under. Work the other sleeve the same way. ASSEMBLY: Sew sleeve seams edge to edge to avoid a chunky seam. Sew on buttons evenly down on left band – top button should be 1 cm / ½" from the top. Button through sts on right band. |
||||||||||
Diagram explanations |
||||||||||
|
||||||||||
 |
||||||||||
 |
||||||||||
Have you finished this pattern?Tag your pictures with #dropspattern #ameliesmilescardigan or submit them to the #dropsfan gallery. Do you need help with this pattern?You'll find 6 tutorial videos, a Comments/Questions area and more by visiting the pattern on garnstudio.com. © 1982-2026 DROPS Design A/S. We reserve all rights. This document, including all its sub-sections, has copyrights. Read more about what you can do with our patterns at the bottom of each pattern on our site. |
||||||||||


With over 40 years in knitting and crochet design, DROPS Design offers one of the most extensive collections of free patterns on the internet - translated to 17 languages. As of today we count 324 catalogs and 12290 patterns - 12280 of which are translated into English (US/in).
We work hard to bring you the best knitting and crochet have to offer, inspiration and advice as well as great quality yarns at incredible prices! Would you like to use our patterns for other than personal use? You can read what you are allowed to do in the Copyright text at the bottom of all our patterns. Happy crafting!
Post a comment to pattern DROPS Children 24-38
We would love to hear what you have to say about this pattern!
If you want to leave a question, please make sure you select the correct category in the form below, to speed up the answering process. Required fields are marked *.