
Popular categories
Looking for a yarn?


Comments / Questions (38)
![]() Willeke wrote:
Willeke wrote:
Hoe is de onderkant nadat je de kop gevuld hebt dicht gemaakt. Groetjes Willeke
21.07.2025 - 16:21DROPS Design answered:
Dag Willeke,
Je kunt de kop vullen, maar volgens het patroon wordt het verder niet dicht gemaakt, dus de vulling zit er als het ware los in.
22.07.2025 - 21:27
![]() April Stevenson wrote:
April Stevenson wrote:
Ok so this is a clarification question about the head of the chicken. I understand moving the st marker 12 st ahead before you reach your last stitch. So when you crochet 12 st it reach your new stitch marker spot do you slip stitch into the first stitch on the left the start of the 24 st to create a circle that you work upwards?
15.11.2024 - 20:53DROPS Design answered:
Dear April, you move the marker 12 stitches back, so you will have 12 stitches between the marker and the stitch where you stop (which would be the mid-front of the head). Then, from there, without cutting the thread, work 12 more stitches. The 12 stitches from before + the new 12 stitches = 24 stitches, so now you have the 24 stitches of the head. Then join the round simply with a dc in the stitch with the marker (first stitch of the head) and continue working as indicated over the 24 stitches. Happy crochetting!
17.11.2024 - 20:52
![]() Raquel wrote:
Raquel wrote:
Cuanto debería medir la pieza desde el centro de la labor (vuelta 1) hasta la última vuelta del cuerpo antes de empezar a hacer la cabeza?
30.10.2024 - 01:10DROPS Design answered:
Hola Raquel, la altura de la labor antes de empezar la cabeza serían 16cm. La base de la pieza son 20 cm de diámetro (desde el centro 10cm). Así que deberías tener 10 cm de media base (plana) y 16 cm de altura.
03.11.2024 - 13:03
![]() Betsy wrote:
Betsy wrote:
Thank you for this adorable hen pattern. I just finished my first one ( love it so much I want to make another ) I had no trouble following the pattern. I added wattles and gave her white tail feathers.
24.10.2024 - 17:08
![]() Marion Nijman wrote:
Marion Nijman wrote:
Hallo ik ben nu bij de kop maar snap niet hoe het verder moet ik. Weer niet hoe dat zit met die 24 vasten ik kom op 12 vasten ., ik denk dat er nu rond gehaakt moet worden klopt dat verder bedankt alvast groetjes marion nijman
02.04.2024 - 12:02DROPS Design answered:
Dag Marion,
Op midden voor van de kop zit de markeerder en aan beide kanten daarvan zitten 12 vasten waarover je de kop in de rondte haakt.
03.04.2024 - 20:26
![]() Sandra wrote:
Sandra wrote:
Hej! Ska de 16 centimetrarna mätas från mitten eller från sista varvet med ökning? Mvh Sandra
06.03.2024 - 10:39DROPS Design answered:
Hei Sandra. Fra siste omgang med økninger. Omgang 1. til 21. med økninger er bunnen, høyden på høna blir da fra siste omgang med økninger. mvh DROPS Design
11.03.2024 - 10:10
![]() Brandie Stewart wrote:
Brandie Stewart wrote:
I am having a hard time working the head portion of this pattern. When starting the head, it's a new round, I move my stitch marker from its og spot to 12 SC over, then do I start from that marker and crochet 12 more SC then SC in each of those making a 14 count? Or do crochet 12 SC into the last 12 SC to make it stacked?
15.02.2024 - 20:18DROPS Design answered:
Dear Mrs Stewart, the marker is inserted into the 12th sc before the end of the round, now work 1 sc in each of the next 12 sc = the first 12 sc at the beginning of the round and join now in the round working 1 sc in the stitch with the marker = there are 24 sc for head: 12 before marker + 12 after marker. Happy crocheting!
16.02.2024 - 07:44
![]() Ashleigh Cole wrote:
Ashleigh Cole wrote:
Hello, I’m making the body of the chicken and it more wide and narrow than the one on the picture. I did the same amount of stitches and everything it says in the body category, however, it is more than like a wide basket (a taco shape) than a bag (a u shape) I was wondering if you could tell me what I did wrong or how to fix it?
06.01.2024 - 03:26DROPS Design answered:
Dear Ashleigh, firstly, if the shape is too different, it may be an issue with the gauge. Also, after finishing and assemblying the piece, you will shape as much as possible to your desired shape, so if it isn't finished yet then maybe that is the difference with the one in the photo. Happy crocheting!
08.01.2024 - 00:05
![]() Sandy wrote:
Sandy wrote:
I had asked the question about working the head of the pattern. My second message indicated that I still didn't understand even with your response. BUT, I figured it out! So happy for myself. LOVING this pattern now that I figured it out. So happy with the results so far. Thank you for your help!
17.03.2023 - 03:05
![]() Sandy wrote:
Sandy wrote:
Your response to my last question, unfortunately did not answer my question. Do you have a video tutorial for this pattern? I don't understand the directions for the head. It would be helpful for me to see a tutorial. I am not understanding what is meant by moving the market 12 stitches and then turning so the marker is toward me and then working in the round. I am very visual and I am just not getting how to work this step of the pattern. A video would be most helpful. Thank you.
17.03.2023 - 01:27DROPS Design answered:
Dear Sandy, we don't have any video to that pattern sorry, the head is worked following the body part, at the end of the bordy, you moved the marker in the 12th stitch before the last stitch worked, for the head, you will now work 12 sts, these 12 sts + the 12 sts worked at the end of previous round are now a total of 24 sts and you will worke now these 24 stitches in the round, work now 1 st in each of the 24 sts starting with the first of the 12 sts worked at the end of previous round on body, and continue with 1 st in each st for 6 rounds. Hope it can help. Happy crocheting!
17.03.2023 - 08:53
|
|
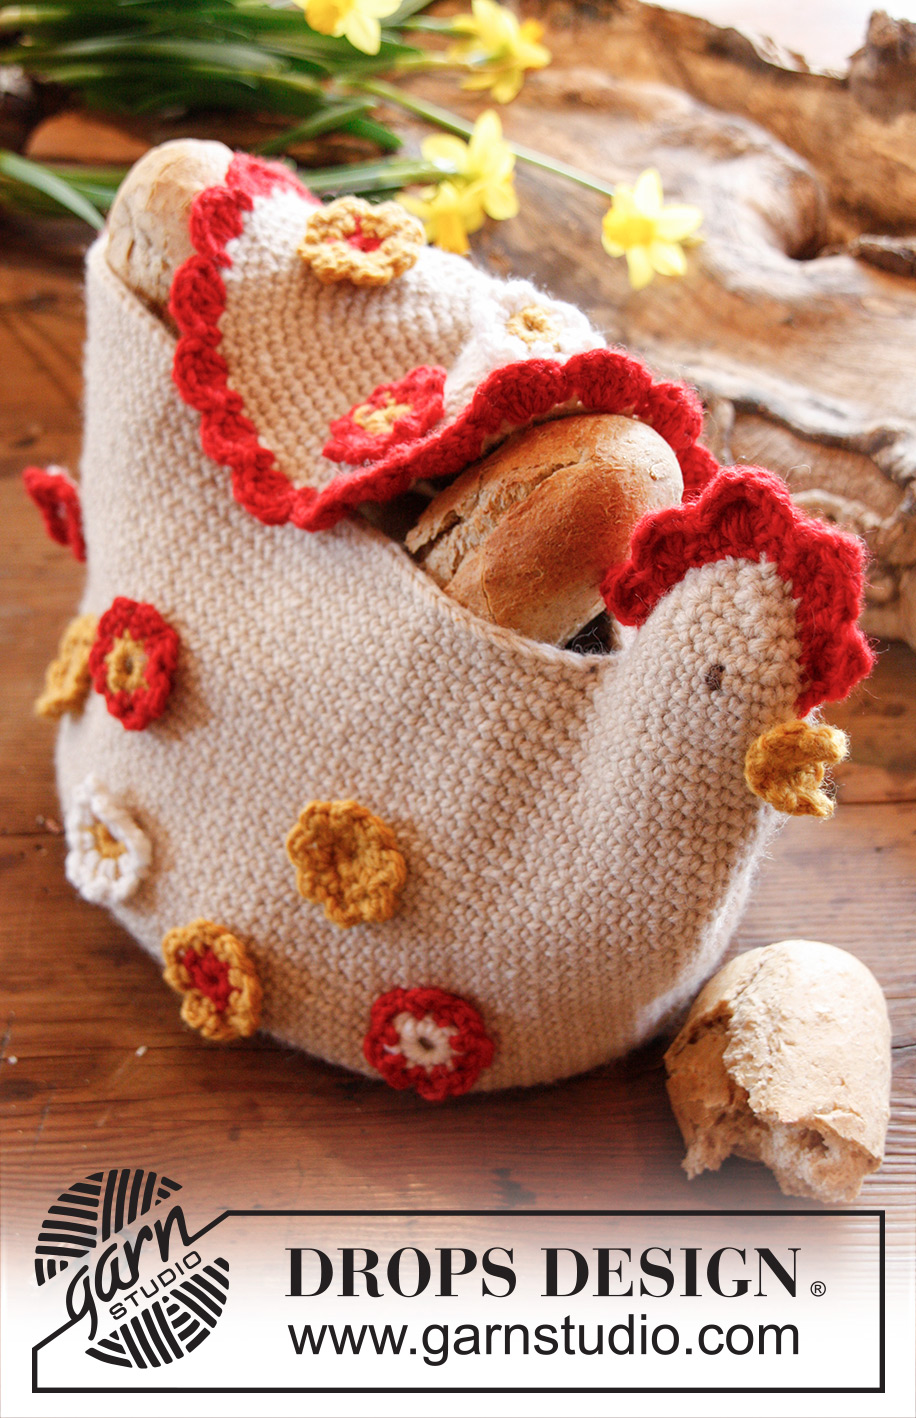
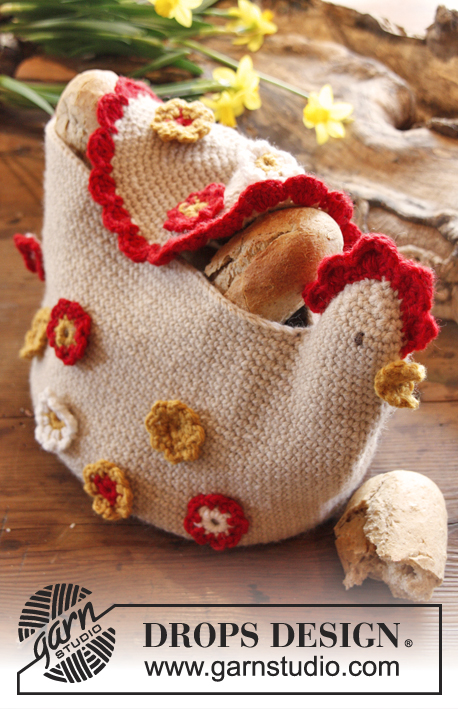
Henny Penny#hennypennybasket |
|
 |
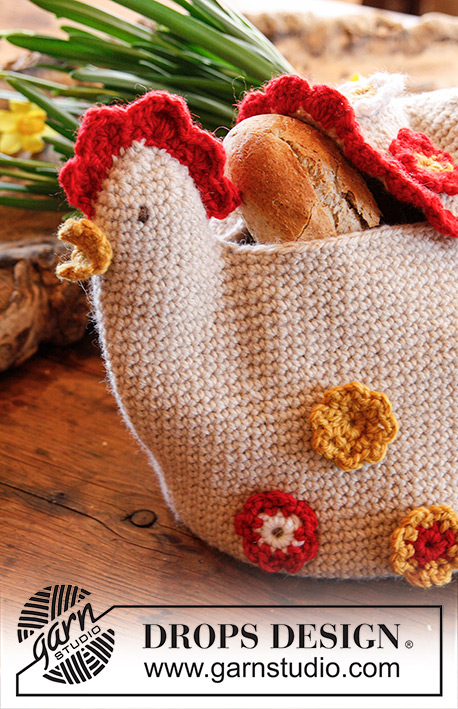 |
DROPS Easter: Crochet DROPS chicken basket in "Nepal".
DROPS Extra 0-908 |
|
|
MAGIC CIRCLE: When piece is worked in the round, start with this technique to avoid holes in the middle (instead of ch-ring): Hold the yarn end and wind the yarn one time around the index finger to make a loop. Hold the loop with left thumb and middle finger, place the yarn over left index finger. Insert hook through the loop, make a YO and pull yarn through loop, work ch 1, then work sc around the loop. When the desired no of sc have been reached, pull the yarn end to tighten the loop. Fasten the yarn end at the back. Continue to work in the round in a circle. WORK IN THE ROUND IN A CIRCLE: After last sc on the round, continue to next round with 1 sc in next sc (= first sc from previous round). NOTE: Insert a marker at the beg of round between last sc and 1st sc on round, move the marker upwards when working. INCREASE TIP: Inc 1 st by working 2 sc in next sc. DECREASE TIP: Dec 1 sc by working 2 sc tog as follows: * Insert hook in next sc, get yarn *, repeat from *-* one more time, make 1 YO and pull yarn through all 3 sts on hook. -------------------------------------------------------- BASKET: Worked in the round in a circle. Start by making a MAGIC CIRCLE - read explanation above - at the bottom of basket with light beige on hook size 4 mm / G/6. ROUND 1: Work 8 sc in the magic circle. Read WORK IN THE ROUND IN A CIRCLE above. ROUND 2: Inc 1 sc in every sc - Read INCREASE TIP above = 16 sc. ROUND 3: * 1 sc in next sc, inc 1 sc *, repeat from *-* the entire round = 24 sc. ROUND 4: * 1 sc in each of the next 2 sc, inc 1 sc *, repeat from *-* the entire round = 32 sc. ROUND 5: * 1 sc in each of the next 3 sc, inc 1 sc *, repeat from *-* the entire round = 40 sc. ROUND 6 (and then on every even numbered round): Work 1 sc in every sc. ROUND 7: * 1 sc in each of the next 4 sc, inc 1 sc *, repeat from *-* the entire round = 48 sc. ROUND 9: * 1 sc in each of the next 5 sc, inc 1 sc *, repeat from *-* the entire round = 56 sc. ROUND 11: * 1 sc in each of the next 6 sc, inc 1 sc *, repeat from *-* the entire round = 64 sc. ROUND 13: * 1 sc in each of the next 7 sc, inc 1 sc *, repeat from *-* the entire round = 72 sc. ROUND 15: * 1 sc in each of the next 5 sc, inc 1 sc *, repeat from *-* the entire round = 84 sc. ROUND 17: * 1 sc in each of the next 6 sc, inc 1 sc *, repeat from *-* the entire round = 96 sc. ROUND 19: * 1 sc in each of the next 7 sc, inc 1 sc *, repeat from *-* the entire round = 108 sc. ROUND 21: * 1 sc in each of the next 8 sc, inc 1 sc *, repeat from *-* the entire round = 120 sc. Then work 1 sc in every sc until basket measures approx. 16 cm / 6¼" vertically. When the last sc on the last round has been worked, move the marker to the 12th sc from hook (on the right side of the last sc, end of round = mid front of head). Do not cut the yarn. HEAD: Continue working 1 sc in each of the next 12 sc, there are now 24 sc in total counted from the st with marker. Now work the head in the round over these 24 sts as follows: Turn the basket so that st with marker is towards you, work 1 sc in this sc (this st is now 1st sc on round, move the marker upwards), continue with 1 sc in each of the next 23 sc = 24 sc on round. Move the marker upwards when working. Then work 1 sc in every sc for 5 more rounds (= 6 rounds in total). Then dec as follows: ROUND 1: * 1 sc in each of the next 4 sc, dec 1 sc - READ DECREASE TIP above *, repeat from *-* the entire round = 20 sc. ROUND 2: * 1 sc in each of the next 3 sc, dec 1 sc *, repeat from *-* the entire round = 16 sc. ROUND 3: * 1 sc in each of the next 2 sc, dec 1 sc *, repeat from *-* the entire round = 12 sc. ROUND 4: * 1 sc in next sc, dec 1 sc *, repeat from *-* the entire round = 8 sc. ROUND 5: Work all sc tog 2 by 2 = 4 sc, cut the yarn. Sew the last 4 sc tog with yarn end. COCK'S COMB: Worked back and forth. Ch 20 with red, then 1 sl st in 2nd ch from hook, then 1 sl st in every ch = 19 sl sts, turn. Skip 1st sl st, in next sl st work: 1 dc, 1 tr and 1 dc, skip 1 sl st, 1 sc in next sl st, skip 1 sl st, in next sl st work: 2 dc, 1 tr and 2 dc, skip 1 sl st, 1 sc in next sl st, skip 1 sl st, in next sl st work: 2 dc, 3 tr and 2 dc, skip 1 sl st, 1 sc in next sl st, skip 1 sl st, in next sl st work: 2 dc, 1 tr and 2 dc, skip 1 sl st, 1 sc in next sl st, skip 1 sl st, in next sl st work: 1 dc, 1 tr and 1 dc, finish with 1 sl st in the last sl st, fasten off. BEAK: Worked back and forth. Ch 2 with goldenrod. ROW 1: Work 2 sc in 2nd ch from hook = 2 sc, turn. ROW 2: Work ch 1, inc 1 sc in every sc = 4 sc, turn ROW 3-4: Work ch 1, 1 sc in every sc. ROW 5: ch 1, work all sc tog 2 by 2 = 2 sc. ROW 6: ch 1, work the 2 sc tog = 1 sc. Fasten off. TAIL: Worked back and forth. Ch 12 with red, then 1 sc in 2nd ch from hook, then 1 sc in every ch = 11 sc, turn. Skip 1st sc, in next sc work 3 dc, skip 1 sc, 1 sc in next sc, skip 1 sc, in next sc work as follows: 1 dc, 3 tr and 1 dc, skip 1 sc, 1 sc in next sc, skip 1 sc, in next sc work 3 dc, finish with 1 sl st in last sc, fasten off. WING: Worked in the round in a circle. Start by making a MAGIC CIRCLE in light beige. Work rounds 1 to 17 as on basket = 96 sc. ROUND 18: Switch to red and work as follows: * 1 sc, skip 1 sc, 5 dc in next sc, skip 1 sc *, repeat from *-* the entire round, fasten off. FLOWERS: Worked in the round. Work 2 of each flower. FLOWER 1: ROUND 1: Ch 3 with goldenrod and form a ring with 1 sl st in first ch. Ch 1, 8 sc in ch-ring, finish with 1 sl st in first sc. ROUND 2: Work ch 1, * 1 sc in next sc, 3 ch *, repeat from *-* the entire round, finish with 3 ch and 1 sl st in 1st sc (= 8 ch-spaces). Fasten off. FLOWER 2: Work as FLOWER 1 but work 1ST ROUND with goldenrod and 2ND ROUND with red. FLOWER 3: Work as FLOWER 1 but work 1ST ROUND with red and 2ND ROUND with goldenrod. FLOWER 4: Work as FLOWER 1 but work 1ST ROUND with white and 2ND ROUND with red. FLOWER 5: Work as FLOWER 1 but work 1ST ROUND with goldenrod and 2ND ROUND with white. ASSEMBLY: Sew cock's comb to the top of head, sew the tail to the other side of basket. Sew the beak at the front of head and embroider eyes with medium brown. Place the wing over the basket, fasten it on one side. Use the wing as a lid. Fasten the flowers on to basket and lid. Fill some poly stuffing, paper or similar in the top of head to fill it out. |
|
Have you finished this pattern?Tag your pictures with #dropspattern #hennypennybasket or submit them to the #dropsfan gallery. Do you need help with this pattern?You'll find 9 tutorial videos, a Comments/Questions area and more by visiting the pattern on garnstudio.com. © 1982-2026 DROPS Design A/S. We reserve all rights. This document, including all its sub-sections, has copyrights. Read more about what you can do with our patterns at the bottom of each pattern on our site. |
|


With over 40 years in knitting and crochet design, DROPS Design offers one of the most extensive collections of free patterns on the internet - translated to 17 languages. As of today we count 325 catalogs and 12298 patterns - 12288 of which are translated into English (US/in).
We work hard to bring you the best knitting and crochet have to offer, inspiration and advice as well as great quality yarns at incredible prices! Would you like to use our patterns for other than personal use? You can read what you are allowed to do in the Copyright text at the bottom of all our patterns. Happy crafting!
Post a comment to pattern DROPS Extra 0-908
We would love to hear what you have to say about this pattern!
If you want to leave a question, please make sure you select the correct category in the form below, to speed up the answering process. Required fields are marked *.