
Popular categories
Looking for a yarn?


|
|
Henny Penny |
|
 |
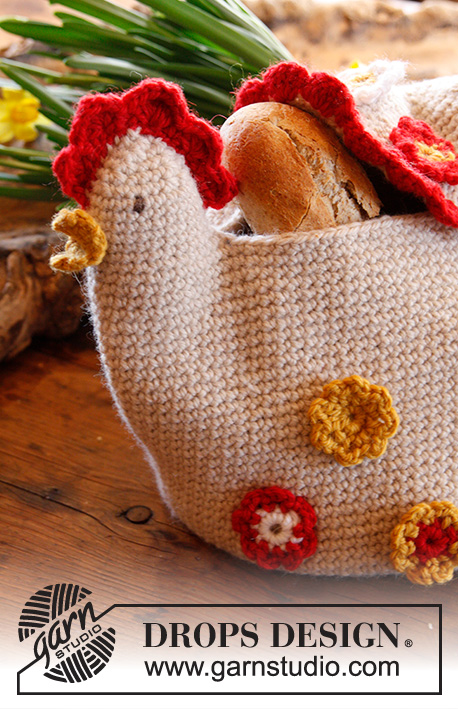 |
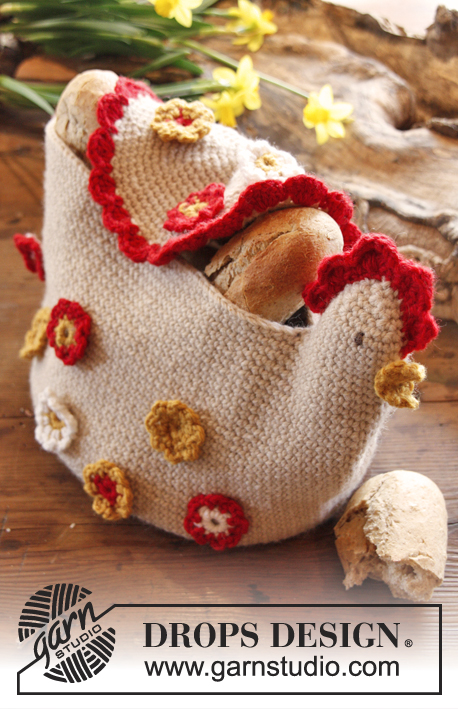
DROPS Easter: Crochet DROPS chicken basket in "Nepal".
DROPS Extra 0-908 |
|
|
MAGIC CIRCLE: When piece is worked in the round, start with this technique to avoid holes in the middle (instead of ch-ring): Hold the yarn end and wind the yarn one time around the index finger to make a loop. Hold the loop with left thumb and middle finger, place the yarn over left index finger. Insert hook through the loop, make a YO and pull yarn through loop, work ch 1, then work sc around the loop. When the desired no of sc have been reached, pull the yarn end to tighten the loop. Fasten the yarn end at the back. Continue to work in the round in a circle. WORK IN THE ROUND IN A CIRCLE: After last sc on the round, continue to next round with 1 sc in next sc (= first sc from previous round). NOTE: Insert a marker at the beg of round between last sc and 1st sc on round, move the marker upwards when working. INCREASE TIP: Inc 1 st by working 2 sc in next sc. DECREASE TIP: Dec 1 sc by working 2 sc tog as follows: * Insert hook in next sc, get yarn *, repeat from *-* one more time, make 1 YO and pull yarn through all 3 sts on hook. -------------------------------------------------------- BASKET: Worked in the round in a circle. Start by making a MAGIC CIRCLE - read explanation above - at the bottom of basket with light beige on hook size 4 mm / G/6. ROUND 1: Work 8 sc in the magic circle. Read WORK IN THE ROUND IN A CIRCLE above. ROUND 2: Inc 1 sc in every sc - Read INCREASE TIP above = 16 sc. ROUND 3: * 1 sc in next sc, inc 1 sc *, repeat from *-* the entire round = 24 sc. ROUND 4: * 1 sc in each of the next 2 sc, inc 1 sc *, repeat from *-* the entire round = 32 sc. ROUND 5: * 1 sc in each of the next 3 sc, inc 1 sc *, repeat from *-* the entire round = 40 sc. ROUND 6 (and then on every even numbered round): Work 1 sc in every sc. ROUND 7: * 1 sc in each of the next 4 sc, inc 1 sc *, repeat from *-* the entire round = 48 sc. ROUND 9: * 1 sc in each of the next 5 sc, inc 1 sc *, repeat from *-* the entire round = 56 sc. ROUND 11: * 1 sc in each of the next 6 sc, inc 1 sc *, repeat from *-* the entire round = 64 sc. ROUND 13: * 1 sc in each of the next 7 sc, inc 1 sc *, repeat from *-* the entire round = 72 sc. ROUND 15: * 1 sc in each of the next 5 sc, inc 1 sc *, repeat from *-* the entire round = 84 sc. ROUND 17: * 1 sc in each of the next 6 sc, inc 1 sc *, repeat from *-* the entire round = 96 sc. ROUND 19: * 1 sc in each of the next 7 sc, inc 1 sc *, repeat from *-* the entire round = 108 sc. ROUND 21: * 1 sc in each of the next 8 sc, inc 1 sc *, repeat from *-* the entire round = 120 sc. Then work 1 sc in every sc until basket measures approx. 16 cm / 6¼" vertically. When the last sc on the last round has been worked, move the marker to the 12th sc from hook (on the right side of the last sc, end of round = mid front of head). Do not cut the yarn. HEAD: Continue working 1 sc in each of the next 12 sc, there are now 24 sc in total counted from the st with marker. Now work the head in the round over these 24 sts as follows: Turn the basket so that st with marker is towards you, work 1 sc in this sc (this st is now 1st sc on round, move the marker upwards), continue with 1 sc in each of the next 23 sc = 24 sc on round. Move the marker upwards when working. Then work 1 sc in every sc for 5 more rounds (= 6 rounds in total). Then dec as follows: ROUND 1: * 1 sc in each of the next 4 sc, dec 1 sc - READ DECREASE TIP above *, repeat from *-* the entire round = 20 sc. ROUND 2: * 1 sc in each of the next 3 sc, dec 1 sc *, repeat from *-* the entire round = 16 sc. ROUND 3: * 1 sc in each of the next 2 sc, dec 1 sc *, repeat from *-* the entire round = 12 sc. ROUND 4: * 1 sc in next sc, dec 1 sc *, repeat from *-* the entire round = 8 sc. ROUND 5: Work all sc tog 2 by 2 = 4 sc, cut the yarn. Sew the last 4 sc tog with yarn end. COCK'S COMB: Worked back and forth. Ch 20 with red, then 1 sl st in 2nd ch from hook, then 1 sl st in every ch = 19 sl sts, turn. Skip 1st sl st, in next sl st work: 1 dc, 1 tr and 1 dc, skip 1 sl st, 1 sc in next sl st, skip 1 sl st, in next sl st work: 2 dc, 1 tr and 2 dc, skip 1 sl st, 1 sc in next sl st, skip 1 sl st, in next sl st work: 2 dc, 3 tr and 2 dc, skip 1 sl st, 1 sc in next sl st, skip 1 sl st, in next sl st work: 2 dc, 1 tr and 2 dc, skip 1 sl st, 1 sc in next sl st, skip 1 sl st, in next sl st work: 1 dc, 1 tr and 1 dc, finish with 1 sl st in the last sl st, fasten off. BEAK: Worked back and forth. Ch 2 with goldenrod. ROW 1: Work 2 sc in 2nd ch from hook = 2 sc, turn. ROW 2: Work ch 1, inc 1 sc in every sc = 4 sc, turn ROW 3-4: Work ch 1, 1 sc in every sc. ROW 5: ch 1, work all sc tog 2 by 2 = 2 sc. ROW 6: ch 1, work the 2 sc tog = 1 sc. Fasten off. TAIL: Worked back and forth. Ch 12 with red, then 1 sc in 2nd ch from hook, then 1 sc in every ch = 11 sc, turn. Skip 1st sc, in next sc work 3 dc, skip 1 sc, 1 sc in next sc, skip 1 sc, in next sc work as follows: 1 dc, 3 tr and 1 dc, skip 1 sc, 1 sc in next sc, skip 1 sc, in next sc work 3 dc, finish with 1 sl st in last sc, fasten off. WING: Worked in the round in a circle. Start by making a MAGIC CIRCLE in light beige. Work rounds 1 to 17 as on basket = 96 sc. ROUND 18: Switch to red and work as follows: * 1 sc, skip 1 sc, 5 dc in next sc, skip 1 sc *, repeat from *-* the entire round, fasten off. FLOWERS: Worked in the round. Work 2 of each flower. FLOWER 1: ROUND 1: Ch 3 with goldenrod and form a ring with 1 sl st in first ch. Ch 1, 8 sc in ch-ring, finish with 1 sl st in first sc. ROUND 2: Work ch 1, * 1 sc in next sc, 3 ch *, repeat from *-* the entire round, finish with 3 ch and 1 sl st in 1st sc (= 8 ch-spaces). Fasten off. FLOWER 2: Work as FLOWER 1 but work 1ST ROUND with goldenrod and 2ND ROUND with red. FLOWER 3: Work as FLOWER 1 but work 1ST ROUND with red and 2ND ROUND with goldenrod. FLOWER 4: Work as FLOWER 1 but work 1ST ROUND with white and 2ND ROUND with red. FLOWER 5: Work as FLOWER 1 but work 1ST ROUND with goldenrod and 2ND ROUND with white. ASSEMBLY: Sew cock's comb to the top of head, sew the tail to the other side of basket. Sew the beak at the front of head and embroider eyes with medium brown. Place the wing over the basket, fasten it on one side. Use the wing as a lid. Fasten the flowers on to basket and lid. Fill some poly stuffing, paper or similar in the top of head to fill it out. |
|
|
Have you made this or any other of our designs? Tag your pictures in social media with #dropsdesign so we can see them! Do you need help with this pattern?You'll find tutorial videos, a Comments/Questions area and more by visiting the pattern on garnstudio.com. © 1982-2024 DROPS Design A/S. We reserve all rights. This document, including all its sub-sections, has copyrights. Read more about what you can do with our patterns at the bottom of each pattern on our site. |
|


With over 40 years in knitting and crochet design, DROPS Design offers one of the most extensive collections of free patterns on the internet - translated to 17 languages. As of today we count 304 catalogs and 11422 patterns - 11417 of which are translated into English (US/in).
We work hard to bring you the best knitting and crochet have to offer, inspiration and advice as well as great quality yarns at incredible prices! Would you like to use our patterns for other than personal use? You can read what you are allowed to do in the Copyright text at the bottom of all our patterns. Happy crafting!
Comments / Questions (34)
¡Por favor! Pongan GRÁFICOS. Quiero hacer esta gallina y no puedo. Les agradecería me enviaran el gráfico. Me es difícil entender las instrucciones y como yo, seguramente muchas personas. Un saludo, Carmen Pd. espero respuesta.
09.04.2015 - 16:45DROPS Design answered:
Hola Carmen, el límite de espacio en la web no nos permite añadir todos los gráficos de los patrones pero si tienes alguna duda en concreto no dudes en preguntarnos
12.04.2015 - 09:35IK heb toevallig dit kip gemerkt en toevallig net gebreid precies voor Paasdagen voor mijn huis! Dus nu woont nog een gebruide kip in Nederland)) Ik vond dit model makkelijk en spannend om uit te voeren
30.03.2015 - 17:43De 16 cm hoogte is dat vanaf toer 21 of vanaf de magische ring? Hoop dat u kunt helpen. Hartelijk dank alvast. Groeten Leni Vinkestein
19.03.2015 - 20:31DROPS Design answered:
Hoi Leni. Je meet vanaf het begin (magische ring).
20.03.2015 - 14:06Bonjour, Pour le corps, il faut mesurer les 16cm à partir du moment ou l'on arrête d'augmenter, c'est bien ca? Ce n'est pas à partir du centre?
16.03.2015 - 18:37DROPS Design answered:
Bonjour Iseult, c'est tout à fait exact. Bon crochet!
17.03.2015 - 08:55For the life of me I can NOT figure out what the instructions to make the head mean. I'm self-taught and been crocheting for only a month, so I'm still figuring things out. But for the life of me, I can NOT figure out the instructions to make the head. Do you have "for dummies" instructions on how to do it? Or even better, a video? I love this pattern, but I am absolutely stuck!
05.03.2015 - 12:53DROPS Design answered:
Dear Pam, after you have worked the basket (it should measure approx 6 1/4" in height), move the marker to the 12th sc on the right side of last sc made, and continue now with 1 sc in the next sc (= you have now 24 sc from the marker) - and continue in the round with 1 sc in each of these 24 sc for the head. Happy crocheting!
05.03.2015 - 13:32Sonja Loyd wrote:
Thank you all for the corrections or tips,I am making this for my Aunt who has been raising chickens for 60 years,Shes 84 and still Clucking!!
04.03.2015 - 16:06Bonjour, une fois le corps du panier réalisé, je n'obtiens pas un "dos" droit comme sur la photo. Le mien est courbe puisque réalisé en cercle. Avez-vous une explication ? Merci ! Martine
17.01.2015 - 17:06DROPS Design answered:
Bonjour Martine, on augmente pour le fond du paner jusqu'à obtenir 120 ms, puis on continue en rond, mais sans augmenter jusqu'à ce que le panier mesure environ 16 cm de hauteur (ce qui va "redresser" les bords du panier), puis en crochetant la tête on va "refermer" et donner la forme comme sur la photo. Bon crochet!
19.01.2015 - 11:29Thanks for trying but that was not helpful. You answered my question with what the pattern says.
28.08.2014 - 00:18DROPS Design answered:
Dear Michelle, sorry for not having been so helpful, let me try again.. head should be worked in the round over the last 12 sts from end of previous round (of basket) + first 12 sts from beg of round = 24 sts - but rounds will start now where you will join, ie 1st st of heead = 1st of the last 12 sts from last round in basket. Happy crocheting!
28.08.2014 - 14:40I have never really read a pattern. I understand most terminology. I'm having trouble with the directions after making it 6 1/4" going into making the head. Do I slip stitch after last st? It says 24 st but you only do 12?
27.08.2014 - 04:11DROPS Design answered:
Dear Michele, on last round on basket, you move the marker to the 12th sc from hook (count towards the right = beg of head), the last st on basket is middle front of head - then continue working 1 sc in each of the next 12 sc - there are now a total of 24 sc from markr, continue now in the round. Happy crocheting!
27.08.2014 - 09:26Gentili signori e signori, ho dei problemi con il sistemare la coda della gallina, in quanto non è visibile dalla foto come e' sistemata. Potreste aiutarmi? Vi ringrazio e mi complimento con voi. Siete per me fonte di ispirazione.
03.05.2014 - 12:12DROPS Design answered:
Buongiorno Francesca, la coda della gallina va attaccata dal lato opposto rispetto alla cresta. Buon lavoro!!
04.05.2014 - 18:12