
Popular categories
Looking for a yarn?


Comments / Questions (44)
![]() Ivy wrote:
Ivy wrote:
Sleeves - I see in the pattern that once you reach your length and then bind off for armholes - the measurement is about 2.75 inches but mine is more like 4 + inches. I did 3 st - once, 2st - 2 times, 1 st - 3 times and then 2st each side . This makes 14 rows of knitting which measures actually about 4.5 inches in length. This is far more than 2.75 inches?
18.01.2020 - 22:41DROPS Design answered:
Dear Ivy, the sleeve cap should measure 8-9-10-11 cm which are 3.15-3.54-3.94-4.33 inches - does your tension match in height? you should have 15 rows = 4". Happy knitting!
20.01.2020 - 09:07
![]() Ivy wrote:
Ivy wrote:
Thanks so much for your reply to my questions - love the pattern!
18.01.2020 - 12:44
![]() Ivy wrote:
Ivy wrote:
I have knit the body and sleeves longer. I measured my son from armpit to wrist and armpit to waist and knit accordingly to the length the sleeves and body of sweater needs to be. Should I also make the sleeve cap a few rows longer and the chest portion of the front and back of the sweater a few rows longer as well?
17.01.2020 - 03:08DROPS Design answered:
Dear Ivy, when adding length to the body, this extra length should be added before armholes, so that you can keep the correct measurements on armholes and top of sleeve/sleeve cap. Happy knitting!
17.01.2020 - 09:07
![]() Ivy wrote:
Ivy wrote:
2 st - 0 time - Do you knit/purl 2 rows without binding off any stitches then 1st - 2 times This is on the front binding off for armholes
17.01.2020 - 00:13DROPS Design answered:
Dear Ivy, in the first 2 sizes you just do not work these rows, ie you cast off 3 sts the beg of next 2 rows, then cast off 1 stitch at the beg of next 4-6 rows. Happy knitting!
17.01.2020 - 09:06
![]() Anke Behrens wrote:
Anke Behrens wrote:
Hallo! Ich verstehe nicht wie ich nach dem Halsausschnitt weiter stricken soll. Stricke ich dann die restlichen Reihen getrennt voneinander? Ich kann ja den Faden nicht über die in der Mitte abgenommen Maschen laufen lassen. Viele Grüße Anke
26.02.2019 - 21:47DROPS Design answered:
Liebe Frau Behrens, Sie stricken die ersten 19-19-20-21 Maschen, die nächsten 8-10-10-10 Maschen ketten Sie ab, 19-19-20-21 M bleiben auf der Nadel, diese Maschen stricken. Jetzt stricken Sie jeden Schulter separat. Wenden und alle 19-19-20-21 Maschen stricken, wenden, am Anfang der Reihe vom Hals sollen Sie jetzt Maschen abketten bis 15-15-16-17 M. bleiben, dann über diese Maschen weiterstricken bis die Arbeit 64-66-68-70 cm misst. Die restlichen 19-19-20-21 Maschen auffassen und genauso gleich stricken = am Anfang der Reihe vom Hals werden die Maschen für den Halsausschnitt abgenommen. Viel Spaß beim stricken!
27.02.2019 - 08:45
![]() Kety wrote:
Kety wrote:
È possibile utilizzare ferri 4.5?E quindi un filato più fine? Mantengo le solite misure?
14.02.2019 - 07:48DROPS Design answered:
Buongiorno Kety. Può usare un filato e ferri più sottili. Le misure rimangono le stesse. Cambierà però il campione, e quindi il numero di maglie con cui lavorare. Buon lavoro!
14.02.2019 - 08:30
![]() Merja Laitinen wrote:
Merja Laitinen wrote:
Tässä mallissa pienimmän koon leveys alhaalta on 48cm. Pojalleni riittäisi 40cm. Eli sen sijaan, että loisin 50 silmukkaa etu- ja takakappaleeseen, mikä olisi sopiva määrä? Jos pienennän silmukkamäärää, miten vaikuttaa muihin kohtiin?
23.10.2018 - 19:01
![]() Laura wrote:
Laura wrote:
Buonasera, è possibile utilizzare i ferri circolari, lavorando avanti e indietro come coi ferri dritti, mantenendo le stesse istruzioni o bisogna cambiare qualcosa? Grazie
15.05.2018 - 17:45DROPS Design answered:
Buonasera Laura. Può usare i ferri circolari al posto di quelli dritti e seguire le istruzioni date, senza alcuna modifica. Buon lavoro!
15.05.2018 - 18:46
![]() Beatriz wrote:
Beatriz wrote:
Hola, buenos dias, mi nombre es Bea y tengo una duda. No consigo entender el esquema que aparece en el patron para hacer las disminuciones en la sisa. Me gustaria que me lo aclarasen, para la talla L. Un saludo y gracias
31.10.2017 - 07:51DROPS Design answered:
Hola Beatriz. Para la talla L la sisa se trabaja como sigue: cerrar a cada lado 3 pts 1 vez y después 1 punto 3 veces. Cerrar los puntos para la sisa al inicio de cada fila. Después trabajar recto hasta llegar a la altura del escote.
04.11.2017 - 13:30
![]() Nicky wrote:
Nicky wrote:
Ik heb gelezen dat deze wol pluist bij het dragen. Is er een andere wol voor naald 9 en die vergelijkbaar is met de Drops Andes en niet pluist?
15.10.2017 - 17:27DROPS Design answered:
Hoi Nicky, Veel wol soorten pluizen wel een beetje. Als je echt niet wilt dat het pluist zou ik een Merinokwaliteit nemen. Je kunt ook meerdere dunne draden (bijvoorbeeld 2 draden van categorie C) nemen om op een dikte van Andes (categorie E) uit te komen. Op deze pagina vind je daarover meer informatie.
18.10.2017 - 10:45
|
|
Rover#roversweater |
|
 |
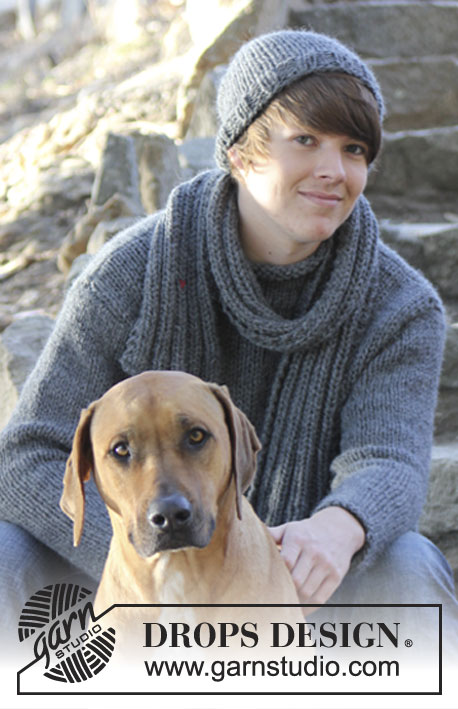 |
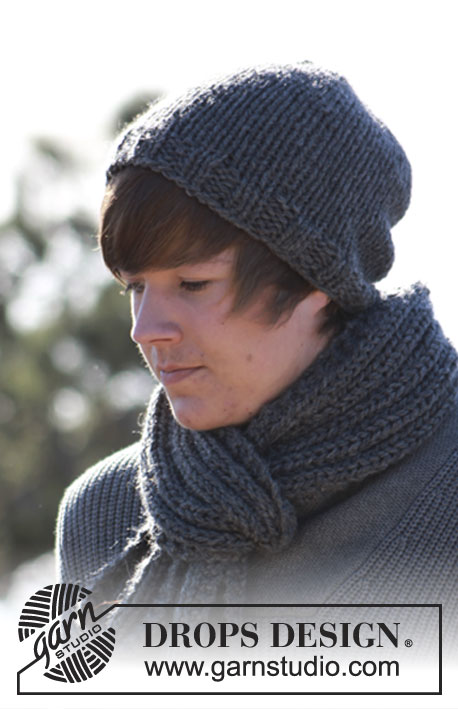
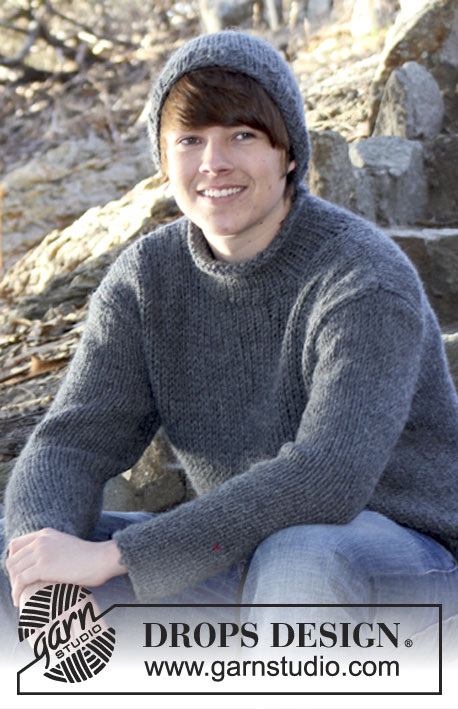
Basic DROPS mens pullover and hat in stockinette st and scarf in rib in ”Andes”.
DROPS Extra 0-819 |
|
|
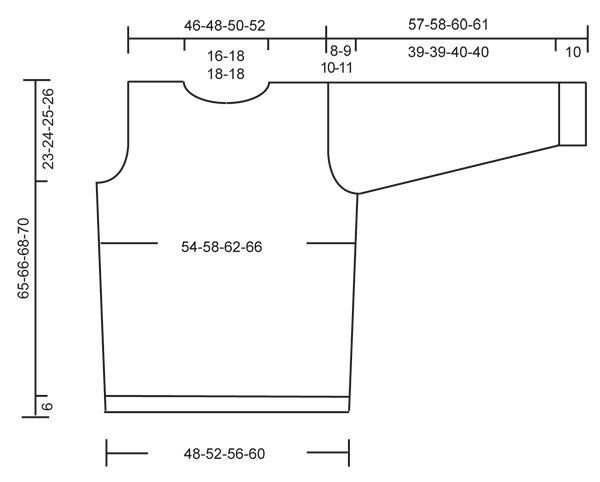
PULLOVER: FRONT PIECE With Andes cast on 50-54-58-62 sts on needles size 9 mm/US 13 and work in stockinette st. When piece measures 10 cm/4" inc 1 st at each side every 12 cm/4¾" a total of 3 times = 56-60-64-68 sts. When piece measures 41-42-43-44 cm/16"-16½"-17"-17¼" bind off for armholes in beg of each row each side: 3 sts 1 time, 2 sts 0-0-1-1 time and 1 st 2-3-2-3 times = 46-48-50-52 sts. When the piece measures 57-59-61-63 cm/22½"-23¼"-24"-24¾" bind off the center 8-10-10-10 sts for the neck and continue each side separately. Bind off in beg of every row from neck: 2 sts 1 time and 1 st 2 times = 15-15-16-17 sts remain on shoulder. Bind off when piece measures 64-66-68-70 cm/25¼"-26"-26¾"-27½". BACK PIECE Cast on and work the same as the front. Bind off for armholes as on front. When the piece measures 62-64-66-68 cm bind off the center 14-16-16-16 sts for neck and continue each side separately. On next row dec 1 st at neck edge = 15-15-16-17 sts remain on shoulder. Bind off when piece measures 64-66-68-70 cm/25¼"-26"-26¾"-27½". SLEEVE With Andes cast on 25-25-26-26 sts on needles size 9 mm/US 13 and work in stockinette st. When piece measures 11-12-13-14 cm/4⅜"-4¾"-5⅛"-5½" inc 1 st at each side every 4-3.5-3.5-3 cm/1½"-1¼"-1¼"-1⅛" a total of 10-11-11-12 times = 45-47-48-50 sts. When sleeve measures 49-49-50-50 cm/19¼"-19¼"-19¾"-19¾" bind off for sleeve cap in beg of each row each side: 3 sts 1 time, 2 sts 2 times and 1 st 3-3-2-3 times, then 2 sts each side until the piece measures 56-57-59-60 cm/22"-22½"-23¼"-23⅝", and then bind off 3 sts at each side 1 time. Bind off the remaining sts, piece measures approx. 57-58-60-61 cm/22½"-22¾"-23⅝"-24". ASSEMBLY Sew shoulder seams. Pick up approx. 48-52 sts (divisible by 4) around neck on double-pointed needles (pick up in bound-off sts and not between them). Join and work in stockinette in the round. When neck measures 8-10 cm/3"-4" bind off loosely. Sew in sleeves. Sew sleeve and side seams using edge sts as a seam allowance. -------------------------------------------------------- HAT: Worked in the round. Cast on 56 sts on circular needle size 8 mm / US 11 with Andes. K 1 round and continue in rib, K2/P2. Work 5 rounds in rib, then continue in stockinette. When piece measures approx 18 cm / 7" start dec (change to double pointed needles when sts no longer fit circular needle): Next round *K2 tog, K5*, repeat *-* around = 48 sts. K1 round. Next round *K2 tog, K4*, repeat *-* around = 40 sts. K1 round. Next round *K2 tog, K3*, repeat *-* around = 32 sts. K1 round. Next round *K2 tog, K2*, repeat *-* around = 24 sts. Next 2 rounds: K2 tog around, 6 sts rem. Pull yarn 2 times through rem 6 sts, tighten and fasten. -------------------------------------------------------- SCARF: Cast on 22 sts on needle size 8 mm / US 11 with Andes. Work in rib with 2 edge sts each side in garter st like this: 1st row: K2, *K2, P2*, repeat *-* 4 times, K4. 2nd row: K2, *P2, K2*, repeat *-* 4 times, P2, K2. Repeat row 1 and 2. Continue until scarf measures approx 150 cm / 59". Bind off in rib. |
|
 |
|
Have you finished this pattern?Tag your pictures with #dropspattern #roversweater or submit them to the #dropsfan gallery. Do you need help with this pattern?You'll find 19 tutorial videos, a Comments/Questions area and more by visiting the pattern on garnstudio.com. © 1982-2026 DROPS Design A/S. We reserve all rights. This document, including all its sub-sections, has copyrights. Read more about what you can do with our patterns at the bottom of each pattern on our site. |
|


With over 40 years in knitting and crochet design, DROPS Design offers one of the most extensive collections of free patterns on the internet - translated to 17 languages. As of today we count 324 catalogs and 12267 patterns - 12257 of which are translated into English (US/in).
We work hard to bring you the best knitting and crochet have to offer, inspiration and advice as well as great quality yarns at incredible prices! Would you like to use our patterns for other than personal use? You can read what you are allowed to do in the Copyright text at the bottom of all our patterns. Happy crafting!
Post a comment to pattern DROPS Extra 0-819
We would love to hear what you have to say about this pattern!
If you want to leave a question, please make sure you select the correct category in the form below, to speed up the answering process. Required fields are marked *.