
Popular categories
Looking for a yarn?


Comments / Questions (272)
![]() Nina wrote:
Nina wrote:
Hei:) Skal maskene til hetten legges opp på pinne 2,5 eller 3? Mvh Nina
08.03.2018 - 15:57DROPS Design answered:
Hei Nina. Hetten skal strikkes med pinne størrelse 3,0 mm. God Fornøyelse!
09.03.2018 - 14:00Sue McCully wrote:
When knitting the fronts and short rows where do you measure the 4cm from?? Is it the side or the front band??
08.03.2018 - 07:59DROPS Design answered:
Dear Mrs McCully, measure in the stocking st section, straight from cast on edge up to sts on needle. Happy knitting!
08.03.2018 - 09:29Sue-ellen Bowey wrote:
Hi in the Buttercup Drops Design hooded jacket I am not sure for the hood if I am supposed to do short rows at the end of each row every 1cm or 2cms. It says to continue every other cm until 23cm ( I am doing 6 to 9 month old size). Could you please clarify this for me? Thanks.
13.02.2018 - 01:59DROPS Design answered:
Dear Mrs Bowey, you continue the short rows as before over the 24 first sts on each side every 2 cm until hood measures 23 cm. Happy knitting!
13.02.2018 - 09:43Jette Damgaard wrote:
Jeg er nu kommet til hætten, men mangler nogle masker. Hvad har jeg gjort forkert. Jeg har 2x24 masker fra forstykkerne, 16 masker fra nakken og 8 masker fra halsen. Det giver 72 masker, men der står at jeg skal have 106. Hvad mangler jeg? Venlig hilsen Jette Damgaard
07.01.2018 - 16:26DROPS Design answered:
Hej Jette, Hvis du har for få masker når du samler op så tager du bare ud på første pind. God fornøjelse!
22.01.2018 - 16:27
![]() Steffi Maier wrote:
Steffi Maier wrote:
Ich verstehe bei den Hausschuhen den vorletzten Satz nicht: vorne und hinten auf beiden Seiten der mittleren Masche je 2M rechts zusammenstricken... welche Maschen sind damit gemeint und welche Mittlere Masche? Ich weiß auch schon gar nicht wo vorne und hinten sein soll. Das Strickstück ist ja hinten offen... für schnelle Hilfe wäre ich dankbar, es soll ein Geschenk werden.
16.08.2017 - 21:33
![]() Pia Nielsen wrote:
Pia Nielsen wrote:
Hej Når jeg strikker forstykket, så starter jeg med ret, og derefter fortsætter i glatstrikning. Når jeg så skal lave den forkortede pind, gøres dette så på vrang, dvs 13 masker også vend? Når jeg holder stykket foran mig så er det glatstrikning som bliver længst, er dette korrekt? Når jeg skal lave den forkortede pind, hvilken ende måler man så fra dvs de 4 cm? Hjælp hjælp Mvh Pia
18.07.2017 - 20:30DROPS Design answered:
Hej Pia, du strikker forkortede pinde over de retstrikkede riller, så forkanten ikke trækker arbejdet sammen. Når du måler skal du gøre det i det glatstrikkede arbejde. God fornøjelse!
09.08.2017 - 15:03Keith McCloy wrote:
In BabyDrops21-1, left frontpiece, last para, it says slip 24 stitches onto a holder, then cast on 2 new stitches. My yarn is at the end of the row, then I have 24 stitches on a holder, then I have 60 stitches on my needle. Where exactly, do I cast on these two stitches?
06.07.2017 - 16:49DROPS Design answered:
Dear Mrs McCloy, on left front piece, work the first 24 sts from WS and slip them onto a st holder (so that you don't have to cut the yarn), work to the end of row, turn and at the end of next row from RS cast on 2 new sts. Work next row from WS and cast on 2 new sts at the end of next row from RS (= 4 new sts on needle = 64-69 sts (see size)). Happy knitting!
07.07.2017 - 09:12Sandra wrote:
Wenn ich die Grösse 68/74 stricken möchte, muss ich dafür 47 + 24 Maschen = 71 Maschen anschlagen oder kommt die Randmacher noch hinzu, also 72 Maschen insgesamt?
04.06.2017 - 22:13DROPS Design answered:
Liebe Sandra, in der 2. Größe müssen 47 M angeschlagen werden, die Randmasche und die Blendemaschen gehören zu den 47 M. Viel Spaß beim stricken!
06.06.2017 - 08:55Alejandra Solá wrote:
Hola tengo duda con las vueltas cortas, dice que se deben tejer 2 vueltas cortas sobre los 24 puntos del borde, ¿qué borde, el tejido en punto jersey? Y luego dice tejer 2 vtas en pt musgo únicamente sobre los 12 puntos externos, ¿a qué puntos se refiere, son parte de los 24 puntos anteriores? Muchas gracias
16.05.2017 - 19:52DROPS Design answered:
Hola Alejandra. Las vueltas acortadas se trabajan sobre los 24 puntos de la cenefa (el borde) en punto musgo. Primero se trabajan sobre los 24 puntos de la cenefa de ida y vuelta y después 2 filas solamente sobre los 12 puntos más externos hacia el borde del delantero, es decir, visto por el lado derecho, los primeros 12 puntos de ida y vuelta, y después continuar según el patrón.
28.05.2017 - 12:00
![]() Natascha Magnusson wrote:
Natascha Magnusson wrote:
När man gör mätningarna i detta mönster gör man dem då där man gör de förkortade varven i kanten mitt fram, eller där arbetet blir kortast i sido kanten mot armen?
31.03.2017 - 22:33DROPS Design answered:
Hej Natascha, du mäter i sidan. Lycka till!
03.04.2017 - 14:47
|
|
Buttercup#buttercupset |
|
 |
 |
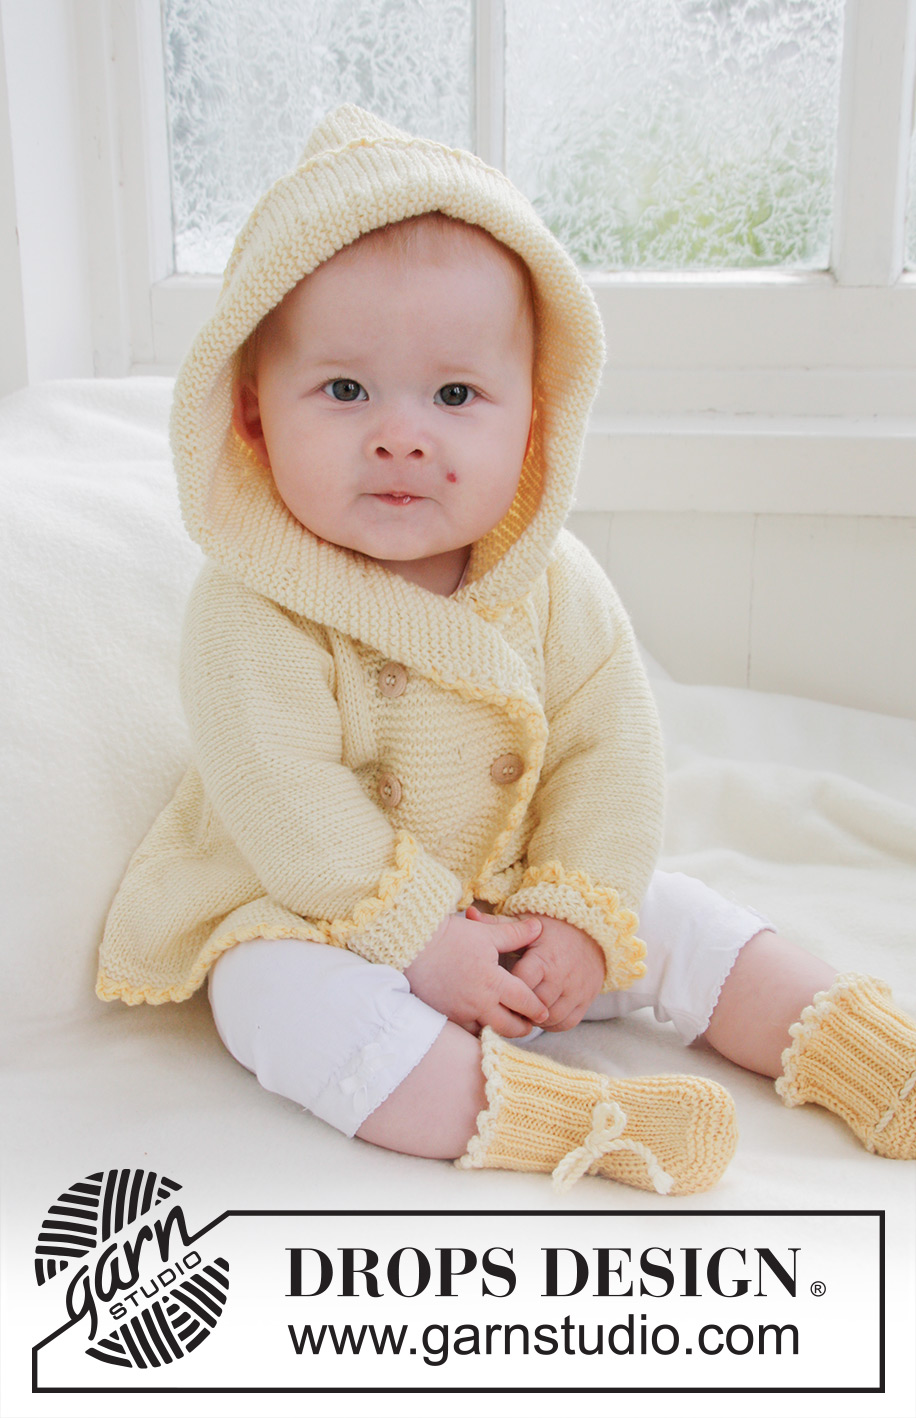
Knitted jacket with hood and booties for baby and children in DROPS BabyMerino
DROPS Baby 21-1 |
|
|
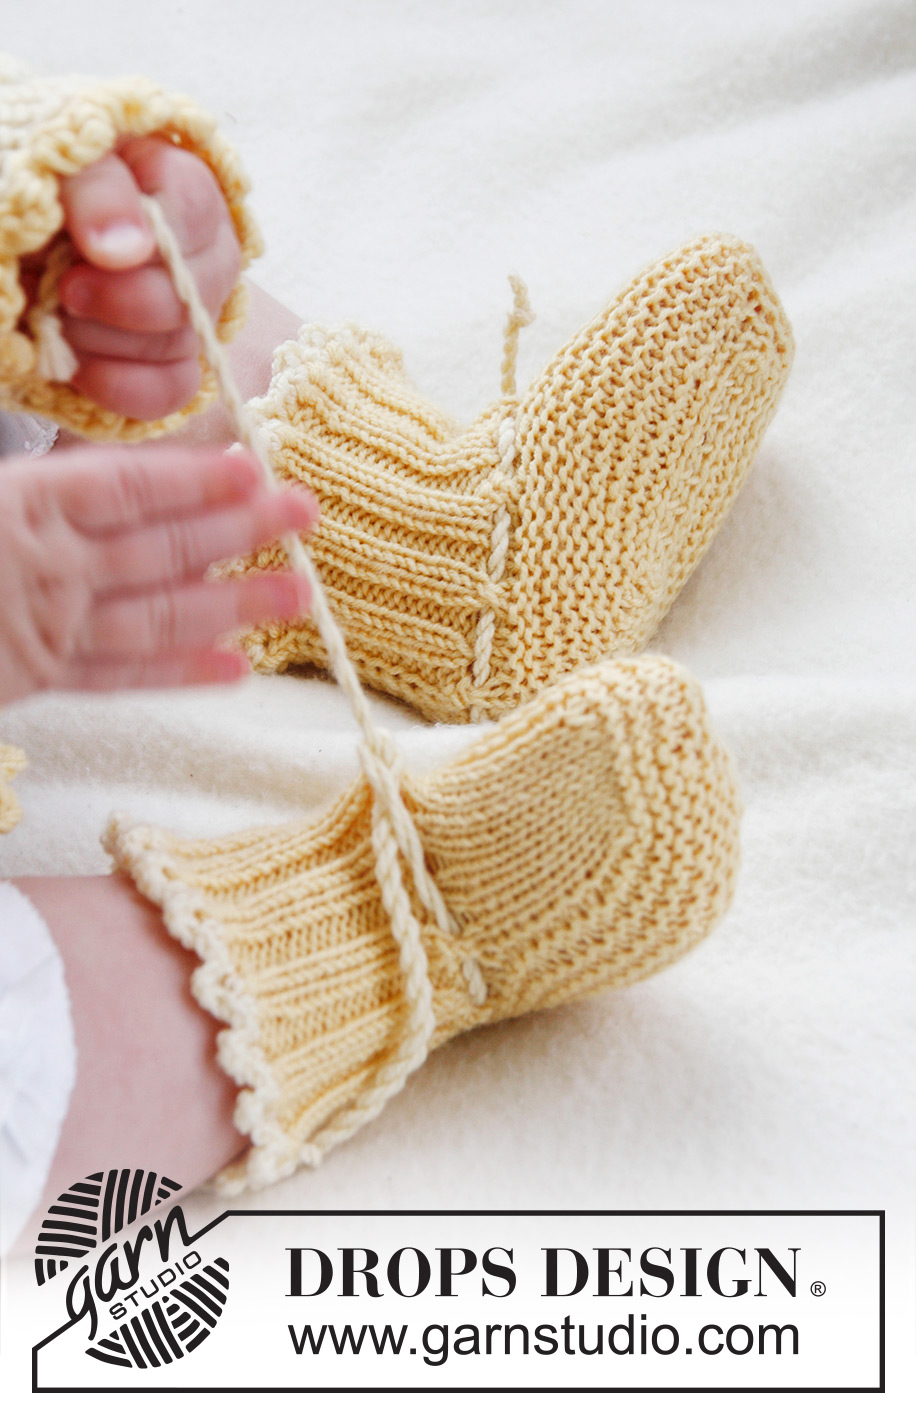
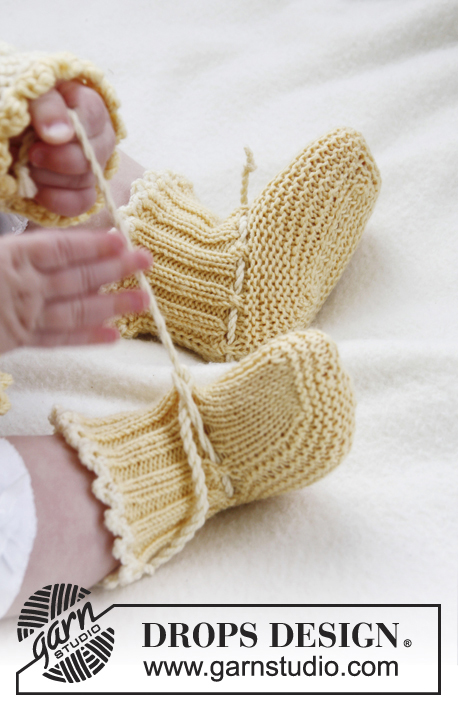
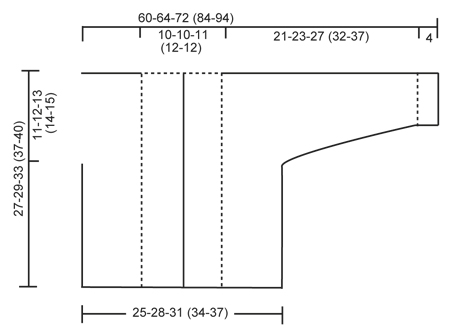
GARTER ST (back and forth on needle): K all rows. SHORT ROWS: * Work 2 rows in garter st over the 24-24-26 (28-28) band sts, work 2 rows in garter st only over the outermost 12-12-13 (14-14) sts. NOTE: When turning mid piece, slip first st. Tighten yarn and continue as before. This is done to avoid holes in the transitions *. BUTTON HOLES: The jacket is double-breasted. Bind off for 4 button holes on right band. 1 BUTTON HOLE = K tog fourth and fifth st from edge and make 1 YO. On same row also K tog fourth and fifth LAST st on band, make 1 YO. Bind off for 2 button holes when piece measures: SIZE 1/3 MONTHS: 14 and 19 cm / 5½" and 7½" SIZE 6/9 MONTHS: 16 and 21 cm / 6 1/4"- and 8 1/4" SIZE 12/18 MONTHS: 18 and 24 cm / 7" and 9½" SIZE 2 YEARS: 20 and 27 cm / 8" and 10½" SIZE 3/4 YEARS: 22 and 30 cm / 8 3/4" and 11 3/4" ---------------------------------------------------------- JACKET: Worked back and forth on circular needle. Beg on front piece, cast on sts for sleeve and work up to the shoulder. Knit the other front piece, place both front pieces tog and work down the back piece. LEFT FRONT PIECE: Read all of the following section before continuing! Cast on 43-47-51 (56-59) sts (includes 1 edge st in the side and 24-24-26 (28-28) band sts towards mid front) on needle size 2.5 mm / US 1or2 with Baby Merino. Work 6 rows in GARTER ST - see explanation above. Switch to circular needle size 3 mm / US 2or3 and work in stockinette st but continue to work the 24-24-26 (28-28) band sts towards mid front in Garter st. When piece measures 4 cm / 1½'', work SHORT ROWS - see explanation above (1st row = from WS). Repeat from *-* 1 time every 4 cm / 1½'' until piece measures 19-21-24 (27-30) cm / 7½"-8 1/4"-9½" (10 5/8"-11 3/4"), then repeat from *-* 1 time every 2 cm / 3/4'' until finished measurements. AT THE SAME TIME when piece measures 16-17-20 (23-25) cm / 6¼''-6¾''-8'' (9''-9¾''), cast on new sts at the end of every row from WS (towards the side of sleeve): 6 sts 2-2-3 (3-3) times, 8 sts 1-1-1 (2-3) times and 21-22-22 (25-26) sts 1 time = 84-89-99 (115-127) sts for shoulder/sleeve. Work inc sts in stockinette st. When all sts have been cast on, continue in stockinette st and Garter st as before while AT THE SAME TIME also working the outermost 10 sts on sleeve in garter st. When piece measures 27-29-33 (37-40) cm / 10 5/8''-11 3/8''-13'' (14½''-15¾''), insert a marker = mid on top of shoulder. Now slip the 24-24-26 (28-28) band sts towards mid front on a stitch holder. Then cast on 2 new sts at the end of row from RS (towards neck), repeat inc on next row towards neck = 64-69-77 (91-103) sts on needle. Work 1 row from WS. Put all sts on a stitch holder. RIGHT FRONT PIECE: Cast on and work as left front piece but reversed. In addition bind off for BUTTON HOLES on band - see explanation above. NOTE! Slip sts on a stitch holder after the last row with inc (i.e. last row = from WS). BACK PIECE: Work left front piece on to circular needle, cast on 16-16-18 (20-20) new sts (= back of neck) and work right front piece on to circular needle = 144-154-172 (202-226) sts. NOW MEASURE PIECE FROM MARKERS ON SHOULDERS. Continue in stockinette st and Garter st at the end on each sleeve back and forth on needle. When piece measures 8½-9½-10 (10-11) cm / 3 1/4"-3 3/4"-4" (4"-4 3/8"), beg to bind off sleeve sts. Bind off at beg of every row in each side as follows: 21-22-22 (25-26) sts 1 time, 8 sts 1-1-1 (2-3) times and 6 sts 2-2-3 (3-3) times = 62-70-76 (84-90) sts on needle. Continue in stockinette st with 1 edge st in garter st each side. When piece measures approx. 26-28-32 (36-39) cm / 10 1/4"-11"-12½" (14 1/4"-15 1/4") – fold the piece double at the markers on shoulders and make sure that the back piece is as long as front piece down to rows in garter st, switch to needle size 2.5 mm / US 1or2 and work 6 rows in garter st, then bind off. ASSEMBLY: Sew the sleeve and side seams inside 1 edge st. Sew on buttons. HOOD: Knit up approx. 102-106-112 (118-122) sts (including sts from stitch holders at the front – NOTE: If more/fewer sts have been knitted up, dec/inc evenly on 1st row. Continue in garter st over all sts while AT THE SAME TIME working short rows in each side every 2 cm / 3/4'' – SEE EXPLANATION ABOVE. Bind off when hood measures approx. 21-23-25 (27-28) cm / 8 1/4"-9"-9 3/4" (10 5/8"-11"). Sew hood neatly tog at the top - sew in outer loop of edge st to avoid a chunky seam. CROCHET BORDER: Crochet a border around the entire jacket. Beg at the bottom on right front piece and crochet with 2 strands yellow Baby Merino and hook size 3 mm / C as follows: Work 1 sc, * ch 3, 1 dc in 1st ch, skip approx. ½ cm / 1/4'', 1 sc in next st *, repeat from *-*. Crochet the same way around the openings on sleeves. ----------------------------------------------------------- BOOTEE: The bootee is worked back and forth from mid back. Cast on 48-52-56 (56) sts on needle size 2.5 mm / US 1or2 with 2 strands yellow Baby Merino. Remove 1 strand and work rib (= K 2/P 2) for 5-6-6 (7) cm / 2"-2 3/8"-2 3/8" (2 3/4") – adjust so that next row is worked from WS. P 1 row from WS while at the same time dec 14-14-18 (14) sts evenly = 34-38-38 (42) sts. On next row work eyelet row as follows from RS: K 1, *K 2 tog, 1 YO *, repeat from *-* and finish with K 1. P 1 row from WS. Now slip the outermost 12-13-13 (15) sts in each side on a stitch holder. Work 4-4½-5½ (6½) cm / 1½"-1 3/4"-2 1/4" (2½") in stockinette st over the middle 10-12-12 (12) sts. Slip sts from stitch holders back on needle and knit up 10-11-13 (16) sts on each side of mid piece = 54-60-64 (74) sts on needle. K every row over all sts for 3-4-5 (5) cm / 1 1/8"-1½"-2" (2") while at the same time after 1½-2-2½ (3) cm / ½"-3/4"-7/8" (1 1/8"), start dec on every other row as follows until completed: Dec 1 st at the beg and the end of row and K 2 tog on each side of the 2 mid sts. bind off and sew tog mid under foot and continue up mid back in outer loop of edge sts to avoid a chunky seam. Knit another bootee the same way. TIES: Cut 3 strands light yellow of approx. 1 meter / 1.1 yds each, twine them tightly tog, fold them double and they will twine again, tie a knot in each end. Thread tie up and down through the eyelet row on bootee. CROCHET BORDER: Crochet a border at the top of bootee on hook size 2 mm/US B with light yellow as follows: 1 sc in first st, * ch 3, 1 dc in 1st ch, skip approx. ½ cm / 1/4'', 1 sc in next st *, repeat from *-* and finish with 1 sl st in sc from beg of round. |
|
 |
|
Have you finished this pattern?Tag your pictures with #dropspattern #buttercupset or submit them to the #dropsfan gallery. Do you need help with this pattern?You'll find 21 tutorial videos, a Comments/Questions area and more by visiting the pattern on garnstudio.com. © 1982-2026 DROPS Design A/S. We reserve all rights. This document, including all its sub-sections, has copyrights. Read more about what you can do with our patterns at the bottom of each pattern on our site. |
|


With over 40 years in knitting and crochet design, DROPS Design offers one of the most extensive collections of free patterns on the internet - translated to 17 languages. As of today we count 324 catalogs and 12290 patterns - 12280 of which are translated into English (US/in).
We work hard to bring you the best knitting and crochet have to offer, inspiration and advice as well as great quality yarns at incredible prices! Would you like to use our patterns for other than personal use? You can read what you are allowed to do in the Copyright text at the bottom of all our patterns. Happy crafting!
Post a comment to pattern DROPS Baby 21-1
We would love to hear what you have to say about this pattern!
If you want to leave a question, please make sure you select the correct category in the form below, to speed up the answering process. Required fields are marked *.