
Popular categories
Looking for a yarn?


Comments / Questions (272)
![]() Maripola wrote:
Maripola wrote:
Hallo! Ich verstehe nicht, wie ich 102 Maschen um den Halsausschnitt (kleinste Größe) aufnehmen soll. Ich habe 24 l. kraus +16 am Nacken+24 r. = 64M, nicht 102, und "um den Halsausschnitt" ist das auch nicht. Wenn ich an den Vorderkanten 43 l.+16 am Nacken +43 r. aufnehme, dann kann ich zwar "um den Halsausschnitt" auf 102M. stricken, aber die Krausrichtung ist dann nicht die gleiche wie vorne, sondern quer! Das kann also nicht gemeint sein; aber wie komme ich dann richtig auf 102 Maschen?
21.04.2020 - 23:15DROPS Design answered:
Liebe Maripola, diese 102 M sollen Sie um den Halsausschnitt aufnehemen: die stillgelgeten 24 Maschen + noch weitere Maschen (in den neuen angeschlagen Maschen (2 x 2 M) gegen Hals) + 16 M am Hals Rückenteil und einige Maschen in den neu angeschlagenen Maschen vom li. Vorderteil + die 24 stillgelegten Maschen = ca 102 M, wenn Sie aber weniger Maschen aufgenommen haben, ist es auch nicht schlimm, einfach Zunahmen regelmäßig verteilt bei der 1. Reihe stricken. Viel Spaß beim stricken!
22.04.2020 - 08:33
![]() Anne-marie JOUGLEUX wrote:
Anne-marie JOUGLEUX wrote:
1/Il est indiqué (en rouge) que ce modèle a fait l\\\'objet de corrections, je ne les ais pas trouvées.\\r\\n\\r\\n2/ Quel est l\\\'intérêt de l\\\'aiguille circulaire ?
16.03.2020 - 15:10DROPS Design answered:
Bonjour Mme Jougleux, si vous avez imprimé les explications après la date des corrections, elles sont justes, si vous les avez imprimé avant cette date, vous pouvez les imprimer à nouveau ou vérifier les corrections concernées. On tricote en allers et retours sur aiguille circulaire pour avoir suffisamment de place pour y loger toutes les mailles. Bon tricot!
16.03.2020 - 15:56
![]() Birgit wrote:
Birgit wrote:
Also die rechte Seite stricken, dann in der Rückreihe noch die Blende stricken und dann 2 Maschen zunehmen,die Blende stillegen, wieder rechte Seite stricken und in der Rückreihe direkt am Anfang 2 Maschen zunehmen? Stehe leider gerade auf dem Schlauch. Verstehe teilweise die übersetzten Begrifflichkeiten wie gegen den Hals nicht. Lieben Dank für die lieben , kompetenten Antworten.
03.03.2020 - 11:36DROPS Design answered:
Liebe Birgit, also nein nicht genau, beim linken Vorderteil muss man so stricken: am Anfang einer Rückreihe die ersten 24-28 M (siehe Größe) (= Blendemaschen) stricken und diese Maschen stilllegen, die Reihe bis zur Ende stricken, wenden und die Hinreihe stricken, am Ende dieser Hinreihe nehmen Sie 2 neuen Maschen an = 64 bis 103 M, wenden die nächste Rückreihe stricken und alle diese Maschen stilllegen (Entschuldiung, ich war schon am rechten Vorderteil :) Viel Spaß beim stricken!
03.03.2020 - 11:49
![]() Birgit wrote:
Birgit wrote:
Folgendes verstehe ich nicht. Wo müssen die 2 Maschen zugenommen werden? Was bedeutet gegen Vorderseite?Jetzt die 24-24-26 (28-28) Blendenm auf einen Hilfsfaden legen. Weiter am Schluss der R., gegen Vorderseite 2 neue M. anschlagen (gegen den Hals). Bei der nächsten R. wiederholen = 64-69-77 (91-103) M. 1 R. auf der Rückseite stricken und danach die M. auf einen Hilfsfaden legen.
03.03.2020 - 03:32DROPS Design answered:
Liebe Birgit, die 2 neuen Maschen sollen gegen Halsausschnnitt angeschlagen werden (diese Maschen sind für den Hals am Rückenteil), dh beim rechten Vorderteil werden diese 2 Maschen am Ende einer Rückreihe angeschlagen. Viel Spaß beim stricken!
03.03.2020 - 10:46
![]() Rosemiek wrote:
Rosemiek wrote:
Er staat bij het patroon van de slofjes ( bijna op het eind van de beschrijving) : minderen tot het werk klaar is. Dit vind ik onduidelijk: wanneer is het klaar? waarom staat er niet hoeveel naalden of hoeveel centimeter?
10.02.2020 - 18:40DROPS Design answered:
Dag Rosemiek,
In de regel er boven staat dat je 3-4-5 (5) cm moet breien in ribbelsteek. In dit stuk minder je de hele tijd tot je die lengte hebt gebreid.
12.02.2020 - 20:56
![]() VERONIQUE wrote:
VERONIQUE wrote:
Bonjour, je suis entrain de tricoter la capuche; pour la taille 3, il est dit de rabattre après 25 cm de hauteur; cette dimension est prise au niveau du milieu du dos ou sur le coté de la bordure,là où il y a les rangs raccourcis??? merci pour cette précision.
28.07.2019 - 16:25DROPS Design answered:
Bonjour Veronique! Cette dimension est prise là où il y a les rangs raccourcis (au bord). Bon tricot!
29.07.2019 - 17:36
![]() Millie wrote:
Millie wrote:
Meet ik het voorpand aan de kant van de voorbies of aan de andere kant. Door de verkorte is de voorbies kant namelijk langer dan de andere kant. Dankjewel!
26.05.2019 - 10:17DROPS Design answered:
Dag Millie,
Je meet deze inderdaad niet over de voorbies maar meer aan de zijkant.
31.05.2019 - 16:23
![]() Sadie wrote:
Sadie wrote:
Im still quite new to aspects of knitting and so, this may sound like a silly question but, what is meant by band sts? Ive tried looking online but dont know whats right.
08.05.2019 - 23:26DROPS Design answered:
Dear Sadie, the band stitches are the stitches on the side of the jacket towards opening, where you will work buttonholes (right front piece) and then sew buttons (left front piece), - these stitches are worked in garter stitch, depending on the size you will work 24-26 or 28 sts in garter stitch for the front bands. Happy knitting!
09.05.2019 - 11:09
![]() Kerstin Lundkvist wrote:
Kerstin Lundkvist wrote:
Hej och tack för ditt snabba svar! Jag undrar ska jag sticka ett avigt varv mellan ökningarna?
03.05.2019 - 10:55DROPS Design answered:
Hei Kerstin. Ja, du strikker 1 pinne fra retten og øker på slutten av denne, så strikker du 1 pinne fra vrangen (ingen øknigner), så strikker du 1 pinne fra retten og øker på slutten av denne. God fornøyelse
03.05.2019 - 11:57
![]() Kerstin Lundkvist wrote:
Kerstin Lundkvist wrote:
Hej! Har fråga om framstycket, när jag satt 24 maskor på en tråd: ”läggs det upp 2 nya m i slutet på v från rätsidan (mot halsen), upprepa ökningen på nästa v mot halsen” . Jag undrar hur? Ska jag öka från avigsidan, hur? Eller sticka avigt v o rätt v och öka då? Tack på förhand!
02.05.2019 - 18:45DROPS Design answered:
Se svar over
03.05.2019 - 07:52
|
|
Buttercup#buttercupset |
|
 |
 |
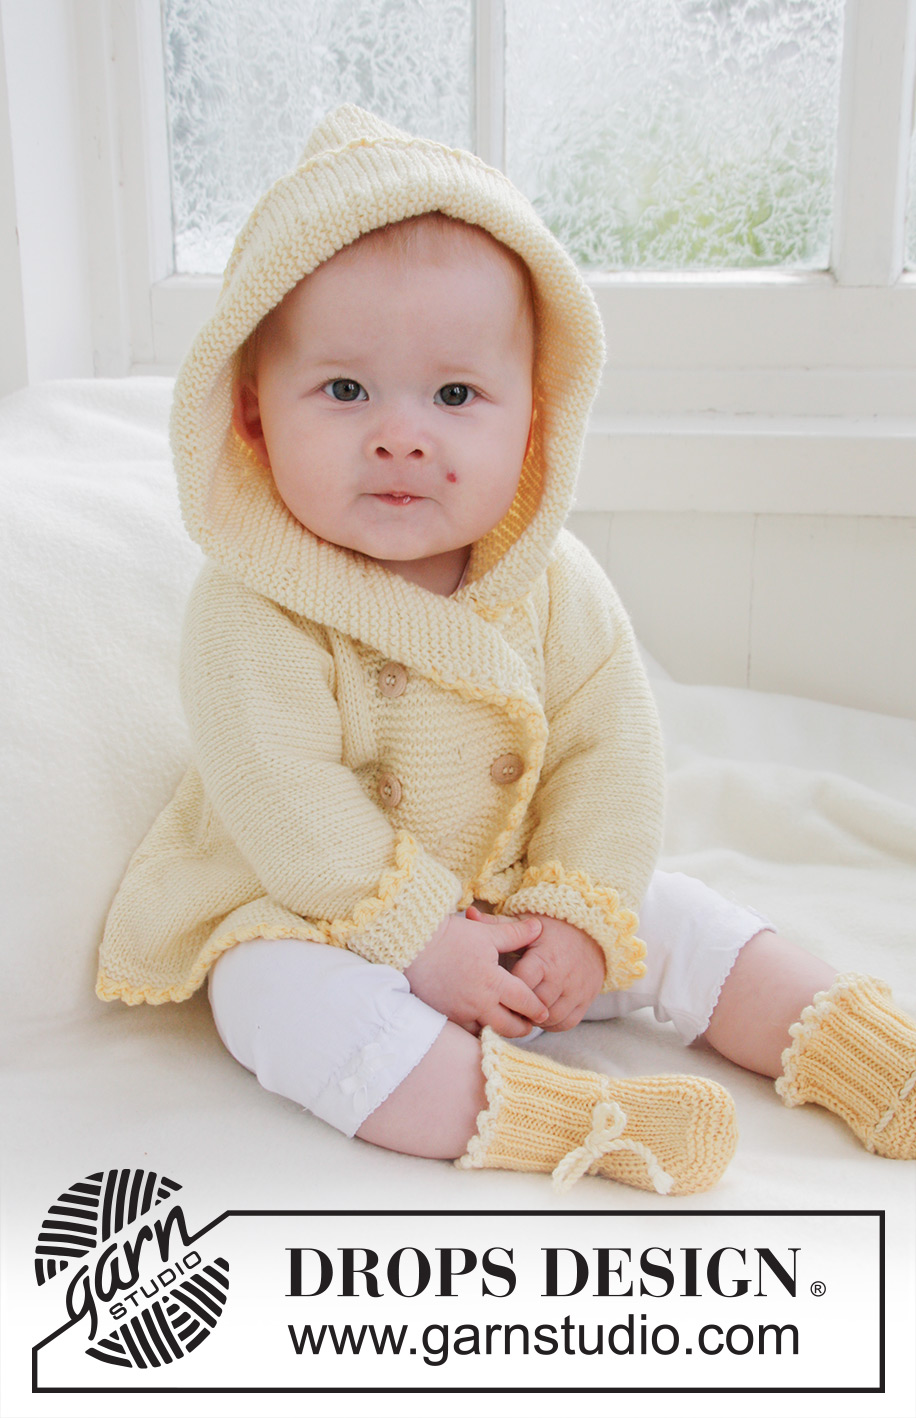
Knitted jacket with hood and booties for baby and children in DROPS BabyMerino
DROPS Baby 21-1 |
|
|
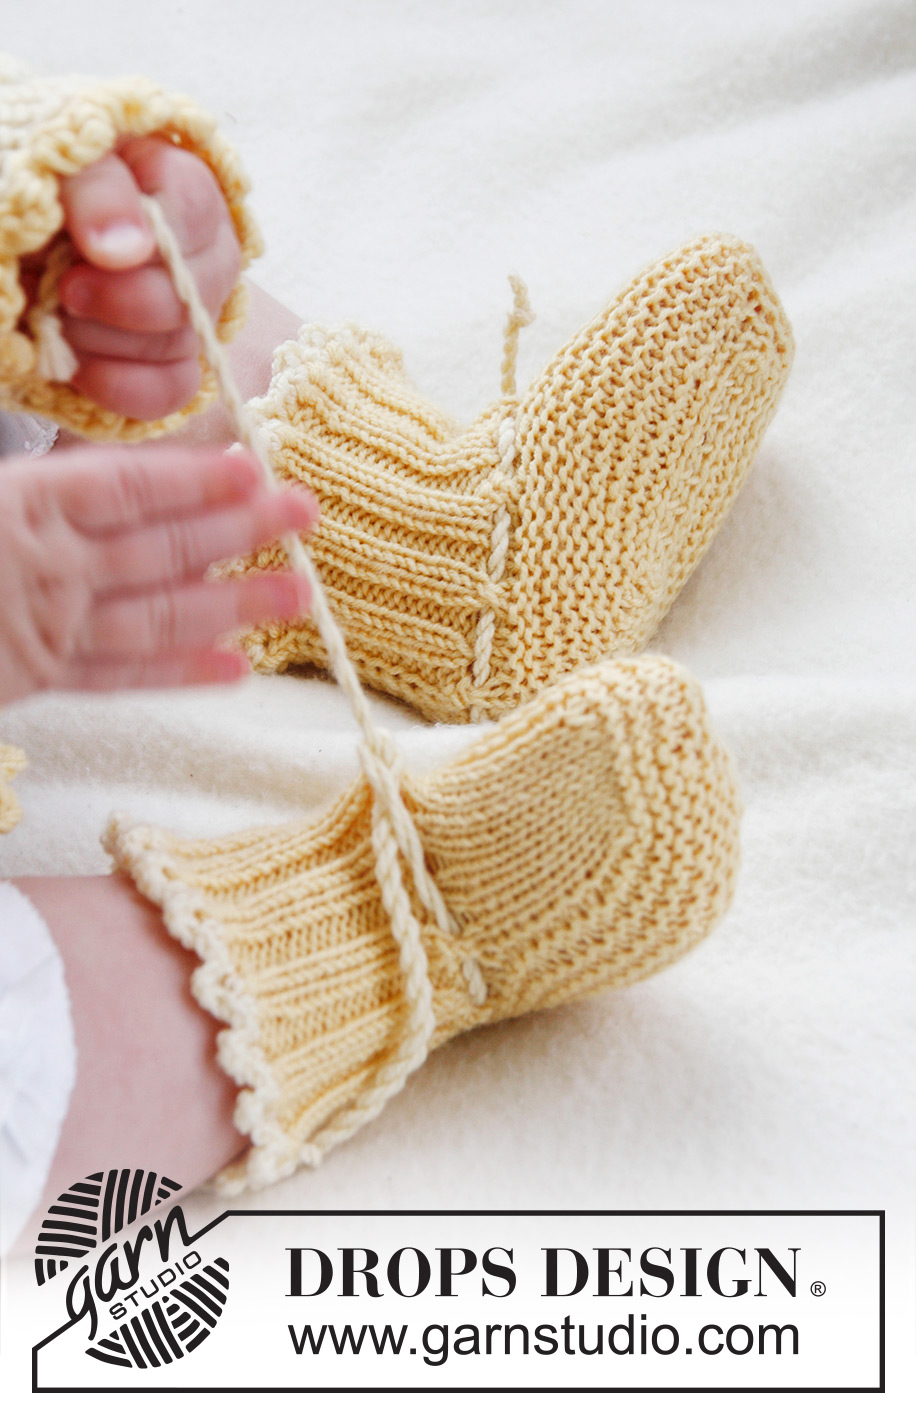
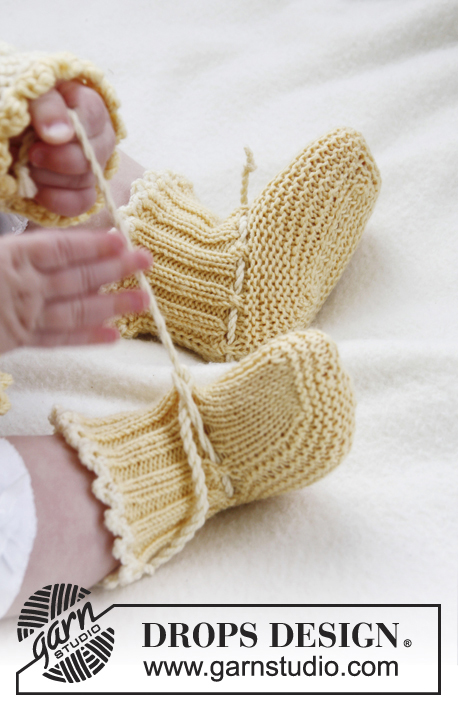
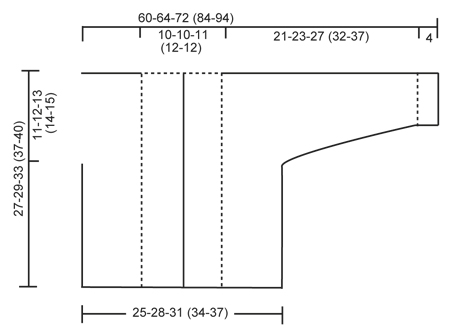
GARTER ST (back and forth on needle): K all rows. SHORT ROWS: * Work 2 rows in garter st over the 24-24-26 (28-28) band sts, work 2 rows in garter st only over the outermost 12-12-13 (14-14) sts. NOTE: When turning mid piece, slip first st. Tighten yarn and continue as before. This is done to avoid holes in the transitions *. BUTTON HOLES: The jacket is double-breasted. Bind off for 4 button holes on right band. 1 BUTTON HOLE = K tog fourth and fifth st from edge and make 1 YO. On same row also K tog fourth and fifth LAST st on band, make 1 YO. Bind off for 2 button holes when piece measures: SIZE 1/3 MONTHS: 14 and 19 cm / 5½" and 7½" SIZE 6/9 MONTHS: 16 and 21 cm / 6 1/4"- and 8 1/4" SIZE 12/18 MONTHS: 18 and 24 cm / 7" and 9½" SIZE 2 YEARS: 20 and 27 cm / 8" and 10½" SIZE 3/4 YEARS: 22 and 30 cm / 8 3/4" and 11 3/4" ---------------------------------------------------------- JACKET: Worked back and forth on circular needle. Beg on front piece, cast on sts for sleeve and work up to the shoulder. Knit the other front piece, place both front pieces tog and work down the back piece. LEFT FRONT PIECE: Read all of the following section before continuing! Cast on 43-47-51 (56-59) sts (includes 1 edge st in the side and 24-24-26 (28-28) band sts towards mid front) on needle size 2.5 mm / US 1or2 with Baby Merino. Work 6 rows in GARTER ST - see explanation above. Switch to circular needle size 3 mm / US 2or3 and work in stockinette st but continue to work the 24-24-26 (28-28) band sts towards mid front in Garter st. When piece measures 4 cm / 1½'', work SHORT ROWS - see explanation above (1st row = from WS). Repeat from *-* 1 time every 4 cm / 1½'' until piece measures 19-21-24 (27-30) cm / 7½"-8 1/4"-9½" (10 5/8"-11 3/4"), then repeat from *-* 1 time every 2 cm / 3/4'' until finished measurements. AT THE SAME TIME when piece measures 16-17-20 (23-25) cm / 6¼''-6¾''-8'' (9''-9¾''), cast on new sts at the end of every row from WS (towards the side of sleeve): 6 sts 2-2-3 (3-3) times, 8 sts 1-1-1 (2-3) times and 21-22-22 (25-26) sts 1 time = 84-89-99 (115-127) sts for shoulder/sleeve. Work inc sts in stockinette st. When all sts have been cast on, continue in stockinette st and Garter st as before while AT THE SAME TIME also working the outermost 10 sts on sleeve in garter st. When piece measures 27-29-33 (37-40) cm / 10 5/8''-11 3/8''-13'' (14½''-15¾''), insert a marker = mid on top of shoulder. Now slip the 24-24-26 (28-28) band sts towards mid front on a stitch holder. Then cast on 2 new sts at the end of row from RS (towards neck), repeat inc on next row towards neck = 64-69-77 (91-103) sts on needle. Work 1 row from WS. Put all sts on a stitch holder. RIGHT FRONT PIECE: Cast on and work as left front piece but reversed. In addition bind off for BUTTON HOLES on band - see explanation above. NOTE! Slip sts on a stitch holder after the last row with inc (i.e. last row = from WS). BACK PIECE: Work left front piece on to circular needle, cast on 16-16-18 (20-20) new sts (= back of neck) and work right front piece on to circular needle = 144-154-172 (202-226) sts. NOW MEASURE PIECE FROM MARKERS ON SHOULDERS. Continue in stockinette st and Garter st at the end on each sleeve back and forth on needle. When piece measures 8½-9½-10 (10-11) cm / 3 1/4"-3 3/4"-4" (4"-4 3/8"), beg to bind off sleeve sts. Bind off at beg of every row in each side as follows: 21-22-22 (25-26) sts 1 time, 8 sts 1-1-1 (2-3) times and 6 sts 2-2-3 (3-3) times = 62-70-76 (84-90) sts on needle. Continue in stockinette st with 1 edge st in garter st each side. When piece measures approx. 26-28-32 (36-39) cm / 10 1/4"-11"-12½" (14 1/4"-15 1/4") – fold the piece double at the markers on shoulders and make sure that the back piece is as long as front piece down to rows in garter st, switch to needle size 2.5 mm / US 1or2 and work 6 rows in garter st, then bind off. ASSEMBLY: Sew the sleeve and side seams inside 1 edge st. Sew on buttons. HOOD: Knit up approx. 102-106-112 (118-122) sts (including sts from stitch holders at the front – NOTE: If more/fewer sts have been knitted up, dec/inc evenly on 1st row. Continue in garter st over all sts while AT THE SAME TIME working short rows in each side every 2 cm / 3/4'' – SEE EXPLANATION ABOVE. Bind off when hood measures approx. 21-23-25 (27-28) cm / 8 1/4"-9"-9 3/4" (10 5/8"-11"). Sew hood neatly tog at the top - sew in outer loop of edge st to avoid a chunky seam. CROCHET BORDER: Crochet a border around the entire jacket. Beg at the bottom on right front piece and crochet with 2 strands yellow Baby Merino and hook size 3 mm / C as follows: Work 1 sc, * ch 3, 1 dc in 1st ch, skip approx. ½ cm / 1/4'', 1 sc in next st *, repeat from *-*. Crochet the same way around the openings on sleeves. ----------------------------------------------------------- BOOTEE: The bootee is worked back and forth from mid back. Cast on 48-52-56 (56) sts on needle size 2.5 mm / US 1or2 with 2 strands yellow Baby Merino. Remove 1 strand and work rib (= K 2/P 2) for 5-6-6 (7) cm / 2"-2 3/8"-2 3/8" (2 3/4") – adjust so that next row is worked from WS. P 1 row from WS while at the same time dec 14-14-18 (14) sts evenly = 34-38-38 (42) sts. On next row work eyelet row as follows from RS: K 1, *K 2 tog, 1 YO *, repeat from *-* and finish with K 1. P 1 row from WS. Now slip the outermost 12-13-13 (15) sts in each side on a stitch holder. Work 4-4½-5½ (6½) cm / 1½"-1 3/4"-2 1/4" (2½") in stockinette st over the middle 10-12-12 (12) sts. Slip sts from stitch holders back on needle and knit up 10-11-13 (16) sts on each side of mid piece = 54-60-64 (74) sts on needle. K every row over all sts for 3-4-5 (5) cm / 1 1/8"-1½"-2" (2") while at the same time after 1½-2-2½ (3) cm / ½"-3/4"-7/8" (1 1/8"), start dec on every other row as follows until completed: Dec 1 st at the beg and the end of row and K 2 tog on each side of the 2 mid sts. bind off and sew tog mid under foot and continue up mid back in outer loop of edge sts to avoid a chunky seam. Knit another bootee the same way. TIES: Cut 3 strands light yellow of approx. 1 meter / 1.1 yds each, twine them tightly tog, fold them double and they will twine again, tie a knot in each end. Thread tie up and down through the eyelet row on bootee. CROCHET BORDER: Crochet a border at the top of bootee on hook size 2 mm/US B with light yellow as follows: 1 sc in first st, * ch 3, 1 dc in 1st ch, skip approx. ½ cm / 1/4'', 1 sc in next st *, repeat from *-* and finish with 1 sl st in sc from beg of round. |
|
 |
|
Have you finished this pattern?Tag your pictures with #dropspattern #buttercupset or submit them to the #dropsfan gallery. Do you need help with this pattern?You'll find 21 tutorial videos, a Comments/Questions area and more by visiting the pattern on garnstudio.com. © 1982-2026 DROPS Design A/S. We reserve all rights. This document, including all its sub-sections, has copyrights. Read more about what you can do with our patterns at the bottom of each pattern on our site. |
|


With over 40 years in knitting and crochet design, DROPS Design offers one of the most extensive collections of free patterns on the internet - translated to 17 languages. As of today we count 324 catalogs and 12290 patterns - 12280 of which are translated into English (US/in).
We work hard to bring you the best knitting and crochet have to offer, inspiration and advice as well as great quality yarns at incredible prices! Would you like to use our patterns for other than personal use? You can read what you are allowed to do in the Copyright text at the bottom of all our patterns. Happy crafting!
Post a comment to pattern DROPS Baby 21-1
We would love to hear what you have to say about this pattern!
If you want to leave a question, please make sure you select the correct category in the form below, to speed up the answering process. Required fields are marked *.