
Popular categories
Looking for a yarn?


Comments / Questions (272)
![]() Ilse Van Eijk wrote:
Ilse Van Eijk wrote:
Ik kan niet antwoorden op uw reactie, maar ik moet inderdaad 5mm naalden hebben voor die stekenverhouding. Ik vind het zelf ook raar, maar de andere naalden waren echt te dun. Wel vind ik dat de wol erg dun is, ik heb expres de baby merino besteld (licht-mintgroen). Heb het met naalden van 4mm opgelost en het ziet er tot nu toe prima uit. Bedankt voor uw snelle reactie.
04.09.2014 - 17:06
![]() Ilse Van Eijk wrote:
Ilse Van Eijk wrote:
Ik wil beginnen aan het patroon, maar ik heb een vraag. Ik heb een rondbreinaald van 5mm nodig zodat de stekenverhouding klopt. Heb ik nu dan ook een naald van 4,5mm nodig voor de rand in ribbelsteek of gewoon een 2,5mm?
03.09.2014 - 20:50DROPS Design answered:
Als u zo vast breit dat u 24 st per 10 cm krijgt met naalden 5 mm, dan raden we voor de boorden ook 4 of 4,5 mm aan. Weet u zeker dat de stekenverhouding klopt zo?
04.09.2014 - 14:41
![]() Eeva wrote:
Eeva wrote:
Kysymys: ohjeessa neuvotaan laittamaan merkkilanka työhön=olkapään keskikohta. Mihin kohtaan merkkilanka laitetaan eli monenko silmukan päähän hihansuusta?
01.09.2014 - 20:58DROPS Design answered:
Merkkilangan paikalla ei sinänsä ole väliä. Kiinnittäisin sen kuitenkin kerroksen keskelle (eli olan silmukoiden keskelle).
02.09.2014 - 14:26
![]() Lone Larsen wrote:
Lone Larsen wrote:
Hvilket p nr strikkes hætten på? - og hvordan strikker man forkortede pinde i begge sider af arbejdet?
29.08.2014 - 22:24DROPS Design answered:
Hej Lone. Du strikker haetten videre med samme pind som du strikkede jakken paa. Du strikker i begge sider ved först at strikke den ene (höjre) og naar du har strikket den förste pind ud efter dette (over til venstre side) strikker du her de forkortede pinde. Dvs, du strikker ikke begge sider samtidig - du gör den ene side faerdig först og derefter den anden.
02.09.2014 - 16:46
![]() Sonja Petersen wrote:
Sonja Petersen wrote:
Jeg mener der er en fejl. Venstre forstykke størrelse 6/9 - sidst i afsnittet. Når man har taget ud til ærme har man 89 masker + 24 forkantmasker. Når man til sidst sætter de 24 forkantmasker på en tråd og der slås 2 nye masker op mod halsen 2 gange så har man 69 masker. Der mangler 24 masker - skal der ikke lukkes af til hals ?
23.08.2014 - 01:23DROPS Design answered:
Du har ialt 89 m sætter 24 på en tråd = 65 tager 2 m ud 2 gange = 69 m som der står i opskriften. De 89 m er altså incl de 24 forkant masker!
03.09.2014 - 12:13
![]() Kammermann wrote:
Kammermann wrote:
Guten Tag, können Sie mir sagen, mit welcher Technik Sie die Kapuze zusammen genäht haben? Ich bekomme eine unschöne Naht wenn ich Sie auf der Vorderseite zusammennähe und danach nach hinten falte wie auf dem Foto.
12.08.2014 - 14:33DROPS Design answered:
Sie arbeiten die Naht am besten an den äußeren M-Gliedern (d.h. Sie stechen abwechselnd in das äußere M-Glied der einen und der anderen Seite ein) und nicht als Matratzenstich, damit die Naht flach wird und kein Wulst beim Umklappen sichtbar wird.
13.08.2014 - 16:50
![]() Bökenkamp wrote:
Bökenkamp wrote:
Mit folgender Anleitung bei den Hausschuhen bin ich nicht klargekommen - es ergibt sich eine Lücke zwischen dem Weitergestrickten und den Maschen auf der Hilfsnadel: Die M. vom Hilfsfaden wieder auf die Nadel legen und auf beiden Seiten des Mittelstückes je 10-12-12 (12) M. aufnehmen = 54-60-64 (74) M. auf der ...
07.08.2014 - 17:09Nicoleta wrote:
Hello, I have a question on the gauge,I have used the merino baby yarn and 3 mm circular needels as indicated in the pattern but I don't have 10× 10 cm from 24 stch and 32 rows I only have 8 × 8 cm. What is it that I am doing wrong? Thank you for your help, Nicoleta
12.07.2014 - 20:39DROPS Design answered:
Dear Nicoleta, if your swatch is too small, try again with larger needle to get the 24 sts and 32 rows be 10 x 10 cm. Happy knitting!
14.07.2014 - 09:37
![]() Gitte wrote:
Gitte wrote:
NB! garnforbrug til str. 6/9 mdr. er 200 g (og ikke 150 som står i opskriften)
03.07.2014 - 08:16
![]() Loni wrote:
Loni wrote:
Hallo, mich irritiert sehr die Angabe der Garnmenge. Für die Größe 92/98 steht in der Anleitung, dass von der Hauptfarbe 200 gr benötigt werden. Ich habe nun von der Kapuze 20 cm gestrickt und schon fast 250 gr verbraucht. Meiner Meinung nach kann die Mengenangabe nicht stimmen.
14.06.2014 - 21:10
|
|
Buttercup#buttercupset |
|
 |
 |
Knitted jacket with hood and booties for baby and children in DROPS BabyMerino
DROPS Baby 21-1 |
|
|
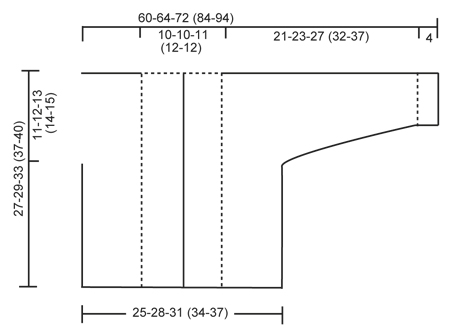
GARTER ST (back and forth on needle): K all rows. SHORT ROWS: * Work 2 rows in garter st over the 24-24-26 (28-28) band sts, work 2 rows in garter st only over the outermost 12-12-13 (14-14) sts. NOTE: When turning mid piece, slip first st. Tighten yarn and continue as before. This is done to avoid holes in the transitions *. BUTTON HOLES: The jacket is double-breasted. Bind off for 4 button holes on right band. 1 BUTTON HOLE = K tog fourth and fifth st from edge and make 1 YO. On same row also K tog fourth and fifth LAST st on band, make 1 YO. Bind off for 2 button holes when piece measures: SIZE 1/3 MONTHS: 14 and 19 cm / 5½" and 7½" SIZE 6/9 MONTHS: 16 and 21 cm / 6 1/4"- and 8 1/4" SIZE 12/18 MONTHS: 18 and 24 cm / 7" and 9½" SIZE 2 YEARS: 20 and 27 cm / 8" and 10½" SIZE 3/4 YEARS: 22 and 30 cm / 8 3/4" and 11 3/4" ---------------------------------------------------------- JACKET: Worked back and forth on circular needle. Beg on front piece, cast on sts for sleeve and work up to the shoulder. Knit the other front piece, place both front pieces tog and work down the back piece. LEFT FRONT PIECE: Read all of the following section before continuing! Cast on 43-47-51 (56-59) sts (includes 1 edge st in the side and 24-24-26 (28-28) band sts towards mid front) on needle size 2.5 mm / US 1or2 with Baby Merino. Work 6 rows in GARTER ST - see explanation above. Switch to circular needle size 3 mm / US 2or3 and work in stockinette st but continue to work the 24-24-26 (28-28) band sts towards mid front in Garter st. When piece measures 4 cm / 1½'', work SHORT ROWS - see explanation above (1st row = from WS). Repeat from *-* 1 time every 4 cm / 1½'' until piece measures 19-21-24 (27-30) cm / 7½"-8 1/4"-9½" (10 5/8"-11 3/4"), then repeat from *-* 1 time every 2 cm / 3/4'' until finished measurements. AT THE SAME TIME when piece measures 16-17-20 (23-25) cm / 6¼''-6¾''-8'' (9''-9¾''), cast on new sts at the end of every row from WS (towards the side of sleeve): 6 sts 2-2-3 (3-3) times, 8 sts 1-1-1 (2-3) times and 21-22-22 (25-26) sts 1 time = 84-89-99 (115-127) sts for shoulder/sleeve. Work inc sts in stockinette st. When all sts have been cast on, continue in stockinette st and Garter st as before while AT THE SAME TIME also working the outermost 10 sts on sleeve in garter st. When piece measures 27-29-33 (37-40) cm / 10 5/8''-11 3/8''-13'' (14½''-15¾''), insert a marker = mid on top of shoulder. Now slip the 24-24-26 (28-28) band sts towards mid front on a stitch holder. Then cast on 2 new sts at the end of row from RS (towards neck), repeat inc on next row towards neck = 64-69-77 (91-103) sts on needle. Work 1 row from WS. Put all sts on a stitch holder. RIGHT FRONT PIECE: Cast on and work as left front piece but reversed. In addition bind off for BUTTON HOLES on band - see explanation above. NOTE! Slip sts on a stitch holder after the last row with inc (i.e. last row = from WS). BACK PIECE: Work left front piece on to circular needle, cast on 16-16-18 (20-20) new sts (= back of neck) and work right front piece on to circular needle = 144-154-172 (202-226) sts. NOW MEASURE PIECE FROM MARKERS ON SHOULDERS. Continue in stockinette st and Garter st at the end on each sleeve back and forth on needle. When piece measures 8½-9½-10 (10-11) cm / 3 1/4"-3 3/4"-4" (4"-4 3/8"), beg to bind off sleeve sts. Bind off at beg of every row in each side as follows: 21-22-22 (25-26) sts 1 time, 8 sts 1-1-1 (2-3) times and 6 sts 2-2-3 (3-3) times = 62-70-76 (84-90) sts on needle. Continue in stockinette st with 1 edge st in garter st each side. When piece measures approx. 26-28-32 (36-39) cm / 10 1/4"-11"-12½" (14 1/4"-15 1/4") – fold the piece double at the markers on shoulders and make sure that the back piece is as long as front piece down to rows in garter st, switch to needle size 2.5 mm / US 1or2 and work 6 rows in garter st, then bind off. ASSEMBLY: Sew the sleeve and side seams inside 1 edge st. Sew on buttons. HOOD: Knit up approx. 102-106-112 (118-122) sts (including sts from stitch holders at the front – NOTE: If more/fewer sts have been knitted up, dec/inc evenly on 1st row. Continue in garter st over all sts while AT THE SAME TIME working short rows in each side every 2 cm / 3/4'' – SEE EXPLANATION ABOVE. Bind off when hood measures approx. 21-23-25 (27-28) cm / 8 1/4"-9"-9 3/4" (10 5/8"-11"). Sew hood neatly tog at the top - sew in outer loop of edge st to avoid a chunky seam. CROCHET BORDER: Crochet a border around the entire jacket. Beg at the bottom on right front piece and crochet with 2 strands yellow Baby Merino and hook size 3 mm / C as follows: Work 1 sc, * ch 3, 1 dc in 1st ch, skip approx. ½ cm / 1/4'', 1 sc in next st *, repeat from *-*. Crochet the same way around the openings on sleeves. ----------------------------------------------------------- BOOTEE: The bootee is worked back and forth from mid back. Cast on 48-52-56 (56) sts on needle size 2.5 mm / US 1or2 with 2 strands yellow Baby Merino. Remove 1 strand and work rib (= K 2/P 2) for 5-6-6 (7) cm / 2"-2 3/8"-2 3/8" (2 3/4") – adjust so that next row is worked from WS. P 1 row from WS while at the same time dec 14-14-18 (14) sts evenly = 34-38-38 (42) sts. On next row work eyelet row as follows from RS: K 1, *K 2 tog, 1 YO *, repeat from *-* and finish with K 1. P 1 row from WS. Now slip the outermost 12-13-13 (15) sts in each side on a stitch holder. Work 4-4½-5½ (6½) cm / 1½"-1 3/4"-2 1/4" (2½") in stockinette st over the middle 10-12-12 (12) sts. Slip sts from stitch holders back on needle and knit up 10-11-13 (16) sts on each side of mid piece = 54-60-64 (74) sts on needle. K every row over all sts for 3-4-5 (5) cm / 1 1/8"-1½"-2" (2") while at the same time after 1½-2-2½ (3) cm / ½"-3/4"-7/8" (1 1/8"), start dec on every other row as follows until completed: Dec 1 st at the beg and the end of row and K 2 tog on each side of the 2 mid sts. bind off and sew tog mid under foot and continue up mid back in outer loop of edge sts to avoid a chunky seam. Knit another bootee the same way. TIES: Cut 3 strands light yellow of approx. 1 meter / 1.1 yds each, twine them tightly tog, fold them double and they will twine again, tie a knot in each end. Thread tie up and down through the eyelet row on bootee. CROCHET BORDER: Crochet a border at the top of bootee on hook size 2 mm/US B with light yellow as follows: 1 sc in first st, * ch 3, 1 dc in 1st ch, skip approx. ½ cm / 1/4'', 1 sc in next st *, repeat from *-* and finish with 1 sl st in sc from beg of round. |
|
 |
|
Have you finished this pattern?Tag your pictures with #dropspattern #buttercupset or submit them to the #dropsfan gallery. Do you need help with this pattern?You'll find 21 tutorial videos, a Comments/Questions area and more by visiting the pattern on garnstudio.com. © 1982-2026 DROPS Design A/S. We reserve all rights. This document, including all its sub-sections, has copyrights. Read more about what you can do with our patterns at the bottom of each pattern on our site. |
|


With over 40 years in knitting and crochet design, DROPS Design offers one of the most extensive collections of free patterns on the internet - translated to 17 languages. As of today we count 324 catalogs and 12290 patterns - 12280 of which are translated into English (US/in).
We work hard to bring you the best knitting and crochet have to offer, inspiration and advice as well as great quality yarns at incredible prices! Would you like to use our patterns for other than personal use? You can read what you are allowed to do in the Copyright text at the bottom of all our patterns. Happy crafting!
Post a comment to pattern DROPS Baby 21-1
We would love to hear what you have to say about this pattern!
If you want to leave a question, please make sure you select the correct category in the form below, to speed up the answering process. Required fields are marked *.