
Popular categories
Looking for a yarn?


Comments / Questions (272)
Sue McCully wrote:
Hello, I have knitted up the left front piece and now starting the right front piece but am a little confused as to which side I start the short rows from, do I start from ws or rs?? Or does it not matter.
13.04.2015 - 23:25DROPS Design answered:
Dear mrs McCully, the short rows start from mid front (= on the side where there are the front band sts): 2 rows on 24-26-28 sts of the front band sts, 2 rows on 12-13-14 sts. Happy knitting!
14.04.2015 - 09:49
![]() Lida Schilder wrote:
Lida Schilder wrote:
Hallo, In het patroon wordt aangegeven dat in de capuchon ook aan beide kanten verkorte toeren moeten worden gebreid, maar er staat niet bij over hoeveel steken dat moet gebeuren. Eerst keren bij de buitenste 26 en daarna bij de buitenste 13? Kunt u dat voor mij nagaan alstublieft? Alvast mijn dank, Lida Schilder
29.03.2015 - 22:44DROPS Design answered:
Er staat bovenaan in het patroon onder Verkorte Toeren wanneer u moet keren, dus afhankelijk van de maat die u breit, is dit het aantal steken: VERKORTE TOEREN: * Brei 2 nld in ribbelst over de 24-24-26 (28-28) voorbies st, brei 2 nld in ribbelst alleen over de buitenste 12-12-13 (14-14) st. LET OP: haal als u keert midden in het werk de eerste st af. Trek de draad goed aan en ga verder als hiervoor. Zo voorkomt u gaatjes in de overgangen *.
30.03.2015 - 10:03
![]() Elena wrote:
Elena wrote:
Hallo liebes Drops Team. Leider ist mir nicht ganz klar, an welcher Stelle ich das Vorderteil messen muss (möchte die maschen für den ärmel anschlagen). Bei mir ist die glatt gestrickte Seite trotz verkürzter Reihen alle 4 cm etwas länger (ca 1,5 cm), ist das korrekt? Vielen Dank für Ihre Unterstützung!
15.03.2015 - 16:36DROPS Design answered:
Sie sollten am glatt re gestrickten Teil messen. Die Krausrippenblende können Sie nachträglich noch etwas dehnen, indem Sie die Jacke anfeuchten und die Blenden auf das passende Maß spannen, sodass sie so lang wie der Rest der Jacke werden. Sie könnten die verkürzten R nun in geringfügig kürzeren Abständen als angegeben arbeiten, damit die Blenden sich nicht noch weiter zusammenziehen.
15.03.2015 - 23:09
![]() Elena wrote:
Elena wrote:
Hallo liebes Drops Team. Leider ist mir nicht ganz klar, an welcher Stelle ich das Vorderteil messen muss (möchte die maschen für den ärmel anschlagen). Bei mir ist die glatt gestrickte Seite trotz verkürzter Reihen alle 4 cm etwas länger (ca 1,5 cm), ist das korrekt? Vielen Dank für Ihre Unterstützung!
15.03.2015 - 16:36DROPS Design answered:
Antwort siehe unten! :-)
15.03.2015 - 23:09
![]() Christiane wrote:
Christiane wrote:
Ich bin jetzt bei der Kapuze und möchte gerne wissen, wo ich die Höhe der Kapuze messen muss. Durch die verkürzten Reihen ist die Kapuze an der Öffnung viel länger als hinten. Viele Grüsse und vielen Dank für die Info Christiane
12.03.2015 - 07:33DROPS Design answered:
Liebe Christiane, Sie müssen in der Mitte der Kapuze messen, bzw. nicht an den Rändern, also an einer Stelle ohne verkürzte R.
13.03.2015 - 10:13
![]() Naima wrote:
Naima wrote:
Bonjour J'ai bien aimé le modèle, je demande simplement si les rangs raccourcis en point mousse sont du côté du bord oubien du côté manche Merci
12.03.2015 - 02:16DROPS Design answered:
Bonjour Naima, les rangs raccourcis se font uniquement sur les mailles des bordures des devants pour éviter que le point mousse des bordures des devants ne resserrent le reste de l'ouvrage tricoté en jersey. Bon tricot!
12.03.2015 - 09:16Tonneke Vogelaar wrote:
Bij het begin vande verkorte toern staat de instructie: Herhaal van *_* 1 keer iedere 4 cm tot het werk .. Cm meet. Herhaal dan van *_* 1 keer iedere 2cm tot het werk klaar is. Hoe moet ik dit begrijpen? Steeds om de vier cm de verkorte toeren doen tot ..cm en dan steeds om de 2 cm? Ook bij de mouwen dus en bij het achterpand? Achterpand wordt dan anders als het voorpand?
09.03.2015 - 19:18DROPS Design answered:
Hoi Tonneke. Je maakt eerst de verkorte toeren om de 4 cm tot de xx cm. En daarna tot het voorpand af is. Je maakt geen verkorte toeren op het achterpand of op de mouwen.
03.06.2015 - 14:42
![]() Charlotte Kristiansen wrote:
Charlotte Kristiansen wrote:
Øv er allerede kørt surt i det ved første gang forkortede pinde. 1 p vrang side : 24 ret m. 2. P : 24 ret m. 3 pind 12 masker, men så er vi på vrangsiden og er det så det yderste af retstykket der menes, eller burde de 12 m forkortede pinde ligge helt fra start/ yderst på ret siden. Hos mig bliver "udvidelsen" på de første 12 retmasker fra vrangsiden. Kan endnu ikke gennemskue hvorfor jeg laver de forkortede pinde, måske derfor jeg ikke helt forstår hvad der menes.
08.03.2015 - 13:19DROPS Design answered:
Hej Charlotte, Du vil have forkanten lidt bredere så den ikke trækker sig sammen. For at få kanten bredere skal du strikke flere pinde over de yderste m til forkant, derfor sørger du for at strikke de forkortede pinde (de ekstra pinde) over det retstrikkede stykke mod midt foran. God fornøjelse!
25.05.2015 - 15:28
![]() Presne wrote:
Presne wrote:
Pour le marqueur à placer milieu d'épaule à 33 cm, dois on tenir compte des 26 m de la bordure (99m en tout divisé par 2) ou 73 m divisé par 2 merci
17.02.2015 - 16:23DROPS Design answered:
Bonjour Mme Presne, le marqueur de l'épaule sert de repère pour la longueur de l'autre devant et celle du dos pour qu'elles soient identiques - placez-le au niveau des mailles de l'épaule (après les mailles de la bordure devant) et laissez le en place, vous pourrez ainsi vérifier le nombre de rangs du devant droit puis du dos pour vos augmentations/diminutions et hauteur totale. Bon tricot!
18.02.2015 - 08:42
![]() Birgit wrote:
Birgit wrote:
Bonjour :) Est-il possible de remplacer l'aiguille circulaire par une aiguille normale c'est à dire droite ? Merci
15.02.2015 - 18:32DROPS Design answered:
Bonjour Birgit, la veste se tricote entièrement en allers et retours, sur une aiguille circulaire pour avoir suffisamment de place pour y loger toutes les mailles. Vous pouvez utiliser des aiguilles droites, vos mailles seront juste plus serrées, pensez à bien conserver la bonne tension pour garder les bonnes mesures. Bon tricot!
16.02.2015 - 11:07
|
|
Buttercup#buttercupset |
|
 |
 |
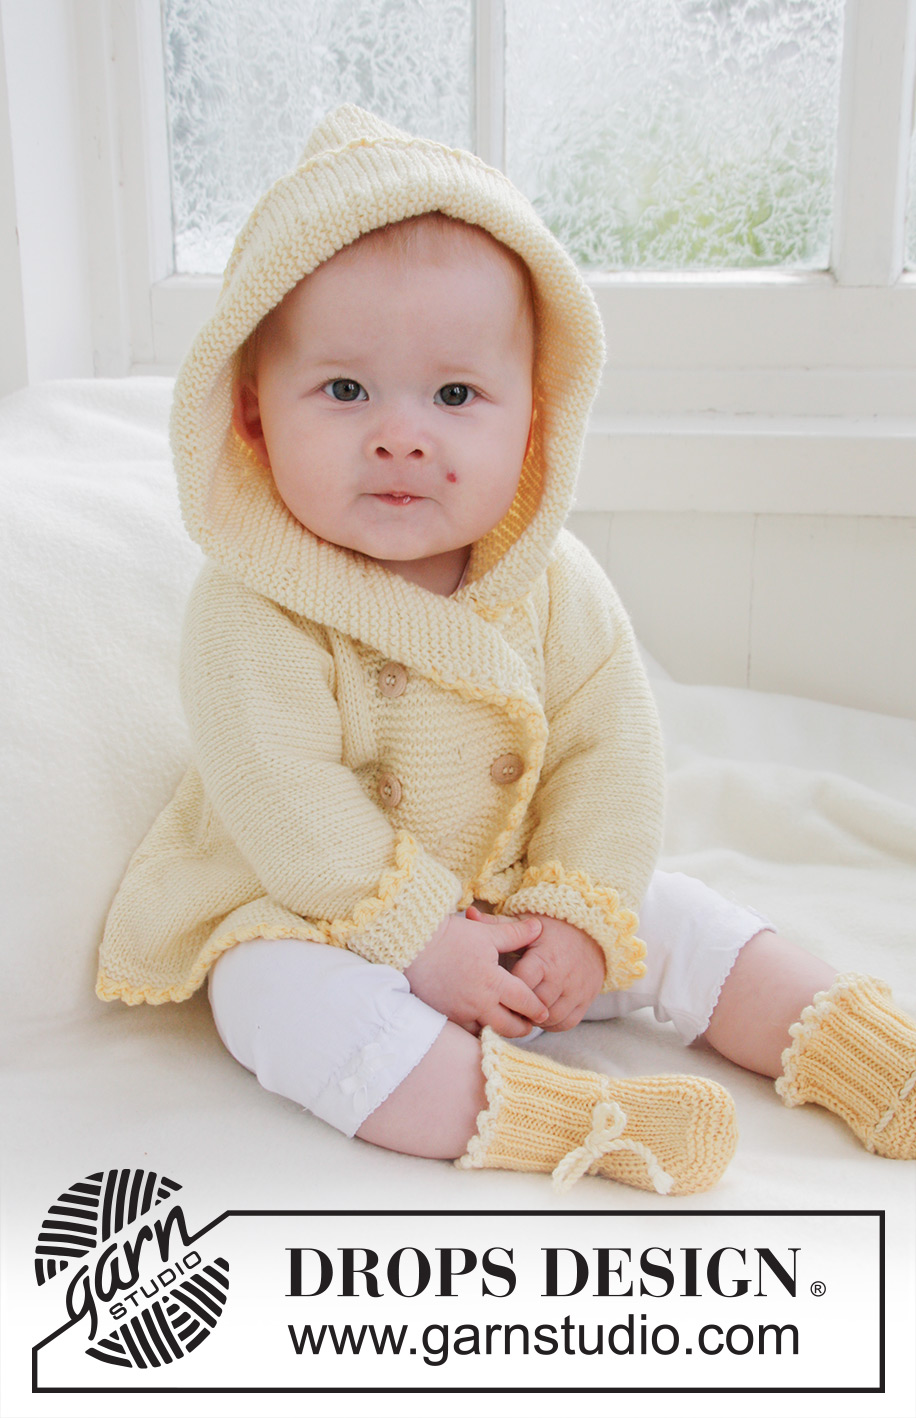
Knitted jacket with hood and booties for baby and children in DROPS BabyMerino
DROPS Baby 21-1 |
|
|
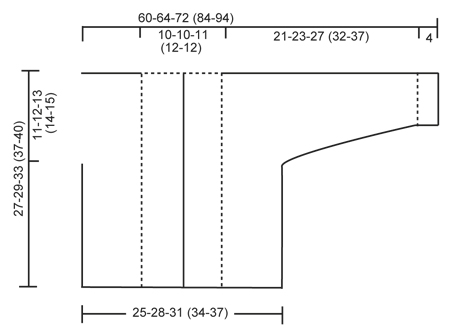
GARTER ST (back and forth on needle): K all rows. SHORT ROWS: * Work 2 rows in garter st over the 24-24-26 (28-28) band sts, work 2 rows in garter st only over the outermost 12-12-13 (14-14) sts. NOTE: When turning mid piece, slip first st. Tighten yarn and continue as before. This is done to avoid holes in the transitions *. BUTTON HOLES: The jacket is double-breasted. Bind off for 4 button holes on right band. 1 BUTTON HOLE = K tog fourth and fifth st from edge and make 1 YO. On same row also K tog fourth and fifth LAST st on band, make 1 YO. Bind off for 2 button holes when piece measures: SIZE 1/3 MONTHS: 14 and 19 cm / 5½" and 7½" SIZE 6/9 MONTHS: 16 and 21 cm / 6 1/4"- and 8 1/4" SIZE 12/18 MONTHS: 18 and 24 cm / 7" and 9½" SIZE 2 YEARS: 20 and 27 cm / 8" and 10½" SIZE 3/4 YEARS: 22 and 30 cm / 8 3/4" and 11 3/4" ---------------------------------------------------------- JACKET: Worked back and forth on circular needle. Beg on front piece, cast on sts for sleeve and work up to the shoulder. Knit the other front piece, place both front pieces tog and work down the back piece. LEFT FRONT PIECE: Read all of the following section before continuing! Cast on 43-47-51 (56-59) sts (includes 1 edge st in the side and 24-24-26 (28-28) band sts towards mid front) on needle size 2.5 mm / US 1or2 with Baby Merino. Work 6 rows in GARTER ST - see explanation above. Switch to circular needle size 3 mm / US 2or3 and work in stockinette st but continue to work the 24-24-26 (28-28) band sts towards mid front in Garter st. When piece measures 4 cm / 1½'', work SHORT ROWS - see explanation above (1st row = from WS). Repeat from *-* 1 time every 4 cm / 1½'' until piece measures 19-21-24 (27-30) cm / 7½"-8 1/4"-9½" (10 5/8"-11 3/4"), then repeat from *-* 1 time every 2 cm / 3/4'' until finished measurements. AT THE SAME TIME when piece measures 16-17-20 (23-25) cm / 6¼''-6¾''-8'' (9''-9¾''), cast on new sts at the end of every row from WS (towards the side of sleeve): 6 sts 2-2-3 (3-3) times, 8 sts 1-1-1 (2-3) times and 21-22-22 (25-26) sts 1 time = 84-89-99 (115-127) sts for shoulder/sleeve. Work inc sts in stockinette st. When all sts have been cast on, continue in stockinette st and Garter st as before while AT THE SAME TIME also working the outermost 10 sts on sleeve in garter st. When piece measures 27-29-33 (37-40) cm / 10 5/8''-11 3/8''-13'' (14½''-15¾''), insert a marker = mid on top of shoulder. Now slip the 24-24-26 (28-28) band sts towards mid front on a stitch holder. Then cast on 2 new sts at the end of row from RS (towards neck), repeat inc on next row towards neck = 64-69-77 (91-103) sts on needle. Work 1 row from WS. Put all sts on a stitch holder. RIGHT FRONT PIECE: Cast on and work as left front piece but reversed. In addition bind off for BUTTON HOLES on band - see explanation above. NOTE! Slip sts on a stitch holder after the last row with inc (i.e. last row = from WS). BACK PIECE: Work left front piece on to circular needle, cast on 16-16-18 (20-20) new sts (= back of neck) and work right front piece on to circular needle = 144-154-172 (202-226) sts. NOW MEASURE PIECE FROM MARKERS ON SHOULDERS. Continue in stockinette st and Garter st at the end on each sleeve back and forth on needle. When piece measures 8½-9½-10 (10-11) cm / 3 1/4"-3 3/4"-4" (4"-4 3/8"), beg to bind off sleeve sts. Bind off at beg of every row in each side as follows: 21-22-22 (25-26) sts 1 time, 8 sts 1-1-1 (2-3) times and 6 sts 2-2-3 (3-3) times = 62-70-76 (84-90) sts on needle. Continue in stockinette st with 1 edge st in garter st each side. When piece measures approx. 26-28-32 (36-39) cm / 10 1/4"-11"-12½" (14 1/4"-15 1/4") – fold the piece double at the markers on shoulders and make sure that the back piece is as long as front piece down to rows in garter st, switch to needle size 2.5 mm / US 1or2 and work 6 rows in garter st, then bind off. ASSEMBLY: Sew the sleeve and side seams inside 1 edge st. Sew on buttons. HOOD: Knit up approx. 102-106-112 (118-122) sts (including sts from stitch holders at the front – NOTE: If more/fewer sts have been knitted up, dec/inc evenly on 1st row. Continue in garter st over all sts while AT THE SAME TIME working short rows in each side every 2 cm / 3/4'' – SEE EXPLANATION ABOVE. Bind off when hood measures approx. 21-23-25 (27-28) cm / 8 1/4"-9"-9 3/4" (10 5/8"-11"). Sew hood neatly tog at the top - sew in outer loop of edge st to avoid a chunky seam. CROCHET BORDER: Crochet a border around the entire jacket. Beg at the bottom on right front piece and crochet with 2 strands yellow Baby Merino and hook size 3 mm / C as follows: Work 1 sc, * ch 3, 1 dc in 1st ch, skip approx. ½ cm / 1/4'', 1 sc in next st *, repeat from *-*. Crochet the same way around the openings on sleeves. ----------------------------------------------------------- BOOTEE: The bootee is worked back and forth from mid back. Cast on 48-52-56 (56) sts on needle size 2.5 mm / US 1or2 with 2 strands yellow Baby Merino. Remove 1 strand and work rib (= K 2/P 2) for 5-6-6 (7) cm / 2"-2 3/8"-2 3/8" (2 3/4") – adjust so that next row is worked from WS. P 1 row from WS while at the same time dec 14-14-18 (14) sts evenly = 34-38-38 (42) sts. On next row work eyelet row as follows from RS: K 1, *K 2 tog, 1 YO *, repeat from *-* and finish with K 1. P 1 row from WS. Now slip the outermost 12-13-13 (15) sts in each side on a stitch holder. Work 4-4½-5½ (6½) cm / 1½"-1 3/4"-2 1/4" (2½") in stockinette st over the middle 10-12-12 (12) sts. Slip sts from stitch holders back on needle and knit up 10-11-13 (16) sts on each side of mid piece = 54-60-64 (74) sts on needle. K every row over all sts for 3-4-5 (5) cm / 1 1/8"-1½"-2" (2") while at the same time after 1½-2-2½ (3) cm / ½"-3/4"-7/8" (1 1/8"), start dec on every other row as follows until completed: Dec 1 st at the beg and the end of row and K 2 tog on each side of the 2 mid sts. bind off and sew tog mid under foot and continue up mid back in outer loop of edge sts to avoid a chunky seam. Knit another bootee the same way. TIES: Cut 3 strands light yellow of approx. 1 meter / 1.1 yds each, twine them tightly tog, fold them double and they will twine again, tie a knot in each end. Thread tie up and down through the eyelet row on bootee. CROCHET BORDER: Crochet a border at the top of bootee on hook size 2 mm/US B with light yellow as follows: 1 sc in first st, * ch 3, 1 dc in 1st ch, skip approx. ½ cm / 1/4'', 1 sc in next st *, repeat from *-* and finish with 1 sl st in sc from beg of round. |
|
 |
|
Have you finished this pattern?Tag your pictures with #dropspattern #buttercupset or submit them to the #dropsfan gallery. Do you need help with this pattern?You'll find 21 tutorial videos, a Comments/Questions area and more by visiting the pattern on garnstudio.com. © 1982-2026 DROPS Design A/S. We reserve all rights. This document, including all its sub-sections, has copyrights. Read more about what you can do with our patterns at the bottom of each pattern on our site. |
|


With over 40 years in knitting and crochet design, DROPS Design offers one of the most extensive collections of free patterns on the internet - translated to 17 languages. As of today we count 324 catalogs and 12290 patterns - 12280 of which are translated into English (US/in).
We work hard to bring you the best knitting and crochet have to offer, inspiration and advice as well as great quality yarns at incredible prices! Would you like to use our patterns for other than personal use? You can read what you are allowed to do in the Copyright text at the bottom of all our patterns. Happy crafting!
Post a comment to pattern DROPS Baby 21-1
We would love to hear what you have to say about this pattern!
If you want to leave a question, please make sure you select the correct category in the form below, to speed up the answering process. Required fields are marked *.