
Popular categories
Looking for a yarn?


Comments / Questions (272)
![]() Aina Nygaard wrote:
Aina Nygaard wrote:
Hei igjen Lurer på om jeg har misforstått oppskriften? Har lagt opp 43+24 stolpemasker=67+(6+6+8+21)41 ermemasker=108 masker. Oppskriften sier 84 her. Får ikke maskeantallet til å stemme med 64 inkl. 4 mot hals som oppskriften sier når stolpemaskene skal på trådTrenger hjelp:-)
15.10.2015 - 11:06DROPS Design answered:
Hej Aina, du legger opp 43 m (24 af dem er stolpem mod midt foran). Så stemmer maskeantallet med de 84. God fornøjelse!
16.10.2015 - 15:38
![]() Caroline wrote:
Caroline wrote:
Hi, I'm making this at the moment and it's going very well, just finished the left front piece! I'm looking at the buttonholes for the right piece, and I notice that it's just k2tog yo, will that be big enough to fit the button through? Seems a little small.
13.10.2015 - 20:43DROPS Design answered:
Dear Caroline, the buttonhole is adjusted to the size of the button, not too tight to let the button go through and not too large so that the button can stay. Happy knitting!
14.10.2015 - 08:48
![]() Pia Duelund wrote:
Pia Duelund wrote:
Jeg er nu i gang med at strikke hætte, men er i tvivl om hvor jeg skal tage slutmålet henne. Er det fra midt på nakken eller er det langs forkanten som jo er længere?
12.10.2015 - 17:30DROPS Design answered:
Hej Pia. Du maaler paa midten, ikke langs med den laengere forkant.
13.10.2015 - 14:49Leo wrote:
Hilfe habe das mit den verkürzten Reihen falsch gemacht und bin nun schon bei der rechten Seite an der Hälfte muss ich nochmal alles aufmachen? Habe bei den verkürzten Reihen die 24 blendenmaschen plus 12 glatte gestrickt und dann gewendet und zurückgestrikt ! Mein linkes Vorderteil ist schon fertig !!!
09.10.2015 - 20:18DROPS Design answered:
Antwort siehe unten!
13.10.2015 - 17:27Leo wrote:
Hilfe habe das mit den verkürzten Reihen falsch gemacht und bin nun schon bei der rechten Seite an der Hälfte muss ich nochmal alles aufmachen? Habe bei den verkürzten Reihen die 24 blendenmaschen plus 12 glatte gestrickt und dann gewendet und zurückgestrikt ! Mein linkes Vorderteil ist schon fertig !!!
09.10.2015 - 07:46DROPS Design answered:
Es kommt darauf an, wie das Vorderteil aussieht, das lässt sich jetzt schlecht bewerten, ohne Ihr Strickstück zu sehen... Der Schnitt/Fall des Vorderteils wird dadurch natürlich etwas anders. Aber wenn es einigermaßen in Ordnung aussieht und Sie nicht mehr von vorne beginnen wollen, lassen Sie es so - wie gesagt, die Form wird dadurch etwas anders, entscheiden Sie am besten selbst, ob es Ihnen gefällt oder nicht.
13.10.2015 - 16:19
![]() Sara wrote:
Sara wrote:
När man sätter markör "mitt på axeln" spelar det ingen roll mellan vilka maskor utan den markerar arbetets längd nerifrån och upp, har jag förstått rätt?
07.10.2015 - 11:27
![]() Sara wrote:
Sara wrote:
Hej! Har lite svårt att tänka motsatt då man ska göra det högra framstycket, kommer den rätstickade delen ligga först på de räta varven då? Och att de förkortade varven görs på räta sidan istället för aviga? Tänker jag rätt då? Vänliga hälsningar Sara
03.10.2015 - 00:22DROPS Design answered:
Hej Sara, ja på högra framst stickar du den rätstickade delen från rätsidan. Lycka till!
06.10.2015 - 14:51
![]() Assunta wrote:
Assunta wrote:
Grazie mille per la risposta e mi scusi se ho mandato la domanda 2 volte, pensavo di aver sbagliato e che non fosse partita. Grazie ancora
09.09.2015 - 08:26
![]() Assunta wrote:
Assunta wrote:
Vorrei sapere se per il cappuccio la misura và presa da dietro il collo oppure da dove ci sono i ferri accorciati che è piu lungo? Grazie in anticipo.
08.09.2015 - 11:53DROPS Design answered:
Buongiorno Assunta. La misura del cappuccio viene presa sul dietro del collo. Buon lavoro!
08.09.2015 - 12:58
![]() Assunta wrote:
Assunta wrote:
Volevo sapere per quanto riguarda il cappuccio per chiudere la maglie, la misura và presa dai ferri accorciati oppure no?
08.09.2015 - 11:39DROPS Design answered:
Buongiorno Assunta. La misura del cappuccio viene presa sul dietro del collo. Buon lavoro!
08.09.2015 - 12:58
|
|
Buttercup#buttercupset |
|
 |
 |
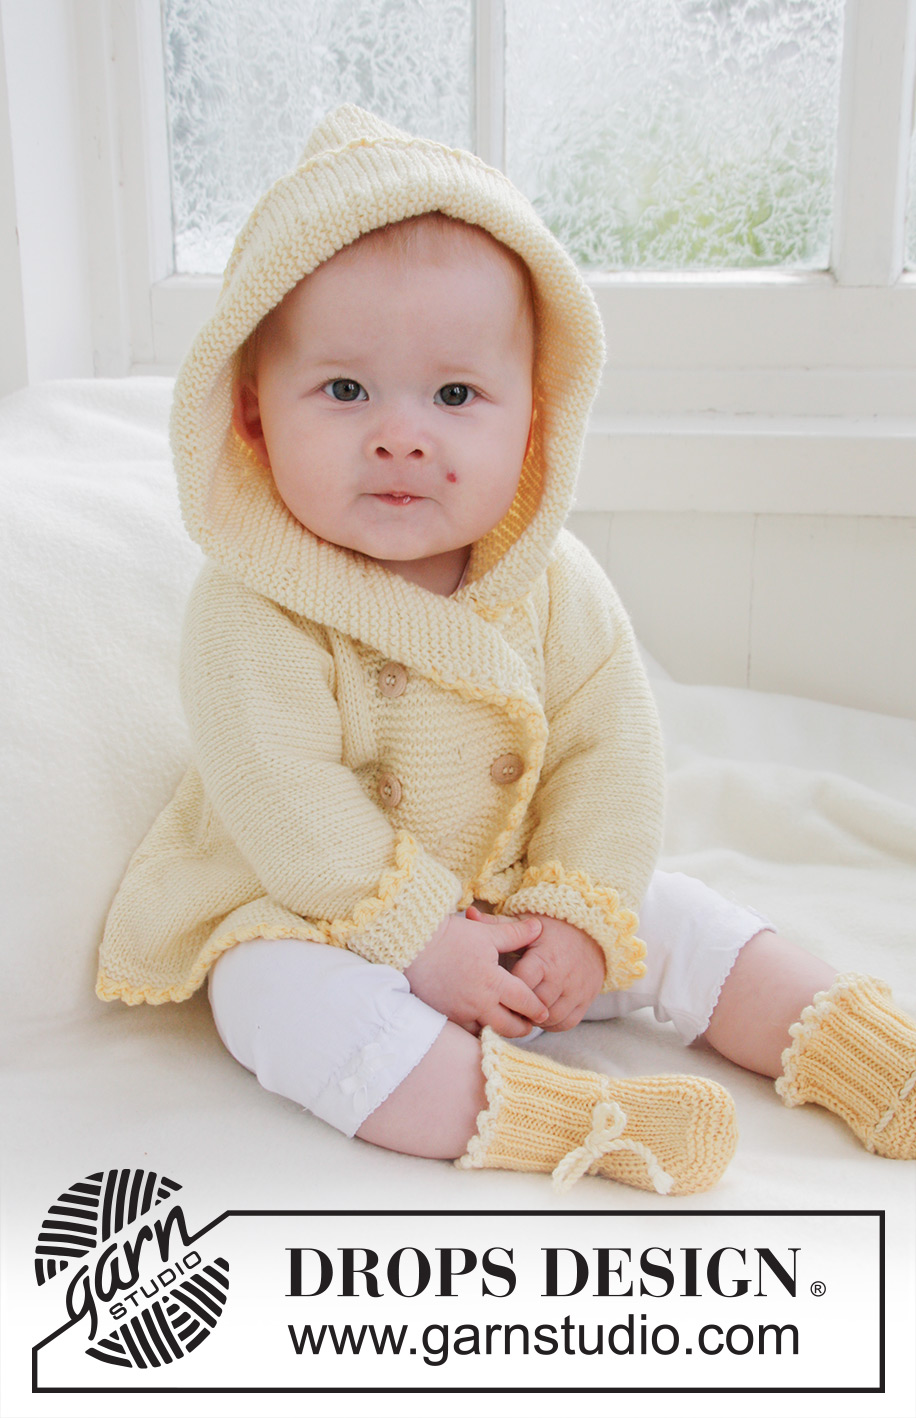
Knitted jacket with hood and booties for baby and children in DROPS BabyMerino
DROPS Baby 21-1 |
|
|
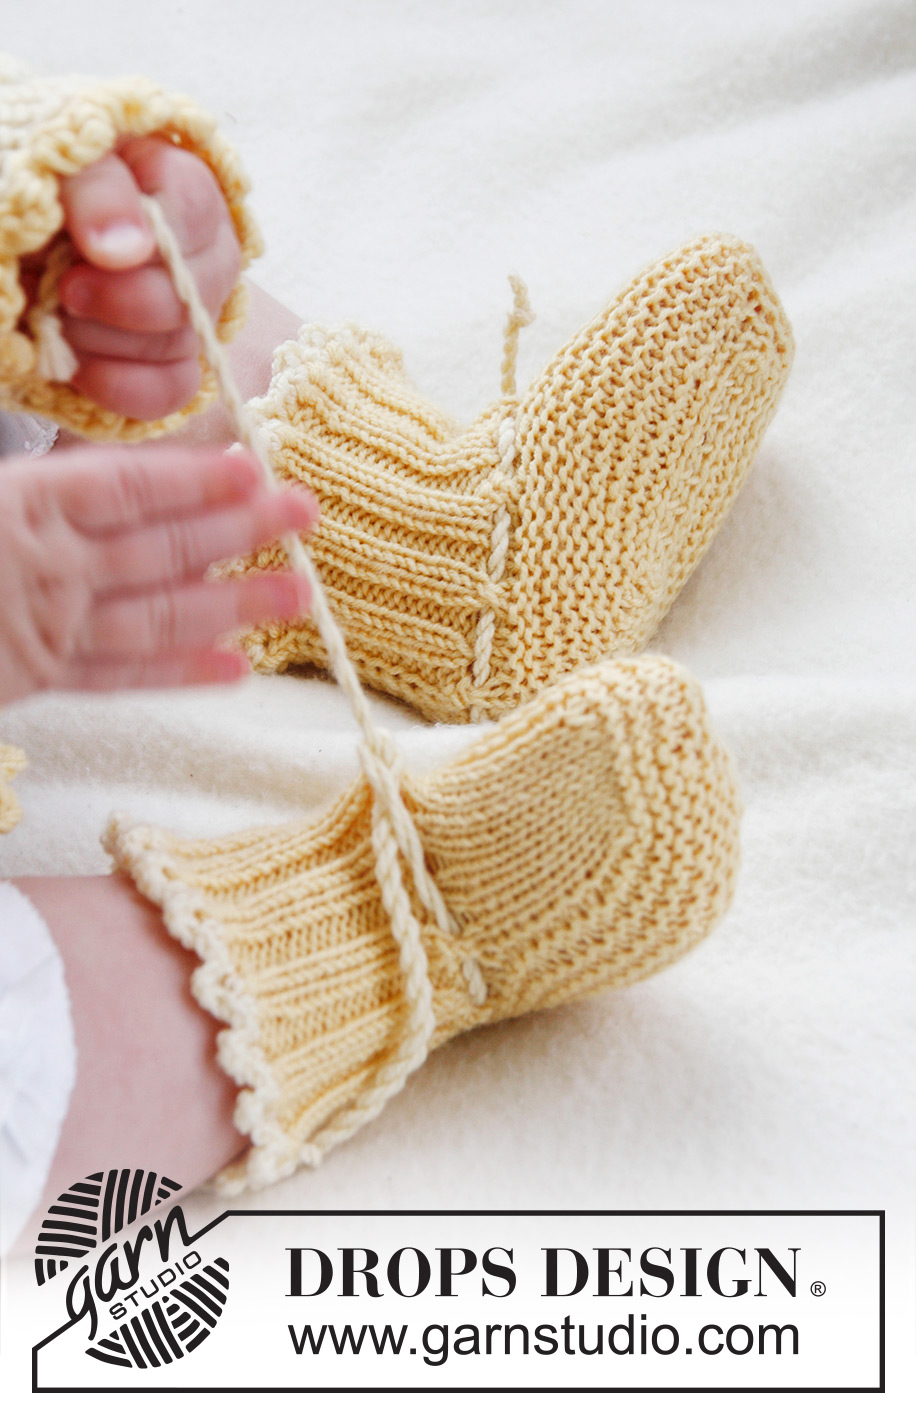
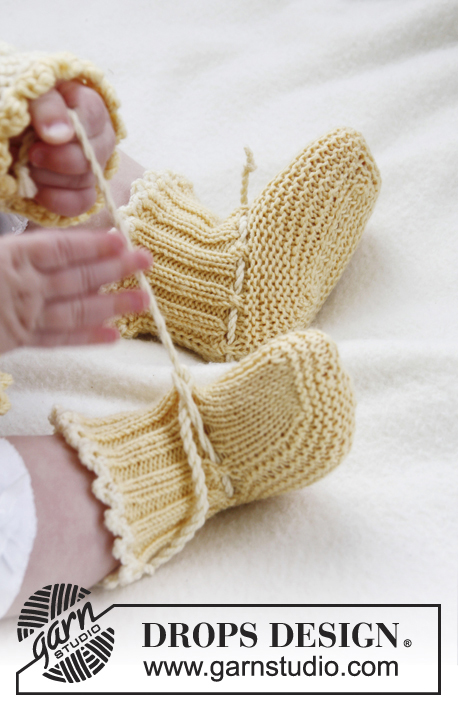
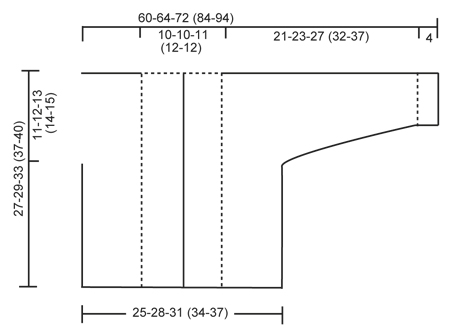
GARTER ST (back and forth on needle): K all rows. SHORT ROWS: * Work 2 rows in garter st over the 24-24-26 (28-28) band sts, work 2 rows in garter st only over the outermost 12-12-13 (14-14) sts. NOTE: When turning mid piece, slip first st. Tighten yarn and continue as before. This is done to avoid holes in the transitions *. BUTTON HOLES: The jacket is double-breasted. Bind off for 4 button holes on right band. 1 BUTTON HOLE = K tog fourth and fifth st from edge and make 1 YO. On same row also K tog fourth and fifth LAST st on band, make 1 YO. Bind off for 2 button holes when piece measures: SIZE 1/3 MONTHS: 14 and 19 cm / 5½" and 7½" SIZE 6/9 MONTHS: 16 and 21 cm / 6 1/4"- and 8 1/4" SIZE 12/18 MONTHS: 18 and 24 cm / 7" and 9½" SIZE 2 YEARS: 20 and 27 cm / 8" and 10½" SIZE 3/4 YEARS: 22 and 30 cm / 8 3/4" and 11 3/4" ---------------------------------------------------------- JACKET: Worked back and forth on circular needle. Beg on front piece, cast on sts for sleeve and work up to the shoulder. Knit the other front piece, place both front pieces tog and work down the back piece. LEFT FRONT PIECE: Read all of the following section before continuing! Cast on 43-47-51 (56-59) sts (includes 1 edge st in the side and 24-24-26 (28-28) band sts towards mid front) on needle size 2.5 mm / US 1or2 with Baby Merino. Work 6 rows in GARTER ST - see explanation above. Switch to circular needle size 3 mm / US 2or3 and work in stockinette st but continue to work the 24-24-26 (28-28) band sts towards mid front in Garter st. When piece measures 4 cm / 1½'', work SHORT ROWS - see explanation above (1st row = from WS). Repeat from *-* 1 time every 4 cm / 1½'' until piece measures 19-21-24 (27-30) cm / 7½"-8 1/4"-9½" (10 5/8"-11 3/4"), then repeat from *-* 1 time every 2 cm / 3/4'' until finished measurements. AT THE SAME TIME when piece measures 16-17-20 (23-25) cm / 6¼''-6¾''-8'' (9''-9¾''), cast on new sts at the end of every row from WS (towards the side of sleeve): 6 sts 2-2-3 (3-3) times, 8 sts 1-1-1 (2-3) times and 21-22-22 (25-26) sts 1 time = 84-89-99 (115-127) sts for shoulder/sleeve. Work inc sts in stockinette st. When all sts have been cast on, continue in stockinette st and Garter st as before while AT THE SAME TIME also working the outermost 10 sts on sleeve in garter st. When piece measures 27-29-33 (37-40) cm / 10 5/8''-11 3/8''-13'' (14½''-15¾''), insert a marker = mid on top of shoulder. Now slip the 24-24-26 (28-28) band sts towards mid front on a stitch holder. Then cast on 2 new sts at the end of row from RS (towards neck), repeat inc on next row towards neck = 64-69-77 (91-103) sts on needle. Work 1 row from WS. Put all sts on a stitch holder. RIGHT FRONT PIECE: Cast on and work as left front piece but reversed. In addition bind off for BUTTON HOLES on band - see explanation above. NOTE! Slip sts on a stitch holder after the last row with inc (i.e. last row = from WS). BACK PIECE: Work left front piece on to circular needle, cast on 16-16-18 (20-20) new sts (= back of neck) and work right front piece on to circular needle = 144-154-172 (202-226) sts. NOW MEASURE PIECE FROM MARKERS ON SHOULDERS. Continue in stockinette st and Garter st at the end on each sleeve back and forth on needle. When piece measures 8½-9½-10 (10-11) cm / 3 1/4"-3 3/4"-4" (4"-4 3/8"), beg to bind off sleeve sts. Bind off at beg of every row in each side as follows: 21-22-22 (25-26) sts 1 time, 8 sts 1-1-1 (2-3) times and 6 sts 2-2-3 (3-3) times = 62-70-76 (84-90) sts on needle. Continue in stockinette st with 1 edge st in garter st each side. When piece measures approx. 26-28-32 (36-39) cm / 10 1/4"-11"-12½" (14 1/4"-15 1/4") – fold the piece double at the markers on shoulders and make sure that the back piece is as long as front piece down to rows in garter st, switch to needle size 2.5 mm / US 1or2 and work 6 rows in garter st, then bind off. ASSEMBLY: Sew the sleeve and side seams inside 1 edge st. Sew on buttons. HOOD: Knit up approx. 102-106-112 (118-122) sts (including sts from stitch holders at the front – NOTE: If more/fewer sts have been knitted up, dec/inc evenly on 1st row. Continue in garter st over all sts while AT THE SAME TIME working short rows in each side every 2 cm / 3/4'' – SEE EXPLANATION ABOVE. Bind off when hood measures approx. 21-23-25 (27-28) cm / 8 1/4"-9"-9 3/4" (10 5/8"-11"). Sew hood neatly tog at the top - sew in outer loop of edge st to avoid a chunky seam. CROCHET BORDER: Crochet a border around the entire jacket. Beg at the bottom on right front piece and crochet with 2 strands yellow Baby Merino and hook size 3 mm / C as follows: Work 1 sc, * ch 3, 1 dc in 1st ch, skip approx. ½ cm / 1/4'', 1 sc in next st *, repeat from *-*. Crochet the same way around the openings on sleeves. ----------------------------------------------------------- BOOTEE: The bootee is worked back and forth from mid back. Cast on 48-52-56 (56) sts on needle size 2.5 mm / US 1or2 with 2 strands yellow Baby Merino. Remove 1 strand and work rib (= K 2/P 2) for 5-6-6 (7) cm / 2"-2 3/8"-2 3/8" (2 3/4") – adjust so that next row is worked from WS. P 1 row from WS while at the same time dec 14-14-18 (14) sts evenly = 34-38-38 (42) sts. On next row work eyelet row as follows from RS: K 1, *K 2 tog, 1 YO *, repeat from *-* and finish with K 1. P 1 row from WS. Now slip the outermost 12-13-13 (15) sts in each side on a stitch holder. Work 4-4½-5½ (6½) cm / 1½"-1 3/4"-2 1/4" (2½") in stockinette st over the middle 10-12-12 (12) sts. Slip sts from stitch holders back on needle and knit up 10-11-13 (16) sts on each side of mid piece = 54-60-64 (74) sts on needle. K every row over all sts for 3-4-5 (5) cm / 1 1/8"-1½"-2" (2") while at the same time after 1½-2-2½ (3) cm / ½"-3/4"-7/8" (1 1/8"), start dec on every other row as follows until completed: Dec 1 st at the beg and the end of row and K 2 tog on each side of the 2 mid sts. bind off and sew tog mid under foot and continue up mid back in outer loop of edge sts to avoid a chunky seam. Knit another bootee the same way. TIES: Cut 3 strands light yellow of approx. 1 meter / 1.1 yds each, twine them tightly tog, fold them double and they will twine again, tie a knot in each end. Thread tie up and down through the eyelet row on bootee. CROCHET BORDER: Crochet a border at the top of bootee on hook size 2 mm/US B with light yellow as follows: 1 sc in first st, * ch 3, 1 dc in 1st ch, skip approx. ½ cm / 1/4'', 1 sc in next st *, repeat from *-* and finish with 1 sl st in sc from beg of round. |
|
 |
|
Have you finished this pattern?Tag your pictures with #dropspattern #buttercupset or submit them to the #dropsfan gallery. Do you need help with this pattern?You'll find 21 tutorial videos, a Comments/Questions area and more by visiting the pattern on garnstudio.com. © 1982-2026 DROPS Design A/S. We reserve all rights. This document, including all its sub-sections, has copyrights. Read more about what you can do with our patterns at the bottom of each pattern on our site. |
|


With over 40 years in knitting and crochet design, DROPS Design offers one of the most extensive collections of free patterns on the internet - translated to 17 languages. As of today we count 324 catalogs and 12290 patterns - 12280 of which are translated into English (US/in).
We work hard to bring you the best knitting and crochet have to offer, inspiration and advice as well as great quality yarns at incredible prices! Would you like to use our patterns for other than personal use? You can read what you are allowed to do in the Copyright text at the bottom of all our patterns. Happy crafting!
Post a comment to pattern DROPS Baby 21-1
We would love to hear what you have to say about this pattern!
If you want to leave a question, please make sure you select the correct category in the form below, to speed up the answering process. Required fields are marked *.