
Popular categories
Looking for a yarn?


Comments / Questions (272)
![]() Cindy wrote:
Cindy wrote:
Bonjour, Je reviens vers vous concernant ma demande sur le marqueur au niveau de l'épaule. J'avoue que je n'ai pas bien compris. Doit-on placer le marqueur après les mailles de bordures que l'on met en attente ou doit-on placer le marqueur à la 64 ème maille (pour moi que fais la taille 3/4 ans)? Merci
13.10.2016 - 10:14DROPS Design answered:
Bonjour Cindy, placez ce marqueur entre les mailles de l'épaule/manche pour marqueur la fin du devant, au niveau du rang, car c'est la hauteur que l'on doit repérer ici, pas la maille. Vous pourrez ainsi facilement vérifier votre nombre de rangs jusqu'au marqueur pour tricoter l'autre devant puis celui du dos jusqu'en bas. Bon tricot!
13.10.2016 - 10:48
![]() Cindy wrote:
Cindy wrote:
J'ai commencé à monter les mailles pour la manche et j'avoue que je ne suis pas très douée pour le montage. Ca forme des escaliers, c'est normal? Merci.
12.10.2016 - 10:01DROPS Design answered:
Bonjour Cindy, tout à fait, comme on monte les mailles des manches progressivement, il y a un petit décalage qui sera invisible lors de la couture. Bon tricot!
12.10.2016 - 10:06
![]() Cindy wrote:
Cindy wrote:
Bonjour, Je ne comprends pas bien lorsqu'il est écrit de placer un marqueur = milieu en haut de l'épaule (sur le devant gauche). Doit-on placer le marquer au milieu de l'ouvrage total (manche + devant gauche)? Soit pour la taille 3/4 ans à 64 mailles? Merci.
12.10.2016 - 10:00DROPS Design answered:
Bonjour Cindy, tout à fait, placez le marqueur au niveau des mailles du dernier rang tricoté pour repérer le milieu de l'ouvrage, c'est au marqueur que l'on pliera ensuite l'ouvrage en double, ce marqueur sera ainsi au niveau de l'épaule, tout en haut (hauteur totale de l'ouvrage). Bon tricot!
12.10.2016 - 10:06
![]() Cindy wrote:
Cindy wrote:
Une fois les 1ers rangs raccourcis faits, on doit mesurer 4cm a partir de quel point? au début du premier rang raccourci ou depuis la fin des 4 rangs raccourcis? merci bcp
30.09.2016 - 15:49DROPS Design answered:
Bonjour Cindy, répétez les rangs raccourcis à la même fréquence, tous les 4 cm en mesurant dans la partie jersey - pour que la bordure devant ait bien la même hauteur que la partie jersey. Bon tricot!
30.09.2016 - 16:04
![]() Cindy wrote:
Cindy wrote:
Bonjour. le tricot est plus long côté jersey.j'ai compté 4cm sur le côté bordure au point mousse et je vais faire les rangs raccourcis.est ce que c'est correct? merci
30.09.2016 - 15:35DROPS Design answered:
Bonjour Cindy, pour conserver la même hauteur, mesurez sur la partie jersey et quand elle mesure 4 cm, faites les rangs raccourcis sur les bordures des devants. Bon tricot!
30.09.2016 - 16:03
![]() Cindy wrote:
Cindy wrote:
Merci! J'ai une autre question: on doit commencer les rangs raccourcis sur l'envers. Par exemple pour le devant gauche, comment sait-on si on travaille l'envers ou l'endroit?
27.09.2016 - 09:21DROPS Design answered:
Bonjour Cindy, quand on tricote le devant gauche, l'endroit commence par le côté et se termine par la bordure devant. Les rangs raccourcis vont se commencer sur l'envers (= par les mailles de bordure devant seulement). Pour le devant droit, on commence sur l'endroit par les mailles de bordure devant pour terminer par le côté, les rangs raccourcis vont commencer sur l'endroit. Bon tricot!
27.09.2016 - 10:23
![]() Cindy wrote:
Cindy wrote:
Entre les 2 rangs raccourcis et les 2 autres rangs de moitié est ce qu'on tricote le jersey? merci
26.09.2016 - 21:46DROPS Design answered:
Bonjour Cindy, vous devez faire ici 4 rangs raccourcis au total, donc sur ces 4 rangs on ne tricote pas de jersey mais bien uniquement: 2 rang sur 28 m, 2 rangs sur 14 m et on continue ensuite comme avant. Ceci permet que la bordure au point mousse ne resserre pas l'ouvrage en hauteur (il faut plus de rangs au point mousse que de rangs jersey pour 10 cm). Bon tricot!
27.09.2016 - 09:18
![]() Maria wrote:
Maria wrote:
På vä framst avigsida st jag 24 (stl 6/9) m o vänder, lyfter 1 m o st tillb 24 m. Ska jag st hela vägen tillb på v (71 m) direkt eft 1 förk v lr ska jag st 24 m till o vända för att sen st 12 m o vända 2 ggr direkt? Om jag gör alla 4 förk v direkt får jag 2 fula hål (1 eft 24m o 1 eft 12m) men om jag eft varje "förkortning" st tillb hela v får jag inte det men när man ska st förkortningarna varannan cm blir det i princip förk v hela vägen. Stort tack!
26.09.2016 - 00:09DROPS Design answered:
Hej Maria. Du strikker de forkortede p i den ene side: 1 rille (1 rille er 2 pinde) over 24 m, 1 rille over 12 m, strik da hele pinden, vend og strik tilbage. Jeg forstaar ikke de 71 m?
20.10.2016 - 16:54
![]() Gabi Raab wrote:
Gabi Raab wrote:
Guten Tag, nach dem Lesen der Anleitung und dem Vergleich mit der Schemazeichnung erschließt sich mir leider nicht, warum verkürzte Reihen gestrickt werden sollen. Lt. Schemazeichnung wird gerade hoch gestrickt, nach der Anleitung müsste sich meiner Meinung nach eine schräge Kante ergeben. Wie erklärt sich die Diskrepanz?
08.07.2016 - 09:22DROPS Design answered:
Hallo Gabi, die Blendenmaschen werden in Krausrippen gestrickt und Krausrippen ziehen sich zusammen. Um dies auszugleichen strickt man verkürzte Reihen.
09.07.2016 - 14:57
![]() Alex wrote:
Alex wrote:
Hallo, ich würde gerne wissen wieviel Maschen ich im unteren Teil im Rückenbereich haben sollte, ich komme nur auf 50 und somit ist das Rückenteil unterhalb der Ärmel schmaler als die zusammengelegte Vorderseite. Danke schon mal im vorraus für die Hilfe.
04.04.2016 - 13:42DROPS Design answered:
Liebe Alex, nach dem Abketten der Ärmelmaschen sollten Sie nach Anleitung 62-70-76 (84-90) M. auf der Nadel haben. Haben Sie evtl irgendwo zu viele M abgenommen?
05.04.2016 - 09:15
|
|
Buttercup#buttercupset |
|
 |
 |
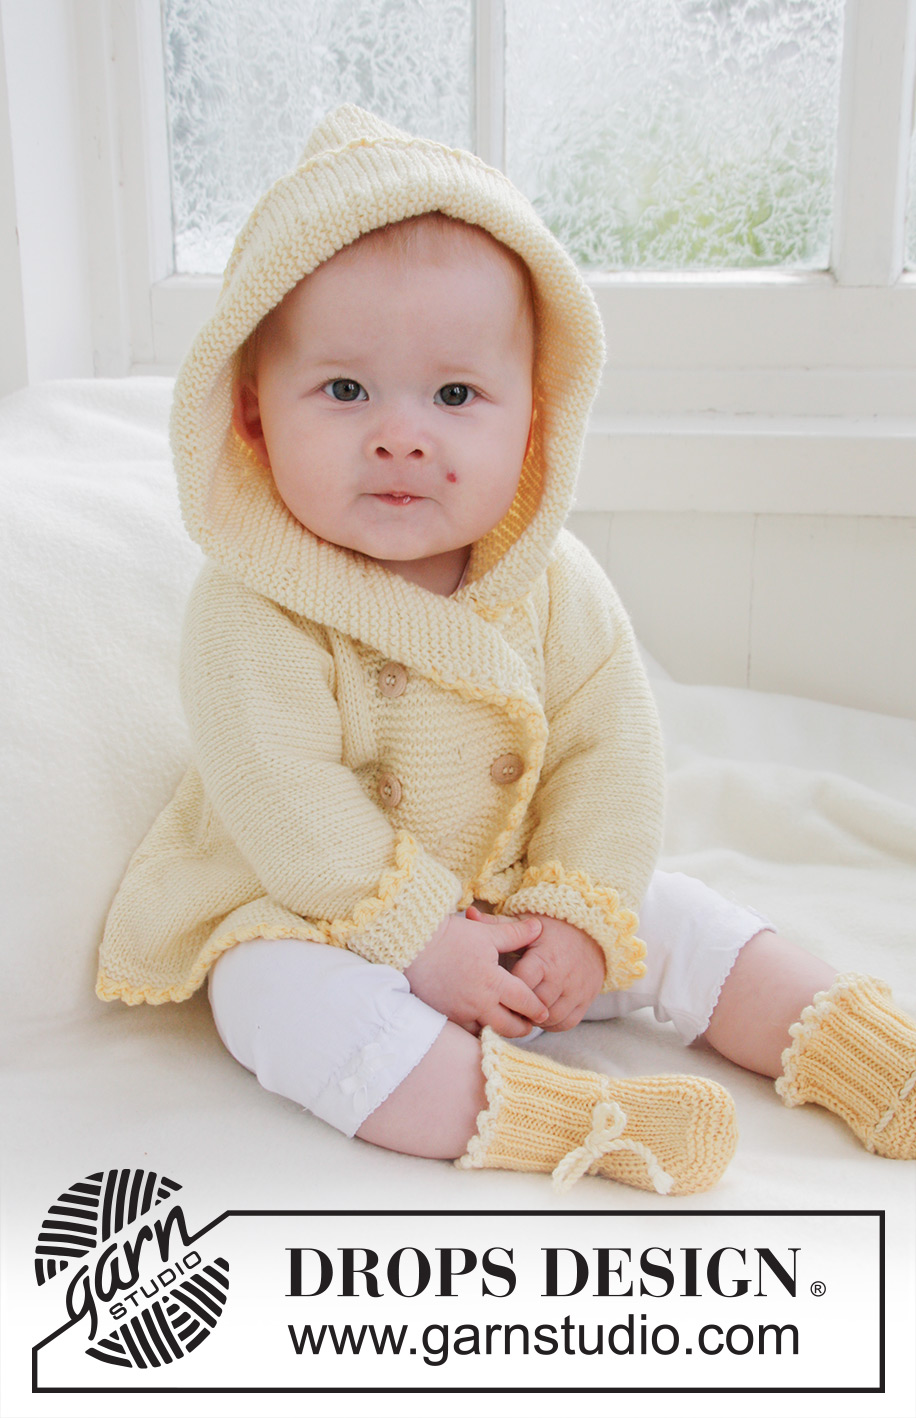
Knitted jacket with hood and booties for baby and children in DROPS BabyMerino
DROPS Baby 21-1 |
|
|
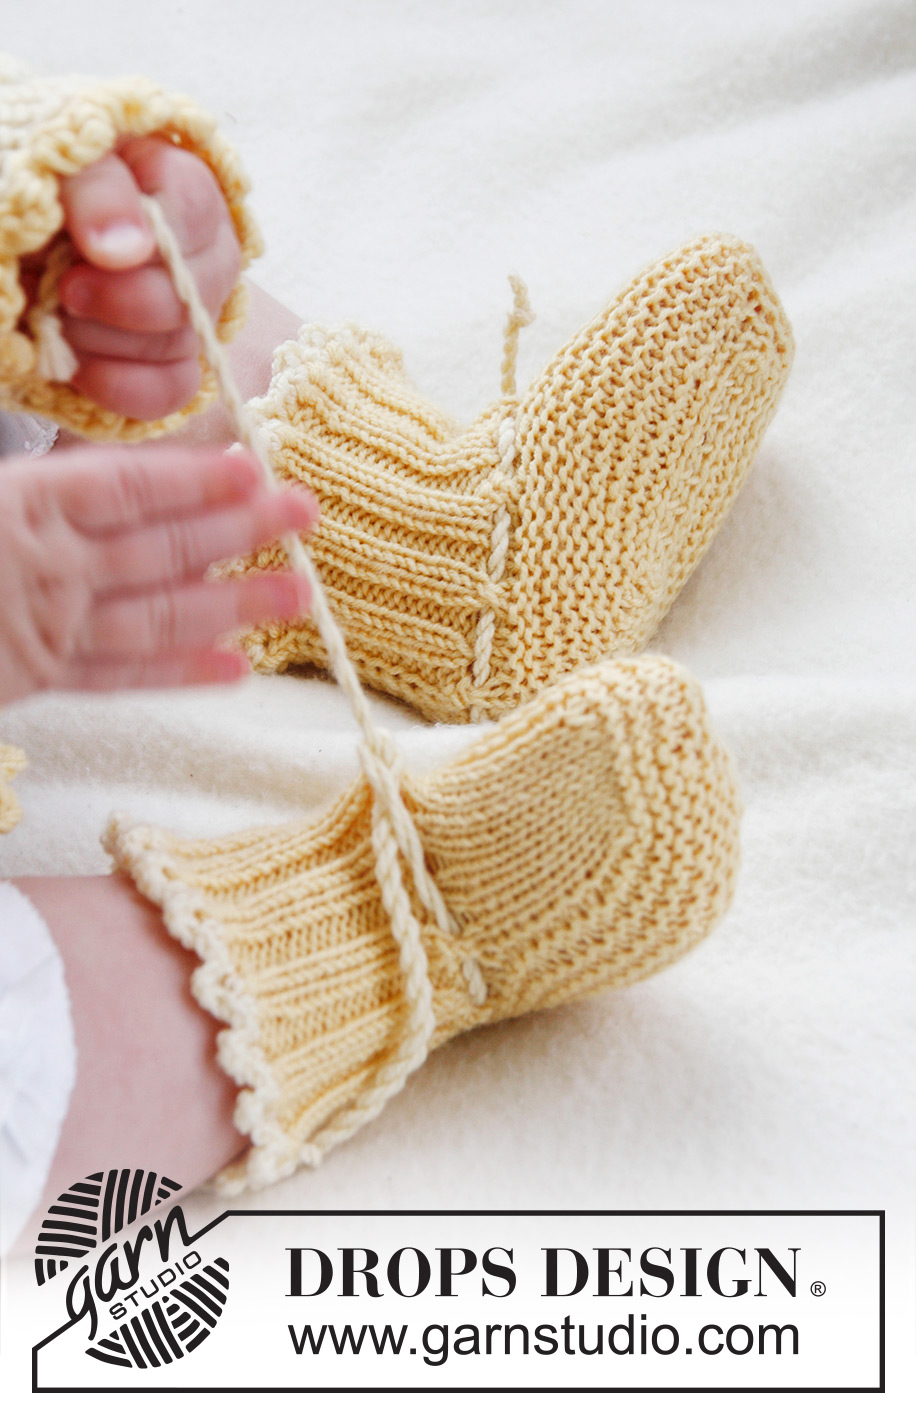
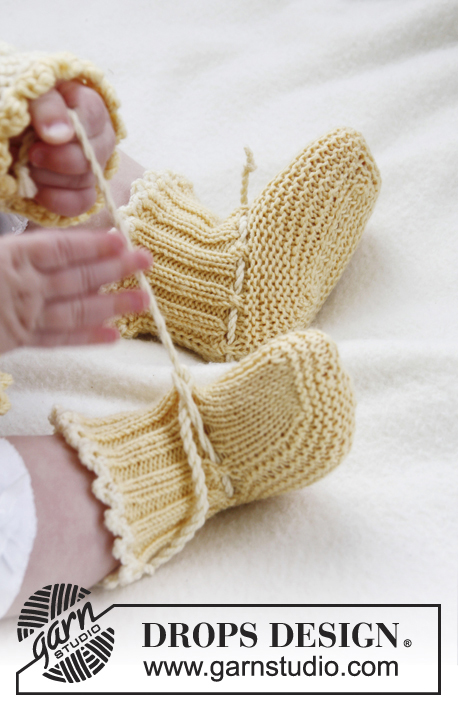
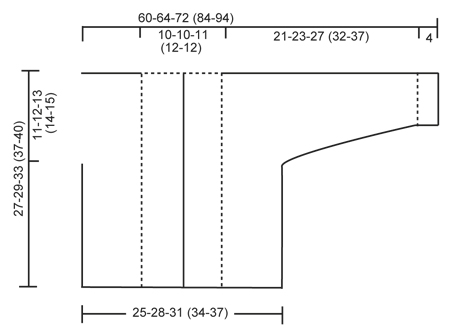
GARTER ST (back and forth on needle): K all rows. SHORT ROWS: * Work 2 rows in garter st over the 24-24-26 (28-28) band sts, work 2 rows in garter st only over the outermost 12-12-13 (14-14) sts. NOTE: When turning mid piece, slip first st. Tighten yarn and continue as before. This is done to avoid holes in the transitions *. BUTTON HOLES: The jacket is double-breasted. Bind off for 4 button holes on right band. 1 BUTTON HOLE = K tog fourth and fifth st from edge and make 1 YO. On same row also K tog fourth and fifth LAST st on band, make 1 YO. Bind off for 2 button holes when piece measures: SIZE 1/3 MONTHS: 14 and 19 cm / 5½" and 7½" SIZE 6/9 MONTHS: 16 and 21 cm / 6 1/4"- and 8 1/4" SIZE 12/18 MONTHS: 18 and 24 cm / 7" and 9½" SIZE 2 YEARS: 20 and 27 cm / 8" and 10½" SIZE 3/4 YEARS: 22 and 30 cm / 8 3/4" and 11 3/4" ---------------------------------------------------------- JACKET: Worked back and forth on circular needle. Beg on front piece, cast on sts for sleeve and work up to the shoulder. Knit the other front piece, place both front pieces tog and work down the back piece. LEFT FRONT PIECE: Read all of the following section before continuing! Cast on 43-47-51 (56-59) sts (includes 1 edge st in the side and 24-24-26 (28-28) band sts towards mid front) on needle size 2.5 mm / US 1or2 with Baby Merino. Work 6 rows in GARTER ST - see explanation above. Switch to circular needle size 3 mm / US 2or3 and work in stockinette st but continue to work the 24-24-26 (28-28) band sts towards mid front in Garter st. When piece measures 4 cm / 1½'', work SHORT ROWS - see explanation above (1st row = from WS). Repeat from *-* 1 time every 4 cm / 1½'' until piece measures 19-21-24 (27-30) cm / 7½"-8 1/4"-9½" (10 5/8"-11 3/4"), then repeat from *-* 1 time every 2 cm / 3/4'' until finished measurements. AT THE SAME TIME when piece measures 16-17-20 (23-25) cm / 6¼''-6¾''-8'' (9''-9¾''), cast on new sts at the end of every row from WS (towards the side of sleeve): 6 sts 2-2-3 (3-3) times, 8 sts 1-1-1 (2-3) times and 21-22-22 (25-26) sts 1 time = 84-89-99 (115-127) sts for shoulder/sleeve. Work inc sts in stockinette st. When all sts have been cast on, continue in stockinette st and Garter st as before while AT THE SAME TIME also working the outermost 10 sts on sleeve in garter st. When piece measures 27-29-33 (37-40) cm / 10 5/8''-11 3/8''-13'' (14½''-15¾''), insert a marker = mid on top of shoulder. Now slip the 24-24-26 (28-28) band sts towards mid front on a stitch holder. Then cast on 2 new sts at the end of row from RS (towards neck), repeat inc on next row towards neck = 64-69-77 (91-103) sts on needle. Work 1 row from WS. Put all sts on a stitch holder. RIGHT FRONT PIECE: Cast on and work as left front piece but reversed. In addition bind off for BUTTON HOLES on band - see explanation above. NOTE! Slip sts on a stitch holder after the last row with inc (i.e. last row = from WS). BACK PIECE: Work left front piece on to circular needle, cast on 16-16-18 (20-20) new sts (= back of neck) and work right front piece on to circular needle = 144-154-172 (202-226) sts. NOW MEASURE PIECE FROM MARKERS ON SHOULDERS. Continue in stockinette st and Garter st at the end on each sleeve back and forth on needle. When piece measures 8½-9½-10 (10-11) cm / 3 1/4"-3 3/4"-4" (4"-4 3/8"), beg to bind off sleeve sts. Bind off at beg of every row in each side as follows: 21-22-22 (25-26) sts 1 time, 8 sts 1-1-1 (2-3) times and 6 sts 2-2-3 (3-3) times = 62-70-76 (84-90) sts on needle. Continue in stockinette st with 1 edge st in garter st each side. When piece measures approx. 26-28-32 (36-39) cm / 10 1/4"-11"-12½" (14 1/4"-15 1/4") – fold the piece double at the markers on shoulders and make sure that the back piece is as long as front piece down to rows in garter st, switch to needle size 2.5 mm / US 1or2 and work 6 rows in garter st, then bind off. ASSEMBLY: Sew the sleeve and side seams inside 1 edge st. Sew on buttons. HOOD: Knit up approx. 102-106-112 (118-122) sts (including sts from stitch holders at the front – NOTE: If more/fewer sts have been knitted up, dec/inc evenly on 1st row. Continue in garter st over all sts while AT THE SAME TIME working short rows in each side every 2 cm / 3/4'' – SEE EXPLANATION ABOVE. Bind off when hood measures approx. 21-23-25 (27-28) cm / 8 1/4"-9"-9 3/4" (10 5/8"-11"). Sew hood neatly tog at the top - sew in outer loop of edge st to avoid a chunky seam. CROCHET BORDER: Crochet a border around the entire jacket. Beg at the bottom on right front piece and crochet with 2 strands yellow Baby Merino and hook size 3 mm / C as follows: Work 1 sc, * ch 3, 1 dc in 1st ch, skip approx. ½ cm / 1/4'', 1 sc in next st *, repeat from *-*. Crochet the same way around the openings on sleeves. ----------------------------------------------------------- BOOTEE: The bootee is worked back and forth from mid back. Cast on 48-52-56 (56) sts on needle size 2.5 mm / US 1or2 with 2 strands yellow Baby Merino. Remove 1 strand and work rib (= K 2/P 2) for 5-6-6 (7) cm / 2"-2 3/8"-2 3/8" (2 3/4") – adjust so that next row is worked from WS. P 1 row from WS while at the same time dec 14-14-18 (14) sts evenly = 34-38-38 (42) sts. On next row work eyelet row as follows from RS: K 1, *K 2 tog, 1 YO *, repeat from *-* and finish with K 1. P 1 row from WS. Now slip the outermost 12-13-13 (15) sts in each side on a stitch holder. Work 4-4½-5½ (6½) cm / 1½"-1 3/4"-2 1/4" (2½") in stockinette st over the middle 10-12-12 (12) sts. Slip sts from stitch holders back on needle and knit up 10-11-13 (16) sts on each side of mid piece = 54-60-64 (74) sts on needle. K every row over all sts for 3-4-5 (5) cm / 1 1/8"-1½"-2" (2") while at the same time after 1½-2-2½ (3) cm / ½"-3/4"-7/8" (1 1/8"), start dec on every other row as follows until completed: Dec 1 st at the beg and the end of row and K 2 tog on each side of the 2 mid sts. bind off and sew tog mid under foot and continue up mid back in outer loop of edge sts to avoid a chunky seam. Knit another bootee the same way. TIES: Cut 3 strands light yellow of approx. 1 meter / 1.1 yds each, twine them tightly tog, fold them double and they will twine again, tie a knot in each end. Thread tie up and down through the eyelet row on bootee. CROCHET BORDER: Crochet a border at the top of bootee on hook size 2 mm/US B with light yellow as follows: 1 sc in first st, * ch 3, 1 dc in 1st ch, skip approx. ½ cm / 1/4'', 1 sc in next st *, repeat from *-* and finish with 1 sl st in sc from beg of round. |
|
 |
|
Have you finished this pattern?Tag your pictures with #dropspattern #buttercupset or submit them to the #dropsfan gallery. Do you need help with this pattern?You'll find 21 tutorial videos, a Comments/Questions area and more by visiting the pattern on garnstudio.com. © 1982-2026 DROPS Design A/S. We reserve all rights. This document, including all its sub-sections, has copyrights. Read more about what you can do with our patterns at the bottom of each pattern on our site. |
|


With over 40 years in knitting and crochet design, DROPS Design offers one of the most extensive collections of free patterns on the internet - translated to 17 languages. As of today we count 324 catalogs and 12290 patterns - 12280 of which are translated into English (US/in).
We work hard to bring you the best knitting and crochet have to offer, inspiration and advice as well as great quality yarns at incredible prices! Would you like to use our patterns for other than personal use? You can read what you are allowed to do in the Copyright text at the bottom of all our patterns. Happy crafting!
Post a comment to pattern DROPS Baby 21-1
We would love to hear what you have to say about this pattern!
If you want to leave a question, please make sure you select the correct category in the form below, to speed up the answering process. Required fields are marked *.