
Popular categories
Looking for a yarn?


Comments / Questions (63)
![]() Marjolein Wesselink wrote:
Marjolein Wesselink wrote:
Hallo. Ik vind de deken super. Ik zou hem graag maken met kleuren passend bij mijn interieur maar vind het erg moeilijk om passende kleur combinaties te maken. Kunnen jullie Hier bij wellicht help en. Mijn kleuren in huis zijn: grijs, oud roze, paars. Hopelijk kunnen jullie suggesties doen
16.11.2015 - 09:21DROPS Design answered:
Beste Marjolein. Je kan hiervoor contact opnemen met jouw DROPS winkel. Zij helpen je graag met het kiezen van de juiste combinatie. Zie het overzicht van Nederlandse winkels hier. Veel haakplezier.
16.11.2015 - 14:01
![]() Willy De Vos wrote:
Willy De Vos wrote:
Kunt u niet een uitgetekend patroon neerzetten, dat haakt een stuk fijner, misschien kost het meer werk voor u, maar de patronen lezen vind ik een stuk lastiger als een uitgetekend patroon. met vr. gr. Willy de Vos
12.02.2015 - 11:06DROPS Design answered:
Hoi Willy. Ik heb helaas niet de tijd voor om een teltekening te maken voor dit gratis patroon. Dit patroon is alleen gemaakt met een geschreven beschrijving.
12.02.2015 - 16:58
![]() Antonella wrote:
Antonella wrote:
Nella fase di unione dei quadrati dove indicato :" 1 m.b. nell'angolo del primo quadrato" si intende che la maglia bassa si fa nello spazio sotto le due catenelle dell'angolo o in una delle due catenelle? grazie
27.01.2015 - 10:52DROPS Design answered:
Buongiorno Antonella. La m.b deve essere lavorata nello spazio sotto le due catenelle. Buon lavoro!
27.01.2015 - 13:44Tuija wrote:
Kiva malli. Tein niin paljon ruutuja kuin langoista (lukuunottamatta reunusväriä) sai. Osittain siitä johtuen jouduin hankkimaan lisää reunuslankaa 5 kerää. Vaan eipä se olisi riittänyt vaikka olisin tehnyt alkuperäisen ruutumäärän.
21.12.2014 - 14:35
![]() Rosa wrote:
Rosa wrote:
Hola, agradecería saber por qué en este patrón hay que virar la pieza en las vueltas 2, 3, 4 y 5. En algunas de estas vueltas se hace primero 1 cad. y posterior se vira la pieza y en las otras se empieza virando directamente. Un saludo.
06.11.2014 - 20:03DROPS Design answered:
Hola Rosa. Son los pasos necesarios para conseguir este modelo de cuadrado.
08.11.2014 - 21:12
![]() Yvonne wrote:
Yvonne wrote:
Hallo. Ich habe die schöne Decke nun doppelt gehäkelt damit sie als Hochzeitsdecke auch für das Paar passt. Leider versteh ich nicht genau wie die Borte gemacht werden soll. Da ich in der ersten Runde, laut Anleitung, in jeder Ecke nur eine fm gemacht habe, weiß ich jetzt nicht wie ich in der zweiten Runde die zweite fm herholen soll um 4 Stäbchen da rein zu häkeln. Hab ich da was falsch verstanden?? Danke für Eure Hilfe.
04.06.2014 - 20:01DROPS Design answered:
Liebe Yvonne, leider war die Übersetzung der 1. Rd der Häkelkante nicht ganz vollständig, sie wurde nun korrigiert. Damit dürfte sich Ihr Problem lösen. Viel Spaß beim Verschenken!
04.06.2014 - 21:56
![]() Rina Westra wrote:
Rina Westra wrote:
Goedendag, ik ben bezig met het in elkaar zetten van de sprei. Volgens mij doe ik iets niet helemaal goed, ondanks dat ik naar mijn idee toch echt de beschrijving volg. Als ik echter 2 vierkantjes aan elkaar haak, ontstaat er geen vlakke verbinding, maar een soort van bultje tussen de 2 verbindingsvlakken. Wat kan ik hieraan doen? Ik heb met veel plezier aan dit patroon gewerkt, het is mooi snel te haken.
09.04.2014 - 13:02DROPS Design answered:
Hoi Rina. Probeer wat losser te haken en vaak na het wassen / opspannen van het deken, zal deze kleine bult vlakker worden.
09.04.2014 - 16:36
![]() Gourhan wrote:
Gourhan wrote:
Bonsoir, je reste dubitative devant mon plaid : je ne peux assembler les 6derniers carres par manque de laine ! Par contre j ai 1 pelote de naturel et de brun en trop. J ai pourtant bien commande les quantites preconisees. Je suis decue et contrariee, d autant plus que j ai commande aussi pour realiser un autre modele en fabel, j espere ne pas avoir le meme probleme. Quelqu un d autre aurait il eu la meme mauvaise surprise ? Merci pour votre reponse.
12.08.2013 - 23:31
![]() Delia wrote:
Delia wrote:
Kann mir jemand weiter helfen: ich bin momentan an dieser decke dran und frage mich was ich anderst hätte machen sollen damit die quadrate wirklich 14cm x 14cm messen statt wie bei mir 11cm x 11cm! habe die vorgeschriebene häckengrösse genommen!
14.04.2013 - 22:21DROPS Design answered:
Liebe Delia, es gibt eigentlich keine vorgeschriebene Grösse der Häkelnadel, Sie sollten sie so wählen, dass die Maschenprobe stimmt d.h. ein Quadrat etwa 14 x 14 cm misst. Nadelstärke 5 ist ein Vorschlag. Sie müssen nun eine stärkere Nadel wählen, wenn Sie nur 11 x 11 cm erhalten, Ihre Decke wird sonst sehr fest (und kleiner).
15.04.2013 - 07:40
![]() Samira wrote:
Samira wrote:
Sehr schöne Decke, wie mit jeder Anleitung muss man sich erst mal reindenken, dann ist es aber total easy. viel spaß
23.03.2013 - 19:28
|
|
Latte Macchiato#lattemacchiatoblanket |
|
 |
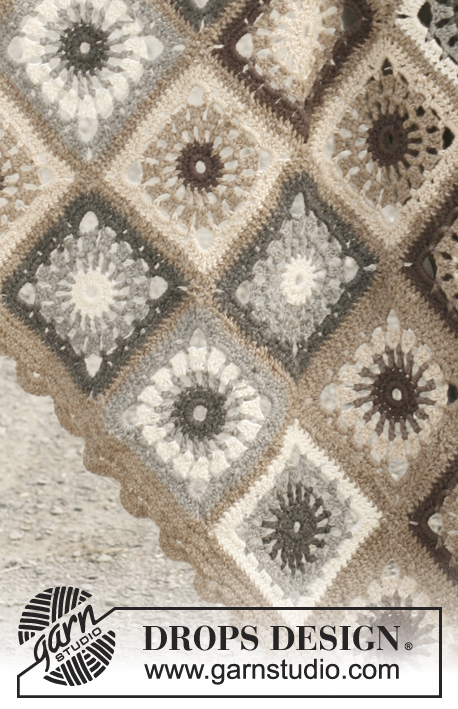 |
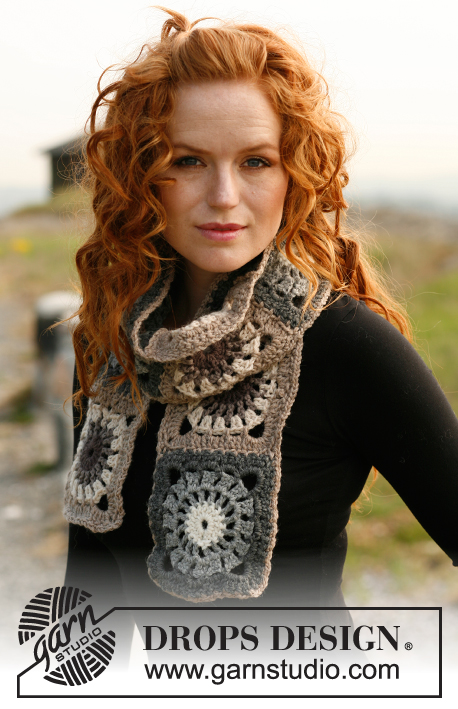
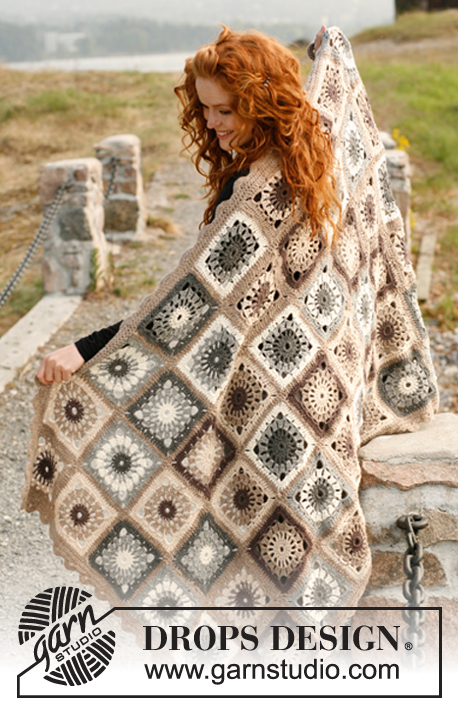
Crochet DROPS blanket in "Lima".
DROPS 131-52 |
|
|
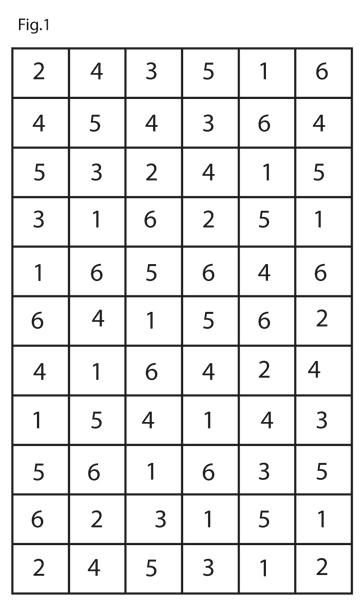
COLOR CHANGE: Square 1: 1ST ROUND: color no 5610, brown 2ND-3RD ROUND: color no 0619, beige mix 4TH-5TH ROUND: color no 0206, light beige mix Square 2: 1ST ROUND: color no 5610, brown 2ND ROUND: color no 5310, light brown 3RD ROUND: color no 0206, light beige mix 4TH-5TH ROUND: color no 0619, beige mix Square 3: 1ST ROUND: color no 0100, off white 2ND-3RD ROUND: color no 9015, medium gray mix 4TH-5TH ROUND: color no 0519, dark gray mix Square 4: 1ST-2ND ROUND: color no 0519, dark gray mix 3RD-4TH ROUND: color no 9015, medium gray mix 5TH ROUND: color no 0100, off white Square 5: 1ST ROUND: color no 0519, dark gray mix 2ND ROUND: color no 9015, medium gray mix 3RD ROUND: color no 0100, off white 4TH-5TH ROUND: color no 9015, medium gray mix Square 6: 1ST-2ND ROUND: color no 0206, light beige mix 3RD ROUND: color no 0619, beige mix 4TH ROUND: color no 5310, light brown 5TH ROUND: color no 5610, brown ASSEMBLY: See Fig. 1 on how to place the squares. -------------------------------------------------------- BLANKET: The blanket consists of 66 squares. There are 6 different squares. Work 13 pieces of Squares 1 and 4, 12 pieces of Squares 5 and 6, and 8 pieces of Squares 2 and 3. CROCHET SQUARE: Ch 7 on hook size 5mm / H/8 with Lima and form a ring with 1 sl st in first ch - use the color from first round of square - see explanation above. ROUND 1: ch 3 (= 1 dc), work 15 dc in ch-ring and finish with 1 sl st in 3rd ch from beg of round = 16 dc. ROUND 2: Turn piece, ch 5 (= 1 dc + 2 ch), * 1 dc in next dc, ch 2 *, repeat from *-* the entire round and finish with 1 sl st in 3rd ch from beg of round = 16 dc with 2 ch between each. ROUND 3: ch 1, turn piece, ch 2 (= 1 dc), 1 dc in first ch space, * ch 2, 2 dc in next ch space *, repeat from *-* the entire round and finish with ch 2 and 1 sl st in 3rd ch from beg of round. ROUND 4: ch 1, turn piece,1 sc in first ch space (from previous round), * ch 3, 1 sc in next ch space, ch 6, 1 sc in next ch space, ch 3, 1 sc in next ch space, ch 3, 1 sc in next ch space*, repeat from *-* a total of 4 times, but finish with 1 sl st in sc from beg of round (instead of sc in next ch). ROUND 5: Turn piece, ch 3 (= 1 dc), 2 dc in first ch space, 3 dc in next ch space, then work 5 dc + ch 2 + 5 dc in every 6-ch-space (= corner), and 3 dc in every 3-ch-space the entire round, finish with 1 sl st in 3rd ch from beg of round. Fasten off. ASSEMBLY: Place the squares with 6 squares in width and 11 squares in height - see Fig. 1. Crochet squares tog with beige mix - crochet squares tog alongside and then across as follows: Place 2 squares tog WS against WS and work tog from RS as follows: 1 sc in corner of first square, ch 1, 1 sc in corner of next square, ch 1, 1 sc in next st on first square, ch 1, 1 sc in next st on second square, ch 1, 1 sc in next st on first square, ch 1, 1 sc in next st on second square etc. finish when 1 sc has been worked in the next corner on both squares, cut and fasten the thread. NOTE: Make sure that the transitions between every square are pretty when the squares are worked tog alongside. CROCHET BORDER: Work a finishing edge around the entire blanket with beige mix as follows: Beg in one corner and work from RS: ROUND 1: 1 sl st in the corner, ch 1, then work 1 sc in every st the entire round (i.e. 1 sc in every dc, 1 sc in each corner on the squares, 2 sc in every transition between every square and 2 sc in each corner on the blanket), finish with 1 sl st in first ch from beg of round. ROUND 2: ch 3, (= 1 dc), then work 1 dc in every sc the entire round but work 2 dc in each of the 2 sc in every corner on the blanket = 4 dc in the corners, finish with 1 sl st in 3rd ch from beg of round. ROUND 3: ch 3, (= 1 dc), then work 1 dc in every dc but work 2 dc in each of the 4 dc in every corner on the blanket = 8 dc in each corner, finish with 1 sl st in 3rd ch from beg of round. OUND 4: ch 3, * skip 3 dc, 1 sc in next dc, skip 3 dc, 10 dc in next dc *, repeat from *-* the entire round - adjust so that there is one 10dc-group in every corner and finish with 1 sl st in 1st sc on round. |
|
 |
|
Have you finished this pattern?Tag your pictures with #dropspattern #lattemacchiatoblanket or submit them to the #dropsfan gallery. Do you need help with this pattern?You'll find 7 tutorial videos, a Comments/Questions area and more by visiting the pattern on garnstudio.com. © 1982-2026 DROPS Design A/S. We reserve all rights. This document, including all its sub-sections, has copyrights. Read more about what you can do with our patterns at the bottom of each pattern on our site. |
|


With over 40 years in knitting and crochet design, DROPS Design offers one of the most extensive collections of free patterns on the internet - translated to 17 languages. As of today we count 324 catalogs and 12284 patterns - 12274 of which are translated into English (US/in).
We work hard to bring you the best knitting and crochet have to offer, inspiration and advice as well as great quality yarns at incredible prices! Would you like to use our patterns for other than personal use? You can read what you are allowed to do in the Copyright text at the bottom of all our patterns. Happy crafting!
Post a comment to pattern DROPS 131-52
We would love to hear what you have to say about this pattern!
If you want to leave a question, please make sure you select the correct category in the form below, to speed up the answering process. Required fields are marked *.