
Popular categories
Looking for a yarn?


Comments / Questions (26)
![]() Elke Schlieszas wrote:
Elke Schlieszas wrote:
Guten Tag Zusammen, Ich habe Probleme mit der Zunahme nach 16 cm + 4 M. Das Muster passt doch nicht mehr. Habe ich einen Denkfehler? Über eine Antwort würde ich mich sehr freuen. Vielen Dank im Voraus M.f.G Elke
05.01.2025 - 08:41
![]() Aafke Oosterkamp wrote:
Aafke Oosterkamp wrote:
Hallo, ik snap het nog steeds niet. Heb her en der ook al gevraagd,maar we komen er niet uit. Kan ik via de telefoon kontakt krijgen om het begin van het minderen door te nemen? eea kan dan via mijn mail om tel. nummer door te geven.
23.09.2014 - 20:51DROPS Design answered:
Hoi Aafke. Ik kan je niet meer hulp bieden dan dit. Wil je meer uitgebreide ondersteuning op de gratis patronen, dan moet je naar de winkel waar ze persoonlijke hulp kunnen bieden.
24.09.2014 - 16:48
![]() Aafke Oosterkamp wrote:
Aafke Oosterkamp wrote:
Ik ben tot het begin van het achterpand van maat 40. Ik haak eerst 3 stokjes dan het begin van het patroon en op het eind weer 3 stokjes: hoe kom ik dan aan 4 zoals in het patroon staat? daarna staat er Ga verder in patroon als hiervoor tot er 1 stokje over is. Dit staat er een paar keer in. Moet ik dan ergens minderen? Moet ik de 3 stokjes meenemen of hierin minderen???
13.09.2014 - 20:34DROPS Design answered:
Hoi Aafke. Je moet inderdaad minderen. Je hebt 6 v/stk aan beide zijkanten aan het begin. Je moet nu beginnen met haken na de eerste 3 v/stk. Haak dan de volgende 3 v/stk, herhaal dan M.1B 5 keer, M.1C één keer en eindig met 3 v/stk. Je zou dan 4 v/stk over moeten hebben van de vorige toer. Je haakt nu terug op dezelfde manier tot er 1 stk over is, keer en haak terug (= Je hebt nu 1 stk gemindert). Je gaat zo door en mindert op deze manier aan het eind van elke toer voor het armsgat.
18.09.2014 - 17:17
![]() Bertha Hop wrote:
Bertha Hop wrote:
Hallo, sorry maar ik haak nu voor het eerst een vest . Dus ik moet het patroon opdelen . Maar het wordt toch aan één stuk gehaakt ? Dus geen zijnaden ? Gr b hop
15.01.2013 - 18:30DROPS Design answered:
Ja, zo kan je het zien. Bijv. haak je maat S en volgt het patroon dan haak je zo: Je hebt 76 v. (begin met toer 1 in het telpatroon): M.1A (dwz, één herhaling), herhaal M.1B 2 keer, M.1C (één keer), 4 v/stk aan de zijkant, herhaal M.1B 5 keer, M.1C (één keer), 4 v/stk aan de zijkant, herhaal M.1B 2 keer, M.1C (één keer) en eindig met M.1D één keer.
16.01.2013 - 16:21
![]() Bertha Hop wrote:
Bertha Hop wrote:
Hallo, ik begrijp niet goed de term m1a , m1c,of m1d. Kunt u mij dat uitleggen? B.v.d. gr. B hop
15.01.2013 - 14:43DROPS Design answered:
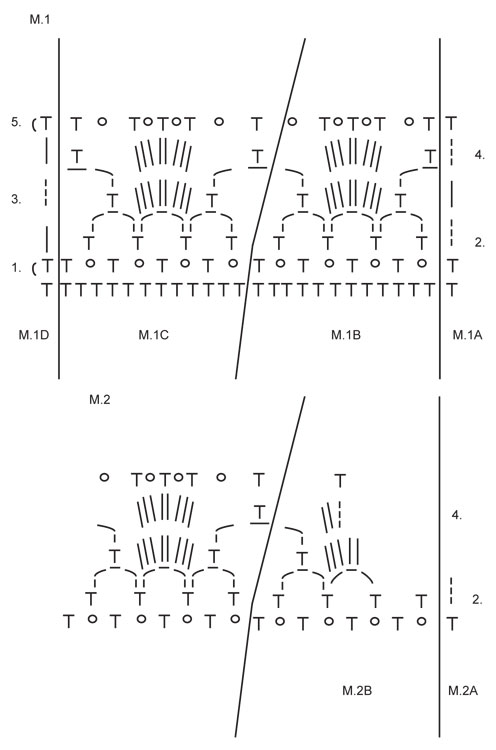
Dat zijn de teltekeningen. Kijk onderaan het patroon. Teltekening M.1 is opgedeelt in 4 delen: M.1A, M.1B, M.1C en M.1B. Volg de beschrijving en haak de verschillende delen zoals beschreven.
15.01.2013 - 16:51
![]() Nida wrote:
Nida wrote:
What does dc / tr means
27.12.2012 - 00:26DROPS Design answered:
Dear Nida, dc means double crochet, tr means treble. When it says to work tr/dc, it means to work the sts either tr or dc as they should be. Happy crocheting !
29.12.2012 - 18:03
![]() Annie wrote:
Annie wrote:
Vil rigtig gerne hækle denne model, men må for første gang opgive at finde ud af en opskrift. Det ville være rart med en skrevet beskrivelse af hæklemønstret over et antal m, i stedet for et diagram der ikke fungerer.
25.11.2012 - 10:34
![]() Margriet wrote:
Margriet wrote:
Welke maat heb ik nodig voor kledingmaat 42. Dank.
16.11.2012 - 14:39DROPS Design answered:
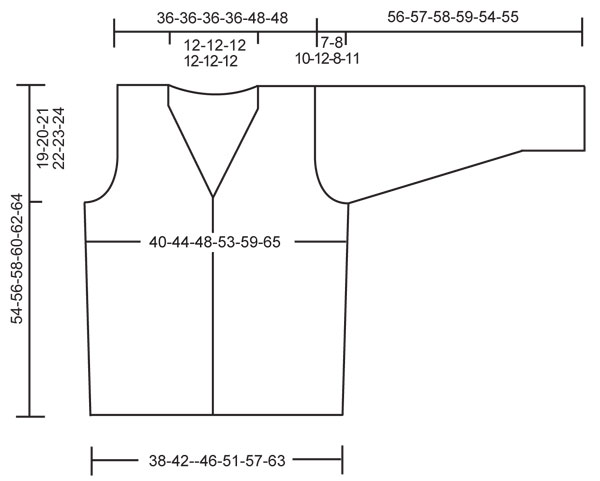
U bent dan ongeveer XL. Kijk onderaan het patroon. Hier vindt u een maattekening met de afmetingen in cm.
16.11.2012 - 17:05
![]() Margriet wrote:
Margriet wrote:
Welke maat heb ik nodig? Mijn kledingmaat is 42. Dank.
16.11.2012 - 14:37
![]() Andrea wrote:
Andrea wrote:
Deze gilet is uitermate prachtig!
10.06.2012 - 18:24
|
|||||||||||||
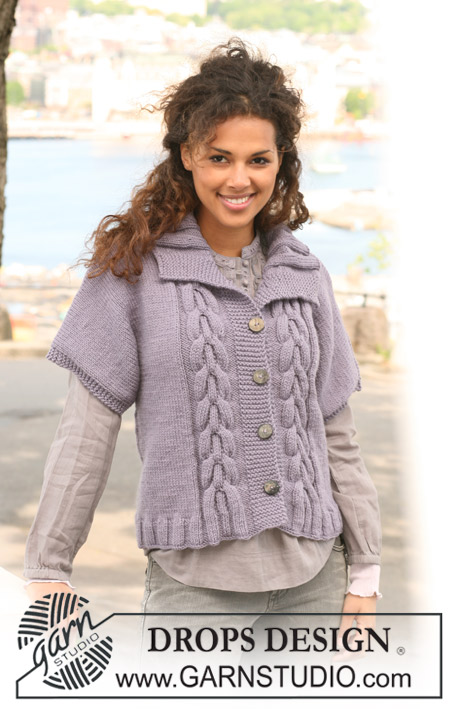
Field of Fans#fieldoffanscardigan |
|||||||||||||
|
|
|||||||||||||
Crochet DROPS jacket in ”Merino Extra Fine”. Size S to XXXL.
DROPS 126-17 |
|||||||||||||
|
PATTERN: See diagram M.1 and M.2. In M.1 beg on row marked with 1 in diagram, then repeat row 2 to 5. In M.2 beg on row marked with 2 in diagram. THE SIDE: At the side work dc/sc as shown in diagram M.1A and M.1D, i.e. on row 1 and 5 in diagram work sc, on row 2, 3, and 4 work dc. Marker sits in st mid each side. DECREASING TIP: Work 1 dc, but wait with last pull-through (= 2 sts on hook), work next dc, but when doing the last pull through pull thread through all sts on hook – 1 dec dc. -------------------------------------------------------- -------------------------------------------------------- JACKET: Ch 155-167-183-199-227-247 LOOSELY with hook size 4 mm / G/6 with Merino. Turn piece. Skip first ch, then work 1 sc in each ch to end = 154-166-182-198-226-246 sc. Insert a marker 39-42-46-50-57-62 sc in from each side (back piece = 76-82-90-98-112-122 sc). Continue as follows (beg on row 1 in diagram): M.1A, repeat M.1B 2-2-2-2-3-3 times, M.1C, 4-10-18-26-16-26 sc/dc at the side - see above -, repeat M.1B 5-5-5-5-7-7 times, M.1C, 4-10-18-26-16-26 sc/dc at the side, repeat M.1B 2-2-2-2-3-3 times, M.1C and M.1D. Continue like this until piece measures approx 15-15-16-16-17-17 cm / 6"-6"-6¼"-6¼"-6¾"-6¾". Now inc 1 sc/dc each side of both markers 1 time. Inc by working 2 sc/dc in 1 sc/dc each side of both markers (= a total of 4 inc sc/dc). Now continue as before until piece measures approx 35-36-37-38-39-40 cm / 13¾"-14¼"-14½"-15"-15¼"-15¾" (adjust to after a full repeat). Cut the thread. Now divide piece and complete each piece separately. BACK PIECE: = 3-6-10-14-9-14 sc/dc each side. Beg inside 2-3-7-11-6-11 sc/dc. Work 1-3-3-3-3-3 sc/dc, repeat M.1B 5-5-5-5-7-7 times, M.1C and 1-3-3-3-3-3 sc/dc (3-4-8-12-7-12 sc/dc remain), turn piece. Continue in pattern as before until 0-1-1-1-1-1 sc/dc remain, turn piece. Continue in pattern as before until 0-1-1-1-1-1 sc/dc remain, turn piece. Continue in pattern as before until 0-1-1-1-1-1 sc/dc remain, turn piece. Continue in pattern as before until 0-1-1-1-1-1 sc/dc remain. There is now 1 sc/dc each side. Continue back and forth in pattern as before and 1 sc/dc each side. When piece measures approx 50-52-54-56-58-60 cm / 19¾"-20½"-21¼"-22"-22¾"-23⅝" (adjust to after a full repeat) divide piece for neck and complete each shoulder separately. RIGHT SHOULDER: Beg at the side. Work the 1 sc/dc at the side, repeat M.1B 1-1-1-1-2-2 times, M.1C and 1 sc/dc. Continue like this until repeat is completed. Piece now measures approx 54-56-58-60-62-64 cm / 21¼"-22"-22¾"-23⅝"-24⅜"-25¼". LEFT SHOULDER: Like right shoulder but mirrored, (i.e. 2 repeats mid back = neck). RIGHT FRONT PIECE: = 3-6-10-14-9-14 sc/dc at the side. Beg mid front and crochet as follows: M.1A, repeat M.1B 2-2-2-2-3-3 times, M.1C and 1-3-3-3-3-3 sc/dc (2-3-7-11-6-11 sc sc/dc remain at the side). Turn piece. Continue in pattern as before. Turn piece. Continue in pattern as before until 0-1-1-1-1-1 sc/dc remain at the side, turn piece. Continue in pattern as before, turn piece. Continue in pattern as before until 0-1-1-1-1-1 sc/dc remain at the side, turn piece. Continue in pattern as before. There is now 1 sc/dc at the side. Continue back and forth in pattern as before. AT THE SAME TIME after 1 vertical repeat after dividing the piece dec for neck. Continue from RS as follows: M.2 A, M.2 B, M.1B 1-1-1-1-2-2 times, M.1C, M.1D. When all dec for armhole and neck are complete continue as follows – from mid front: M.1A, M.1B 1-1-1-1-2-2 times, M.1C and M.1D. Continue like this until piece measures approx 54-56-58-60-62-64 cm / 21¼"-22"-22¾"-23⅝"-24⅜"-25¼" (adjust to number of repeats on back piece). Cut and fasten thread. LEFT FRONT PIECE: Like right front piece but mirrored. ASSEMBLY: Sew shoulder seams. Sew edge to edge to avoid a chunky seam. SLEEVE EDGES: Crochet an edge round armhole with hook size 4 mm / G/6 and Merino as follows: ROW 1: Beg mid under sleeve. Work sc all the way round and finish with 1 sl st in sc from beg of round. ROW 2: ch 3, then 1 dc in each sc to end and finish with 1 sl st in 3rd ch from beg of round (adjust so that no of sts is divisible by 3). ROW 3: 1 sc, * ch 3, 1 dc in the first of the ch 3, skip 2 dc, 1 sc in next dc *, repeat from *-* and finish with 1 sl st in sc from beg of round. Cut and fasten thread. Repeat round the other armhole. BORDER ROUND BODY PIECE: Crochet a border round body piece with hook size 4 mm / G/6 with Merino. Beg at the bottom on right front piece, continue up along front piece, round neck, down along left front piece and along bottom edge. Work ROW 1 and 2 as described for armhole. On ROW 3 finish with 1 sl st at the bottom on right front piece. Cut and fasten thread. SLEEVES: Worked back and forth. Ch 48-48-50-52-54-56 LOOSELY with hook size 4 mm / G/6 and Merino. Turn piece. Work 1 dc in 4th ch, and then 1 dc in each ch to end = 46-46-48-50-52-54 dc. Continue back and forth with 1 dc in each dc (replace first dc on each row with 3 ch). When piece measures approx 6 cm / 2⅜" inc 1 dc each side by working 2 dc in outermost dc each side. Repeat the inc on every 6-5-4-3.5-3-2.5 cm / 2⅜"-2"-1½"-1¼"-1⅛"-⅞" a total of 7-9-10-11-13-14 times = 60-64-68-72-78-82 dc. Continue back and forth until piece measures 49-49-48-47-46-44 cm / 19¼"-19¼"-19"-18½"-18"-17¼". Cut the thread. Now skip the first 6-6-6-6-8-8 dc on next row. Work 1 dc in each of the next 48-52-56-60-62-66 dc, turn piece (i.e. 6-6-6-6-8-8 dc remain the other side). Now dec 1 dc each side on every row by working the 2 outermost dc each side tog – See DECREASING TIP! Repeat on every row a total of 4-5-7-9-6-8 times = 40-42-42-42-50-50 dc. Cut the thread. Skip the first 6-6-6-6-8-8 dc, work 1 dc in each of the next 28-30-30-30-34-34 dc (i.e. 6-6-6-6-8-8 dc remain the other side). Cut and fasten thread. ASSEMBLY: Sew under arm seams. Sew edge to edge with neat sts to avoid a chunky seam. Set in sleeves under sleeve edge. Sew 3 buttons on left front piece, the top one just under neck and the remaining with approx 8 cm / 3⅛" between each. Use the dc on right front piece as buttonholes. |
|||||||||||||
Diagram explanations |
|||||||||||||
|
|||||||||||||
 |
|||||||||||||
 |
|||||||||||||
Have you finished this pattern?Tag your pictures with #dropspattern #fieldoffanscardigan or submit them to the #dropsfan gallery. Do you need help with this pattern?You'll find 6 tutorial videos, a Comments/Questions area and more by visiting the pattern on garnstudio.com. © 1982-2026 DROPS Design A/S. We reserve all rights. This document, including all its sub-sections, has copyrights. Read more about what you can do with our patterns at the bottom of each pattern on our site. |
|||||||||||||


With over 40 years in knitting and crochet design, DROPS Design offers one of the most extensive collections of free patterns on the internet - translated to 17 languages. As of today we count 325 catalogs and 12298 patterns - 12288 of which are translated into English (US/in).
We work hard to bring you the best knitting and crochet have to offer, inspiration and advice as well as great quality yarns at incredible prices! Would you like to use our patterns for other than personal use? You can read what you are allowed to do in the Copyright text at the bottom of all our patterns. Happy crafting!
Post a comment to pattern DROPS 126-17
We would love to hear what you have to say about this pattern!
If you want to leave a question, please make sure you select the correct category in the form below, to speed up the answering process. Required fields are marked *.