
Popular categories
Looking for a yarn?


Comments / Questions (66)
![]() Soraya wrote:
Soraya wrote:
DROPS design: Pattern no R-561 - you have the same pattern on your site twice, once with treble crochet and once with double crochet. very confusing, im worried that the size will change as im not an expert? which is the correct pattern or can i use either
27.06.2019 - 15:22DROPS Design answered:
Dear Soraya, all our pattern have 2 English versions - one in Brittish English, using metric mesures and Brittish crochet/knitting terms, one in American (US) English, which uses inches and different terms - specially crochet terms has very different meaning. Please see at the top of the pattern which one you are using. Happy crocheting!
27.06.2019 - 15:33
![]() Linda Calfee wrote:
Linda Calfee wrote:
Beautiful sweater
13.06.2019 - 19:54
![]() Veronica wrote:
Veronica wrote:
Me encanta las cosas que publican, las prendas son muy variadas y hermosas. Les quisiera hacer una pregunta: se podran publicar los patrones con la forma grafica en vez de que sean de forma escrita. Me refiero a los clasicos patrones con simbolos.
06.06.2019 - 21:58DROPS Design answered:
Hola Veronica. Los patrones de las nuevas temporadas viene ahora en dos formatos ( el diagrama y las explicaciones en el texto). Los patrones ya publicados no se van a modificar.
09.06.2019 - 22:40
![]() Corne Du Preez wrote:
Corne Du Preez wrote:
Pleas help! Corne
12.01.2019 - 23:19DROPS Design answered:
Dear Mrs Du Peez, you are welcome to ask your question here - for any individual assistance you are welcome to also contact the store where you bought the yarn. Happy crocheting!
14.01.2019 - 11:07
![]() Rose-Marie Schreuders wrote:
Rose-Marie Schreuders wrote:
Een leuk patroon en ik ben er vol goede moed mee begonnen. Ik stuit echter al vrij snel op een vraag: ik moet vanaf 9 cm. meerderen (grootste maat), maar is dit gemeten vanaf de schouder of vanaf het middenstuk? Hartelijk dank!
11.01.2019 - 16:37DROPS Design answered:
Dag Rose-Marie,
Dit is gemeten vanaf de schouder, dus van het opzetten.
13.01.2019 - 10:21
![]() Mariana wrote:
Mariana wrote:
No entiendo que significa 1 punto alto en cada una de las ultimas 1-1-1-1-2-2 cadenas. Por favor quisiera que me explicaran. Gracias
06.04.2018 - 08:31DROPS Design answered:
Hola Mariana, la serie de números muestra el número de cadenas, que depende de la talla. Si trabajas la talla más pequeña, sería en la última cadeneta, en la siguiente también en la última solo.... En las 2 tallas más grandes hay que trabajar 1 punto alto en cada una de las 2 últimas cadenas.
08.04.2018 - 18:55
![]() Hannah Gi wrote:
Hannah Gi wrote:
I figured out the previous question. Now I have another question. Please show me how to make the left front piece showing the right side outside. Thank you.
25.03.2018 - 17:32DROPS Design answered:
Dear Mrs Gi, first row on left front piece will be worked from RS (as right front piece). Increase then for mid front on the opposite side (mirored side compared to right front piece), ie if you increased at the end of the row from RS for the right front piece, you will now inc at the beg of row from RS for the left front piece. Happy crocheting!
26.03.2018 - 11:38
![]() Hannah Gi wrote:
Hannah Gi wrote:
Hello, I\\\'m making the right front piece and I can\\\'t get a total of 43 dc for size S at the end of the piece. (23+3+13=39) I only got 39 dc. From what I understand there is no inc for armhole for size S. Please help.
25.03.2018 - 16:22Rushd wrote:
Am confuse for the shoulder intructions. Are two shoulders are crochet seperatly or join as some point. Am not getting it. Can you please explain in simple terms.
31.01.2018 - 16:22DROPS Design answered:
Dear Mrs Rushd, you crochet first the first 3 rows on the left shoulder (back piece), then cut the yarn and put aside. Crochet now the first 3 row on right shoulder, then, on 4th row, crochet the sts on right shoulder, cast on new chains for neckline on back piece and crochet the sts on left shoulder, continue now back piece to the armholes as explained. Happy crocheting!
01.02.2018 - 08:38
![]() Jo wrote:
Jo wrote:
I am having difficulty with the front pieces of this pattern. Using the stated gauge of 10 rows=4 in. I end up with more inches than the 13" for the XXL size I am making. I am assuming that the inc. are only done at the armhole edge. By the time I reach the 5 .5" and begin to inc, I have 44 stitches. I am supposed to end up with 63 st. Those 19 stitches should take 19 rows with only 7.5" to do them. And that will leave no room for any underarm seam like I had on the back piece
14.11.2017 - 12:43DROPS Design answered:
Dear Jo, the increase for sleeve will not take 19 rows in size XXL - you will increase 9 sts towards armhole every row (= 9 rows) + the row with the 12 chains at the end of row towards armhole + the return row. Happy crocheting!
14.11.2017 - 13:17
|
|
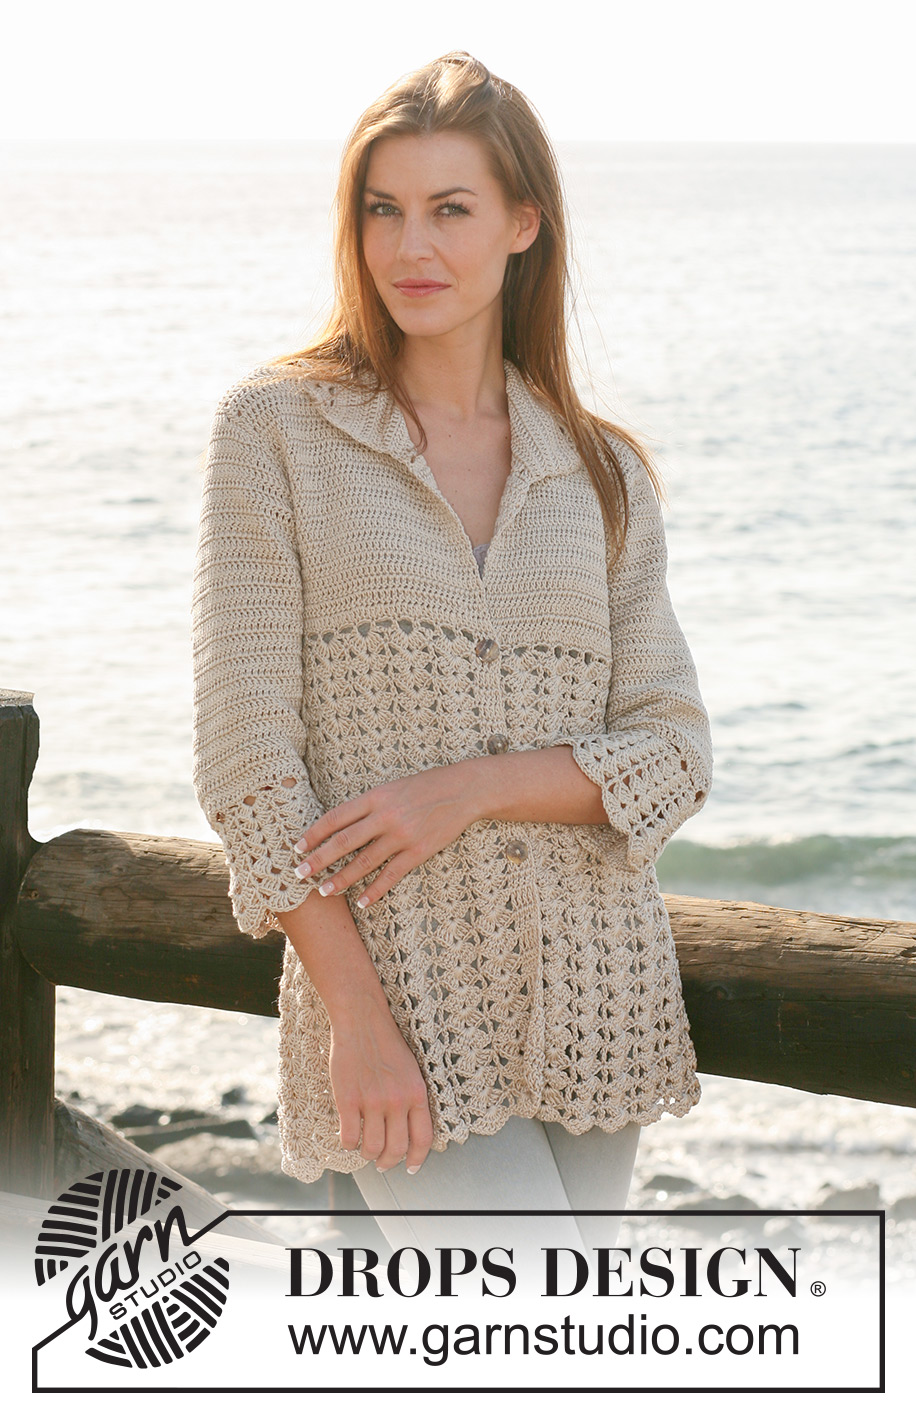
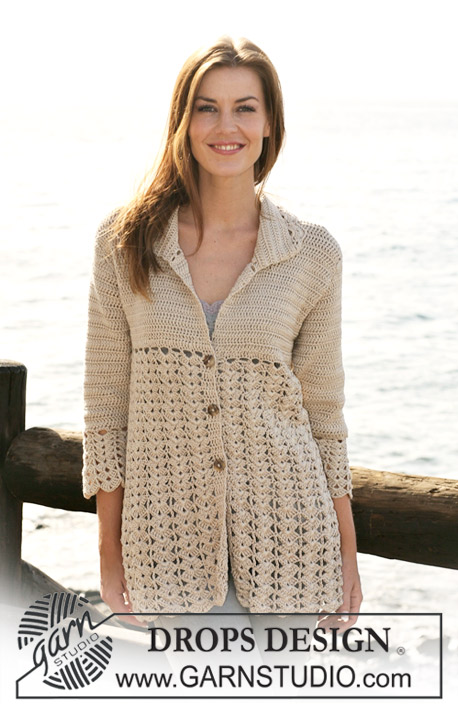
Waves and Shells#wavesandshellscardigan |
|
 |
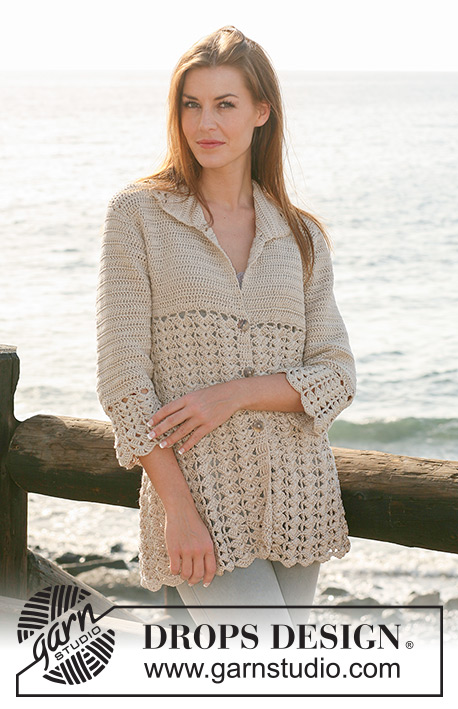 |
Crochet DROPS jacket with fan pattern in ”Muskat”. Size S - XXXL.
DROPS 118-25 |
|
|
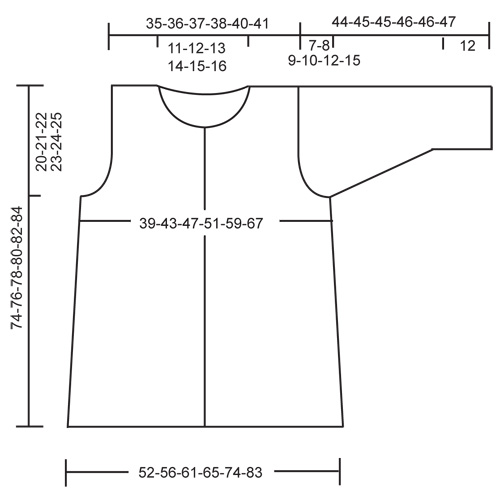
CROCHET TIP: Replace first dc on row with 3 ch and finish row with 1 dc in 3rd ch from previous row. Replace first tr on row with 4 ch and finish row with 1 tr in 4th ch from previous row. DECREASING TIP: Dec as follows at beg of row: replace 1 dc with 1 sl st. Dec as follows at the end of row: Turn piece when no of dc to be dec remain, turn and work return row. ---------------------------------------------------------- ---------------------------------------------------------- JACKET: Back piece and both front pieces crochet from shoulder and down. Then the pieces are sewn tog and the body piece of jacket is crochet in fan pattern from the yoke towards bottom edge. LEFT SHOULDER BACK PIECE (when placed flat): Crochet 31-31-31-31-32-32 LOOSE ch with crochet hook size 3.5 mm/E/4 and Muskat. ROW 1: Crochet 1 dc in 4th ch from hook, * skip 1 ch, 1 dc in each of the next 4 ch *, repeat from *-* and finish with skip 1 ch and 1 dc in each of the last 1-1-1-1-2-2 ch = 23-23-23-23-24-24 dc. ROW 2: See CROCHET TIP! Crochet 1 dc in each dc. ROW 3: Crochet 1 dc in each dc. Put piece aside and crochet RIGHT SHOULDER on back piece in the same way, turn piece. ROW 4: 1 dc in each dc as before, at the end of row on right back piece crochet 30-33-35-38-40-43 ch (= neckline mid back), then 1 dc in each dc on left back piece, turn piece. ROW 5: 1 dc in each dc on left back piece, 1 dc in each of the first 2-1-2-1-2-1 ch, * skip 1 ch, 1 dc in each of the next 4 ch *, repeat from *-* a total of 5-6-6-7-7-8 times, skip 1 ch, 1 dc in each of the last 2-1-2-1-2-1 ch, crochet 1 dc in each dc from right back piece. There are now 70-72-74-76-80-82 dc on row. Continue with 1 dc in each dc. AT THE SAME TIME when piece measures 18-16-16-15-13-9 cm / 7"-6¼"-6¼"-6"-5½"-3½" inc for armhole each side. Inc 1 dc at the beg and at the end of every row, and repeat the inc a total of 0-3-4-6-9-13 times each side by working 2 dc in the outermost dc (no inc in size S). On next row crochet 6-6-8-9-12-15 ch at the end of row, turn and crochet 1 dc in 4th ch from hook and 1 dc in each of the next 2-2-4-5-8-11 ch. Repeat the other side = 78-86-94-102-118-134 dc. Continue with 1 dc in each dc until back piece measures 25-27-29-31-33-35 cm / 9¾"-10⅝"-11⅜"-12¼"-13"-13¾". RIGHT FRONT PIECE: Crochet 31-31-31-31-32-32 LOOSE ch on crochet hook size 3.5 mm/E/4 with Muskat. ROW 1: Crochet 1 dc in 4th ch from hook, * skip 1 ch, 1 dc in each of the next 4 ch *, repeat from *-* and finish with skip 1 ch and crochet 1 dc in each of the last 1-1-1-1-2-2 ch = 23-23-23-23-24-24 dc. ROW 2: Crochet 1 dc in each dc. Continue with 1 dc in each dc, AT THE SAME TIME when piece measures 6 cm / 2⅜" inc for neckline towards mid front. Inc 1 dc at the end of every row towards mid front by working 2 dc in outermost dc a total of 3-3-3-4-4-4 times. On next row crochet 15-16-17-17-18-19 ch towards mid front, turn and crochet 1 dc in 4th ch from hook and 1 dc in each of the next 11-12-13-13-14-15 ch. AT THE SAME TIME when piece measures 18-16-16-15-13-9 cm / 7"-6¼"-6¼"-6"-5½"-3½" inc for armhole at the side as described for back piece. When all inc are complete there are 43-47-51-55-63-71 dc on row. Continue with 1 dc in each dc until piece measures 25-27-29-31-33-35 cm / 9¾"-10⅝"-11⅜"-12¼"-13"-13¾" – adjust to back piece. Put piece aside and crochet left front piece. LEFT FRONT PIECE: Like right front piece. ASSEMBLY: Sew shoulder seams edge to edge. Sew side seams edge to edge. There are now 164-180-196-212-244-276 dc along bottom edge. FAN PATTERN: Continue back and forth from mid front as follows – see CROCHET TIP! ROW 1: 1 dc in each dc = 164-180-196-212-244-276 dc, turn piece. ROW 2: 1 dc in each dc, AT THE SAME TIME inc 32 dc evenly = 196-212-228-244-276-308 dc. ROW 3: 1 sc in each of the first 4 dc, * ch 4, skip 3 dc, 1 sc in next dc *, repeat from *-* until 4 dc remain, 1 sc in each of the last 4 dc = 47-51-55-59-67-75 ch-loops, turn piece. ROW 4: 1 dc in each of the first 4 sc, 1 dc in next ch-loop, * 4 dc + ch 2 + 4 dc in next ch-loop, 1 dc in next ch-loop *, repeat from *-* until 4 sc remain, and finish with 1 dc in each of the last 4 sc = 23-25-27-29-33-37 fans with 4 dc (= front band) each side towards mid front, turn piece. ROW 5: 1 dc in each of the first 4 dc (= front band), 1 dc in next dc, * 4 dc + ch 2 + 4 dc in the middle of next dc-group (i.e. in 2 ch in dc-group), 1 dc in next dc *, repeat from *-* until 4 dc remain, and finish with 1 dc in each dc (= front band). Repeat row 5 until piece measures approx 50-52-54-56-58-60 cm / 19¾"-20½"-21¼"-22"-22¾"-23⅝" from shoulder. NEXT ROW: 1 tr in each of the first 4 dc, 1 tr in next dc, * 4 tr + ch 2 + 4 tr in the middle of next dc-group, 1 tr in next dc *, repeat from *-* until 4 dc remain, and finish with 1 tr in each dc. Repeat this row until piece measures approx 74-76-78-80-82-84 cm / 29⅛"-30"-30¾"-31½"-32¼"-33" from shoulder. Cut and fasten thread. SLEEVE: Crochet 67-67-67-72-72-77 LOOSE ch with crochet hook size 3.5 mm/E/4 and Muskat. ROW 1: Crochet 1 dc in 4th ch from hook, * skip 1 ch, 1 dc in each of the next 4 ch *, repeat from *-* and finish with skip 1 ch and 1 dc in the last 2 ch = 52-52-52-56-56-60 dc. See CROCHET TIP! Crochet 1 dc in each dc, AT THE SAME TIME inc 1 dc each side on every 2-2-1.5-1.5-1-1 cm / ¾"-¾"-½"-½"-⅜"-⅜" a total of 9-11-14-15-17-18 times, inc by crochet 2 dc in outermost dc = 70-74-80-86-90-96 dc. When piece measures 25-25-24-24-22-20 cm / 9¾"-9¾"-9½"-9½"-8¾"-8" - NOTE! Less for the larger sizes because of longer sleeve cap and wider shoulder- dec for sleeve cap each side on every row as follows – see DECREASING TIP: 4 dc 1 time, then 3-3-3-3-2-2 dc each side until piece measures 31-32-32-33-33-34 cm / 12¼"-12½"-12½"-13"-13"-13⅜", dec 4 dc each side. Cut and fasten thread. ASSEMBLY: Set in sleeves and sew under arm seams edge to edge. Sew buttons on left front piece, place the top button in transition between dc and fan pattern and the 2 other buttons with approx 8 cm / 3⅛" between each. Use dc on front band as buttonholes. COLLAR: Crochet round neck as follows: ROW 1: 1 sc in first st towards mid front, * ch 3, skip approx 1 cm / ⅜", 1 sc *, repeat from *-*. ROW 2: Crochet 3 dc in each ch-loop = approx 84 to 111 dc. Insert 3 markers in piece, 1 in each shoulder seam and 1 mid back. Continue with 1 dc in each dc, AT THE SAME TIME when piece measures 3 cm / 1⅛" inc 1 dc each side of all markers, and repeat the inc when piece measures 7 cm / 2¾". Inc by crochet 2 dc in 1 dc. Continue until piece measures 8 cm / 3⅛", and now crochet as follows: ROW 1: 1 sc, * ch 4, skip 3 sts, 1 sc in next st *, repeat from *-*, adjust so that number of ch-loops is divisible by 2 + 1. ROW 2: ch 3, * 4 dc + ch 2 + 4 dc in next ch-loop, 1 dc in next ch-loop *, repeat from *-* until 1 ch-loop remain, crochet 4 dc + ch 2 + 4 dc in the last ch-loop and finish with 1 dc in sc from beg of previous row, turn piece. ROW 3: 1 dc in first dc, * 4 dc + ch 2 + 4 dc in the middle of next dc-group (i.e. in 2 ch in dc-group), 1 dc in next dc *, repeat from *-*. CROCHET BORDER: Crochet round sleeve edges as follows: ROUND 1: 1 sc in first dc, * ch 4, skip 3 sts, 1 sc in next st*, repeat from *-* - adjust to 14 ch-loops (it may be necessary to skip 2 or 4 dc at the end of piece in some sizes to get the right no of ch-loops) and finish with 1 sl st in first sc. ROUND 2: Crochet sl sts to the middle of first ch-loop, ch 3 (= 1 dc), * 4 dc + ch 2 + 4 dc in next ch-loop, 1 dc in next ch-loop *, repeat from *-* and finish with 1 sl st in 3rd ch on round = 7 fans. ROUND 3: ch 3, * 4 dc + ch 2 + 4 dc in the middle of next dc-group (i.e. in 2 ch in dc-group), 1 dc in next dc *, repeat from *-* and finish with 1 sl st in 3rd ch from beg of round. Repeat row 3 until border measures approx 7 cm / 2¾". NEXT ROW: ch 4, * 4 tr + ch 2 + 4 tr in the middle of next dc-group, 1 tr in next dc *, repeat from *-* and finish with 1 sl st in 4th ch from beg of round. Repeat this row until border measures approx 12 cm / 4¾". Cut and fasten thread. |
|
 |
|
Have you finished this pattern?Tag your pictures with #dropspattern #wavesandshellscardigan or submit them to the #dropsfan gallery. Do you need help with this pattern?You'll find 5 tutorial videos, a Comments/Questions area and more by visiting the pattern on garnstudio.com. © 1982-2026 DROPS Design A/S. We reserve all rights. This document, including all its sub-sections, has copyrights. Read more about what you can do with our patterns at the bottom of each pattern on our site. |
|


With over 40 years in knitting and crochet design, DROPS Design offers one of the most extensive collections of free patterns on the internet - translated to 17 languages. As of today we count 324 catalogs and 12290 patterns - 12280 of which are translated into English (US/in).
We work hard to bring you the best knitting and crochet have to offer, inspiration and advice as well as great quality yarns at incredible prices! Would you like to use our patterns for other than personal use? You can read what you are allowed to do in the Copyright text at the bottom of all our patterns. Happy crafting!
Post a comment to pattern DROPS 118-25
We would love to hear what you have to say about this pattern!
If you want to leave a question, please make sure you select the correct category in the form below, to speed up the answering process. Required fields are marked *.