
Popular categories
Looking for a yarn?


Comments / Questions (66)
![]() Maibritt wrote:
Maibritt wrote:
Jeg har et problem. Jeg har lavet ryg og er i gang med højre forstykke, men kan ikke få det til at passe da ærmegab bliver længere end bagstykket. Hvad gør jeg forkert?
12.02.2026 - 10:30
![]() Martina wrote:
Martina wrote:
Dobrý den, nevychází mi počet ok při přidávání na předním díle, můžete mi prosím rozepsat, kolik ok má být po každém přidání (průkrčník, průramky)? Na celkových konečných 47 ok při velikosti M se sice dostanu, ale pouze když to "ošolíchám". Děkuji moc . M. Stupková
09.06.2025 - 15:11
![]() Sylvie wrote:
Sylvie wrote:
Bonjour, Pouvez-vous m'aider s'il vous plait, je ne comprends pas ce paragraphe: "Répéter de l'autre côté". Est ce que je mets un côté en attente pour faire les mailles en l'air de l'autre côté? Je vous remercie. A la fin du rang suivant, monter 6-6-8-9-12-15 ml, tourner et crocheter 1 B dans la 4ème ml à partir du crochet, 1B dans les 2-2-4-5-8-11 ml suiv. Répéter de l'autre côté = 78-86-94-102-118-134 B. Continuer en B jusqu'à 25-27-29-31-33-35 cm de hauteur totale.
11.07.2024 - 16:28DROPS Design answered:
Bonjour Sylvie, à la fin de ce rang, montez le même nombre de mailles en l'air que celui que vous avez monté à la fin du rang précédent, et crochetez de la même façon: 1 bride dans la 4ème ml à partir du crochet, 1 bride dans les ml suivantes et 1 bride dans les brides suivantes jusqu'à la fin du rang. Bon crochet!
29.07.2024 - 09:16
![]() Diane wrote:
Diane wrote:
Hallo, ich habe Probleme beim Einnähen der Ärmel. In der Größe XL bleiben auf beiden Seite jeweils 4 Kettmaschen übrig, die nicht in der Aussparung für die Ärmel passen. Leider hat mir auch das Tutorial nicht geholfen, da hier im Diagramm auch nicht die Buchstaben A und B angegeben sind. Gibt es eventuell eine andere Lösung für das Anbringen der Ärmel. Danke für die Hilfe
27.01.2024 - 23:15DROPS Design answered:
Liebe Diane, vielleicht kann Ihnen dieses Video helfen? Die 4 Stäbchen beidseitig bei der Ärmel abgenommen werden zu den 4 Stäbchen beidseitig beim Rumpt angeschlagen. Viel Spaß beim zusammenstellen!
29.01.2024 - 12:05
![]() Antonia wrote:
Antonia wrote:
Hola. La chaqueta lleva tres botones, pero no veo nada en el patrón sobre los ojales para estos botones. ¿Dónde se harían y cómo? Gracias y saludos.
15.05.2023 - 21:37DROPS Design answered:
Hola Antonia, los botones se explican en la terminación, después de las mangas: "Coser los botones en la pieza del delantero izquierdo, colocar el botón superior en la transición entre p.a. y el patrón con punto abanico, y, los otros 2 botones con aprox 8 cm de separación entre cada uno. Usar los p.a. en el borde delantero como ojales."
21.05.2023 - 18:16
![]() Karin wrote:
Karin wrote:
Ik ben met rechter voorpand begonnen in maat s. Ik kom niet tot 43 stk op de laatste toer. 1e toer zijn 23 stk Dan 3 meerderen voor hals is 26 stk. Dan 11 extra stk is dan 37 stk. Voor maat s zou ik niet hoeven meerderen voor armsgat. Ik kom dus op 37 uit. Wat sla ik over?
12.05.2023 - 13:19DROPS Design answered:
Dag Karin,
Zoals ik het lees meerder je wel voor de armsgaten, ook op het achterpand, namelijk 6 lossen aan het eind van de toer, twee keer. Hierdoor komen er 4 steken bij voor het armsgat. Verder heb je naast de 11 extra steken nog 2 extra steken omdat je eerst in de 4e losse haakt en daarna in de volgende 11 lossen. De eerste 3 lossen gelden ook als een steek. Dus in plaats van 11 extra lossen heb je 13 extra lossen. In totaal kom je dan op 43 steken.
13.05.2023 - 09:04
![]() Antonia Estero Botaro wrote:
Antonia Estero Botaro wrote:
Estoy haciendo la espalda de la chaqueta y dice: cuando la pieza mida 18-16-16-15-13-9 cm, aum para la sisa en cada lado. El número de cm que indica se refiere a la altura que ha alcanzado la pieza, pero ¿desde donde lo mido? ¿Desde el cuello o desde el hombro? Gracias, Antonia
20.04.2023 - 18:00DROPS Design answered:
Hola Antonia, a no ser de qué se indique un sitio concreto o de que se haya colocado un marcapuntos para medir, la labor se mide siempre desde el borde de montaje. En este caso se mide desde el borde de montaje.
23.04.2023 - 20:20
![]() Mieke wrote:
Mieke wrote:
Is het normaal dat het haakwerk vanaf het waaierpatroon veel breder wordt of doe ik iets fout? Is dit bedoeld met de meerderingen vòòr de start van het waaierpatroon?
23.03.2023 - 18:36DROPS Design answered:
Dag Mieke,
Het vest heeft een A-lijn, dus het wordt geleidelijk aan breder naar onderen toe, vandaar dat er meerderingen gemaakt moeten worden voordat je met het waaierpatroon start.
24.03.2023 - 19:25
![]() Gerba De Blieck wrote:
Gerba De Blieck wrote:
Het patroon is erg mooi hard gewerkt aan vorig patroon om te kunnen beginnen, stuit al direct op probleem, toer 3,hk in elk st, 1 st. Laat nu het werk rusten,???? En haak de re schouder... Op het achterpand. Snap er niks van, opnieuw beginnen na derde toer of dubbel haken, kunt u deze zin alstublieft anders aan me uitleggen??
18.01.2021 - 17:42DROPS Design answered:
Dag Gerba,
In toer 3 heb je 1 stk in ieder stokje gehaakt. Je legt het werk aan de kant, pakt een nieuwe bol en begint met de rechter schouder. Dus inderdaad helemaal opnieuw op dezelfde manier de rechter schouder haken. Als je die klaar hebt ga je verder met toer 4, waarbij beide schouders samengevoegd worden.
22.01.2021 - 16:10
![]() Karen J wrote:
Karen J wrote:
On the right front piece—after getting to 2 3/8” inc toward mid front, do I at midfront (for size XL) increase going toward mid front and then turn and immediately work two more for another increase? Will I increase on consecutive 4 rows or every other row and only when I get back to mid front...making 8 rows? If I do four consecutive rows, won’t my ch 17 being going away from the mid front? I’m so confused!
09.09.2019 - 04:44DROPS Design answered:
Dear Karen, you increase for neck on every other row (= at the end of every row towards mid front) a total of 4 times, ie for 8 rows. Then you chain 15 for neck at the end of next row towards mid front. Happy crocheting!
09.09.2019 - 11:37
|
|
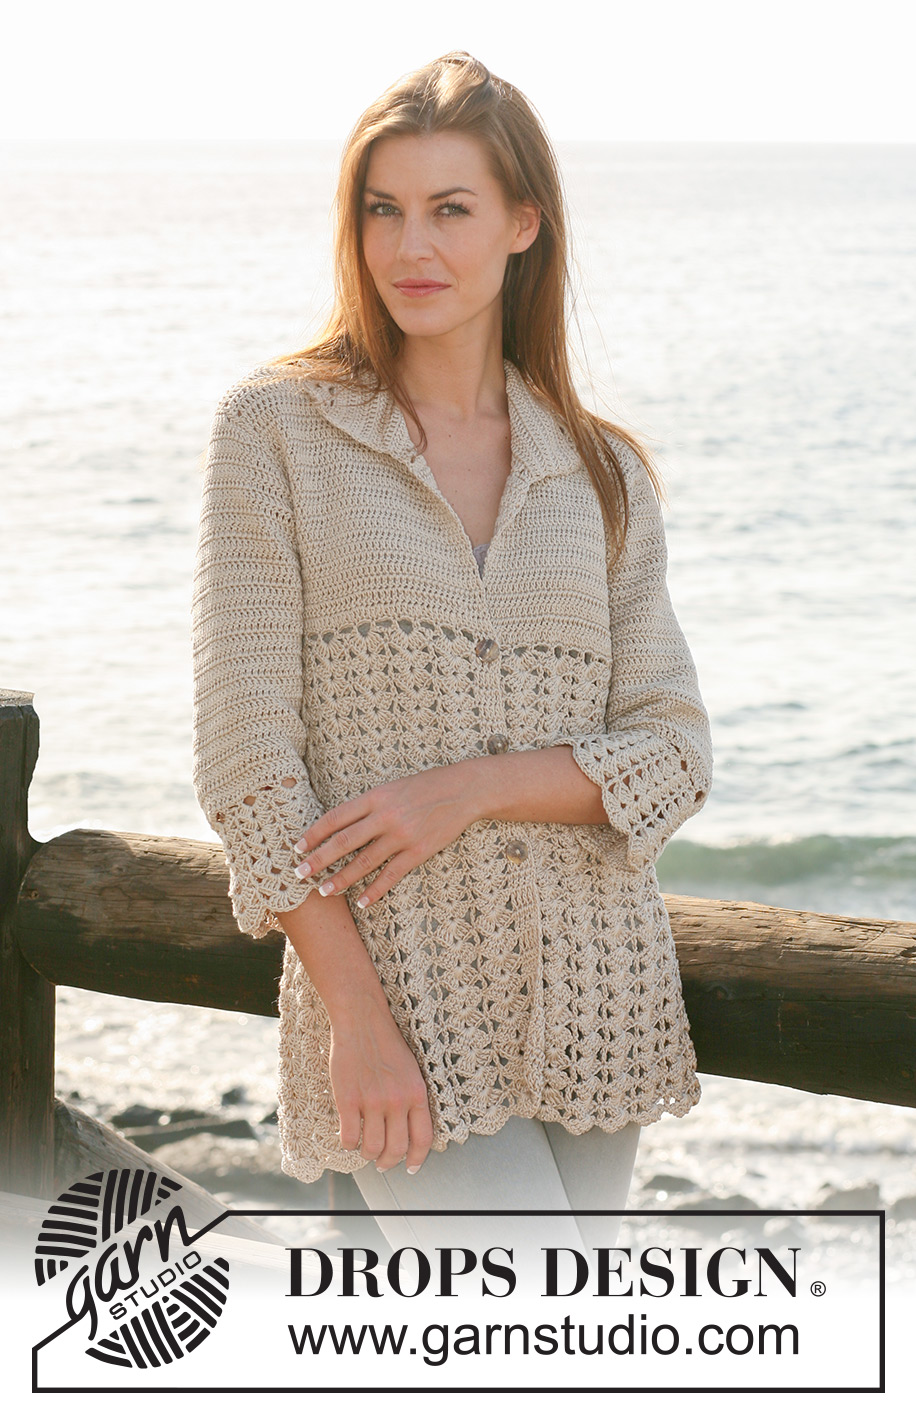
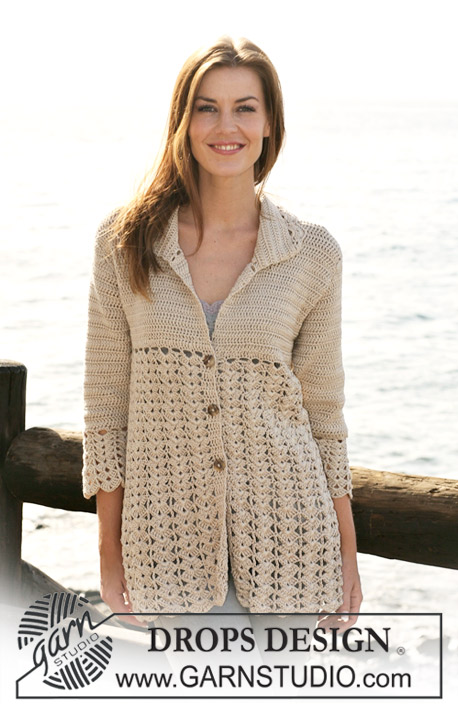
Waves and Shells#wavesandshellscardigan |
|
 |
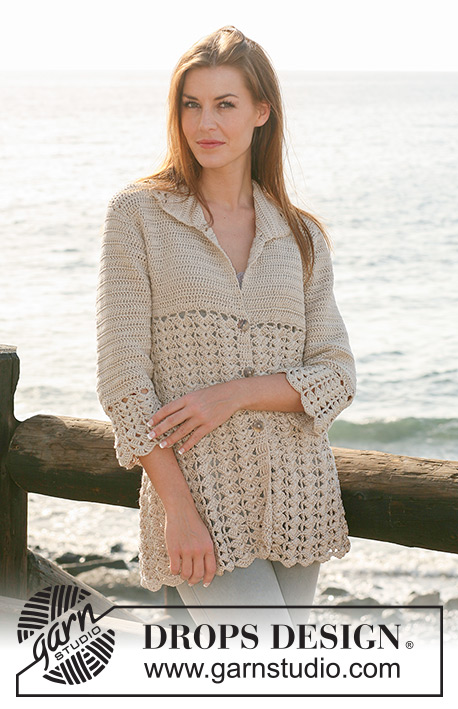 |
Crochet DROPS jacket with fan pattern in ”Muskat”. Size S - XXXL.
DROPS 118-25 |
|
|
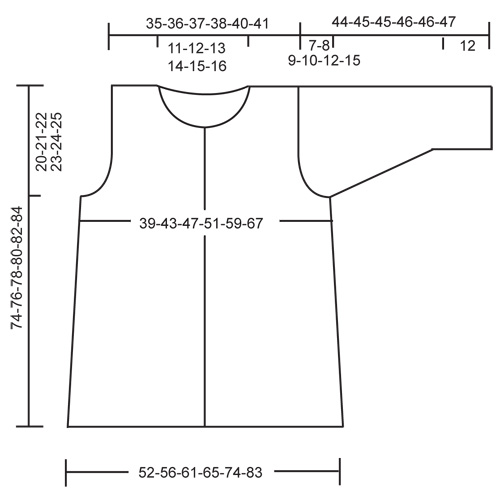
CROCHET TIP: Replace first dc on row with 3 ch and finish row with 1 dc in 3rd ch from previous row. Replace first tr on row with 4 ch and finish row with 1 tr in 4th ch from previous row. DECREASING TIP: Dec as follows at beg of row: replace 1 dc with 1 sl st. Dec as follows at the end of row: Turn piece when no of dc to be dec remain, turn and work return row. ---------------------------------------------------------- ---------------------------------------------------------- JACKET: Back piece and both front pieces crochet from shoulder and down. Then the pieces are sewn tog and the body piece of jacket is crochet in fan pattern from the yoke towards bottom edge. LEFT SHOULDER BACK PIECE (when placed flat): Crochet 31-31-31-31-32-32 LOOSE ch with crochet hook size 3.5 mm/E/4 and Muskat. ROW 1: Crochet 1 dc in 4th ch from hook, * skip 1 ch, 1 dc in each of the next 4 ch *, repeat from *-* and finish with skip 1 ch and 1 dc in each of the last 1-1-1-1-2-2 ch = 23-23-23-23-24-24 dc. ROW 2: See CROCHET TIP! Crochet 1 dc in each dc. ROW 3: Crochet 1 dc in each dc. Put piece aside and crochet RIGHT SHOULDER on back piece in the same way, turn piece. ROW 4: 1 dc in each dc as before, at the end of row on right back piece crochet 30-33-35-38-40-43 ch (= neckline mid back), then 1 dc in each dc on left back piece, turn piece. ROW 5: 1 dc in each dc on left back piece, 1 dc in each of the first 2-1-2-1-2-1 ch, * skip 1 ch, 1 dc in each of the next 4 ch *, repeat from *-* a total of 5-6-6-7-7-8 times, skip 1 ch, 1 dc in each of the last 2-1-2-1-2-1 ch, crochet 1 dc in each dc from right back piece. There are now 70-72-74-76-80-82 dc on row. Continue with 1 dc in each dc. AT THE SAME TIME when piece measures 18-16-16-15-13-9 cm / 7"-6¼"-6¼"-6"-5½"-3½" inc for armhole each side. Inc 1 dc at the beg and at the end of every row, and repeat the inc a total of 0-3-4-6-9-13 times each side by working 2 dc in the outermost dc (no inc in size S). On next row crochet 6-6-8-9-12-15 ch at the end of row, turn and crochet 1 dc in 4th ch from hook and 1 dc in each of the next 2-2-4-5-8-11 ch. Repeat the other side = 78-86-94-102-118-134 dc. Continue with 1 dc in each dc until back piece measures 25-27-29-31-33-35 cm / 9¾"-10⅝"-11⅜"-12¼"-13"-13¾". RIGHT FRONT PIECE: Crochet 31-31-31-31-32-32 LOOSE ch on crochet hook size 3.5 mm/E/4 with Muskat. ROW 1: Crochet 1 dc in 4th ch from hook, * skip 1 ch, 1 dc in each of the next 4 ch *, repeat from *-* and finish with skip 1 ch and crochet 1 dc in each of the last 1-1-1-1-2-2 ch = 23-23-23-23-24-24 dc. ROW 2: Crochet 1 dc in each dc. Continue with 1 dc in each dc, AT THE SAME TIME when piece measures 6 cm / 2⅜" inc for neckline towards mid front. Inc 1 dc at the end of every row towards mid front by working 2 dc in outermost dc a total of 3-3-3-4-4-4 times. On next row crochet 15-16-17-17-18-19 ch towards mid front, turn and crochet 1 dc in 4th ch from hook and 1 dc in each of the next 11-12-13-13-14-15 ch. AT THE SAME TIME when piece measures 18-16-16-15-13-9 cm / 7"-6¼"-6¼"-6"-5½"-3½" inc for armhole at the side as described for back piece. When all inc are complete there are 43-47-51-55-63-71 dc on row. Continue with 1 dc in each dc until piece measures 25-27-29-31-33-35 cm / 9¾"-10⅝"-11⅜"-12¼"-13"-13¾" – adjust to back piece. Put piece aside and crochet left front piece. LEFT FRONT PIECE: Like right front piece. ASSEMBLY: Sew shoulder seams edge to edge. Sew side seams edge to edge. There are now 164-180-196-212-244-276 dc along bottom edge. FAN PATTERN: Continue back and forth from mid front as follows – see CROCHET TIP! ROW 1: 1 dc in each dc = 164-180-196-212-244-276 dc, turn piece. ROW 2: 1 dc in each dc, AT THE SAME TIME inc 32 dc evenly = 196-212-228-244-276-308 dc. ROW 3: 1 sc in each of the first 4 dc, * ch 4, skip 3 dc, 1 sc in next dc *, repeat from *-* until 4 dc remain, 1 sc in each of the last 4 dc = 47-51-55-59-67-75 ch-loops, turn piece. ROW 4: 1 dc in each of the first 4 sc, 1 dc in next ch-loop, * 4 dc + ch 2 + 4 dc in next ch-loop, 1 dc in next ch-loop *, repeat from *-* until 4 sc remain, and finish with 1 dc in each of the last 4 sc = 23-25-27-29-33-37 fans with 4 dc (= front band) each side towards mid front, turn piece. ROW 5: 1 dc in each of the first 4 dc (= front band), 1 dc in next dc, * 4 dc + ch 2 + 4 dc in the middle of next dc-group (i.e. in 2 ch in dc-group), 1 dc in next dc *, repeat from *-* until 4 dc remain, and finish with 1 dc in each dc (= front band). Repeat row 5 until piece measures approx 50-52-54-56-58-60 cm / 19¾"-20½"-21¼"-22"-22¾"-23⅝" from shoulder. NEXT ROW: 1 tr in each of the first 4 dc, 1 tr in next dc, * 4 tr + ch 2 + 4 tr in the middle of next dc-group, 1 tr in next dc *, repeat from *-* until 4 dc remain, and finish with 1 tr in each dc. Repeat this row until piece measures approx 74-76-78-80-82-84 cm / 29⅛"-30"-30¾"-31½"-32¼"-33" from shoulder. Cut and fasten thread. SLEEVE: Crochet 67-67-67-72-72-77 LOOSE ch with crochet hook size 3.5 mm/E/4 and Muskat. ROW 1: Crochet 1 dc in 4th ch from hook, * skip 1 ch, 1 dc in each of the next 4 ch *, repeat from *-* and finish with skip 1 ch and 1 dc in the last 2 ch = 52-52-52-56-56-60 dc. See CROCHET TIP! Crochet 1 dc in each dc, AT THE SAME TIME inc 1 dc each side on every 2-2-1.5-1.5-1-1 cm / ¾"-¾"-½"-½"-⅜"-⅜" a total of 9-11-14-15-17-18 times, inc by crochet 2 dc in outermost dc = 70-74-80-86-90-96 dc. When piece measures 25-25-24-24-22-20 cm / 9¾"-9¾"-9½"-9½"-8¾"-8" - NOTE! Less for the larger sizes because of longer sleeve cap and wider shoulder- dec for sleeve cap each side on every row as follows – see DECREASING TIP: 4 dc 1 time, then 3-3-3-3-2-2 dc each side until piece measures 31-32-32-33-33-34 cm / 12¼"-12½"-12½"-13"-13"-13⅜", dec 4 dc each side. Cut and fasten thread. ASSEMBLY: Set in sleeves and sew under arm seams edge to edge. Sew buttons on left front piece, place the top button in transition between dc and fan pattern and the 2 other buttons with approx 8 cm / 3⅛" between each. Use dc on front band as buttonholes. COLLAR: Crochet round neck as follows: ROW 1: 1 sc in first st towards mid front, * ch 3, skip approx 1 cm / ⅜", 1 sc *, repeat from *-*. ROW 2: Crochet 3 dc in each ch-loop = approx 84 to 111 dc. Insert 3 markers in piece, 1 in each shoulder seam and 1 mid back. Continue with 1 dc in each dc, AT THE SAME TIME when piece measures 3 cm / 1⅛" inc 1 dc each side of all markers, and repeat the inc when piece measures 7 cm / 2¾". Inc by crochet 2 dc in 1 dc. Continue until piece measures 8 cm / 3⅛", and now crochet as follows: ROW 1: 1 sc, * ch 4, skip 3 sts, 1 sc in next st *, repeat from *-*, adjust so that number of ch-loops is divisible by 2 + 1. ROW 2: ch 3, * 4 dc + ch 2 + 4 dc in next ch-loop, 1 dc in next ch-loop *, repeat from *-* until 1 ch-loop remain, crochet 4 dc + ch 2 + 4 dc in the last ch-loop and finish with 1 dc in sc from beg of previous row, turn piece. ROW 3: 1 dc in first dc, * 4 dc + ch 2 + 4 dc in the middle of next dc-group (i.e. in 2 ch in dc-group), 1 dc in next dc *, repeat from *-*. CROCHET BORDER: Crochet round sleeve edges as follows: ROUND 1: 1 sc in first dc, * ch 4, skip 3 sts, 1 sc in next st*, repeat from *-* - adjust to 14 ch-loops (it may be necessary to skip 2 or 4 dc at the end of piece in some sizes to get the right no of ch-loops) and finish with 1 sl st in first sc. ROUND 2: Crochet sl sts to the middle of first ch-loop, ch 3 (= 1 dc), * 4 dc + ch 2 + 4 dc in next ch-loop, 1 dc in next ch-loop *, repeat from *-* and finish with 1 sl st in 3rd ch on round = 7 fans. ROUND 3: ch 3, * 4 dc + ch 2 + 4 dc in the middle of next dc-group (i.e. in 2 ch in dc-group), 1 dc in next dc *, repeat from *-* and finish with 1 sl st in 3rd ch from beg of round. Repeat row 3 until border measures approx 7 cm / 2¾". NEXT ROW: ch 4, * 4 tr + ch 2 + 4 tr in the middle of next dc-group, 1 tr in next dc *, repeat from *-* and finish with 1 sl st in 4th ch from beg of round. Repeat this row until border measures approx 12 cm / 4¾". Cut and fasten thread. |
|
 |
|
Have you finished this pattern?Tag your pictures with #dropspattern #wavesandshellscardigan or submit them to the #dropsfan gallery. Do you need help with this pattern?You'll find 5 tutorial videos, a Comments/Questions area and more by visiting the pattern on garnstudio.com. © 1982-2026 DROPS Design A/S. We reserve all rights. This document, including all its sub-sections, has copyrights. Read more about what you can do with our patterns at the bottom of each pattern on our site. |
|


With over 40 years in knitting and crochet design, DROPS Design offers one of the most extensive collections of free patterns on the internet - translated to 17 languages. As of today we count 324 catalogs and 12284 patterns - 12274 of which are translated into English (US/in).
We work hard to bring you the best knitting and crochet have to offer, inspiration and advice as well as great quality yarns at incredible prices! Would you like to use our patterns for other than personal use? You can read what you are allowed to do in the Copyright text at the bottom of all our patterns. Happy crafting!
Post a comment to pattern DROPS 118-25
We would love to hear what you have to say about this pattern!
If you want to leave a question, please make sure you select the correct category in the form below, to speed up the answering process. Required fields are marked *.